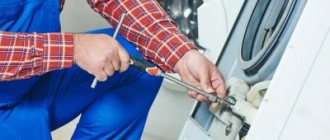
When the warranty period is far behind, and something is broken in the washing machine, many home craftsmen undertake independent repairs. To determine the cause of the breakdown, you first need to “look” under the body of the unit.
Each model has design features, but the basic principle of disassembly is the same for all machines. Let's look at how to disassemble an LG washing machine (as well as Indesit, Bosh, Samsung or any other).
Preparation
The peculiarity of the LG machine is that it is equipped with an inverter motor. As for other manufacturers, their technology uses a commutator motor. As a result, the disassembly will be slightly different. In any case, for disassembly you will need the following tools:
- Screwdriver Set;
- hammer;
- open-end and socket wrenches;
- pliers.
So, the tools are prepared. Now choose the place where the washing machine will be disassembled. Preparatory work is carried out in the following sequence:
- disconnect equipment from the network;
- unscrew the inlet hose and drain the remaining water into a previously prepared container;
- disconnect the filter, which is located behind the hatch on the front panel;
- drain the water and remove the container;
- Move the equipment away from the wall, which will allow you to freely approach the back cover.
The washing machine is ready for disassembly. When performing work, it is worth considering that the machine operates on a direct drive.
Tools
It is worth noting that LG has taken great care of the maintainability of its equipment, although at first glance it may seem that only licensed specialists from the service center can do this. In fact, disassembling LG's entire line of recent models requires little more than a couple of screwdrivers and pliers!
To get to the key components and parts of the LG washing machine, we need the bare minimum of equipment. But for greater convenience and just in case, it’s a good idea to have the following tools on hand:
- pliers or curved round nose pliers;
- adjustable wrench;
- set of open-end wrenches;
- hammer;
- knob for end attachment;
- nozzles on the knob from 8 to 18 mm;
- small flat screwdriver;
- crosshead screwdriver;
- awl.
Dismantling panels
It is very easy to disassemble an automatic washing machine at home. The main thing is to know the sequence of work. Disassembly begins with the removal of all walls and panels. To perform the job efficiently and not damage the machine, you must follow the following instructions:
- Top cover. Disassembling the machine begins with removing the top cover. Use a screwdriver to unscrew the two screws that hold it in place. They are located at the rear of the machine. Push the panel forward and remove it.
- Back cover. On modern LG models there is a service hatch, which is located at the rear of the car. There is a metal cover on it, which is secured with bolts. They need to be unscrewed along the entire perimeter of the hatch, which will allow the rear panel to be removed.
- Control Panel. In order to remove it, it is necessary, first of all, to pull out the tray into which detergents are poured and poured. It is pulled out and pressed on the latch located in the center. This will give access to the screws. Unscrew them and unfasten the latches holding the panel using a screwdriver. Next, the panel is removed. To completely eliminate it, you need to disconnect all wires and connectors.
Important!
When disassembling, it is necessary to put all parts in one place. This also applies to fasteners.
Front Panel
At the final stage, the front panel is removed. This is quite difficult to do, since the process has some nuances. Therefore, they approach disassembly very carefully. Step-by-step instructions can help with this:
- open the hatch door;
- bend the edges of the cuff;
- remove the clamp located under the cuff;
- tuck the cuff into the drum;
- open the filter hatch;
- unscrew the bolts located near the filter;
- release the lid latches and remove it;
- unscrew the bolts that hold the hatch door;
- disassemble the door;
- take out the lock behind the body and disconnect the wires;
- Unscrew the screws holding the panel.
Thus, the front panel is removed. As a result of all manipulations, access to the main parts of the LG washing machine is opened. This allows them to be disassembled without hindrance in the future. During this process, you should be very careful, since the cause of the malfunction may be visible.
Reviews
Anastasia, 37 years old, Krasnoyarsk
Since we have a large family, I chose an economical machine with a load of 5 kg to 7 kg. On the advice of a sales consultant, I bought the ELGI model FH0B8ND1 with direct drive for 6 kg of laundry. I've been using it for over a year now, no complaints yet. I wash mainly at night in order to save electricity, so quiet operation and the delay start function were important selection criteria. It makes a little noise when filling and draining water, but does not interfere with sleep. This machine also has smart controls; before each wash, it weighs the laundry and calculates the required amount of water, which is very convenient. I am satisfied with the quality of washing, things are always clean, I recommend.
Daria, 29 years old, Blagoveshchensk (Amur region)
We spent a long time choosing a washing machine until we saw the LG E1096SD3 with direct drive. I was attracted by the fact that the model is compact and can load up to 4 kg of laundry. A large selection of programs and a functional display make operation easy. The machine is noisy, but through the closed door in the bathroom you can hardly hear it in the room. There is a slight knocking sound when spinning, possibly due to uneven floors. In two years of use, the program crashed once and the spin cycle did not start. There were no more breakdowns, it works properly, it justified its price.
Sergey, 43 years old, Lipetsk
I purchased an LG F1022NDR machine equipped with the Direct Drive system. I was attracted by the intuitive interface; all modes are written in Russian. The model is quiet and practical. We are completely satisfied with a drum load of up to 6 kg in an LG direct drive washing machine. The wife noted the good quality of washing and the spin speed of 1000 rpm, which can be an alternative to drying. The machine has a timer, but it does not always correctly indicate the time until the end of the process. I don’t know what this is connected with, but it does not affect functionality. I haven’t noticed any other drawbacks, we’ve only been using it for a few months.
In conclusion, we can say that LG's innovations, unfortunately, did not revolutionize the washing industry. Manufacturers still have work to do to provide users with household appliances that are reliable in all respects.
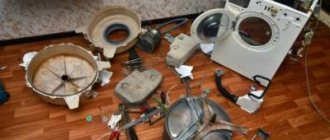
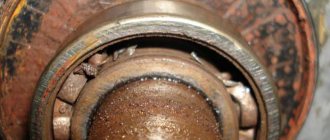
Counterweights and tank parts
When all the panels and covers are removed, you can begin to work on the internal parts of the machine. They start with counterweights that weigh down the tank. They prevent the drum from beating under the influence of vibration while the washing machine is operating. They are located around the hatch. They will be visible after dismantling the panel.
The counterweights are secured with bolts. They are unscrewed with a torx head. After removing the upper counterweight, we proceed to the parts that are on top of the tank. The disassembly algorithm looks like this:
- unscrew the screws and remove the hopper of the dispensing tray;
- disconnect the pipe that goes down;
- disconnect the contacts leading to the inlet valve;
- unscrew the screws at the back and pull out the valve;
- dismantle the hopper with the valve.
The next step is to do the following:
- disconnect the pressure switch hose that leads to the tank;
- inspect the tank and check for parts that may prevent its disassembly;
- disconnect everything.
When work with the tank is completed, you can move on to the bottom of the washing machine. At this stage, it is important to write down the sequence of the process, which will later simplify the assembly of the machine in reverse order.
Possible difficulties
Sometimes, after tightening the bolts, it is not possible to remove the cover, even with some effort. This indicates that it is jammed. Do not try to pry it off with a screwdriver or other sharp object. With their help, you can damage the panel: scratch it or leave chips on it.
To remove the upper part of the case, it is enough to perform a few rocking movements from side to side. They should be short, without applying force. If everything is done correctly, the cover can be dismantled and will not be damaged.
If the washing machine is built-in or located under the sink, you will have to pull it out. There is no other way to remove the required part.
Before you start moving the device, you need to close the hatch so that a click is heard. An open door may prevent the free movement of household appliances. There is also a risk of breaking it during short transportation.
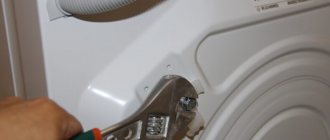
Removing the motor
Like any other equipment, an important element of a washing machine is the motor. Therefore, you need to work with it very carefully. In the process, it is worth protecting it from damage and falling. As for its dismantling, it is carried out according to the following scheme:
- Disconnecting the drain pipe. This is the first thing done when disassembling the engine. To begin with, use pliers to loosen the metal clamp. If it is secured with a bolt, it must be unscrewed. Disconnect the pipe.
- Disconnect the wires. Wires lead to the motor, which are fastened with special clamps. Put them aside. Unclench the connectors of the wires that lead to the heating element. There is no need to remove the heating element.
- Disconnecting the engine. Unscrew the screw located in the center and remove the engine cover. This will give you access to the fasteners located on it. Unscrew all bolts and remove the power unit.
Once the motor is removed, nothing will prevent the removal of the tank. It is supported by stands alone.
Washing machine diagram
The next thing to do is to study the device of the machine. Each unit comes with instructions with pictures and captions for all components. It will be much easier to navigate if you know where everything is and what it is called correctly.
General diagram of the design of front-type washing machines
How to disassemble the tank and drum
To disassemble the drum, you must first remove the stands. They are attached using plastic rods. From the back side of the rack, put a 14mm socket on the bolt. This will disable the latches that prevent the removal of the rods. You can get them out using pliers. You just need to securely fix them and pull them towards you.
Now you can disassemble the tank. It hangs on hooks. You just need to lift it up and remove it. Place aside. At the final stage, the drum is disassembled:
- Unscrew the bolts that hold it around the perimeter;
- remove the top;
- flip the bottom half over;
- lightly tap the bushing with a hammer;
- remove the drum from the tank.
This is how the washing machine is disassembled and prepared for further repairs. Inspect all main parts of the equipment for defects and contamination.
Repairing damage
Immediately prepare the necessary tools and materials:
- Phillips and slotted screwdriver.
- spare parts for replacement (lock, tongue, spare glass).
UBL repair
Can't open the hatch after washing? The UBL lock may have broken. Since it runs on electronics, check to see if the lights in the apartment have been turned off. In this case, the door will remain locked.
The operating principle of the UBL is simple: the control module supplies electric current to the lock plates. When heated, they bend and press on the latch, which latches the hatch.
How to understand that the device is broken? According to these signs:
- After turning off the machine, the hatch does not open.
- When you start the wash, an error code appears on the screen.
- You've loaded laundry, but the lock won't lock.
To make sure that the problem is in the device and not the control board, you need to carry out diagnostics with a multimeter.
- Attach the tester probes to the “neutral” and “lock phase” contacts.
- Measure the indicators.
- Everything works if three numbers are shown on the screen.
- Then attach the probes to the “neutral” and “common” contacts.
- Zeros or one on the screen indicate a breakdown.
To open the door when locked, you can use the method suggested by our users. Take a thin ribbon and thread it between the SMA body and the hatch. Holding the ends on both sides, pull the tape towards you. After opening, you can begin repairs.
How to fix it yourself:
- Pull back the cuff.
- Using a screwdriver, remove the clamp. If it is plastic, remove the latch.
- Remove the bolts that hold the device in place.
- Tuck the cuff in and remove the lock.
- Disconnect the wiring.
- Install the new part in reverse order.
Replacing the latch
Over time, the latch lever becomes deformed and irregularities appear on it, which interfere with normal closure. To perform the replacement, you need to know how to remove the door:
- Remove the clamp and rubber cuff. If you don’t want to remove it completely, bend it back and tuck it inside.
- On the side you will see the door mounts.
- Remove two screws.
- Lift the hatch up and remove it from its seat.
To return the latch to a smooth surface, you will need a file - grind off the nicks and irregularities. Lubricate parts with graphite lubricant for better performance. Lock the door in its original place.
The reason for the drum not closing tightly may be sagging hinges or loose fastenings. When installing the hatch in place, you need to adjust its position so that the latch fits normally into the hole.
Glass replacement
It’s good if the glass in your SMA model can be replaced, but such luck is rare. Otherwise, you will have to seal the cracks.
- On the outside you need to attach plastic film with tape. It is important that there are no gaps.
- Apply reinforcing tape to the damaged part.
- In a separate container, prepare a solution of epoxy resin.
- Fill the gap with solution.
- After 24 hours, remove the film. Remove drips with sandpaper.
How to prepare resin? To ensure that the product has good adhesiveness and resistance to temperature changes, a hardener is added to the composition. You can prepare a solution based on EDP glue:
- Take 6 parts resin and 4 parts hardener.
- Mix in a separate container until smooth.
- If it turns out too thick, heat it a little in a water bath.
Read the instructions carefully before diluting: an error in the ratios will affect the quality of the resin.
In some cases, a special sealant can be used, although it will not last as long.
Pump disassembly
Often, owners of washing machines are faced with a problem such as stopping the water from draining. The reason for this is a malfunction of the pump. In this regard, the question often arises of how to disassemble the pump of a washing machine.
After the pump is removed, it must be disconnected from the cochlea. You need to unscrew the screws that connect it to the motor. At this stage, it is important to make marks that will allow you to install all the elements in their original position.
When the motor is removed, you need to inspect the impeller for wear. Under the influence of high temperatures, it undergoes deformation, which results in its friction against the body. In this case, you need to shorten the blades. Trimming must be done carefully, as significant shortening will reduce the productivity of the pump.
What other problems may occur?
After replacing the cuff, it is best to check its functionality by running the washing machine “idle” (for example, on a short program, without loading laundry). This way you will understand whether the new part is installed tightly and whether repeated removal is required.
A common problem is a broken machine handle, especially the plastic part. Replacing the door handle of a washing machine is a very simple process, for which you probably only need one screwdriver. You can purchase a new part in a specialized store, indicating the make and model of your car. Qualified specialists will select a new part and offer their assistance in installing it.
It is worth noting that the hatch cuff requires regular maintenance. It must be cleaned, otherwise the dirt accumulated on it will become a source of not only an unpleasant odor, but also bacteria that corrode the material.
1.Test mode of models WD-6021, WD-8021, WD-1021, WD-6022, WD-8022 and WD-1022:
— After pressing the “Spin” (spin) and “Temp” (temperature) buttons simultaneously, press the power button. The signal should sound twice, you are in service mode.
— Press the “Start/Pause” button to move to the next stages of the test.
— To exit the test, press “Start” more than four times!
Start button | Checking devices | Display indications |
| No | All indicators are on | Board code displayed |
| 1 once | Rotate the drum counterclockwise | Revolutions per minute |
| 2 times | Low rotation speed | Revolutions per minute |
| 3 times | High rotation speed | Revolutions per minute |
| 4 times | Pre-valve operation | Pressostat frequency |
| 5 once | Main valve operation | Pressostat frequency |
| 6 once | Water intake | Level relay frequency |
| 7 once | Air Conditioning Valve Operation | Level relay frequency |
| 8 once | Rotate the drum clockwise | Engine speed |
| 9 once | The heating element operates for 3 seconds. | Water temperature |
| 10 once | Pump operation | Level sensor frequency |
| 11 once | Auto power off operation | All indications are turned off |