Setting up the operation of the pressure switch
You can try to “reprogram” a non-working pressure switch. To do this, we adjust two adjusting screws to a certain water level so that the one located in the center fixes the moment of closing the contacts, and the third one – their breaking. In this case, there are several contact pairs, since different models of the machine require washing programs with different fullness of the tank. For example, with a standard or delicate cycle, a full drum is taken, and when choosing an economical mode, only half is taken.
Adjusting the position of the screws yourself is extremely problematic. Full setup is carried out by professionals at the factory, and the appropriate marks are applied to the tube. It is strongly not recommended to change the given position, since intervention threatens a serious imbalance. The situation is complicated by the fact that the average user of the machine does not know how many liters of water the unit takes at each stage when any of the available programs is turned on. The more options a washing machine offers for selecting modes, the more difficult it is to reprogram the pressure switch.
Hardware sensor test
To check the pressure switch of an Ariston, Samsung, LG or Bosch washing machine using a multimeter, you need to:
- prepare a device for testing resistance;
- place the multimeter probes on the contacts corresponding to the electrical circuit of the sensor;
- create pressure in the air tube until a certain relay contact is activated.
If the resistance value does not change when the contact is activated, it means that the sensor must be replaced.
Checking pressure switches
If all stages of the test have shown that the pressure switch of the washing machine is working, you need to additionally check how the tube is attached to it and evaluate its tightness.
Appearance and principle of operation
The device that checks the water level in the washing machine is made in the form of a small plastic round. Several wires and a tube are directly connected to it. All this is connected to a high-pressure reservoir.
When liquid is drawn into the tank, pressure corresponding to the water level is pumped through the tube. After this, a special relay closes and the contact opens. This is how the main control processor receives a signal that there is enough water.
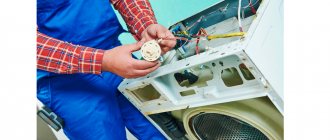
Preliminary actions
As soon as you discover a malfunction, you should understand whether the reason actually lies in the part that controls the water level. It is necessary to carefully inspect the water intake system, check the sleeve and fitting of the water intake sensor, and the transition chamber section. When inspecting these parts, you should not find any tears or abrasions, as well as deposits from washing powder.
If detergent is detected on the parts, all components must be washed, after which a second attempt is made to start the washing machine. It is quite possible that you have restored the ability of the pressure switch to work.
Secondly, the correctness and strength of the electrical wiring connection to the part is checked. There is a possibility that one of the wires is worn out or bent. Having discovered such a defect, we eliminate it and perform a test run again.
Be sure to check the contact group of the pressure switch. If there is a deposit of dirt, clean it and again check the water intake sensor for serviceability.
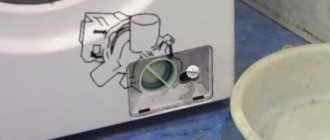
Diagnostics is performed using a tube whose diameter matches the size of the part’s hose. We put one end of the tube on the instrument fitting, and blow into the second. If the part that controls the water intake is in good condition, light clicking sounds will be heard.
When this method of checking does not help identify problems, the pressure switch will have to be disassembled.
Changing the level sensor
You can replace a non-functioning pressure switch with a new one on your own, without resorting to the help of specialists. The first task will be to purchase a part similar to the failed relay. For the seller to select the appropriate element, you just need to name the exact model of your washing machine, but you can take a non-working level sensor with you to the store.
After the pressure switch has been purchased, you can begin replacing it. It is necessary to remove the level sensor that has lost its functionality.
- Disconnect all hoses and contacts leading to the part (be sure to take a photo of the wire connection diagram).
- Unscrew the screws securing the pressure switch to the SMA housing.
- Remove the device.
As you can see, the work is not difficult. To install a new liquid level switch, perform all the steps described again, but in reverse order. Using the mounting bolts, install the new sensor, attach the pressure hose, and secure the clamp. Then you need to connect all the contacts and wires. Afterwards, install the cover of the machine body in place. Having completed all the basic steps for replacing the pressure switch, you can start the Indesit washing machine and check its performance.
Share your opinion - leave a comment
Replacing the sensor yourself
If the water level sensor does not work, it must be replaced. It will not be possible to disassemble and repair it due to the solid body. The new pressure switch must be identical to the old one. Install the sensor:
- Screw the new device with screws into the designated location.
- Connect the hose to the device tube and secure with a clamp of the appropriate size. Before connecting the hose, inspect it for damage. This is important for tightness.
- Connect the electrical wiring connector.
- Install the top cover of the washer and secure it with the provided screws.
- After installation, check operation by loading laundry and starting the wash.
The condition of the pressure switch is very important for the normal operation of the automatic washing machine. If a part breaks, it will have to be replaced with a new one. Do not use the machine with a non-functioning sensor, so as not to provoke serious damage.
Everyone knows how to use an automated washing machine. However, not everyone thinks to understand how the device works and how the parts interact with each other. And if the unit fails and for some reason there is no way to call a repairman, you have to, willy-nilly, figure out how the washing machine works. Topic of the article: adjusting the pressure switch of a washing machine - a small but very important detail.
.
[custom_ads_shortcode1]
Operating principle of the pressure switch
Each washing machine is equipped with a water level sensor (pressostat). It serves to supply an electrical signal to the washing machine controller about the presence or absence of water in the tank to perform further operations according to the established washing program.
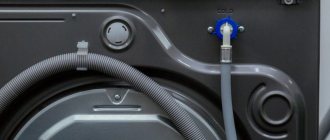
A standard pressure switch consists of a disc-shaped sealed housing, inside of which there is an air chamber. A tube is connected to it through a fitting, the second end is lowered into the tank of the machine. When water enters the machine, the air pressure in the tube and chamber of the pressure switch increases. The sensitive membrane begins to lift the rod, which presses on the spring-loaded contact plate.
When a certain level of liquid in the tank is reached, the spring plate clicks into the upper position, closing the electrical circuit of the sensor input lamellas. If the contents of the tank are drained, the pressure in the chamber decreases, the rod moves down and the contact plate switches to the lower position, breaking the electrical circuit. Based on the pressure switch signal, the controller issues control signals to other actuators (exhaust pump, motor, inlet valve, heater relay).
Description of the device and its operating principle
Every owner knows how to use a washing machine. But not everyone is aware of the design. In order to know how to independently fix a particular problem, it is worth knowing the location of parts and their functions, for example, a pressure switch. The normal functioning of the unit and the quality of washing depend on this part.
The pressure switch of a washing machine is a device that controls the volume of water in the tank. The main task of the device is to determine the amount of liquid by the pressure of its column. The relay looks like a disk, inside of which there is an air chamber with wires and a tube. The complexity of the pressure switch design depends on the number of washing modes that the machine is characterized by.
Relays can be of simple or complex type. In addition, electronic sensors are distinguished from each other by the stroke of their core and membrane rigidity.
For this reason, the pressure switch from one unit will not necessarily function in another. The sensor is made from high quality plastic; it usually looks like a rounded part. A mechanism is needed for the proper functioning of the washing machine and high quality washing. This simple mechanical assembly consists of the following elements:
- frame;
- inductor;
- magnetic core;
- a diaphragm that changes shape under the influence of water pressure and displaces the core;
- contact group.
The electronic liquid level sensor may be located in the following parts of the unit.
- Under the top cover in classic-type washing machines, where there is a front door for loading things.
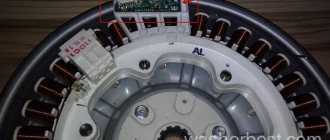
- In the lower part under the tank in a technique that is characterized by a vertical type of loading of laundry.
- In the area of the rear part of the case, slightly below the laundry container, the pressure switch is located in those machines that have plastic drums.
The pressure switch works according to a specific scheme, which is not complicated. The owner of the washing machine can independently clean the pipe, remove the sensor, or replace the device. A broken water level sensor can cause serious problems with your washing machine. If the user fails to clean or repair the part in a timely manner, the following problems may appear:
- water will stop collecting;
- the spin of washed clothes will deteriorate;
- Over time, the heating element may burn out;
- the laundry will be poorly washed;
- the tank will overflow with water.
In case of minor breakdowns of the pressure switch, you should not buy a new mechanism; tuning the old device can help with this situation. The sensor is replaced as follows.
- Removing the old relay by disconnecting the wires and hoses. The procedure must be carried out with extreme care to avoid unwanted damage. After this, unscrew the mounting bolts that secure the housing.
- Installing a new relay. The structure is screwed to the place where the old one was. After this, a hose is attached to it with a clamp and the electrical wiring is installed.
The owner of the unit should remember that the sensor should be purchased original or identical to the old device.
Before installing a new relay, it is worth checking its functionality in advance. Immediately after repair work, the machine should be checked in several washing modes. In order to prevent breakdowns of the pressure switch, experts recommend listening to the following advice.
- Do not use the washing machine while idling. Before washing, the drum is filled more than half with liquid. If the device is empty, the sensor will soon break.
- Wash exclusively with warm water. For a high-quality laundry cleaning procedure, the temperature of the liquid should not be more than 45 degrees.
- Clean the drain on a regular basis. To ensure that water drains from the tank without obstructions, the drain must be cleaned once every 30 days.
We suggest you familiarize yourself with the washing program on the Indesit washing machine.
Each washing machine is equipped with a pressure switch, which is responsible for the water level in the drum. In some cases, the relay may break down, after which it will need to be repaired or urgently replaced. If it is difficult for the owner to check or replace it, then it is better to use the services of professionals.
To learn how the pressure switch works, see below.
A device that controls the presence and volume of water in the tank of a washing machine, regardless of its brand (LG, Samsung, Ariston or Indesit), is called a pressure switch, or water level sensor. The main washing algorithms are turned on or not on according to its indications. The answer to the question of where the pressure switch is in a washing machine varies depending on the model and manufacturer, but the general criterion is its location near the housing wall, under the top panel of the unit.
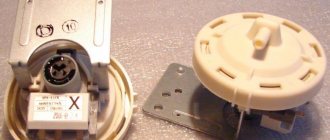
You can find out where the pressure switch of an LG, Samsung, Indesit or Bosch Maxx 4 washing machine is located by removing the top panel of the unit. The pressure switch looks like a flat plastic (monochrome or multi-colored) corrugated washer, to which wires with connectors fit on both planes, and a plastic tube at the end.
Options for pressure switches
The water level sensor is essentially a pneumatic relay, triggered by air pressure filling a tube connected to the tank of the machine. Depending on the pressure created by the water flowing into the drum, the air pressure on the internal membrane of the relay increases. The membrane, in turn, closes and opens certain contacts, passing current through the connected wires and triggering the corresponding command in the electronic control unit.
The absence of a “response” from the relay to the started operation or the absence of continuity in the control circuit in electronically controlled units causes the washing program to stop and an error signal appears on the dashboard indicator.
Water level sensor
Pressostat error codes depending on the manufacturer and model of the equipment:
- LG – PE;
- Ariston (Indesit) – F04 (F05);
- Electrolux – E11-E12; E21-E22;
- Bosch (Maxx 4) – F26 (F19);
- Samsung – E7 (E2; E3).
Water level sensor
Setting up the water level sensor
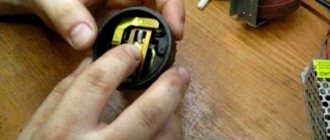
The pressure switch is adjusted to the required amount of liquid using two adjusting screws, one of which (central) is used to set the moment of connection of the contacts, and the second (peripheral) is intended to set the moment of their breaking. There may be several contact groups or sensors depending on the operating modes and model of the washing machine. Programs of different washing modes can also use different amounts of liquid in the washing machine, for example, economical or gentle wash, in which the tank is half filled.
Fine adjustment of the alarm is carried out by specialists at the factory, and the position of the adjusting screws is fixed with paint or varnish. It is not recommended to change their position, as unbalancing the settings will cause disturbances in the established washing program. In order to properly configure the unit yourself, you need to know how much liquid the machine requires at each stage of all washing modes, and in accordance with this, set the moments for turning on and off the contact groups. For example, the pressure switch of a Bosch washing machine has three contact groups configured for full mode, economy mode and tank overflow.
Adjusting the part
In some cases, replacing the pressure switch can be avoided if it is adjusted and configured correctly. To make adjustments, you must have information about the volume of water that the Indesit machine requires to complete the washing program. Depending on their number, there are from 1 to 3 screws on the relay.
In accordance with the amount of liquid required for each mode, these screws are tightened. If you configure the level sensor correctly, you don’t have to spend money on buying a new element.
Finding the exact setting coordinates is not easy, so this type of work is usually carried out by professionals.
Pressostat adjustment
To adjust the part that controls the water level in the washing machine, there is no need to call repair specialists, because such work can be done independently. You must follow the sequence of actions exactly and work carefully. So, the algorithm for adjusting the pressure switch of a washing machine is as follows:
- the laundry washing unit is disconnected from the electrical network and water pipe;
- Having unscrewed the bolts and disconnected the wiring, remove the pressure switch;
- we find special screws that are used to tighten or loosen the contacts inside the device;
- remove the sealant from their surface.
All of the above actions can be attributed to the preparatory stage, because the main work on adjusting the sensor is still ahead. You will have to use the stripped screws to try to catch the moment of approaching and opening the contact group. In this case, the well-known “poke method” is used, because only a professional washing machine repair specialist can have a special device for performing such work. You will have to act as follows:
- the first screw is turned half a turn, the pressure switch is connected to the machine, the washing machine starts in operating mode;
- If initially the car took in little water, and after adjusting the fluid it became more, you are on the right track. All that remains is to unscrew the screw further in the chosen direction and fill it with sealant;
- if manipulations with the bolt produce the opposite result, it will have to be unscrewed in the opposite direction, making one or one and a half turns.
The main task of adjusting the pressure switch is to determine its optimal operating parameters so that the part operates in a timely manner and accurately determines the amount of water poured into the washing machine tank.
Setting the washing machine pressure switch
In order for the indicator to accurately respond to the pressure level, the manufacturing company adjusts the pressure switch initially. In most cases, this is quite enough, and there is no need to worry about configuration. If you want to experiment with the sensor, then use the special screws available on the pressure switch. For more precise adjustments, they can be tightened.
Important! Without special knowledge, precise instruments and the extreme need to tighten and adjust the pressure switch of the washing machine yourself, it is extremely undesirable! .
[custom_ads_shortcode3]
Possible faults
The following signs may indicate failure of the pressure switch:
- Does not turn on if there is water in the machine.
- Turning on the machine with the tank not fully filled.
- Overflow of water.
Of course, these reasons can also occur in case of malfunctions of other components, but one of the first signs of a malfunctioning pressure switch is the lack of control over the water level. Its absence and overflow. Also turning on spinning clothes with not completely drained water. As a result, the laundry is not completely wrung out.
Solution
Some malfunctions that are not related to serious failure of the pressure switch parts can be resolved independently. To do this you will need a minimal set of tools. There are two types of screwdrivers: simple and figured. Pliers and a small knife. The pressure switch itself is shaped like a flying saucer with an add-on where three wires fit. A tube extends from it into the inside of the washing machine. It is usually located at the top of the body.
The most common cause of failure is poor contact in connections as a result of vibration of the machine during operation. Carefully inspect all incoming and outgoing connections. Make sure there is no oxidation on the contacts and that their connections are tight.
To check whether the contacts operate, you will need a rubber bulb and some kind of indicator. You can use a flashlight bulb and a battery. We put a rubber bulb on the tip of the control tube of the pressure switch and use it to create pressure in the system. When the contacts are triggered, a faint click is heard, and the device indicates the presence of contact. If there is a click, but there is no contact, this indicates oxidation of the contacts. If you have some experience, you can try to carefully open the sensor and clean the contacts. Of course, these are already extreme measures; it is better to replace the entire sensor. If you need one hundred percent confidence, you can visually trace the entire operating cycle of the machine by closing the contacts manually. After all, this is the only purpose of the sensor.
Also, the cause of failure of the pressure switch may be the entry of a foreign object into the control tube, which will impede the passage of water and introduce an error in the operation of the sensor.
Repair of an analog pressure switch comes down mainly to a visual inspection, checking connections for breaks and oxidation, and measuring the resistance between the contacts. It should change depending on the force of pressing the pear. If you were unable to solve the problem yourself, contact us: washing machine repair Yekaterinburg. We travel to all areas of Yekaterinburg, Verkhnyaya Pyshma, as well as the suburbs.
What is this?
Such a part as a pressure switch is found in any automatic washing machine, be it Electrolux, Samsung, Indesit, Zanussi, Ariston, Candy or any other manufacturer. The main function of this element in a washing machine is to determine the presence of water in the tank and its level. That is why the second common name for such a part is “water level sensor”.
In the absence of a pressure switch, the control module of the device would not be able to determine whether water is being filled into the tank and how much of it is already inside the machine. In addition, different programs require different amounts of water, which should also be regulated by a pressure switch.
The sensor itself is a small round plastic piece to which wires are connected. Also, a tube from the high-pressure tank is connected to the pressure switch.
The principle of operation of the pressure switch is that after collecting water in a given tank, the pressure increases, which is an incentive to close or open the contacts in the relay.
Testing and setting up the sensor
Before you start repairing your “home assistant”, find the receipts and see if the washing machine is under warranty. If the deadline has not passed and you are entitled to free diagnostics, it is better to contact the service center specialists. It should be remembered that if you open the machine body yourself, you can’t hope for warranty service in the future.
If the warranty card is no longer valid, you can proceed with diagnostics. First you need to remove the sensor from the housing. The algorithm of actions will be as follows:
- de-energize the SMA by unplugging the power cord from the outlet;
- turn off the tap responsible for the water supply;
- Unscrew the two bolts securing the top panel of the machine;
- remove the “cover” of the unit;
- find the pressure switch - it has the shape of a washer;
- Unscrew the bolt securing the relay in the housing, remove the connector;
- loosen the clamp and remove the sensor from the machine.
Before adjusting the device, you need to check whether it is working properly. For diagnostics, you will need a rubber tube of the same diameter as on the pressure switch. Having taken out the level sensor, put the prepared tube on its inlet fitting. Then blow into it - the working pressure switch will make 1-3 characteristic clicks. If the device is silent, it means that the contacts do not work and the relay is faulty.
Then inspect the level sensor. You need to make sure that it is not deformed and that there are no traces of burning on the surface. Also check the hose for blockages; sometimes the cavity becomes clogged with dust. If the tube is clogged, clear it or rinse it with warm water.
Hardware diagnostics of the pressure switch is more accurate. To test the device, set the device to resistance measurement mode and attach the multimeter probes to the pressure switch terminals. To activate the contacts, it is necessary to create pressure in the tube.
If the values on the multimeter display remain unchanged when the relay contacts are activated, you will have to replace the pressure switch. If the numbers on the screen change, we can talk about the serviceability of the sensor. Then, perhaps, it will be enough to simply adjust the existing device.
The level sensor is configured manually. Adjustment will be advisable in cases where too little or, on the contrary, too much water is poured into the tank during washing. The amount of liquid collected by the washing machine can be reduced or increased - to do this, you need to set the response force of the pressure switch.
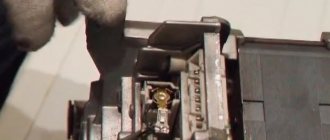
First you need to turn off the power to the machine. Next, remove the top panel of the case, find the pressure switch and disconnect the connector. The relay has three adjusting screws, one of which needs to be tightened. The bolt with which adjustment is made is usually located in the central part.
To tighten the screw, you will need a Phillips screwdriver or a special wrench. The process is carried out in stages - it is necessary to evaluate the intermediate results of adjusting the pressure switch. So, you should turn the bolt half a turn, then assemble the machine body and start a test “idle” wash. If the desired effect is not achieved, you still need to turn the screw.
To set up a pressure switch, you need to have minimal basic knowledge of the internal structure of a washing machine. If you do not have even the slightest idea how a level sensor functions, it is better to invite a specialist to do the work. Otherwise, you can harm the “home assistant” even more.
Interesting:
- How does the pressure switch of a washing machine work?
- Miele dishwasher errors
- Washing machine connection - review
- Checking the pressure switch of the Indesit washing machine
- Error codes for AEG washing machines
- How to adjust the pressure switch of a washing machine
Reader comments
Share your opinion - leave a comment
Where is?
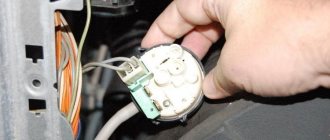
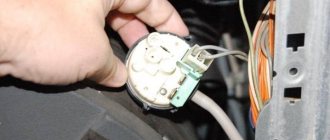
In the Indesit washing machine, the pressure switch is located under the top panel, on the right side of the body.
Getting to the pressure switch is easy. It is enough to carry out a series of sequential actions:
- Unplug the washing machine and move it away from the wall.
- Turn off the water supply tap to the washing machine.
- Unscrew the two bolts securing the top panel (fasteners can be found on the back wall of the household appliance).
- Lift it, move it slightly (until the characteristic two clicks), and then remove the top panel. Do not press on the cover, otherwise the plastic latches holding the top panel will break.
After the washer cover is removed, in the corner, on the right side, on the body of the household appliance you can see a small washer with wires - a pressure switch.
Most often, the sensor housing is made of white, black or blue plastic. A tube extending from the washer deep into the washing machine will also help to recognize the pressure switch.
Diagnostics and setup
It will be useful for every owner of an automatic washing machine to know how to check, configure, ring, and adjust its pressure switch. Before you independently check the functionality and adjust the sensor, it is worth checking whether the unit is under warranty. If this is so, then with unauthorized intervention you can forget about warranty service. The sequence of work consists of the following steps:
- unplugging the power cord from the outlet;
- dismantling the top panel by removing two small screws located on the back wall and moving the panel back and forth;
- detection of a pressure switch, which is located on one of the body walls;
- removing the connector, freeing the screw, pulling the hanging sensor out of the car;
- unscrewing the clamp and removing the device with pliers.
After the device is removed from the washing machine, it is connected to a small pipe. After this, you need to blow into it to see if there is a clicking sound inside the sensor when the pressure changes. If there are no clicks, then the pressure switch is considered to be working. To check the serviceability of the water level sensor using a hardware method, namely a multimeter, you will need to perform the following measures:
- preparing a device for determining resistance;
- placing the probe on the contacts that correspond to the electrical circuit of the pressure switch;
- the formation of pressure in the air tube until a certain relay contact is activated.
If there is no change in the resistance value when the contact is activated, then the water level sensor should be changed. If all of the above checks have shown that the mechanism is in good condition, then it would not be superfluous to carry out an additional check. The procedure is carried out by attaching a tube to the sensor and assessing it for leaks.
It is possible to set up and adjust the mechanism at home if the liquid level in the drum is not suitable for the user. The volume of liquid can be made larger or smaller by adjusting the trigger force of the sensor. Before starting the adjustment procedure, you will need to disconnect the unit from the power supply. To do this, remove the top cover and also disconnect the connector from the relay.
The required screw that controls the primary force is usually located in the central part of the relay housing. This part is usually made for a Phillips screwdriver, as well as an asterisk. It is worth adjusting the sensor when the tank is empty. The process is carried out in stages with intermediate, visual checks of the water level:
- turn the key - assembly;
- connection - testing, etc.
It is recommended to turn the screw only half a turn at a time and no more. It is worth checking, changing, and adjusting the pressure switch only if you have at least basic basic knowledge of the theory. If you have no experience in this process, then it is better to entrust the procedure to a professional.
Pressostat adjustment
To adjust the part that controls the water level in the washing machine, there is no need to call repair specialists, because such work can be done independently. You must follow the sequence of actions exactly and work carefully. So, the algorithm for adjusting the pressure switch of a washing machine is as follows:
- the laundry washing unit is disconnected from the electrical network and water pipe;
- Having unscrewed the bolts and disconnected the wiring, remove the pressure switch;
- we find special screws that are used to tighten or loosen the contacts inside the device;
- remove the sealant from their surface.
All of the above actions can be attributed to the preparatory stage, because the main work on adjusting the sensor is still ahead. You will have to use the stripped screws to try to catch the moment of approaching and opening the contact group. In this case, the well-known “poke method” is used, because only a professional washing machine repair specialist can have a special device for performing such work. You will have to act as follows:
- the first screw is turned half a turn, the pressure switch is connected to the machine, the washing machine starts in operating mode;
- If initially the car took in little water, and after adjusting the fluid it became more, you are on the right track. All that remains is to unscrew the screw further in the chosen direction and fill it with sealant;
- if manipulations with the bolt produce the opposite result, it will have to be unscrewed in the opposite direction, making one or one and a half turns.
The main task of adjusting the pressure switch is to determine its optimal operating parameters so that the part operates in a timely manner and accurately determines the amount of water poured into the washing machine tank.
Options of pressure switches, principle of operation, consequences of malfunction
If the pressure switch of a Samsung, Ariston, Indesit, Bosch or LG washing machine does not work correctly, this will provoke one or more malfunction options:
- overflowing water in the tank of the machine with constant addition and drainage of liquid;
- the liquid level in the tank is too low, the quality of the wash deteriorates;
- incomplete drainage of liquid after washing, insufficient spinning of laundry;
- start of the program (turning on the heating element) without water, overheating of the element and its failure.
The last point threatens serious damage to the washing machine and may even cause a fire.
Washing machine water level sensor
Failure of this part will result in incorrect operation of the unit.
You can determine that the liquid level relay has broken down based on the following indicators:
- the machine tries to wash in the absence of liquid;
- insufficient or excessive amount of water to implement the current action;
- burning smell, heating element reaction;
- when the rinse starts, the water is either drained or collected;
- The laundry is not spun at the end of the wash cycle.
The occurrence of these symptoms requires checking the functioning of the pressure switch. Since the fasteners on some machines have a specific shape (this is done to protect against burglary), it is recommended to purchase a special device for opening with a set of several attachments.
You can consult with the seller which device is suitable for checking the liquid sensor in the machine.
The washing machine water level sensor can be adjusted using two adjusting screws. The peripheral screw determines the contact disconnection time, the central screw determines the connection time. The device can be equipped with not one, but two or three groups of contacts - this is determined by the characteristics of the operating modes of a particular model.
An example of a machine with one sensor with a large number of groups is machines of modern models. Three contact groups are built into their pressure switches - one is responsible for the normal mode, the other for the economical mode, and the third shows the tank overflow status.
It also happens that the body of one washing machine is equipped with several such devices. Different wash programs fill the washing machine with water differently. In particular, the gentle wash uses a half-fill tank.
It is problematic to achieve the most precise adjustment of the device at home. This is done at the factory during the production of devices.
The screws that regulate the process are secured with varnish or paint. You should not move or rearrange the screws - in this case, malfunctions will occur in the well-thought-out program implemented by the unit.
Setting up a pressure switch at home is a procedure that is very demanding on the competence of the master. It is recommended to carry it out independently only if you know the volume of liquid required by a specific model at all stages of the washing programs implemented by this technique and the ability to adjust the operation of the contact groups in accordance with these data.
When purchasing a new pressure switch for a washing machine to replace a non-working one, you must make sure that the purchased model is identical to the one previously installed in the machine and is suitable for use in a specific brand and model with its inherent drum capacity parameter.
Before placing the sensor inside the housing, it is recommended to check it for correct operation using the above algorithm.
The procedure for replacing a pressure switch in a washing machine is similar to removing a broken sensor, but the steps are carried out in reverse order:
- The device is secured with special screws.
- The hose is connected to the fitting and the whip is tightened.
- Connect the wiring.
- Place the cover and tighten it with screws.
When the work is completed, you must turn on the equipment and run a test wash to check that the sensor copes with its functions correctly.
Since repairing the pressure switch of a washing machine is possible in very rare cases, it is better to replace this element immediately by purchasing a sensor of the required type. When purchasing a sensor, you must tell the seller exactly the make and model of your washing machine so as not to buy a different type of sensor. It would be even better to purchase a relay with markings that correspond to the number indicated on the body of your sensor.
One of the water level sensor models
Install a new pressure sensor in the following order:
- the tube that was removed from the old sensor is put on the same place on the new sensor;
- electrical wires are connected to the sensor;
- The pressure switch of the washing machine is bolted to the old place;
- The top cover of the washing machine is installed in its place and secured with bolts;
- the machine is connected to the electrical network;
- laundry is loaded into the machine;
- The required washing mode is set, after which the machine starts working. During the first wash after the repair, it is recommended to monitor the operation of the pressure switch. If there are no comments on its operation, then the repair is considered successful.
We suggest you read: How to get rid of smell in a washing machine? The automatic machine smells moldy, what should you do if the drum smells rotten?
If the adjustment didn't help?
If an attempt to set up a pressure switch with your own hands fails, this does not mean that you need to change the washing machine or urgently call a technician. The most cost-effective option would be to replace the faulty part with a new sensor.
Installing a new water level sensor will not take much time. It is enough just to remove the broken part, having previously photographed the wiring diagram, and then carry out the following sequence of actions:
- secure a working pressure switch in the system;
- connect the hose to the sensor tube and secure it well with a clamp;
- inspect the resulting connection for cracks, creases, and damage;
- connect the electrical wiring according to the previous diagram.
Then you need to assemble the body of the automatic washing machine, replace the top cover, turn on the washing machine and start the washing program. After replacing the part, the situation should undoubtedly improve.
https://youtube.com/watch?v=XOBXWWR5RPQ
- https://1stiralnaya.ru/remont/pressostat-stiralnoj-mashiny
- https://stiralkainfo.ru/remont/kak-otregulirovat-pressostat-stiralnoj-mashiny.html
- https://mashmaster.ru/regulirovka-pressostata-sm/
Setting doesn't help
If external damage is found on the pressure switch or the adjustment fails to help, then replacement is necessary. Fortunately, this is done quickly, and the part itself is relatively cheap. You just need to purchase a sensor that matches the serial number, remove the old one and install the new one.
Before connecting a new pressure switch, it is recommended to carefully study the electrical wiring diagram of the washing machine.
- First, a new sensor is attached to the seat.
- Next, connect the hose to the part and secure it with a clamp.
- We connect the wiring, focusing on the electrical diagram.
At the “finish” we start a test wash. If the error situation repeats, then the problem is different, and it is better to contact the service center for a comprehensive diagnosis.
If your Indesit washing machine begins to draw too little water or, on the contrary, threatens to overfill the tank, then you need to pay attention to the pressure switch. It is likely that the level sensor has failed, become clogged, or its factory settings have been lost due to vibrations or voltage surges. In any case, it needs to be looked at, repaired and replaced. In order for the adjustment of the pressure switch of the Indesit washing machine to be successful, you must follow certain instructions.
Checking the pressure switch
If you have the slightest doubt about the correct operation of the pressure switch, you must immediately replace it with a new one. But before that, you need to gain confidence that the problem is with the sensor. Checking the pressure switch of a washing machine is quite simple:
- The top panel must be removed. You can remove it by unscrewing the special bolts and sliding it in the opposite direction from you. On most models, the sensor is located at the top of the side wall.
- Experts recommend simply unscrewing the pressure switch. It is usually secured with several screws, which are quite easy to unscrew.
- After this, disconnect the tube and contacts from the sensor. The hose is secured with special clamps; they will either have to be carefully disassembled or cut off and then replaced with new ones.
Carefully examine the dismantled pressure switch: there should be no damage or formations on the housing. Check the tube and the condition of the insulating material of the wiring no less carefully. If necessary, clear blockages and repair minor damage. Clean the sensor contacts.
Now let's check the device itself. Typically, a ten-centimeter hose is used for this, identical in diameter to the one already removed earlier. Having connected the tube to the inlet fitting of the pressure switch, blow strongly into it. At this moment, clicks should be heard from the sensor. Their number depends on the blowing force.
To finally make sure that the pressure switch is not working, measure its resistance with a multimeter. If during injection the resistance remains at the same level, feel free to throw away the sensor.
This small device is necessary for the entire system. When it fails, it deprives you of the ability to wash, and can lead to various breakdowns. Replacing the pressure switch in an automatic washing machine is a troublesome, but not complicated process.
Pay attention to the behavior of your machine, and you will be able to notice a malfunction in time
Read further:
Good bathroom faucets
Water meter connection diagram
Thermostatic mixer how it works
Water filtration systems for summer cottages
Mechanical cold water filter
Replacement with a new one
If you are convinced that the level sensor is indeed faulty, it will have to be replaced with a new part. You can purchase a new pressure switch both in a regular store and on the Internet. To do this, you just need to know the make and model of the washing machine or look at its number on your non-working pressure switch.
Installing a new sensor is quite simple. First, a tube is put on it, then the contacts are connected, after which the pressure switch is installed in its place in the washing machine. Next, all that remains is to start the device and check whether the new sensor works.
You can learn more about the operation of the pressure switch in this video:
After some time from the moment of operation of the washing machine, any of its elements may lose their functionality. For example, a violation of water intake, expressed in underfilling or overfilling of liquid, will tell you that there are problems with the sensor that controls its intake. It is not always necessary to replace it; sometimes it is enough to adjust the pressure switch of the washing machine so that it works normally. By performing these steps yourself, you will not spend extra money on a new element and will extend the life of the existing sensor.
Checking and adjusting the sensor
Before you disassemble the washing machine body with your own hands, check whether the machine is under warranty. If the free service has not yet expired, it is better to invite a specialist to diagnose it. If you carry out unauthorized repairs, you can forget about warranty service.
If the warranty on the device has long expired, you can start self-diagnosis. You should proceed like this:
- unplug the machine's power cord from the network;
- close the shut-off valve responsible for the water supply;
- unscrew a pair of screws holding the top panel of the machine;
- remove the “cover” of the washer body;
- find the pressure switch;
- Unscrew the screw fixing the relay in the housing and remove the connector;
- loosen the clamp and remove the pressure switch from the machine.
Before changing or adjusting the device, you should check that it is working properly. To do this, you will have to prepare a short rubber tube, the same as on the pressure switch. Having pulled out the water level sensor, connect the prepared tube to it. Next, blow into it - if the pressure switch is working, two or three characteristic clicks should be heard. Silence will indicate that the contacts are not actuating, therefore the relay is faulty.
Next, inspect the pressure switch and make sure there is no damage to it. Also check the hose for blockages - if it is clogged, blow it out or rinse it under running warm water.
Hardware testing of the pressure switch is considered more accurate. To perform diagnostics, switch the multimeter to ohmmeter mode and attach the probes of the device to the relay contacts. Be sure to create pressure in the tube for the contacts to work. If the numbers on the tester screen do not change when the contacts are activated, you will have to replace the pressure switch. When everything is in order, you don’t have to purchase a new sensor, but simply adjust the existing one.
The pressure switch is adjusted manually. The adjustment will help if too little water gets into the machine when washing. The volume of liquid can be made smaller or larger - to do this, you need to set the relay response force. Before starting the procedure, be sure to turn off the power to the equipment.
Remove the top cover of the machine, find the pressure switch and reset the connector. The level sensor has 3 adjusting bolts; one of them will have to be tightened during the process. The screw with which the adjustment is made is usually located in the central part.
You can tighten the screw using a Phillips screwdriver or an asterisk
The procedure is carried out in stages - it is important to evaluate the intermediate results of setting up the sensor. So, you need to turn the bolt half a turn, then assemble the machine and run the test cycle with an empty drum
When the results are not satisfactory, you still need to turn the screw.
It is necessary to set up a pressure switch with at least minimal basic theoretical knowledge. If you have absolutely no idea how the level sensor works, it is better to entrust the work to a specialist. A specialist will adjust the relay correctly.
Share your opinion - leave a comment
Principle of operation
A pressure switch, also known as a pressure or water level switch, is a small round element made of plastic. Several insulated wires and a tube or hose clamped with clamps are connected to it. There are several types of devices:
- mechanical;
- electronic;
- single-chamber;
- two-chamber.
A rubber membrane is built into the sealed housing, which moves under the influence of air pressure, closing or opening electrical contacts. The device has a return spring that returns the diaphragm to its original position. From the outside it looks like a click inside the washing machine body.
A rubber hose runs from the bottom fitting of the tank to the sensor. When you turn on the washing machine, water begins to fill the tank, which puts pressure on the air in the hose. When the pressure reaches a certain value, the membrane will compress the spring, the contacts will open, and the water supply will stop.
The pressure and volume of water are adjusted by a screw that acts on a spring (but not all models are adjustable). A mechanical pressure switch is designed and operates on this principle. An electronic relay has an inductor (choke) instead of contacts, which controls the operation of the device.
Why is it needed and how is it designed?
The level relay is one of the main parts of the washing machine, without which the device simply could not function. The operation of the machine is regulated by the control module, to which the pressure switch sends signals that there is enough water in the tank, you can stop taking it and close the inlet valve. It is thanks to the level sensor that the main unit knows that the tank is filled with a sufficient amount of liquid. Let's talk in more detail about the operating principle of the pressure switch.
The liquid level switch controls the volume of water poured into the tank. Any of the washing programs involves the addition of different amounts of liquid. The pressure switch is a round-shaped part that has a plastic body. The pressure hose and electrical wiring are connected to the sensor. Inside the element there is a switch and a thin membrane.
Air passing under high pressure through the hose is transmitted to the membrane surface, which changes shape and closes the switch. Next, through the connected wires, a signal about the need to stop water intake is transmitted to the control module. This is how the liquid level sensor in the tank works.
It is worth mentioning where the pressure switch is located in the Indesit machine. It is located under the top cover, near the side wall of the unit.
Adjustment process
It is not necessary to seek the help of professionals to set up the liquid level sensor; repair work can be done independently
It is necessary to strictly follow the instructions below and perform all actions carefully, with extreme caution. To adjust the level sensor of a washing machine, you need to follow the following algorithm:
- disconnect the automatic machine from the power supply and water supply;
- remove the pressure switch by unscrewing a pair of bolts holding it and carefully disconnecting the wires supplying the part;
- look for special screws designed to tighten and loosen the internal contacts of the device;
- remove any remaining sealant from their surface.
These manipulations can be called preparatory; the main work of setting up the pressure switch remains to be done. Next, using the cleaned screws, you need to try to catch the moment of approaching and opening the contacts with your own hands. In this case, you will have to use the well-known “poke method”, since a non-professional does not have special devices that allow you to establish the moment of closure. You need to do this:
- turn the first screw half a turn, connect the sensor to the machine, turn on the machine and start the washing mode;
- if in your case the required volume of water was not initially collected, but now there is more of it, then the right path of action has been chosen. Unscrew the screw further in the same direction, then fill part of the part with sealant;
- if unscrewing the bolt has the opposite effect, turn it in the opposite direction by one or one and a half turns.
The main task when adjusting the pressure switch is to set the optimal parameters for its operation so that the sensor is triggered at the right time and clearly determines the volume of water collected in the tank.
How to check the pressure switch yourself
If the symptoms described above were noticed in the operation of the machine, then it is time to check the operation of this device.
Checking the pressure switch is quite simple. To do this you need to do the following:
- To start checking, you should dismantle the top panel of the washing machine itself. To do this, you need to unscrew special bolts from the panels, after which the panel moves. In most car models, the pressure switch is located in the side wall, namely, in its upper part.
- Most often, experts advise unscrewing the pressure switch. Most often, the device is secured with several screws. Unscrewing them is quite simple.
- After access to the device is gained, it is necessary to disconnect the tube and all contacts from the device itself. The tube is firmly secured using special clamps. They should be carefully removed. If this cannot be done, then the clamps can be cut off and subsequently replaced with new ones.
After dismantling is completed, you must do the following:
- There should be no damage or cracks on the sensor body. You should also check the tube and the insulating material of the wiring itself. If blockages and minor damage are found, all this should be eliminated. You should also clean the sensor contacts.
- Now you can proceed to checking the operation of the sensor itself. To check, most often, a ten-centimeter hose is used, which is similar in diameter to the removed hose. The hose should be connected to the fitting of the device. After which, you should blow hard into it. At this moment, clicks should be heard from the device, the number of which will depend on the force with which you blow.
- If clicks are inaudible, then most likely the device is faulty and needs to be replaced with a new one.
In order to finally make sure that the device is faulty, you should measure its resistance using a special device - a multimeter. In the case when the resistance of the device remains the same during “blowing in,” the sensor can be thrown out.
The pressure switch is necessary for the operation of the entire washing machine. Her work depends on him. If the device becomes faulty, the operation of the entire machine is disrupted. Without a sensor, it is impossible to wash, and a breakdown of the sensor can lead to breakdown of the machine itself.
In this case, you definitely can’t do without buying a new washing machine. Replacing the sensor is quite a troublesome task, but not at all difficult. To avoid its breakdown, you should monitor the operation of the machine and correct all malfunctions in a timely manner.
Repair
Having removed the pressure switch from the washing machine, first of all you need to see if the sensor itself is damaged, and also evaluate the integrity of the hose. It is also important to check if there is any blockage inside the tube. Replace the damaged tube with a new one, and if it is clogged, it must be cleaned. Next, the pressure switch contacts are inspected and, if necessary, cleaned.
Before opening the pressure switch
After detecting a malfunction in the system, it is necessary to understand whether the pressure switch was really the cause. Carefully inspect the filling system, examine the hose and fitting of the water intake sensor, its transition chamber. The inspected elements should not contain:
- abrasions, tears;
- deposits from laundry detergents.
If you find dried detergent on the parts, be sure to rinse the components and try to start the machine again. Perhaps these measures will help restore the functionality of the pressure switch.
Next, you should check the stability of the connection of the power supply wiring to the sensor. Perhaps a wire has become frayed or bent. If a defect is found, fix it and check the washer for functionality.
And finally, it is necessary to inspect the contacts of the pressure switch; if they are dirty, they should be cleaned. Then start checking the water intake sensor. For diagnostics, you will need a tube with a diameter similar to the permanent sensor hose. One end of the tube will have to be put on the inlet fitting of the device, and lightly blow into the free second hole. When the sensor is working properly, it makes a clicking sound. If after such a check no problems were found, it is necessary to disassemble the pressure switch.