The importance of a washing machine cannot be overestimated. Therefore, for a person, the breakdown of this type of household appliance becomes a real nightmare. Are you faced with a similar situation and don’t know where to get qualified help? Our specialists are ready to help you around the clock. Our technicians have extensive experience, so they can repair Siemens washing machines of any complexity.
Our professionals will quickly restore the work of your home assistant. They choose us because we do not require large equipment to be delivered to our service center and wait for it to be professionally restored. We offer our services directly to the client's home.
Repair Siemens IQ300
technicians can repair Siemens IQ300 for most breakdowns. The typical cost of repairing a Siemens IQ300 is from 2500 rubles (replacement of the pump) to 3000 rubles (replacement of the st02 hatch cuff).
The IQ300 family (WS1xGxxx) is a budget line of narrow washing machines from Siemens, produced since 2011. Twin of Bosch washing machines WLG series. The differences between brands are only in the external design; the filling, with the same digital indices, is completely identical. Both brands are assembled at the plant in St. Petersburg.
Due to the budget, it lacks the Aquastop leakage protection system and the standard possibility of installation under the countertop
The design is close to the previous generation Bosch Maxx5 washing machines and is largely compatible with component parts. The main visible difference is the return to mechanical buttons on the control panel.
Technical characteristics of Siemens IQ300
Washing programs Siemens WS10G160
Design features of Siemens IQ300
Siemens IQ300 washing machine repair
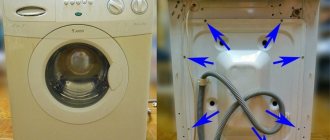
For the most part, these problems are caused by:
— Metal corrosion when the sealing collar and oil seal are destroyed, which leads to leaching of the lubricant;
— Incorrect installation of the washing machine, which leads to strong vibration and mechanical damage to the most vulnerable parts;
— Careless loading of laundry, which can cause the drum to block, make it difficult to rotate or warp;
— Failure of stabilizers and shock absorbers (springs);
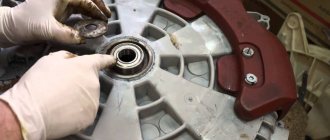
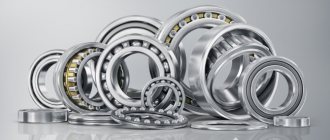
In addition to destructive vibrations, extraneous noises appear: crackling, grinding. All the user can do is check the stability of the household appliance. If he fails to eliminate extraneous vibrations, it is easier to contact a specialist than to carry out the repairs yourself. Replacing bearings is a rather labor-intensive process, since they are an integral part of the drum. To replace them, you need to disassemble the washing machine, remove the drum, disassemble it, remove the pulley. Only after this will it be possible to replace the faulty part.
This procedure does not require special equipment; a minimum of tools is required. However, the replacement should be made with an assistant, since it is physically impossible to do it alone. In addition, the bearings are fixed in the washing device in a rigid manner. This creates additional difficulties for replacement. Even a professional replacement job takes 3-4 hours.
Washing modes of the Siemens WS10G160 washing machine
number of main washing programs - 12
There is an ultra-fast wash program (15 min)
program selection - rotary knob
indication of the washing progress - mnemonic indicators of the main stages of washing and a timer until the end of the wash
There is a sound signal for the end of washing and detection of problems during the washing process.
additional adjustments—on delay up to 24 hours, accelerated washing, increased water level, spin speed. The selection buttons are mechanical, without locking.
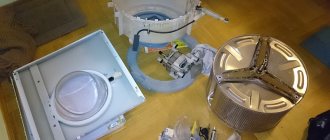
Work order:
— Disconnect electricity, water, drain;
— Depending on the design, remove the top and rear panels;
— Remove the control unit;
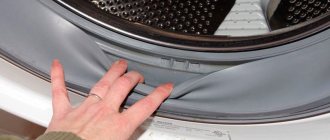
— Open the hatch, remove the cuff clamp and tuck it inside;
— Unscrew the front wall;
— Remove everything that prevents the clamp from loosening;
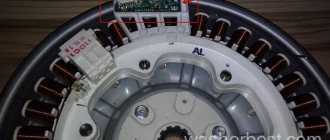
— Unhook the pipes, drive belt, unhook the wires, unscrew the engine;
After these steps, you can begin to change the bearing.
We collect everything you need
The scope of work is quite wide: the unit will have to be disassembled almost completely. For this, of course, you will need auxiliary tools. To replace bearings on a Siemens machine, you must have in your arsenal:
- Phillips and slotted screwdrivers;
- keys of various diameters;
- reversible screwdriver with a set of bits;
- pliers;
- sealant characterized by excellent water resistance;
- punch;
- hammer with rubber nozzle;
- puller;
- several bolts and nuts;
- an ordinary small hammer.
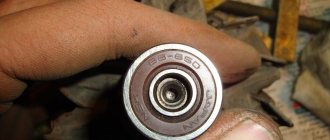
In addition to a working set of tools, you should take care of purchasing new parts. The oil seal and bearings can be purchased at specialized stores. When purchasing, you must provide the full name of the washing machine model or specify the serial number of the parts, which can be seen on failed items.
Perhaps, when disassembling the washing machine yourself, you will see that the old bearings are strongly stuck to the surface and even partially collapsed. To make them easier to remove, purchase WD-40, an all-purpose spray lubricant.
The tanks of most Siemens machines are non-separable, they will have to be cut. A grinder is useful for these purposes.
Advice from professionals, preventive measures
If you want to wash the outside of the washing machine, you must turn off the power to the unit and do not use a stream of water or chemical detergents containing solvents or abrasive components. It will be better if you simply wipe the case with a damp cloth.
It is necessary to remove scale from the elements of the washing machine using special means, using them in accordance with the recommended dosages.
The detergent drawer should be inspected regularly. If there is dirt or powder residues in it, remove it, rinse thoroughly, and return it to its original place.
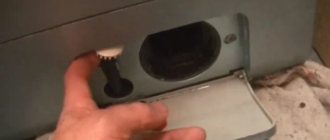
The condition of the water pump should be checked several times throughout the year. For this procedure, the base wall is removed, the drain hose is pulled out, and the liquid is drained. After this, the pump is cleaned and the impeller is checked for rotation. Then the pump cover is installed in its place and the panel is attached.
At least once a year, it is necessary to remove and check the filter located in the water intake hose of the washing machine.
Tank disassembly and bearing repair
As mentioned above, the tanks of most models of automatic machines are non-separable, so in order to gain access to the bearings you will have to cut or break off the fasteners connecting the two halves of the tank.
The problem may arise with the internal fastenings on which the hook hangs. It can either be knocked down using a hammer or cut off. It will be impossible to disassemble the tank any other way.
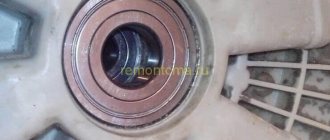
Once the tank body is opened, you can begin to replace parts. First you need to dismantle the old oil seal. To remove the bearings from the caliper, it is best to use a puller. If you see that the parts are stuck to the surface, treat them with WD-40 lubricant, this will make the process of removing the bearings much easier.
Remove the drum from the tank body
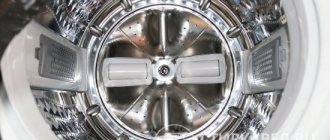
The washing machine tank weighs up to 10 kilograms. But removing it with your own hands alone is a dubious undertaking, so we recommend calling a friend/neighbor for help. Together we remove the tank from the springs and pull it out. We unscrew the front counterweight (this part most often looks like a massive half ring) and remove it. We turn the tank with the open side down, providing ourselves with access to the pulley.
How much can repairs cost?
By filling out an application online, you can get a discount on repairs of up to 15%.
Prices are valid from 09/01/2021 to 11/30/2021.
| Replacement | Price with master's work | Time | Guarantee | Online order |
| Bearing block | 1200 ₽ — 2500 ₽ | 60-120 minutes | 2 years | Order (- 15%) |
| Tank supports | 1500 ₽ — 3000 ₽ | 120-160 minutes | 2 years | Order (- 15%) |
Supports and supports for top-loading machines
Unlike front loading, vertical drums do not have bearings. Instead, supports are installed (rear and front), which are also called calipers.
These are round or square discs that keep the drum spinning. Their installation differs in that the calipers must be assembled independently:
We recommend entrusting this procedure only to professionals, since often, in the absence of experience, people bend gears that are almost impossible to buy in a regular store.
Otherwise, the process itself is not particularly different.
Related work for bearing replacement
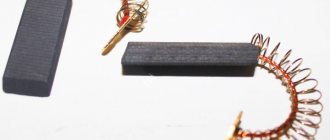
If the bearing has failed due to the advanced age of the washing machine, along with its replacement it will be necessary to inspect the motor commutator brushes. Severe destruction of the bearing at the same time renders the shaft, crosspiece and bushings unusable. In any case, the contacts in the electrical connectors are checked, the water drainage system is thoroughly cleaned, lime deposits are removed, and the condition of the belt and pulley is assessed.
Proper replacement of the bearing and putting in order the remaining components of the automatic washing machine will provide it with many years of impeccable service, and the receipt for payment for the service will be the best reminder of the need to follow the operating rules. Once again, we warn you against attempting to replace the bearing yourself. In half the cases, this only leads to an increase in repair costs by 1.5-2 times due to the need to completely replace the washing unit.
Replacement of heating element and pump
It is important to understand that it is impossible to restore a non-working heating element or drain pump. Even professionals don’t do this - they install new components right away.
Dismantling the facade of the washing machine is possible only after removing the powder receptacle. It is important to remember that wires are connected to the facade (blocking the door during washing).
The wires are connected using connectors. Consequently, replacing the heating element and pump with new analogues does not require specialized equipment.
The video clearly demonstrates the above steps:
Source
Let's get to the "main" node
At the very beginning, disconnect the washing machine from the electrical network. Turn off the water supply. Unhook the supply hose and drain hose, lowering the latter into a previously prepared basin. This will ensure safe work and not flood everything around with water.
We remove the hatch door by unscrewing two screws and removing it along with the metal hinge. Remove the upper part of the body. Usually the cover is fixed with various screws, which are unscrewed with a Phillips screwdriver. The fastening elements are located on the back side under the top of the panel on the eyes. Unscrew them and press firmly on the front end of the cover, then lift it up.
How to remove the detergent dispenser yourself? Feel for a separate plastic button in the center of the drawer. Press it and pull the tray towards you.
Next step: dismantling the control panel. The latter is secured to the washer body with two screws. The first is located under the tray for washing powder and other products. The second one is in the opposite direction. When unscrewing the panel, be careful, as it is very fragile.
Life hack: after removing, hang the panel on a hook or place it separately on a table/window sill so as not to accidentally damage it.
Step number four is disassembling the service panel. To do this, simultaneously press the two locking clips and then the latch located in the middle. Remove the panel.
To remove the front wall, remove the metal clamp holding the washer door seal. You can easily pick it up with a screwdriver, the main thing is to act carefully so as not to pierce the cuff. A rubber cuff seal is installed inside the loading hatch. The clamp itself is secured with a small spring; Just push it a little and the clamp will be removed. Now place the cuff inside the drum. Do not try to pull out or pull out the seal - it is held in place by an additional internal lock.
Now it's time to dismantle the front panel, but there may be some difficulties. You will need to complete the following steps (be especially careful with the panel, there are chips inside):
To remove the back cover, unscrew the screws with a screwdriver. They are usually located along the entire perimeter of the rear wall of the car. According to the manufacturer's idea, this allows you to securely fix the housing element, which, in fact, protects the drive mechanism.