The loading hatch door is a CMA part through which the laundry intended for washing is placed into the drum. At first glance, it seems that its device does not cause any difficulties, and there should be no breakdowns. But frankly, technicians at washing machine service centers are faced with the problem of door failure quite often. Often the problem lies not in manufacturing defects, but in violation of the operating conditions of the machine. In this article you will learn how to repair a washing machine door yourself.
Possible problems
Even the best quality and most reliable devices can break down.
A variety of components are susceptible to breakdowns. It is often necessary to repair the hatch door of equipment. Let's consider what problems most often arise with this important part of the unit.
- If you slam the hatch door carelessly, you can break the glass.
- The latch of the part in question often breaks - in most cases it jams when the door is closed.
- Hinge supports made of plastic may break.
- The door handle comes off.
If you encounter similar problems, don't panic. The main thing is to identify the fault in time, and then stock up on all the necessary parts and begin a fairly simple repair.
Common breakdowns
There are several common faults of this kind:
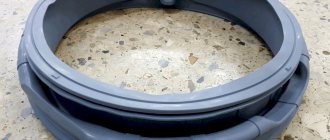
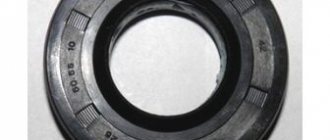
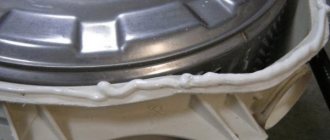
- In the case when the hatch cuff is worn out and damaged. Because of this, leaks occur and household appliances cannot be used.
- Wear or damage to hinges. In this case, the hatch simply does not close.
- The door handle is broken.
- The lock lock is broken. In this case, the door does not close or does not open. If the lock is broken, the machine will not work.
Let's take a closer look at each of them.
What will you need?
When repairing a car hatch door, you will need a good screwdriver. With its help, you will be able to unfasten all the necessary components, as well as tighten the removed parts and fragments of the unit. Here it is worth clarifying the ideal type of bits used. In many cases, imported models of washing machines use, in addition to simple crosses, sprockets of various diameters, as well as shaped profiles. They should be kept on hand. You may need to stock up on special bit extensions.
When is a sunroof replacement required?
For safety reasons, the machine will not start pouring water into the tank if the door is not completely closed. According to the principle of operation, the user places laundry in the drum and closes the hatch tightly. After this, the electronic lock is activated and the intake valves open to supply water.
What happens if the lock doesn't work? The control module does not receive a signal from the blocker, therefore it does not issue commands for water intake. Here are the main problems with MMA doors:
- The fastening loops have sagged. Then the latch tongue simply does not fit into the keyhole.
- The glass cracked. This is already threatening a flood. It’s especially scary when there’s boiling water inside.
- The door itself is damaged. Any depressurization increases the risk of leakage.
The last problem is especially relevant for vertical washing machines. The metal parts of the lid are subject to corrosion, so after a few years the door simply becomes unusable. Some craftsmen clean and paint the damaged surface. But we know that corrosion cannot be stopped. Therefore, if possible, it is better to replace it immediately.
Typical faults
Before starting repairs, study the structure of the door and the features of its fastening. What problems happen:
- Glass breaks.
- The latch does not work or, on the contrary, gets stuck.
- The support on the hinge breaks.
- The hatch locking device (UBL) does not work.
If the damage is mechanical, you can carry out repairs yourself. But it happens that a failure occurs in the control unit - then the door also does not lock. It is better to entrust the diagnosis and repair of the unit to a professional.
Latch problem
If the car hatch door is broken, first check the condition of the lock. The fact that the problem lies in this part may be indicated by the absence of a characteristic clicking sound at the moment of closing. The lever that fits into the hole may show nicks. It is because of them that the device runs the risk of not closing normally. You will need to carefully unscrew the door and place it on a flat surface. It is better to prepare a free table for this. Remove burrs using a regular file.
Pre-apply a special graphite lubricant, then carefully remove all excess so as not to spoil the laundry during washing.
All that remains is to reinstall the door.
If the latch is severely deformed, it is easier to replace it with a new one than to try to repair it. Such a procedure can take a lot of time - there are no guarantees that the work will be effective. It’s better to spend a little money and find a new, working part of a suitable modification.
Sometimes the “root of the problem” is hidden not in the latch at all, but in weak fasteners and hinges. In such a situation, you just need to correctly adjust the position of the hatch itself so that the latch fits into the desired hole more easily.
Repairing the locking mechanism
If the door does not close tightly, then there is suspicion of deformation of the latch lever. More precisely, irregularities appear on the part, which prevent the hatch from being fixed in the locking mechanism. It's easy to fix the situation:
- remove the door according to the algorithm described above;
- unfold the hatch with the latch towards you;
- take a file and grind off all the existing nicks and irregularities;
- lubricate the surfaces with graphite lubricant for prevention;
- we return the door to its place.
You must handle the hatch door with extreme care: do not hang wet things on it and do not allow children to “ride” on them.
When problems with closing the hatch are caused by sagging hinges or loose fasteners, you need to adjust the position of the door hinges. But here everything is determined by eye: we twist and tighten the fasteners until they fit completely into the grooves.
Algorithm for repairing a washing machine lock:
- dismantling the retaining loop and hatch;
- using a ring made from wire yourself, and also armed with a screwdriver, you should pick up the mechanism and pull the hook-shaped element out of the groove;
- move the rubber seal around the lock and remove it, holding it with one hand and unscrewing the fixing bolts with the other;
- After the completed manipulations, you can repair the washing machine door or replace it, in accordance with the recommendations of a specialist, because the cost and feasibility of repairs are not always justified.
Preparing for work
To troubleshoot, you must:
- find out the characteristics of the SMA and, in particular, the door itself,
- clarify the basic requirements that will have to be observed during repairs,
- prepare tools,
- buy the necessary materials and spare parts (original versions),
- if the need arises, be prepared to manufacture the necessary elements yourself.
Having outlined an algorithm for your own actions, you need to think through every step so that the washing machine door becomes operational again.
Broken plastic support
Even in good washing machines, the plastic deteriorates over time due to neglectful use of the machine. If the support breaks, the hatch may not fit tightly, creating a risk of flooding. If this part becomes damaged, remove it and secure the damaged part with a vice. The diameter of the nail should be 4 mm. Cut it to the desired length, if it is different.
Drill a 3.8 mm through hole in the support. Hold the nail with pliers and heat to 180ºC. After this, insert it into the drilled hole and wait 3 minutes for the nail to cool. All that remains is to assemble the door and install it in place.
Why remove the manhole cover?
Before you start repairing a door, it is worth studying its structure and mounting features. As a rule, all washing machine manufacturers adhere to the same design. But each model has its own characteristics that must be taken into account when carrying out any work. We also make sure to study the electrical diagram and try to determine the nature of the malfunction before disassembling. There are enough reasons to replace the door or its components:
- broken glass;
- latch that does not work or sticks;
- sagging hinges;
- failure of the hinge support.
In addition to the glass, lock and hinges, the UBL can also fail. The hatch locking device is located separately on the washing machine body, but plays an important role in closing the drum. Now we will analyze each breakdown and necessary repairs in more detail.
Repair of damaged glass
Damaged glass is more difficult to repair. Here you will need to use polyester or epoxy resin. After removing the door, you should consider removing the glass. Most often it is not removed. Therefore, they repair it like this:
- A plastic film is glued to the front surface. You may need to use tape. Gaps are not allowed.
- Reinforcing tape is placed on the existing hole that requires sealing (it is used for plastering work).
- Prepare the resin in a separate container according to the instructions. Mix the base and hardener in the required proportions.
- After preparing the resin, it is poured into the desired location.
- Typically polymerization occurs within 24 hours. After this time, the plastic film is removed.
- Smudges are removed using sandpaper.
Skewed locking tongue or hinges on the door
If you press hard on the hatch door, you can bend or completely break the retaining hinge. Also, the cause of such a problem may be the initially incorrect installation of the device, when it vibrates strongly and “trembles” during washing.
Often the problems under consideration are caused by low-quality components made from weak materials.
Look and evaluate the scale of the distortion. If possible, adjust the location of the hinge by slightly tightening the bolts. If you notice that the damage is more serious - the bearings and trim of the sash are affected, then you will have to change the hinge.
- First you need to remove the door from the washing machine.
- Next, you will need to unscrew all the connecting screws and disassemble the door.
- Separate the decorative flanges and then remove the glass. If the plastic parts of the hatch are damaged, they can also be replaced with new ones.
- In most situations, hinge bearings and hinges are susceptible to failure. The listed spare parts will need to be removed from the device and replaced.
- Reassembly must be done in reverse order.
If you did everything correctly, and the hatch door does not lock, this means that the problem is with the fixation hook. He can't get into the lock hole. This may be due to displacement or severe wear of the iron rod, which is responsible for fixing the tongue in the correct position. The tongue itself may also be damaged.
In order to cope with such malfunctions on your own, you will need to disassemble the hatch door using the method described above and see the extent of the damage. If the rod is slightly bent or has jumped out of the retaining groove, it is better to carefully adjust the spare part and fix it in the correct place. Be sure to install a new rod if it breaks. Once these repairs have been completed, you should see that the tongue should begin to function correctly.
If the hook responsible for locking the washing machine has broken, it is better to completely replace the handle with a new one.
If you are afraid to carry out independent repair work, even despite its simplicity, it is better to call experienced repairmen. Our specialists will quickly fix your faulty door.
In the next video you will learn how to open a washing machine and change the broken handle.
The reason for the machine door not closing tightly
Technically, the reasons for a leaky hatch closure can be divided into two types - errors in the control board and mechanical reasons.
Mechanical reasons are damage that prevents the door from locking, so you don’t hear the click of the door closing with your ear.
Problems with the electronic component - this malfunction looks a little different. You manage to close the door, you can even hear that the lock has worked, but in fact the hatch remains not closed, because there is no second click.
If the problem is electronics, then a modern device will notify you of the problem using an error code that will appear on the notification display. This is for your own safety, so that an unlocked machine does not start working and flood you and your neighbors below.
And if the hatch cannot be closed hermetically for physical reasons, then even the oldest machines, without such sophisticated safety systems as today, will still not start the washing cycle. There is no need to worry in vain - it is best to understand the causes and consequences of the fact that happened to your washing machine.
In principle, if you don’t have time to delve into technical details, then you can right now call a technician to your home to repair your washing machine
. Because Artalis Group provides you with such an opportunity.
We also have a lot of advantages:
Free visit of a specialist to your home at your address in a short time.
Diagnostics of faults costs only 500 RUB, and when you order repairs, we give it to you as a gift.
Prices in our price list start at 500 rubles.
The masters are experienced and responsible.
We provide a guarantee on all parts and labor.
Pensioners get a 10% discount on repairs.
Open the door first
When repairing the handle of an LG washing machine, the user may encounter the main problem - the difficulty of opening the hatch. In most cases, the handle fails precisely when you try to open the door at the end of the washing process. What should you do if you are unable to remove laundry from the drum?
To open a “jammed” hatch mechanically, you will have to approach the lock through the top or bottom of the SMA.
So, to open the door, you need to:
- Unscrew the two screws holding the top cover of the case and remove it;
- tilt the machine body slightly back (this will cause the drum to move slightly to the side);
- put your hand into the hole, feel the lock and unlock it.
Similar manipulations can be carried out through the bottom of the washing machine. Remove the bottom cover, if present, and open the hatch latch. You can also gain access to things if the door handle is broken using a rope. The twine is threaded between the washer body and the hatch. Then it is pulled on both sides, pressing on the latch. The lock should open.
Looking at the locking device
You can guess that the UBL is malfunctioning by several telling “symptoms”. The most important thing is that the machine will display the corresponding error. A door that does not open at the end of the cycle or does not lock when closing also indicates problems with the electronic locking.
To remove and check the functionality of the UBL, you need to remove the device from the housing. But first, you should prepare some tools: a flathead and Phillips screwdriver, a multimeter and a double wire. The latter must have terminals on one side and a plug on the other for connecting to a 220-volt outlet.
Now we remove the UBL from its seat through the top cover of the washer. You can also get the device through the drum, but, we repeat: it is better not to touch the hatch cuff.
- Disconnect the washing machine from the power supply and water supply.
- We unhook the drain and inlet hoses from the machine.
- We provide free access to equipment by moving it away from the wall by 0.5-1 m.
- Loosen the bolts holding the housing cover and remove it.
- We find the fasteners that secure the UBL, which are located directly behind the door lock, and unscrew them.
- We put our hand through the top to the UBL and, holding it with the other hand, disconnect it from the supplied wiring.
- We take out the device.
Next, we begin to diagnose UBL. We take a multimeter, set it to measure resistance and apply the probes to “zero” and “phase”. Then we evaluate the result on the scoreboard: if a three-digit number is shown, then there are no problems with blocking.
Now, using a thin screwdriver, switch the UBL to the “Open” position and connect the device to the socket through the wire. If the mechanism works and a click is heard, then there are no complaints about the performance of the blocker. It doesn’t hurt to attach probes to the neutral and common contacts. The part is operational when “0” is displayed on the display.
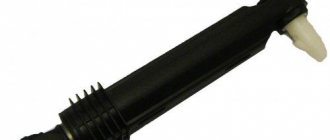
Removing the broken handle
After the hatch is open, you can directly begin dismantling the element. The plastic handle of the LG washing machine cannot be repaired; you need to purchase a new part to reinstall the broken one. You can buy a spare part in a specialized store by telling the consultant the SMA model. To remove the handle:
- turn off the power to the washing machine, turn off the water intake tap;
- unscrew the door from the machine body (open the hatch and use a screwdriver to unscrew the two bolts holding the door);
- Place the door on a flat surface with the glass facing up;
- unscrew the bolts holding the two parts of the hatch together;
- use a screwdriver to release the latches located in a circle;
- remove the top and glass.
The hinges are broken
Hinges break due to careless handling or natural wear and tear. Replacing washing machine door hinges is accessible to anyone with minimal repair skills.
- Remove the door along with the hinge. To do this, disconnect the clamp that holds the rubber of the hatch (if the seal is on the door itself), bend it and tighten it with the key for securing the hinge bolts. Then unscrew the bolts that secure the hinge to the unit body. Remove the hatch.
- In some models (Ariston, Indesit), the hinges can be replaced without disassembling the door. Simply unscrew the screws and install a new hinge. Models from manufacturers such as Samsung and Kandy require the hatch to be disassembled.
- Let's disassemble the door. Unscrew the screws that hold the two halves together. Then we separate them, applying uniform force, pressing carefully around the door.
- We install a new loop in the old place. We connect the door with even pressure until a characteristic sound is heard. We connect with bolts.
- We attach the structure to a new hinge to the body.
- Check in rinse mode.
We put the handle
Installation of the handle should be done carefully, without violating the recommended assembly order. The sequence of actions when reinstalling the mechanism will be as follows:
- put the spring in place;
- Place the lock on the side of the spring;
- Holding the lock, proceed to install the pin. It should not be inserted completely, but only inserted into one ear of the spring;
- Place the handle onto the locking element and insert the pin all the way.
Next you need to assemble the door. The glass is wound under the handle, and the outer part of the hatch is placed on top. The locking latches are secured. The bolts connecting the two parts of the door are screwed in. And in the end, all that remains is to put the hatch back on the LG washing machine.
Algorithm of actions
For each type of Electrolux washing machine (depending on the loading method), a specific parsing algorithm is prescribed.
Horizontal loading household appliance
The body of a front-loading washing machine consists of two halves (back and front, connected by fasteners along the side line).
Taking into account this design feature, the Electrolux washing machine is disassembled as follows:
- We find two screws located on the back wall of the case and unscrew them. We slightly push the cover towards the back wall, lift it and remove it from the body.
- On the left and right side panels, unscrew the two screws that secure the rear panel.
- At the bottom of the rear panel, unscrew the two fasteners.
- On the sides, after opening the plugs, unscrew the fixing bolts.
- Unclench and lift the plastic holders that secure the panel in the upper part of the case.
- Remove the back panel.
- Inside the powder receptacle we find a plastic tab, press it, and carefully pull the dispenser out of the washing machine body.
- We unscrew the fastening bolts and remove the hatch door along with the hinge.
- Carefully prying up the clamp spring with a slotted screwdriver, pull the metal ring off the cuff. We put the rubber seal inside the drum.
- We unscrew the screws located on the left side of the control panel, carefully use a screwdriver to open the latches on the top and sides of the panel, without disconnecting the wiring, remove the control unit.
- We unscrew the screws located around the hatch lock, under the control panel and around the drain filter, and remove the front panel from the body.
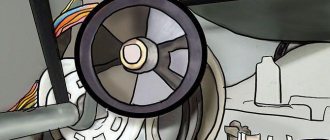
- Hold the pulley with one hand and remove the drive belt with the other.
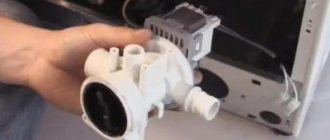
- We unscrew the fasteners holding the motor, disconnect the terminals of the power wires, move the motor slightly toward itself, and remove the mechanism from the housing.
- Disconnect the wires from the drain pump, unscrew the fasteners, carefully turning clockwise, and remove the pump from the housing.
- We disconnect the wiring from the heating element, unscrew the central bolt (located between the contacts) and, using gentle rocking movements, remove the heating element from its seat.
- Having unscrewed the central bolts, we dismantle the counterweights.
- Using pliers, pull out the pin holding the shock absorbers and remove the paired elements from the bottom of the tank and the body of the washing machine.
- In the upper part of the housing, we disconnect the powder receiver pipes, the wiring of the filling valve, the springs, after first disconnecting the tube, we dismantle the pressure switch.
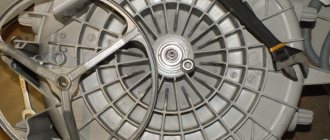
- Carefully lifting it, remove the tank from the springs and remove it from the housing.
At this stage, the analysis of the Electrolux front-loading washing machine is completed.
From vertical
Algorithm of actions:
Carefully prying the latches on the right and left sides, lift the control panel, disconnect the wiring from the board connectors, and remove the panel from the case.
Before you disconnect any wires, you need to take a photo of their connection diagram.- Disconnect the wires, unscrew the fasteners, and remove the electronic board.
- Having previously disconnected the pipes and wiring, we dismantle the fill valve.
- Having unscrewed the fixing elements located on the rear panel and one at the bottom of the front panel, we dismantle the side walls of the case.
- From the opened space we pull out the engine, drain pump and water level sensor (all elements are located under the tank). To do this, unscrew the fasteners, remove the wiring, and pull the mechanisms out of the housing.
- We block the pulley wheel with a wooden block. Carefully remove the drive belt.
- Raise the top panel (cover), take out the powder receptacle (fixed with latches).
- Unscrew the bolts holding the cover.
- We pull back the rubber cuff, under which we have access to the screws that secure the plastic strip. They also need to be unscrewed. Remove the top panel.
- We unscrew the hardware holding the shaft, close the tank doors, and remove the tank from the housing.
At this stage, the disassembly of a top-loading washing machine can be considered complete.
How to lock the hatch
When the water heats up, the bimetallic plate lengthens, blocking the doors, and when the hatch closes, the hook-shaped element secures the lock, putting pressure on the plate and displacing it. When selecting a washing mode, the automatic control unit sends a signal to the thermistor, and the plate, being energized, is deformed and puts pressure on the pin. The latter moves in the plate into the hole and the blocking principle is activated, which occurs as a result of a closed contact.
After completing the washing process, unlocking is carried out by performing the above operations in reverse order.
Delay in opening at the end of the program
Electrolux “braking” after completing a cycle is not a reason to panic. First of all, you need to understand whether the problem is serious. In addition to mechanical locking, washing machines are equipped with an electronic lock, which operates automatically, but not immediately. Usually the system needs 1-5 minutes to verify that the drain has occurred and give the go-ahead to open the equipment.
If the measured time has passed and the machine remains locked, then we exclude the second reason - a technical failure of the system. Often UBL slows down due to the board freezing. The electronic unit could react to a sudden voltage drop or a second switching off of the light - the program stalled and did not continue as usual. In such a situation, a reboot will help: just turn off the power to the equipment for 15-30 minutes and start it again. Most likely, the error will be reset and the mechanism will be unlocked.
The UBL turns off automatically 1-3 minutes after the wash is completed!
It's another matter if the machine freezes with a full tank. It is useless to wait in such a situation - it is necessary to urgently look for the reason for the failed drain. The problem is likely larger and will require a comprehensive inspection followed by repairs. You will have to forcefully open the machine and only after certain preparation.
How to unlock the door if the washing machine is stuck with water in the wash and does not open
If the machine stops running with water and does not wash, then the reason is most likely a drainage problem. Read the material “Why did the washing machine stop draining water”, it contains a complete list of possible problems. The inability to open the door in this case is protection against flooding, and the water must first be drained. Five ways to do this are described in the article “How to drain water from a washing machine if it is broken.” After draining the water, follow the methods described in this article above to open the car door.
What difficulties might arise?
The main difficulty that arises in the process of disassembling a washing machine is soured, rust-covered fasteners and mechanism components.
As a rule, it is very difficult (almost impossible) to unscrew or dismantle such parts the first time.
A special product will help solve the problem - WD-40 . It is enough to treat the soured element, wait from five to thirty minutes (the length of the wait depends on the density of limescale or rust), and then, with a little effort, unscrew the desired element.