If water flows out of the drum during washing, it means that the cuff for the washing machine is broken - that same silicone gasket between the door and the drum, or the “Elastic band” looks durable, but can easily wear out or tear. We'll look at what to do about it in this article.
The article is relevant for most models of washing machines, for example: Ardo / Ardo, Beko / Beko / Veko, Bosch Classixx, Logixx, Maxx / Bosch Classics, Logix, Max; Candy Aquamatic / Candy Aquamatic, Gorenje / Gorenje, Electrolux EWS / Electrolux, Euronova / Euronova, Haier / Haer, Hotpoint Ariston MVC, ARSL, Margherita / Hotpoint Ariston Margherita, Indesit WISN, WISL / Indesit, LG / Eldzhi, Miele / Miele, Samsung Eco Bubble, Diamond, Diamond, Smeg, Whirlpool, Vestel, Zanussi ZWQ, Atlant, Vyatka, Katyusha, including automatic models, with vertical and front loading.
A little theory
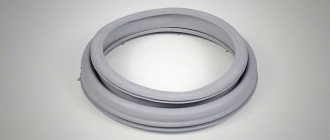
The cuff is a rubber gasket that is installed on the body of the “washing machine” and seals the hatch, preventing liquid from flowing out during washing.
At first, the parts were made of dense and flexible rubber. Now the rubber has been replaced with its closest “relative” - silicone. This has its advantages: silicone is more resistant to high temperatures and does not tan, turning into “wood” after many years of use. And it is easier to withstand severe deformation during repairs and dismantling.
The shape of the waterproof gasket may change depending on the functions of the washing machine: for example, if the machine has drying and aquaspray programs, the “elastic” becomes perforated. It is impossible to talk about all the features of the part within the framework of this article.
This is an article from a series about repairing washing machines. Review of the main machine breakdowns and solutions:
We fix 15 main problems with washing machines with our own hands
Call a specialist and price of work
Repairing a machine to replace the hatch cuff is a relatively simple process, but it requires care and skill in handling equipment. If you do not have such knowledge and skills, then it is better to call a specialist from a company that services washing household appliances.
If the machine is under warranty, then you should not carry out repairs yourself - since any intervention may damage the integrity of the seals.
When calling a repair specialist, you must describe the problem , and also say whether there is a new cuff available that needs to be installed. At a time convenient for the client, the master will come to the house and carry out repair work.
To have confidence in the quality of the repairs being carried out, it is advisable to call a specialist from a specialized company that has permission to carry out the work. You can find such a company via the Internet by entering your city in the search.
The cost will include labor and the price of a new cuff if the artist brings his own.
The amount of payment may vary by region, city and company. The work alone will cost from 1,000 rubles.
If the technician uses his own consumables or carries out additional work to repair other components, the cost will be higher.
A private master, unlike a representative of a self-respecting company, does not provide an official guarantee and is not responsible for the quality of repairs. In addition, there is a chance of falling for scammers who can remove the parts, take money to buy new ones and simply disappear.
Causes of damage: briefly
Wear and time
After each wash, the shelf life of machine parts decreases. The sealing rubber deforms, stretches or shrinks (depending on the material and how often the equipment is used), becomes less airtight, small cracks appear on it, and then large holes.
Mechanical damage during washing
Damage may appear:
- when loading or unloading things carelessly;
- due to sharp objects in pockets. When the drum rotates, they can even become a coin or piece of paper, so check your clothes carefully, turning out your pockets while still “dry”;
- from friction of hard objects or parts: in some Indesit and Ariston models, the drum touches the cuff and rubs against it.
Powder quality
The most common cause of seal rupture is cheap or low-quality washing powder. Aggressive chemical components in the inexpensive powder spoil the cuff material, making it “compressed,” porous and therefore fragile.
Mold and dirt
Fungi and mold appear due to poor ventilation and care of the machine. Reasons: installation in a very humid place, improperly connected drain to the sewer, constantly closed door (due to which moisture does not evaporate after washing). The fungus appears as dark spots, complemented by an unpleasant odor from the machine.
Fold back the side after any wash and see how much moisture, and sometimes debris, remains in the gaps. Ideally, after each use, wipe the “bins” with a soft cloth.
Why do this?
It may be necessary to remove the sealing collar not only if external damage is detected. Often it looks intact, but it no longer performs its functions one hundred percent. Experts recommend periodically replacing the gasket with a new one, or cleaning it thoroughly. This will help prevent leaks and maintain the tightness of the system. So, the sealing gum will have to be removed to achieve the following goals:
- cleaning the cuff and its installation site from plaque, scale, dirt and debris accumulation;
- replacing a part if it has stopped functioning and cannot ensure the tightness of the automatic machine.
Important! It is very easy to diagnose the need to replace the sealing cuff. If you find a violation of the integrity of its surface, an unpleasant odor emanating from the gasket, or a leak that occurs during the washing process, you must urgently remove the old one and install a new one.
DIY instructions for repairing holes in the cuff
Important! This is a temporary repair option: the patch we install will not last long due to frequent contact with water. Only new and original spare parts are durable!
To start
To repair the cuff and patch the hole, first unplug the washing machine and turn off the water supply.
Prepare:
- flat head screwdriver;
- a piece of thin elastic band (larger than the hole formed on the drum);
- scissors;
- surface degreasing agent (alcohol or gasoline will do);
- glue suitable for rubber (“Moment” is great);
- cotton pad or piece of cotton wool.
Dismantling: remove the clamps
First, let's pull out the front clamp. It can be attached to the front wall in three ways:
- latches;
- spring;
- on the screw.
If the tie is attached to a screw, unscrew it and pry the clamp with a screwdriver. For plastic clamps on a spring, you need to hold the spring at one end, pull it back and loosen it. Then pull the clamp towards you and remove it with a screwdriver.
To remove the second tie, unscrew the front panel of the machine. As soon as you see the clamp, unscrew the screw that holds it, pry the spring with a screwdriver and pull it off.
It happens that the rubber band comes off or flies off the mounting connectors in the case, then you need to check the spring and fastening, this is most likely the problem.
Looking for a hole
The cuff is in your hands, now you need to find the “hole”. Carefully inspect the rubber for holes.
If the hole or cut is significant, then there is no point in repairing it - it’s easier to buy a new one. To purchase a suitable one and not make a mistake with your choice, take the old elastic band and, based on it, select an analogue or identical model.
Putting on a patch
- Prepare the material for gluing. Fold it in several layers, gluing them together. The patch should be 1.5-2 cm longer and wider than the hole on each side.
- Degrease the sizing area: wet a cotton wool or rag with alcohol or any other impregnation, then thoroughly wipe the area with the hole.
- Apply glue to the elastic and patch. Glue them: “join” them with each other, press them and hold them in this state for a while so that the glue grips better. We recommend reading the instructions on the packaging, as there are some nuances.
- Leave the seal in its natural position for a day - sometimes it is enough to spread it on the floor.
Installation: install back
Place the inner clamp correctly. If it is screw-type, then put it on the cuff and tighten it. Stretch the spring version over the entire area of the opening, the plastic version with latches - insert into the grooves and snap into place. Take the front clamp and do the same with it.
Checking the tightness
To check the sealed part, run a quick wash. If the water no longer flows, everything is done correctly.
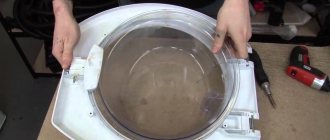
Dismantling the rubber band on the drum of the Indesit washing machine
Damage to the cuff is not a reason to replace the washing device. This type of repair work is much cheaper than replacing a control module or failed electronics, and any owner of this brand can handle it.
First of all, you need to prepare for the replacement. A new rubber band is purchased, similar in diameter and markings to the damaged one. The machine is de-energized, wiped inside with a rag, and you can dismantle it:
- clamps in the form of clamps are removed. If they are made of plastic, then hold the joints of the pair of latches and pull them forward. And if the rims are made of metal, unscrew the screws, or pry up the spring using a flat screwdriver,
- carefully pull out the front part of the cuff,
- we find a mark that marks the required location of the elastic band in relation to the SMA drum (as a rule, this is a characteristic protrusion),
- With a marker we put a response mark on the body,
- To remove the sealing rubber, pull it towards you, removing it from the recess.
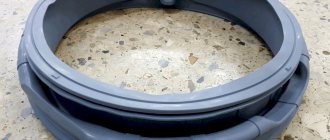
After dismantling the damaged seal, you should not rush to replace it with an analogue one. First, thoroughly clean the edge from dirt, scale and remaining washing powder.
What to do if the cuff is covered with mold
If you feel signs of mold (stains are visible, there is an odor), the cuff must be washed and cleaned. Remove the rubber band. Wash it in a large container of water with detergent and bleach. Wipe the drum and door thoroughly with a sponge soaked in a chlorine-containing solution. Once all the components are dry, return the rubber to its place.
Important! The fungus can grow quite deeply in the rubber - most likely, even after cleaning, the cuff will still have to be changed.
Why is this happening
The cause of a cuff tear should be understood at the very beginning. It will become clear whether it makes sense to carry out such home renovations, as well as how to avoid a similar situation in the future. There may be several reasons that caused the gap.
- Cracks that occur as a result of strong vibration of the machine drum. Repairs can be made, but the issue with vibration must be resolved, and this is much more difficult.
- Sometimes rubbing of the cuff occurs if something in the mechanism is broken and the cuff rubs against some part. Drum displacement can lead to such a breakdown. Before carrying out repairs, the cause of the damage must be eliminated.
- A tear or cut that can be caused by small items forgotten in pockets.
- “Incurable” damage, the repair of which does not make sense.
The latter can arise for a number of reasons, for example, poor quality of the cuff initially or cracks from old age that will appear again and again. Such damage cannot be repaired, and there is no point.
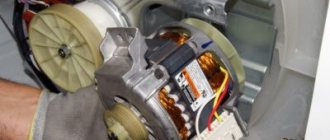
What is a shock absorber
Why is it needed?
Shock absorbers absorb vibration load on the drum, facilitating its operation and extending the life of the entire “washing machine”. Most often, the elements are installed in a standard place - under the tank. The springs move back and forth (along a reciprocating trajectory), due to which they “eat up” the load. That is why the tank does not knock on the walls.
If the washing machine makes noises and moves during the spin cycle, first check that the shipping bolts have been removed.
What does it consist of?
The part has a spring-piston design: its shape resembles a cylinder. Inside there is a rod consisting of a rod holder and a rubber gasket, which is impregnated with a special lubricant for effective friction. The upper part of the rod is specially made for fitting polymer inserts and rubber gaskets. A piston with another gasket is attached to the base of the rod.
How is it different from a damper?
Dampers are a modern type of shock absorber. The principle of operation is the same, the only difference is in the position of the springs: in models with dampers, they are installed not inside the part, but at the top, and the tank is suspended from them. This allows you to replace springs faster and reduce the likelihood of breakage.