Aggressive exposure to detergents and careless handling of the washing machine lead to the rubber cuff losing its density and elasticity.
As a result, the seal of the hatch is broken and leaks appear. Replacing the rubber seal, thereby restoring the smooth operation of the LG washing machine is not so difficult.
The main thing is to study the theoretical part in advance, properly prepare for the process, and strictly follow the prescribed sequence of actions. We will talk about replacing the hatch cuff of an LG washing machine below.
When is it necessary to change a part?
A signal that the rubber seal in the LG washing machine has worn out is water trails appearing on the front panel from under the loading hatch as soon as the tank is filled with water and washing begins.
At the same time, the washer signals problems with the cuff (closing the hatch) with the error code DE (shown on the display). If there is no information display on the washing machine panel, a problem with the cuff can be identified by the blinking of the temperature, wash and rinse indicators.
A puddle of water in front of the washing machine indicates that the rubber cuff is torn. It is unsafe to operate a washing machine with such damage . You must immediately turn off the household appliance from the power supply, turn off the water supply tap and begin troubleshooting the problem (either yourself or call a technician).
This article will tell you what are the reasons for water flowing from below the LG washing machine, how to find the problem and fix it.
Causes of malfunction
Before you begin replacing an element, you need to determine the cause of the failure. As a rule, there are two of them: wear of the part or its mechanical damage.
For example:
- long-term use has led to wear of the rubber component;
- the use of strong chemical compounds when washing clothes;
- a situation with the hatch being clogged with small hard objects (buttons, badges, pins);
- regular use of sma lg for washing down jackets, coats, sneakers;
- the appearance of fungus;
- using washing powder of inadequate quality or exceeding the maximum volume;
- friction when working on the inner edge of the housing;
- improper care of equipment.
Preparation for the process
A quick, high-quality replacement of the cuff on an LG washing machine is possible with proper preparation.
First of all, we determine the location for the repair work. The washing machine is moved away from the wall and placed on a flat surface so that it is convenient to approach it from any side.
The second step is to disconnect the washing machine from the electricity and water supply (turn off the water supply tap). Afterwards, remove the drain and inlet hoses (during the dismantling process, it is better to cover the surface around the washing machine with rags).
The third step is to check that all the necessary tools are available:
- screwdrivers (phillips and slotted),
- pliers,
- small flashlight.
Before starting repair work, it would be a good idea to study the operating instructions for the LG washing machine, paying special attention to the safety point of repairing electrical appliances.
How to remove and change?
Replacing a worn cuff can be divided into three stages:
- disassembling the washing machine and removing the worn element;
- installation of a new rubber seal;
- Reassembly of the washing machine.
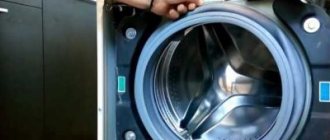
In order to get to the worn cuff, the LG washing machine will have to be disassembled.
Algorithm of actions:
- Remove the top panel (to do this, unscrew the fixing bolts located on the rear wall);
- We take out the detergent dispenser (press the blue plastic “tab” inside the tray and pull out the powder receptacle);
We dismantle the control panel (to do this, unscrew the screws located in the niche of the powder receptacle, and then press out the special latches holding the panel).
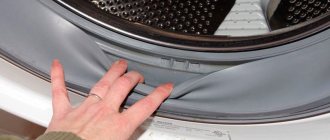
It is necessary to remove the control panel extremely carefully. Behind it are cables and contacts. Nothing needs to be disconnected. We simply carefully move the dismantled panel to the side.- We remove the decorative strip on the front panel. Using a flat-head screwdriver, open the hatch cover (you can find it at the bottom of the front panel), after which in the opened niche we unscrew the screws holding the decorative strip. Additionally, we move the hose to the side for emergency drainage of water. To carefully remove the panel, it is pulled off the latches, first from the right and then from the left side.
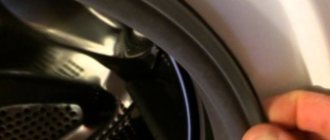
- Remove the front hatch cuff clamp. To do this, open the hatch door using a flat-head screwdriver, pry up the spring, move it to the side, and remove the front clamp. If you don't have a flat-head screwdriver at hand, you can pry and remove the spring with a dull table knife.
- We dismantle the UBL (hatch blocking device). To ensure that nothing interferes with the work, before unscrewing the bolts securing the UBL to the body (located to the right of the hatch), the rubber cuff is tucked inside the drum.
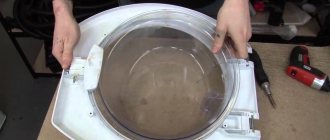
- We dismantle the front panel of the LG washing machine. Using a Phillips screwdriver, unscrew two bolts from the top and three bolts from the bottom. There is no need to remove the hatch door from the front panel.
After the machine body is disassembled, you can proceed directly to the process of dismantling the old worn rubber cuff.
Algorithm of actions:
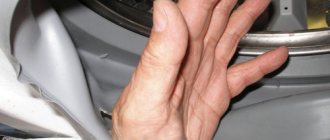
- remove the hose fixed to the cuff fitting;
- dismantle the internal clamp (holds the rubber seal on the washing machine tank) - to do this, use a flat screwdriver to pry up the spring and pull out the clamp;
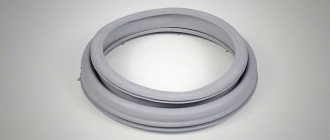
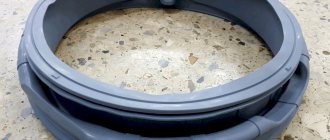
- dismantle the rubber seal (cuff) - in order to remove the seal from the grooves, you need to firmly grasp the rubber with your hands and pull it towards you; you should not be careful, since the old worn part will still be thrown away.
After the old seal is removed, the seat is wiped of accumulated dirt and the next stage of repair begins - installation of a new rubber cuff.
Algorithm of actions:
We remove the bushing from the worn seal and fix it on the new cuff.- We install a new seal. To do this, unfold the part with the fitting facing up and put it on the seat.
- Before tightening the rubber seal, you need to check whether the arrow on the washer body matches the arrow on the cuff. We also make sure to check the coincidence of the technological notches.
- We fix the cuff with an internal clamp. To do this, slightly stretch the spring and pull the clamp onto the seal. To make the process easier, two flat screwdrivers can be used to gently open the clamp.
After the internal clamp is fixed, a tube is connected to the fitting on the seal, and the process of assembling the washing machine begins. The sequence of actions is the reverse of the dismantling process.
Algorithm of actions:
- install the front panel;
- return the UBL to its original place;
- fix the outer clamp;
- insert the lower decorative strip on the front panel into the latches;
- we mount the control panel, insert the powder receptacle, and return the top panel of the LG washing machine to its place.
As soon as the last bolt on the body is screwed in, the washing machine needs to be tested. To do this, start the rinse mode. If at the end of the process no leaks are found, the repair was successful.
The process of replacing the cuff is in the video:
Where and at what price can I buy a new rubber band?
The quality of the repair directly depends on which part will be mounted in place of the worn one. It is important that the new cuff fully matches the characteristics of the original previously installed on a specific model of the LG washing machine.
In order not to make a mistake, the seller must correctly inform the washer model (the numbers and letters are indicated on the plate located above the hatch) and he himself will select a new seal.
It is better to purchase a new cuff from official representatives of LG household appliances or from service departments that repair LG washing machines (contacts are not difficult to find on the Internet).
Installing an original cuff greatly improves the quality of the repair and reduces the risk of rapid wear of the installed part. The cost of an original cuff for an LG washing machine varies from 2000 rubles. up to 3000 rub.
Installing the cuff
All sealing rubbers are asymmetrical. They have a bottom, which can be identified by through technological holes, and a top, which is marked by a small protrusion. There is a triangle mark on the tank.
Therefore, installation must be done from above, aligning the designations.
Working with your fingers, stretch the rubber over the edges of the tank. And gradually we go in circles.
Expert opinion
I work in the household appliance repair industry. Extensive experience in restoring washing machines and dishwashers.
Ask a Question
Important! If difficulties arise, you can lubricate the joint on the cuff with a small amount of dishwashing detergent.
After completion, be sure to check with your fingers along the entire radius to make sure that the rubber is completely seated in place. And also spin the drum. It should not touch the cuff.
Then install the clamp. First you need to insert the edge with the hook into the gutter. And pull the other end with the spring onto it. To do this, it is most convenient to use round nose pliers with an angle of 90°.
Call the master
Replacing the cuff is a rather lengthy process that requires certain knowledge of the structure of the LG washing machine.
If there is no understanding of what needs to be done, then it is better to entrust the replacement of the rubber seal to the professionals of service centers . It’s not difficult to find the necessary contacts on the Internet or use the recommendations of friends.
The cost of a specialist’s services to replace a cuff starts from 2000 rubles. This amount includes: diagnostics, dismantling of the washing machine, installation of a new element, reassembly. A new rubber seal is paid separately.
To avoid the unpleasant moments of poor-quality repairs, you need to inform the technician the exact model of the washing machine . If the specialist is little interested in the essence of the problem and the main emphasis is on paying for repairs that have not yet been carried out, you should refuse.
Purpose of the rubber seal
In any model of washing machine, the rubber seal performs the same function - it serves as a sealant. It reliably isolates the space between the body and the tank. If the integrity of this part is compromised, then water can leak onto the electrics - the control board.
The second rubber band - the one you see every day - is located on the door. It prevents water from overflowing from the drum and prevents short circuits.
How to avoid problems in the future?
to maximize the service life of the rubber cuff of the LG washing machine hatch :
- Before putting dirty laundry into the drum, be sure to check the pockets for sharp small objects (they are the most common cause of cuff ruptures).
- Things are stacked one at a time, and not in a big lump (careful loading helps maintain the tightness of the rubber cuff).
- Never pour bleach or concentrated liquid powders into the washing machine drum (aggressive chemical components destroy rubber).
- After each wash, wipe the cuff with a dry cloth (in a damp environment, mold and fungi develop very quickly, corroding the rubber seal).
It is very important to comply with drum loading standards by weight (parameters are indicated in the washing machine passport). Overload not only accelerates the wear of the rubber cuff, but also has an extremely negative effect on the functioning of the washing machine as a whole.