Automatic washing machines make a significant contribution in helping us manage our household chores. For many years, they carry significant loads of washing clothes, helping us save a lot of time and effort. But there comes a time when our washing unit, due to long-term operation, lets us know about the need for its routine maintenance.
One such sign is increased, gradually increasing noise during operation. First, the noise level becomes prohibitive in the spin mode, and then it can be heard at normal washing speeds. The reason for this behavior of the machine is a bearing unit worn out by long-term operation.
There is no point in delaying this problem due to the seriousness of the breakdown; if we fail to eliminate it in a timely manner, we doom ourselves to additional costs to eliminate additional collateral faults.
As in other machines, bearings for the Atlant washing machine can be changed with your own hands at home.
Disassembling the Atlant washing machine will take a significant part of your time, but you will be pleased with the saved budget.
Tool preparation
Disassembling any machine cannot be done without tools. First of all, you will need:
- flat and Phillips screwdrivers;
- pliers;
- wrenches and socket wrenches;
- hammer.
It is quite difficult to tell the size of the keys; you can find out when you start disassembling the machine. Therefore, it is better when the household has a set of different keys. Most often, 8, 10, 13 mm wrenches are required. In addition, it’s a good idea to have special tools, instruments and devices on hand, for example:
- bearing puller;
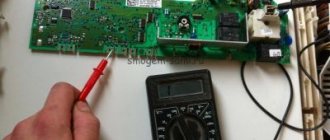
- ohmmeter or multimeter;
- screwdriver;
- WD-40 liquid;
- a rag and a container for water.
Partial disassembly of the machine
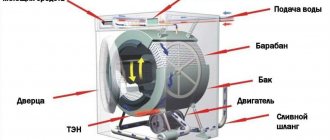
In most cases, repairing a washing machine requires partial disassembly of the machine. To get, for example, a drain pump or heating element, you do not need to disassemble the entire housing. Therefore, first let’s talk about how to get to machine components that do not require complete disassembly. If you have a poor understanding of the structure of a washing machine, then you need to at least familiarize yourself with the diagram, which shows all its main components and parts. The picture below is one of such schemes.
Disassembling the washing machine should begin with the top and rear housing covers, which are held in place by several self-tapping screws, but before that, disconnect the inlet hose. To lift the top cover, you not only need to unscrew it, but also move it back 1.5 cm. Under the top cover you have access to:
- pressure switch (water level sensor);
- transformer;
- interference filter (mains capacitor);
- water supply valve.
If you put the Atlant machine on its left side, you will see the drain pump and drain pipe. The pump is held on by two self-tapping screws that can be easily unscrewed. To remove the pipe, you need to use pliers.
Important! Before turning the machine over, drain the water from it. This can be done either through the emergency drain hose located near the drain filter, or through the filter itself.
Next, you can remove the back cover of the case, behind which you will see the heating element, drive belt, engine, and tank. From all this, you can remove the heating element without much difficulty. It is located at the bottom under the tank. Before pulling it towards you, you need to disconnect all the wires and the temperature sensor, fixing their correct position in the photo. If the heating element does not come out of its seat well, use WD-40 fluid.
There is also an electronic module attached to the back wall on the left, which is also easy to remove; just disconnect all the chips with wires from it. Now let's move on to the front part of the machine. On this side, you must first remove the powder receptacle from its seat, then unscrew the control panel.
To remove the hatch door, you need to unscrew the two screws holding it. The hatch cuff is secured with a metal clamp that needs to be loosened. To remove the front housing cover, you also need to unscrew the door locking device and disconnect the sensor from it by sticking your hand into the drum. Thus, the body of the Atlant washing machine will be completely disassembled.
Removing moving parts and tank
Replacing the bearings in the tub, pulley and drum of the washing machine will require a lot of effort and time. Parsing these elements can be quite labor intensive. Not many people agree to carry it out at home. To remove the tank from the car, you need:
- unscrew the counterweights;
- remove the drive belt;
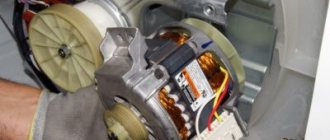
- Unscrew the screws holding the motor, disconnect the wires from the motor and remove it;
- disconnect the wires from the heating element and temperature sensor;
- loosen the clamps of the drain and filler pipes and remove them;
- in front, remove the hatch cuff from the drum;
- remove the pressure switch;
- We remove the racks and pull out the tank along with the drum from the housing.
It is worth noting that it is inconvenient to pull out the drum of the Atlant washing machine alone; it is better to use someone’s help.
Now, let's start disassembling the tank of the Atlant washing machine. Before you start disassembling the tank of a washing machine of this brand, you should know that the manufacturer initially made such tanks non-separable. But this, of course, does not mean that this is an insurmountable obstacle for us. What should be done?
- We lay our removed tank with the hole for storing laundry facing up.
- We find the place where the two halves of the tank join together.
- We select the screws with which we will then tighten the halves of the tank.
- We drill holes in a circle (according to the diameter of the screws), it is better to drill them immediately, so that later you can easily combine the halves of the tank.
- Next, take a hacksaw for metal and begin sawing the tank along the seam; this work is labor-intensive and requires patience.
Be careful when sawing the tank, try not to touch any metal parts, including the drum.
- Having cut the tank, we disassemble it into two halves, one half (the bottom) remains on the tank, and the second is removed to the side.
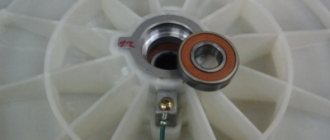
- Take the T-40 star wrench and unscrew the screw located in the center of the drum pulley. If you have problems with this, you can spray the screw with WD-40.
- Using loosening movements, remove the drum pulley.
- We tighten the screw back so that it is convenient to knock out the shaft.
- Next, we apply light blows to the screw with a hammer so that the shaft together with the drum pops out of the tank half along with the bearings. If the shaft does not come out, then blows must be applied through a wooden block so as not to damage the important part.
Having freed the shaft with the cross and the drum from the second half of the tank and bearings, we finished disassembling the Atlant washing machine. Next, we will need to start installing new bearings and assembling the washing machine, but this will be discussed in a separate publication. If you are interested in how to change a bearing in a washing machine, read about it in the article of the same name.
In conclusion, we note that any good owner can partially disassemble the Atlant washing machine without much difficulty, but only a patient person will be able to completely disassemble it, because here you need to do everything carefully without damaging any important parts. So be patient, have the right tools and go for it, we hope everything works out for you!
Call the master
If you are not sure that you will be able to cope with bearing repairs yourself, it is better to entrust this work to specialists. You can find a master by looking at advertisements posted on bulletin boards on the Internet and in newspapers. In addition to private repairmen, service centers offer their services.
When choosing a specialist, you need to study reviews on the Internet. It would be good if they were posted on a third-party resource and not on the service’s website. You can search for thematic groups on social networks.
The cost of work differs depending on the city and the organization providing the service . To replace bearings at a service center you will have to pay about 3,200 rubles. The price does not include the price of the part. It is paid separately.
The master must provide receipts and a report with a list of work performed. If the machine is under warranty, then malfunctions that are not the fault of the user must be corrected by the manufacturer.
Step-by-step instructions on how to disassemble an Atlant washing machine
Disassembling an Atlant washing machine into its component parts (in order to repair or replace a faulty element) without knowledge of the internal structure is a difficult task.
Proper preparation and strict adherence to a certain algorithm of actions will help to simplify the dismantling process as much as possible. We will tell you more about how to disassemble the Atlant washing machine with your own hands in the article.
When is replacement necessary?
If during the washing cycle you hear a hum, knocks that intensify during centrifugation, then it is time to replace the bearing of the Atlant washing machine. A prolonged collision leads to equipment breakdown beyond repair.
You can replace the bearing yourself only in cars in which the tank is disassembled. If this condition cannot be met, you should contact a workshop. For repairs, it is advisable to use original oil seals and bearings purchased in specialized stores. They can also be ordered online, but for this it is important to know the model of the Atlant washing machine (45Y82, 50C102, 50C82) and the part number.
Bearing in the Atlant washing machine
This is interesting: The plate does not spin in the microwave - what to do? causes of malfunction
Main elements
It is not difficult to understand how a washing machine works. All components are listed in the factory instructions, and a wiring diagram for connecting the components to the components is also shown there. You can highlight the main components of the machine and additional parts.
Basic elements include:
- electric motor;
- tank (can be made of plastic or metal);
- drum;
- drain pump;
- control module;
- shock absorbers, dampers, springs (necessary to suppress vibrations during machine operation);
- bearing unit;
- a heating element;
Having understood the structure of the Atlant washing machine, you can diagnose breakdowns and repair the equipment yourself, without turning to specialists.
This is the main set of components; without them, the Atlant washing machine will not be able to function. Knowing where each of the elements is located and understanding what it is responsible for, it is easier to notice improper operation of the machine and repair the equipment in a timely manner.
SMA tank
The washing machine tank is the largest element of this device. The schematic diagram of the washing machine clearly shows that it occupies almost the entire internal space of the unit. In the tank itself there is a drum into which the laundry is loaded. The tank is a plastic container with a drum, a tubular electric heater (TEN) and a thermostat inside.
For ease of repair, the tank is divided into two parts, which can be connected, depending on the model of the machine, with bolts or staples. The tank has mounting points for pipes. Water is filled and drained through them. Due to the large weight of this structure, the drum is secured from above through springs to the body, and from below it is mounted on shock absorbers that soften vibration.
Preparing for disassembly
In order for the work on disassembling the Atlant washing machine to proceed as quickly as possible, it is important to prepare properly.
First of all, collect the necessary set of tools:
- screwdrivers (phillips and flathead);
- pliers;
- wrenches and spanners;
- hammer;
- auxiliary elements (rags, basin or bucket).
A screwdriver and WD-40 liquid will maximally speed up the process of unscrewing fasteners covered with a layer of scale or rust. The second very important point is the preparation of the household appliance. The Atlant washing machine is pulled away from the wall and placed on a stable, flat surface. The device is unplugged from the outlet, the filler valve is closed, and the water supply and drainage hoses are disconnected.
How to determine if a bearing is damaged and replace it?
The main sign of wear is a humming noise when spinning. Squeaks and knocks are especially audible at high speeds. Open the hatch door, rotate the drum by hand, and rock it up and down. If play is visible and uneven rotation occurs, this indicates bearing wear.
Don't delay replacement. Following the moving parts, the drum shaft will begin to deteriorate, which will lead to the replacement of the cross. And this is an expensive repair.
Everything in the Atlant washing machine is collapsible, so you can replace it yourself. It is enough to follow the step-by-step instructions.
What you will need for repair:
- Set of screwdrivers (phillips, flat).
- Open-end and socket wrenches.
- Hammer.
- Bolt or chisel.
- WD-40 liquid for unscrewing stuck fasteners.
- Lubrication.
- Repair kit.
What bearings are in the Atlant washing machine? For example, element 6203+, 6204+oil seal 25*47*8/11.5 is suitable. It is advisable to buy original parts. You can find them in the online store or order directly from the supplier. If it doesn't work out, then Korean parts will do. They last longer than those produced in Russia.
Be sure to replace the oil seal immediately. This O-ring protects the moving parts from water ingress. The part is included in the repair kit.
Features of the machine
In a normal situation, all components and sensors of the washing machine work smoothly, without failures. Each element strictly performs its assigned functions. The process is controlled by the main control module, the “brain” of the machine. The board monitors the order of operations, receives and transmits signals, and ensures communication between components.
The most voluminous element of the washing machine is the tank. It is a large plastic or metal cylinder, the position of which is controlled by shock-absorbing springs and dampers. A drum made of stainless steel is placed in the container. It actively rotates during washing, thanks to the “wheel” attached through the cross. The pulley is spun by the drive belt, which in turn is driven by the engine. It is due to the increased speed that the laundry in the drum is washed.
Almost all automatic machines from the Belarusian manufacturer are equipped with plastic collapsible tanks.
After starting the wash, the drum begins to fill with water. The user, by pressing the “Start” button, sends a signal to the control board, which gives a command to the solenoid valve. It opens, liquid flows into the system, and the pressure switch controls the degree of filling of the tank. When the water reaches the desired level, the sensor will notify the “brain” about this, and the set will stop.
Next, the heating element is activated to heat the water to the set temperature. The control unit controls the stages of the cycle, moving from soaking to main wash, then to rinsing. In between, a command is given to the pump to drain the water.
This is exactly the general picture of almost every wash. In fact, there is nothing complicated in the principle of how the machine works. To understand even better how the machine works, you need to disassemble each of its components separately.
Instructions for dismantling the tank
Now we will tell you how to replace bearings. In most Atlant washing machines, the tank compartment is removed through the top of the machine, which makes the task a little more difficult. The dismantling steps will be as follows:
- take out the powder hopper;
- disconnect the top cover of the washing machine from the fastenings;
- remove the front panel, carefully as there is a control panel there;
- Unscrew the counterweight plate from its mountings and remove it.
- unscrew the screws and remove the water supply hose along with the powder receiving compartment;
- Now you need to disconnect the pipes;
- remove the back cover and disconnect the hoses and all wiring from the heating element and the engine;
- remove the lower tank shock absorbers;
- carefully remove the control unit;
- remove all drain and supply hoses;
- remove the cuffs;
- grab the springs and pull the tank compartment up.
Power unit
Yes, it also has its own motor, like a car and other similar equipment. It is the engine that rotates the drum, where, in fact, dirty laundry is washed. As a rule, torque is transmitted to the working container through a belt drive.
But some models are equipped with direct drive. It happens that the drum rotates manually, but when you try to start the washing machine, it does not rotate. In this particular case, the motor itself is faulty, which can be “treated” by repairing or replacing it.
The drum does not rotate
First, rule out the simplest reason - a broken door latch. If the lock is faulty, the drum will not rotate. To check, press the door button several times, it may be stuck.
If the drum in the washing machine is not mounted on a direct drive to the motor, but on a tension belt, the belt may come off. Move the engine down a little and adjust the belt tension tighter. Be careful not to overdo it. Too much belt tension will cause rapid bearing wear and failure. With the correct belt tension, when pressed, the belt moves about 12 mm. If your washing machine does not have a belt tensioner, the best alternative is to replace the belt with a new one.
Replacing the washing machine drive belt
Another possible reason for the drum stopping is a breakdown of the electric motor. In this case, you should contact a specialist.
How does the main node function?
The tank is the largest element of the SMA. At Atlant it is made of plastic, which explains the low cost of the equipment. Some manufacturers make containers from stainless steel; such equipment costs an order of magnitude more, but is considered more reliable. The tank in the body is located horizontally, but you can find models with a tank located at an angle.
A metal drum is built into the main tank, where laundry is placed for washing. The water is heated and mixed with the powder in the tank, then it penetrates through the pores on the walls of the drum to the clothes. The ribs present on the drum surface improve the quality of washing and help cope with dirt.
Very rarely, the “tank-drum” assembly is damaged in Atlant washing machines. This can happen if you do not comply with the amount of things allowed for loading, or if you do not install the machine at the level. Foreign objects can also pierce the plastic tank, for example, a bra wire, a nail, a hairpin, or a key that got inside the washing machine due to the user’s carelessness.
Causes of failure
There may be several reasons for this failure.
- Overload during washing when the weight of wet items exceeds the permissible load weight. In this case, there is an excessive load on the bearing assembly, which, in turn, reduces its service life.
- Oil seal that allows water to pass through. If water gets into the bearing through the seal, severe corrosion will occur, which will destroy the structural part in question.
- The machine is not level. Many people are faced with the problem of the machine “running away” from its place while washing. This happens because it stands crooked. This causes an imbalance at high speeds, and excessive vibration of great force causes the machine to move out of its place. This vibration negatively affects the bearings, since it is through them that vibration movements from the drum are transferred to the housing.
Causes and prevention of problems
The main causes of electronic module failure include:
- A manufacturing defect.
- Water gets on the board.
- Power surges in the network.
- Broken or damaged wiring by rodents.
- Violation of operating techniques.
Preventive measures to prevent board damage:
- Maintaining an optimal level of humidity in the room where the washing machine is located.
- Ventilate the appliance after each wash cycle. To do this, the hatch must be left open for several hours.
- Removing residual water from the cuff.
- Careful movement and transportation of equipment.
- Follow the operating rules specified in the User Manual.
How is water heated?
The water “reaches” the desired temperature thanks to the heating element. The heating element is located directly under the drum, on the back side of the housing. You can access the tubular heater by removing the wall and removing the drive belt.
The heating element is one of the most frequently damaged and replacement elements of Atlant washing machines.
The heater breaks down because:
- constantly comes into contact with hard water, as a result of which scale forms on its surface;
- the settled layer of limescale interferes with the heat transfer of the heating element, which leads to overheating and burnout of the element.
Therefore, it is better to avoid constantly using high-temperature washing modes. Especially, run several cycles in a row with water heating to 60-90 degrees. The heating element should be allowed to cool for an hour, and only then turn on a new program. If we talk about the power of the heater, it consumes approximately 1800-2200 Watts. These values are identical to those of other heating devices.
Disassembling a household appliance
By strictly following a certain sequence of actions, disassembling the Atlant washing machine will not be difficult.
Front loading
Unwinding a horizontal (front) loading washing machine begins by removing the top panel . To do this, unscrew the fasteners (two self-tapping screws). Then, slightly lifting it and moving it to the side, remove the cover from the body.
The second step is dismantling the back wall. To do this, you need to unscrew the fasteners and remove the panel from the body. The third step is dismantling the front panel. Here you will have to tinker a little. First, take out the powder receptacle, unscrew the control panel fasteners, and remove it from the body (before disconnecting the wires, you need to photograph their connection diagram).
At the bottom of the front panel, a small hatch is opened, behind the door of which the drain filter is hidden (it must be unscrewed).
There is a loading hatch in the central part of the front panel . It is necessary to open it and, by unscrewing the fasteners, remove the hatch locking device (located on the right side). Additionally, the clamp (a thin metal ring connecting the washer drum to the front panel) is dismantled. This is easy to do: carefully pry the ring off with a flat screwdriver and then pull it off the washing machine body.
As soon as all the auxiliary elements are removed from the front panel, the fasteners are unscrewed around the perimeter and the panel is removed from the body. The last step is to remove the side panels.
After the washing machine body is disassembled, access to all elements of the internal structure is available. They are removed in a certain sequence:
- After unscrewing the long mounting bolts, remove the heavy counterweight blocks (you will need the help of a friend for this work).
- Remove the heating element (located at the bottom of the washer under the tank). To do this, unscrew the central nut, carefully push the fixing pin, then carefully pry it off with a flat screwdriver and remove the heating element from the mounting socket. When disconnecting the wiring, do not forget to mark their location with colored markers.
- Remove the tank. To do this, disconnect the shock absorbers (springs), and then remove the drive belt. After unscrewing the fasteners and disconnecting the wiring, dismantle the washing machine motor. Only after the tank has been freed from all components and mechanisms can it be easily removed from the body and washed.
The final touch is to remove the pressure switch (the sensor is easy to find on the back panel of the washing machine body). Before removing the sensor, you need to photograph the wiring diagram, and then unscrew the fasteners and remove it from the panel.
The video will show you how to disassemble the Atlant washing machine:
From vertical
The disassembly of the Atlant top-loading washing machine proceeds according to the following algorithm:
- Using a Phillips screwdriver, unscrew the fasteners located on the sides of the case.
- Using a flat-head screwdriver, pry up the control panel and carefully disconnect it. Before removing the panel from the case, you need to tilt it slightly to the side and photograph the wiring diagram.
- Lifting the lid, unscrew the screws holding it. Additionally, we unscrew the bolts hidden behind the sealing collar. After all fasteners have been removed, the washer cover can be removed from the body.
- Loosen the clamp and disconnect the rubber pipes.
- After unscrewing the screws, remove the side panels.
- After unscrewing the bolts, remove the front panel.
In the Atlant washing machine, the tank cannot be removed from the body. By disassembling the body of the household appliance, access only opens to:
- drive belt (if necessary, remove it from the pulley wheel),
- electric motor (by unscrewing the fasteners and disconnecting the wiring, it can be easily removed from under the tank),
- drain pump (before dismantling it would be a good idea to photograph the wiring diagram and hose location).
What is the structure of the electronic unit?
The solution in this case may be the ability to connect Samsung equipment not directly, but through a stabilizer. The progress of filling the loading tank with water is carried out gradually and is also regulated electronically.
Repair of a thyristor unit Repair of this unit should be carried out only after checking for faulty capacitors.
In the instructions for the equipment, the manufacturer gives several recommendations in case the machine does not turn on: It is necessary to check the connection network and the integrity of the wire; Check that the inlet hose is connected correctly; Make sure the door is closed tightly; It is also necessary to pay attention to the parameters of the selected washing program, the absence of a wash delay.
What may indicate a malfunction and subsequent repair of the circuit board in the washing machine: SMA displays an error code on the display. From the second anode A2 of this triac, the signal arrives through a resistive voltage divider to the pin. Naturally, such modules will not work, since they must first be loaded with firmware files corresponding to certain SM models. The winding diagram can also be found on the Internet.
We recommend: How to connect a triple socket
The water overheats or does not heat up, which does not correspond to the selected mode. Indesites-Aristons, there are also about five boards lying around, with Electrolux and Zanusi processors, very rarely in the sense of which I could not repair - There is only one LG Electrolux board in my home collection - There is not a single one that I could not repair, despite the inconvenience of repair.
Indesit-Ariston, there are also about five boards lying around, with the processors. The diagram of the control module of a Samsung, Ariston, Indesit or other popular brands of washing machine allows you to understand the sequence of connections of the circuit components and the functions of each component. Any person, even those far from physics, can understand this scheme.
About the mechanism as a whole
After this, you can mount a new trigger. It is easy to eliminate such troubles if the protection systems prevented an accident. The capacitor is always soldered only to the positive electrode in the block.
General information A distinctive feature of the VEKO SM electronic modules under consideration is that, despite the various functionality of the SM, their “electronic filling” undergoes almost no changes with the exception of the external components of the electronic module as part of the SM. It is worth noting that some manufacturers strive to completely eliminate this problem. Any person, even those far from physics, can understand this scheme. Repair of the Samsung WF-R862 washing machine module. Doesn't turn on.
Video
We invite you to watch a video on how to disassemble a Samsung washing machine at home.
About the author:
She graduated from the Institute of Tourism of the Federal Pedagogical University with a degree in Management, loves to travel and communicate with people. She is interested in psychology, enjoys dancing, and studies English. During the five years of maternity leave, I thoroughly mastered housekeeping, not forgetting about my own development. He skillfully uses words and can support a conversation on any topic thanks to his interest in different areas of life.
Found a mistake? Select it and click the buttons:
Ctrl + Enter
Interesting!
There are a variety of balls that are used in the washing machine. Antistatic ones will prevent the fabric from sticking to the body after washing, balls with special loops will “comb” the lint and prevent the appearance of pills, and silicone ones with pimples will prevent fluff from matting when washing outerwear.
What makes the drum move?
The drum spins to the specified speed thanks to the washing machine motor. The engine, through a drive belt and pulley, accelerates the tank to the desired speed, ensuring high-quality washing and spinning. The maintenance-free service life of an engine depends on several parameters, primarily on its type. Inverter motors are more reliable and durable than commutator motors.
Atlant brand washing machines have collectors - they are cheaper than inverters, but at the same time they are inferior to the latter in several characteristics. Commutator motors are too sensitive to voltage surges and require regular maintenance, for example, replacing brushes when they wear out. You can take this feature into account and connect the automatic machine through a stabilizer - then you won’t have to worry about changes in the power supply. As for electric brushes, this is a simple repair that takes a little time.
Water is poured into the drum according to the following principle:
- the user starts the wash by pressing the “Start” button;
- the module commands the solenoid valve to open;
- the pressure in the system decreases, water begins to flow into the tank;
After this, the machine starts heating the water and the main wash. When the water needs to be drained, the module signals this to the pump. The pump begins to pump out water and discharge it through the pipes into the sewer. The level sensor, noticing that the tank is empty, notifies the control unit. When the washing is completed, the “brain” stops the drainage system, makes sure that all elements of the machine have finished working, and turns off the hatch lock.
A RemBytTech service engineer will advise you on the approximate cost of repairs based on the description of the fault. To contact him, leave a request for a cost estimate. The technician will call you back within a few hours. Below is a standard price list for types of repair work for Atlant cars with warranty periods.
| Type of work | Cost* (work only) | Cost* (work only) | Working hours | Guarantee |
| Visit of the master | For free** | For free** | Within 24 hours | — |
| Diagnostics | For free** | For free** | 10-40 minutes | — |
| SMALL REPAIR | ||||
| Replacing a button | from 1100 rub. | from 1100 rub. | 30-50 minutes | 6 months |
| Replacing the hatch handle | from 1400 rub. | from 1400 rub. | 30-40 minutes | 6 months |
| Replacing the door hinge | from 1300 rub. | from 1300 rub. | 20-30 minutes | 6 months |
| Sunroof glass replacement | from 1400 rub. | from 1400 rub. | 30-50 minutes | 6 months |
| Replacing the hatch | from 1300 rub. | from 1300 rub. | 20-40 minutes | 1 year |
| Opening the hatch without repair | from 1100 rub. | from 1100 rub. | 20-30 minutes | — |
| Replacing the mains filter (FPS, starting capacitor) | from 1500 rub. | from 1500 rub. | 30-50 minutes | 6 - 12 months |
| Replacing the drain hose | from 1300 rub. | from 1300 rub. | 20-40 minutes | from 1 to 2 years |
| Replacing the inlet hose | from 900 rub. | from 900 rub. | 10-20 minutes | 1 year |
| Replacing the drain filter | from 1400 rub. | from 1400 rub. | 20-50 minutes | 1 year |
| Replacing the detergent dispenser | from 900 rub. | from 900 rub. | 10-20 minutes | 2 years |
| Cleaning the drain filter | from 1100 rub. | from 1100 rub. | 15-30 minutes | — |
| Cleaning the filler filter | from 1100 rub. | from 1100 rub. | 15-30 minutes | — |
| Replacing the drive belt | from 900 rub. | from 900 rub. | 20-50 minutes | 9 months |
| Removing shipping bolts | from 1200 rub. | from 1200 rub. | 20 minutes | — |
| MEDIUM REPAIR | ||||
| Replacing the heating element | from 1500 rub. | from 1500 rub. | 30-60 minutes | 6 months |
| Replacing the drain pump | from 1700 rub. | from 1700 rub. | 30-70 minutes | 6 months |
| Replacing the hatch cuff | from 1700 rub. | from 1700 rub. | 40-90 minutes | 1 year |
| Finding and eliminating blockages in the drain tract | from 1200 rub. | from 1200 rub. | 20-70 minutes | — |
| Replacing UBL (hatch lock) | from 1400 rub. | from 1400 rub. | 30-60 minutes | 1 year |
| Replacing motor brushes | from 1500 rub. | from 1500 rub. | 30-70 minutes | 6 months |
| Motor repair or replacement | from 2100 rub. | from 2100 rub. | 40-80 minutes | 1 year |
| Replacing shock absorbers | from 2300 rub. | from 2300 rub. | 40-90 minutes | 1 year |
| Replacing springs | from 2000 rub. | from 2000 rub. | 30-70 minutes | 1 year |
| Replacing the pressure switch (level sensor) | from 1700 rub. | from 1700 rub. | 40-60 minutes | 6 months |
| Replacing the filling valve (KEN) | from 1600 rub. | from 1600 rub. | 30-60 minutes | 6 months |
| Remove foreign object | from 1400 rub. | from 1400 rub. | 30-70 minutes | — |
| Replacing the control or display unit | from 2100 rub. | from 2100 rub. | 30-80 minutes | 1 year |
| Repair of control or indication board | from 2600 rub. | from 2600 rub. | 40-90 minutes on site or 2-3 days (taken to the workshop) | 6 months |
| Replacing the program selector | from 2100 rub. | from 2100 rub. | 30-70 minutes | 6 months |
| Repair or replacement of aquastop | from 2100 rub. | from 2100 rub. | 30-90 minutes | 1 year |
| Repair or replacement of pipe | from 1600 rub. | from 1600 rub. | 30-70 minutes | 1 year |
| Replacing the drum pulley | from 1700 rub. | from 1700 rub. | 30-50 minutes | 1 year |
| Replacing the temperature sensor or thermostat | from 1400 rub. | from 1400 rub. | 30-60 minutes | 6 months |
| Replacing the drying heating element | from 1700 rub. | from 1700 rub. | 40-80 minutes | 6 months |
| Replacing the drying fan motor | from 1900 rub. | from 1900 rub. | 40-80 minutes | 6 months |
| Replacing the wiring harness | from 1600 rub. | from 1600 rub. | 40-80 minutes | 2 years |
| Replacing the circulation pump | from 2100 rub. | from 2100 rub. | 40-70 minutes | 6 months |
| Replacing the upper counterweight | from 1900 rub. | from 1900 rub. | 30-60 minutes | 2 years |
| Replacing drum curtains (for top-loading machines) | from 2000 rub. | from 2000 rub. | 40-70 minutes | 6 months |
| COMPLEX REPAIR | ||||
| Bearing replacement | from 3500 rub. | from 3500 rub. | 1-4 hours | 1 year |
| Replacing the cross | from 3000 rub. | from 3000 rub. | 1-3 hours | 2 years |
| Replacing the tank or drum | from 3700 rub. | from 3700 rub. | 1-3 hours | 1 year |
| Replacing the tank support | from 3500 rub. | from 3500 rub. | 1-2 hours | 1 year |
| Replacing the lower counterweight | from 3700 rub. | from 3700 rub. | 1-2 hours | 2 years |
| Replacing drum curtains with tank disassembly | from 3000 rub. | from 3000 rub. | 1-3 hours | 6 months |
*The cost of spare parts is not included. **Payment for on-site and diagnostics is charged only if you refuse further work (400 rubles).
Basically, the price is affected by:
- complexity of the work ahead;
- need to use spare parts.
The final price is calculated after diagnosing the washing machine, when the exact cause of the malfunction becomes known.
Other body parts
The main part of the design of an automatic washing machine has been described above. But there were some elements that were not mentioned:
- powder hopper;
- counterweights;
- washing machine body;
- hoses.
Powder hopper
The dispenser compartment contains a tray for powder and rinse aid. This compartment is connected to pipes through which water is supplied to flush out detergents.
The design of the Zanussi automatic washing machine differs from other models in the presence of the Jet System, which, thanks to the constant circulation of the washing solution, evenly saturates the laundry during soaking. The unit is able to determine the moment when the fabrics are well saturated and it’s time to turn off the water supply.
Counterweights
To balance the vibration that occurs when spinning clothes, a system of counterweights is installed in the machine body. They look like concrete blocks that are attached to the top and bottom of the tank.
SMA Corps
If you remove all the internal parts from the machine, you will be left with a body containing a loading hatch and a top cover. The body is the frame of the machine to which all the elements and components of the washing unit are attached.
Hoses
To fill or drain water from the machine, hoses are connected to it. The drain is discharged into the sewer or into a special container. The filler is connected at one end to the water supply and the other to the SMA.
The operating principle of an automatic washing machine was discussed above. And having understood how this unit works, you can begin to study its individual parts and mechanisms. But there are SMAs with vertical loading, for example – Ardo. The design of such washing machines differs in the placement of the loading hatch, and in some internal design features developed for this type of unit.
A brief overview of the MCA units, of course, will not help you with repairs, but knowing the device, it is easier to find the cause of the machine malfunction and study the unit that has failed more thoroughly.
"Brain" of the machine
Continuous communication of all components with each other is possible thanks to electronics. The control module is the “brain” of the washing machine, coordinating the actions of all nodes, issuing commands and monitoring their implementation. The board consists of numerous semiconductor components. Communication with other parts of the machine is carried out along electrically conductive paths.
Modern washing machines are equipped with a self-diagnosis system. It notices any failures and malfunctions in the operation of the equipment and notifies the user about them by flashing the display or displaying an error code on the screen.
It is the “brain” of the unit that sets the algorithm of actions when choosing a specific washing program. The sequence of operations and settings of each mode are programmed in the intellect, the user only has to launch the desired one through the control panel. Some Atlant models offer the possibility of adjusting factory washing programs. So, the user can change the temperature of water heating and the spin speed.
Removing the cover
Often the need for dismantling work arises when there is a breakdown inside the housing. If you are faced with a breakdown of your washing machine, you need to figure out the cause of the malfunction - this is where disassembly will be necessary. In many cases, it starts with removing the cover.
If you are interested in which washing machines have the top cover removed, then the first answer to the question will be: SM with front loading. In the article we will consider whether it is possible to do this yourself.
As for brands and models, it happens that under the same brand there are different model lines, in which the covers are removed in different ways, or maybe not removed at all.
Removing the top cover of the washing machine does not require careful preparation, and all you need is a screwdriver - give preference to the Phillips type.
Remember to be safe: Before removing the cover, unplug the power cord by removing the plug from the outlet. Then proceed like this:
- Pull out the machine for convenience and unscrew the mounting bolts (located at the back).
- Move the panel back slightly by pushing it slightly.
- When it comes out of its grooves, you can easily remove it.
- Now nothing prevents you from getting inside the SM housing to carry out the necessary checks and repairs.
Knowing how to open the top lid of a washing machine automatically gives you the idea of how to close it. To replace the panel, you need to place the front part in the grooves and push it forward. At the very end, the fasteners are screwed in.
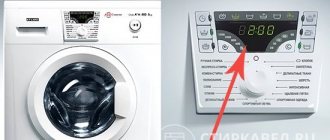
Fault codes for Atlant washing machines
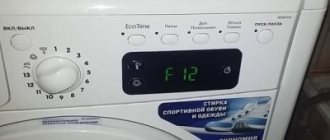
There are problems that are most common in Belarusian washing machines. The breakdown can be expressed as an error code (door, none, sel, F2, F3, F4, F5, F6, F7, F8, F9, F10, F12, F13, F14). Judging by user reviews, the most common ones are:
- Door - the washing machine door (SM) is not blocked. The cause may be a broken lock or locking device.
- F2 - no water heating. The point is incorrect readings of the temperature sensor or combustion of the heating element.
- F4 - water drains from the tank very slowly or does not drain at all. It is worth checking the pump and the hoses supplying it.
- F5 - water does not enter the system. Diagnostics of the filler path is required.
All fault codes are listed in the operating instructions. Why does equipment break down? Here are the main reasons:
- Poor water quality.
- Items left in pockets that fall into the drain and damage parts.
- Poor quality powder or excess of it.
- Natural wear and tear.
As you can see, violation of operating rules is not the last place on the list. If you often overload the drum with laundry or wash items with small decor without a bag, this may lead to breakage of one of the units.
Disassembling the washing machine and its subsequent repair
The error codes that many washing devices display on the display will help you identify what exactly is broken.
Suppose, in order to understand that the bearings are predisposing to failure, you should open the hatch door and lift the drum with your hand. If there is play, then the problem is really in the bearings.
Here are some common breakdowns and how to fix them.
Replacing the heating element
Let's look at how to replace a water heating element.
- If the water stops heating, the heating element should be replaced. Buy a part that suits your machine, then find a diagram of a specific type of machine. As a rule, simply removing the back panel of the washing machine helps.
- Under the tank you will see the end part of the heating element and the terminal. It is better to capture their location by taking a photo on your phone.
- The wires and terminals should be disconnected and the central screw should be loosened. Next, using a screwdriver, pick up the heater by the edge and try to loosen it from side to side, pulling it slightly towards you.
- You are cleaning the interior of the repair site.
- Install the new element, tighten the screw and connect everything according to the photographed diagram.
Pump and drain system
Quite often, the problem appears in the drainage system (water either stops draining altogether, or flows out, but very slowly). First, you should check the filter, which is located behind the base service panel and the hoses that go from it to the pump and back. It is in this gap that a blockage appears, which is not at all difficult to remove.
“To check the functionality of the pump, you can remove it from the device”
Sometimes it happens that foreign objects could damage the impeller of the washing machine. In such cases, the pump will have to be replaced with a new one.
Assembly
If during disassembly you photographed everything you needed, then after that it will be enough to carry out all the work, but only in the reverse order.
It can be quite difficult to install the retaining spring in place. For convenience, secure it with wire at the top, and then tighten it counterclockwise.
And in conclusion…
It is quite possible to make repairs, clean or change a part in the tank of an automatic washing machine, as the experience of many home craftsmen shows.
Other “filling” of the washing machine
To fully understand how a front-facing washing machine works, you will have to understand not only the main components and sensors, but also additional elements. Although we consider these details as secondary, in fact, without them the machine will not be able to perform its functions. Any, even the smallest element plays an important role in the design of the device.
So, we are talking about the following components:
- door cuff. The sealing rubber ensures the tightness of the system;
- locking device. It is activated by the “brain” after mechanically closing the hatch and starting the wash. When the UBL has triggered, it will be impossible to simply open the door until the end of the cycle;
The control module automatically activates the UBL after starting the washing mode.
- drive belt. It is he who transmits the impulse from the engine to the drum pulley, after which it spins the container to the required speed. If the elastic band breaks or slips, the wash will stop and the drum will “freeze” in place;
- counterweights. These are concrete blocks necessary to give the machine stability. Without them, the washing machine will not be able to withstand the centrifugal force that occurs when the drum moves;
Having understood how the Atlant washing machine works, you can independently analyze the operation of the equipment and notice the first “symptoms” of breakdowns. It is important to read the factory instructions to understand the design of the “home assistant” and promptly fix minor problems.
Interesting:
- How does a Whirlpool washing machine work?
- How does a Zanussi washing machine work?
- How does a Kandy washing machine work?
- How does an Electrolux washing machine work?
- How does a Hansa washing machine work?
- Reviews of Atlant washing machines
- Share your opinion - leave a comment
Troubleshooting
Let's look at how to repair a Samsung washing machine yourself.
Samsung machine does not pump out water
You need to check the drainage system: most often the cause is a clogged drain pipe or pump.
- Unplug the machine and turn off the water.
- Disconnect all communications.
- Remove the dispenser tray by pressing the lock in the center.
- Open the drain filter hatch on the front panel from the bottom.
- Drain off any remaining water and clean the filter.
- Lay the SM on its side, open access to the bottom.
- Having found the location of the pump and pipe, loosen the pipe clamps.
- Disconnect the pump wires.
- Unscrew the screws securing the pump.
- After removing the pump, check it for blockages.
- Remove the pipe and wash it to remove any dirt.
Carefully inspect the pipe for damage. Most often, it loses its tightness at the places where the clamp is attached. If the pipe or pump malfunctions, new elements must be installed.
No heating
To check and replace, you need to get to the heating element. Based on how the Samsung washing machine is structured, we can conclude: to get the heating element, you need to remove the front casing of the washing machine.
We repair the washing machine ourselves:
- After disconnecting the SM from the network, unscrew the screws securing the top panel from the back.
- Pull out the dispenser tray. Unscrew the bolts located behind it.
- Unscrew the remaining mounting bolts and remove the control panel of the Samsung washing machine.
- Remove the bottom panel.
- After bending the hatch cuff, pry up the metal clamp and remove it.
- Place the cuff inside the drum.
- After unscrewing the door lock screws and disconnecting the wires, remove the front panel.
- At the base of the drum there is a heating element.
- Disconnect the heater wires.
- Unscrew the central nut (not all the way).
- After pushing the central bolt inward, remove the heating element.
- Remove the thermostat from the heater.
If the thermostat is working properly, simply replace it with a new heating element. Installation is carried out in the reverse order, after which the housing is installed.
Doesn't take up water or fills up too much water
The reason for the lack of water may be a blockage. When repairing a washing machine with your own hands, first of all:
- Turn the shut-off valve.
- Check to see if the water pressure in the tap is sufficient.
- Inspect the inlet hose. Maybe he was bent, twisted.
- Disconnect the hose and rinse under pressure from the tap.
- Remove the inlet valve mesh filter.
- Clear it of any blockage.
If an excessive amount of water enters the machine, you need to check the fill valve.
- Having removed the top panel of the CM, you will see the inlet valve on top of the wall.
- Disconnect the valve wires.
- Unscrew the fixing bolts.
- Loosen the clamps and disconnect the hoses.
If the valve is generally in good condition, replace the rubber seals. If not, install a new part.
Drive belt wear
To replace the belt, you need to know how to remove the back wall of a Samsung washing machine:
- After unscrewing the bolts, remove the back panel.
- Remove the old belt from the pulley.
- If inspection confirms belt wear, install a new element.
- Begin to slide the belt onto the engine pulley by moving and turning the drum pulley.
Now you know how to repair a washing machine without calling a technician.
Samsung machine is noisy
When washing, did the SM begin to vibrate strongly, hum, or make noise? Check whether the installation is correct and how stable the equipment is on the floor.
A more serious cause of noise is bearing wear. To replace it, you need to know the device or have a diagram of a Samsung washing machine. Changing bearings is described in detail in the video:
SMA does not respond to button presses and does not turn on
The reason may be in the control panel. You need to check the contacts of all the buttons, perhaps they are stuck, or the keys themselves have been pressed through.
Another problem lies in the electronic board. Repairing the control module in a Samsung washing machine is not an easy task, so it is better to contact a service center. Of course, before contacting, you can inspect the board yourself:
- After removing the top cover, pull out the detergent tray.
- Remove the screws holding the control panel in place.
- Unclench the plastic latches and disconnect the wires.
- Unlock the block latches, remove the cover and remove the board.
Visible damage can be caused by burnt elements and paths. If nothing is noticeable visually, contact service.
Having studied typical malfunctions, you learned how to repair and repair a Samsung washing machine with your own hands.
When starting repairs, do not forget about safety precautions. This video will help you:
Source
What difficulties might arise and what should be done in this case?
In the process of independently disassembling and assembling the Atlant washing machine, you may encounter some difficulties.
First of all, difficulties are associated with unscrewing fasteners. To facilitate and speed up the process, lubricant must be applied to the thread or joint between the fastener and the part.
The second point is that it is impossible to remove the tank from the housing . As a rule, this problem can be solved very simply. It is enough to carefully check that all fasteners are disconnected, paying special attention to the shock absorbers under the tank.
The third point is that upon completion of reassembly, the inlet and drain hoses begin to leak. To fix the problem, you need to tighten the compression rings and coat the threads of the connection with sealant.
And one more, very unpleasant situation - there are not enough parts during reassembly . Most often, the problem can be prevented if, during the disassembly process, you carefully lay out all the dismantled parts on a flat surface, labeling and numbering each element. All small parts, as well as fasteners, are placed in separate small containers (boxes).
Bearing replacement instructions
Now all that remains is to dismantle the old bearing and install a new one, it all looks like this:
- remove the front counterweight;
- unscrew the bolts that hold the front of the tank;
- turn the tank upside down, that is, with the pulley up, and unscrew the bolt in the center, then remove the pulley and belt;
- after which the drum can be safely removed from the tank, which is what we do;
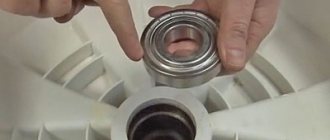
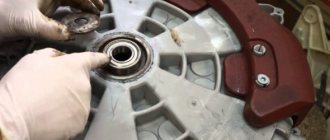
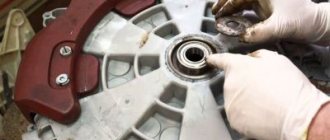
- now, using chisels, knock out both bearings;
- After dismantling two bearings, the landing site for new parts must be thoroughly cleaned. This is exactly what WD-40 lubricant was needed for; when you remove all the dirt, wipe the area dry;
- Now carefully install both bearings, first the outer and then the inner, driving them in with light blows of a hammer;
- from the inside, install the oil seal after lubricating it. It will prevent water from entering the bearing itself.
The replacement is complete, all that remains is to reassemble everything in reverse order. However, before this, it is advisable to look at other parts of the main compartment of the washing machine, and make sure that they do not need to be changed or cleaned, such as the anti-scale heating element and other little things.
We told you about how to replace a bearing in an Atlant washing machine; this operation is not that complicated. However, if you do not want to repair the washing machine yourself, or are afraid of damaging something during the replacement, it is recommended to call specialists who will do everything quickly and efficiently.
- 7 best Gorenje washing machines according to customer reviews
- 7 best washing machines under 20,000 rubles according to customer reviews
- 8 best narrow washing machines according to customers
- 8 best BEKO washing machines according to customer reviews
- 10 best washing machines from Samsung