In Samsung washing machines, the electric tubular heater (TEH) is located on the flange - often the fuse is also located there. This is relevant for many models. The main function is obvious - heating water for washing. Next, we will look at the reasons why the heating element breaks down in Samsung washing machines and how to replace it with your own hands.
What causes the crash
The first sign of a heater malfunction is washing in cold water (if you select a high temperature mode). The machine washes in cold water due to a breakdown of the water heating system as a whole.
If you, for example, have a SM Samsung Diamond, then error code H1 will appear on the display, and the wash will end early. The reasons may be:
- malfunction of the control unit;
- temperature sensor failure;
- heater failure.
Most often, the heating element fails due to poor water quality. If the water in the water supply system is too hard, when washing at high temperatures, and especially when boiling, scale forms on the heating element.
If you do not carry out periodic preventive maintenance and do not deal with water hardness and scale itself, the layer becomes thicker. Over time, the heat generated by the heating element stops passing through the thick coating, and the heater burns out.
You may not notice it right away, but when the clothes stop washing or the error code comes on, everything will become clear.
Reply to the post “Washing machine with dryer. Pros and cons", or Candy, and programmed aging
I apologize to the public, I broke the title and, accordingly, the link to the parent post. I correct my mistake and add the required link. Washer-dryer. Advantages and disadvantages
So, let's go. The story will be about the older (by age) brother of this device - Candy-264 with drying. He came into my service in 2016, for the first year and a half or two he buzzed like a bee almost every day. Of the minuses: a narrow machine with underweight counterweights can’t help but jump during the spin cycle. No matter how you level it, no matter how solid the foundation it stands on, it will still go for a walk around the apartment during the spin cycle. At least 16 kg of weight was missing, I checked by placing weights on the lid. This problem was overcome by two anchors with rings in the floor, and a car luggage belt with a ratchet, with which she was forever chained to her place. But then, after two or two and a half years, breakdowns began. First, glitches began with the “start” button not turning on. The button turned out to be complete guano and was replaced with an analogue from “chip and dip” for 20 rubles (much better quality) because The control board assembly costs obscene money. Then the drive belt began to creak. The belt is a rare size, 5-ribbed, the original service centers sell for 4-5 rubles, and you have to wait. If you search, you can find much cheaper analogues, but only on order, because... The machine does NOT have a mechanism for adjusting the tension, and the size may not be correct. I didn’t look for adventures, but simply treated the rivulet part of the original belt with an alcohol-rosin solution. The creaking and slippage have disappeared and have not reappeared for two years. Then glitches began with filling with water. The machine began to overflow, filling the drum more than half with water, and poured out errors, the numbers of which I, alas, forgot. Yes, I don’t care, because... Google did not report anything sensible about them. But you and I are smart adults, and we know where to look for the problem? That's right, the pressure switch is to blame for underfilling and overfilling.
Article on the topic: How to use a washing machine
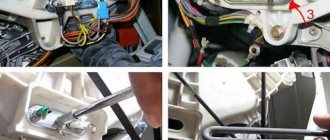
It can be seen in the corner of this photo. A gray tube made of shitty plastic goes from it to the very bottom of the drum. When the drum is filled with water, its pressure (depending on the level) is transmitted through this tube by air to the pressure switch, and it gives the command to stop drawing water. But the tube is made of shitty plastic, and was laid stupidly, with a bend, and at the site of this bend it broke. The air pressure was released through the hole, the pressure switch was malfunctioning. He spliced the pipe and rerouted it. Couldn't they have chosen a better material, like silicone? A year later, the same song again: overflowing water. It turned out that due to the fact that the tube was connected to the drum from below and at an unfortunate angle, it became clogged with dirt and lint and the pressure switch turned off the water supply at the wrong time. Okay, washed, reassembled and repaired again. This year, just when it was damp and cold, the dryer failed. The program runs, but the laundry is wet. Let's find out.
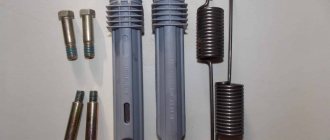
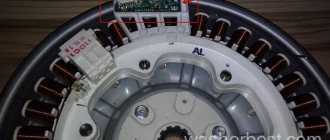
Here in the photo above, you can see a hair dryer snail with a heating element unit, a hair dryer motor, and on the snail body there is a block of return thermal fuses that have tripped. Below is a close-up photo of the thermal fuse.
Pressing the pins turns them back on. I turned on the pre-heater, the heating element rang - it turned out to be intact. Suspicions fell on the engine. And they were confirmed.
The plastic of the winding cheeks is non-heat-resistant shit, it began to dry out and crumble, a piece fell off and the winding terminal came off. I was able to restore the cheeks, soldered the winding, and the hair dryer engine came to life. Assembly unit - 6500 (snail without heating element with engine). Why not make the linings from heat-resistant plastic? Fuck it, it's some kind of nonsense. These are the pies. For now, the machine is washing and drying. I'm looking forward to the next one falling off. I suspect that the control unit kicks in; sometimes it malfunctions and does not start the program, despite pressing the “start” button. Treated by attention to the cord from the outlet. It would be necessary to reflash it, but there is no in-circuit programmer and I haven’t found the firmware yet. True, I didn’t really look for it. I am sincerely convinced that plot devices such as the lack of tension adjustment and the use of shitty plastics that are unsuitable for the task are the direct intention of the manufacturer.
How to find a part
To get to the heater, it is not enough to simply unscrew the back cover, as in Ariston or Indesit models. In Samsung cars, the heating element can be located in the front and rear . We'll show you how to remove it from the front. To do this you need to remove the front wall.
On the front panel there is a loading hatch, a powder dispenser, a control panel - you understand that removing this is somewhat more difficult than simply unscrewing 4 bolts. Don't worry, we will tell you in detail how to replace the heating element in your washing machine.
Attention! Don’t get upset ahead of time: you won’t have to turn the machine around or disconnect it from communications, the repair will be much “cleaner.”
Let's take a closer look at how to remove the heating element from a Samsung washing machine, starting with the front panel:
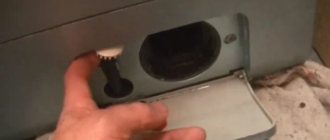
- Remove the drain filter to easily drain any water remaining in the tank.
- Remove the detergent dispenser (there should be a small button inside, pressing which you can easily remove the part).
- After removing the dispenser, you will see a couple more fasteners, unscrew them.
- Another bolt is located on the right, on the control panel - it also needs to be tightened.
- Slide the panel without removing it
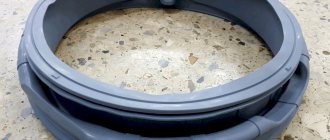
- Take care of the loading hatch: use a thin screwdriver to pick up the clamp that holds the rubber cuff. Turn the cuff itself inside - into the drum.
- At the bottom you will find another small panel, near the garbage filter. It is held in place by fasteners that also need to be unscrewed. For convenience, the panel itself can be pryed off with a thin screwdriver.
- Along the removed wall there will be 4 more fasteners waiting for you, which were previously covered with a panel. Unscrew them.
- Lift the control panel and place it on the top cover of the housing. In the place where the panel was, you will only have to unscrew three more screws.
Important! When working with the control panel, do not break the wiring, so as not to complicate the repair.
- Now all that holds the front part of the machine body are two small hooks. To make them release the panel, grab it at the bottom by the corners and lift it up - it can be easily removed.
Important! Do not pull the panel sharply or forcefully, so as not to break the interlock wiring. Your task is to move the wall away so that it does not interfere with access to the heater, so you don’t need to disconnect anything - just put it next to it.
- Return to the control panel, now it is out of your way, so lower it down so that it does not fall off the cover during repairs.
Now you know what work needs to be done before removing the heating element from the Samsung washing machine. After removing the wall, you will immediately see the heater shank - it is located under the tank.
But don't rush to make a replacement! You must first check everything, make sure that the heating element is faulty, and then decide: to change or not to change.
Self-repair instructions
The procedure for replacing the heating element of a washing machine is as follows:
- First determine which side the heater is located on. Move the body away from the wall and turn it towards you. If the back cover is large, most likely the heating element is squeezed under the tank from the back side. There will be less work here. If the lid is medium in size, through it you can only get to the washing machine belt, and the heating element is clearly located below, but in front. You will have to completely disassemble the front panel, which will take more time than in the first case.
- Having determined the position of the heater, it’s time to move on to disassembling the housing (you can see instructions for disassembling washing machines of different brands here). First, unplug the device to avoid electric shock. If the heating element is located at the rear, disconnect the water supply, drain hose, drain the remaining water from the machine (this can be done by lowering the drain pipe below the level of the device body or using a special drain filter).
Then there are 2 options:
- If the heating element is behind the back cover, remove it.
- If it is behind the front, remove the cover from above, pull out the tray into which detergents are poured (it is attached with self-tapping screws and secured with a latch. Carefully remove that too). Pull the steel hoop off the seal. It is held by a spring - stretch it a little. Next, remove the seal, the door blocker (disconnect the wires from the blocker), and remove the front panel.
- The next step is replacing the heating element.
It is held in place by only one nut, but before unscrewing it, disconnect the power terminals, wires from the temperature sensor, and grounding. To unscrew the nut, take a socket wrench (if you don’t have one, take an open-end wrench). Unscrew the nut slightly (not all the way, but to the length of the thread), then, pressing the pin inward (this will allow you to pull the part out of the seat), unscrew the nut completely. Use a screwdriver to pry the heating element around the perimeter and slowly tear it away from the rubber. This is done with loosening movements. - Check its functionality.
- When you go shopping for a new heater, take your old one with you. This will allow you not to make a mistake when choosing a new one, because different heating elements are produced for each model. The part may differ by literally a few centimeters or even millimeters. This is done in order to assign a new series to a line of devices and sell them at a new, higher price. And heating elements are no longer interchangeable.
- Over time, the installation site becomes covered with a layer of calcium and carbon deposits, so it must be cleaned before work. Do not ignore the tank (how to repair a washing machine tank with your own hands?). Help yourself with a flashlight.
- Loosen the nut and insert the new heater into place. Tighten and connect all wires.
- Carry out a test: pour a little water into the tank, turn on the heat for a few seconds. After turning it off, touch the heating element. If it is warm and there are no water leaks, screw on the remaining parts.
Article on the topic: How to disassemble the Ariston avsd 109 washing machine
Examination
We have already said that before removing the heater in a Samsung washing machine, it is worth checking it. This is completely justified: suddenly the heating element turns out to be in good working order, and it does not have to be changed (this happens when there is a failure in the electronic unit).
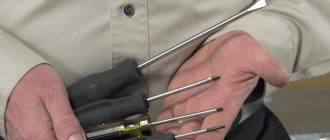
All you need to test is a regular multimeter; People know him better as a tester.
Proceed like this:
- Set up the tester: select the resistance test mode, set the lowest value (in Ohms).
- Remove all wires from the contacts and the temperature sensor (built into the heating element). This work must be done carefully so as not to break the wiring.
- Place one probe against one heater contact, the second one against the second.
- Based on the value obtained, you evaluate the situation: if it shows you in the range between 25-30 Ohms, then the heating element is working. Did you see 0 or 1? The heating element in the Samsung washing machine will need to be replaced.
Buying a heater
As a rule, it is impossible to repair the heating element in a Samsung washing machine, so you need to change it.
Before removing the old heating element, buy a new one. But be extremely focused on the purchase, the new item must fully match your model and brand of SMA. If in doubt, then first you need to get the part and take it with you to the store.
You can also order an element in an online store, you can often find it cheaper there. But be careful - do not buy too cheap spare parts. On average, the price of a heating element for SM Samsung varies in the following range: 500-1500 rubles.
Knowing which heating element is installed in your Samsung washing machine, you should choose a similar one - not only in appearance, but also in power.
Important! The heater power in SAMSUNG models is usually 1850 or 1900 Watts.
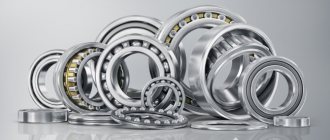
Manufacturers of heating elements for washing machines
The most famous manufacturers of heating elements for washing machines are TERMOWATT and IRCA. They supply their products to such giants as Ardo, Ariston, Electrolux, Candy, Bosch, Beko and a number of other world-famous brands, including Gorenje, LG, Euronova, Hansa, Samsung, Siemens, Whirlpool, Zanussi and other top manufacturers washing machines.
Article on the topic: How to break an air conditioner from the street
Today, on the washing machine market, not the original models of heating elements, but their cheaper analogues, are becoming increasingly common. The same models (originals and copies) are often noticeably different from each other. The following fluctuations are allowed: • for the length of the heater: plus/minus 2 cm; • heater power: plus/minus 100-150 W; • if there is a bend, you need to ensure that its degree exactly corresponds to the norm; • a similar situation with terminals, which explains that there are one- and two-terminal models.
Heater replacement
If you removed the front panel and already bought a new part, then it’s time to repair the machine. Let's figure out how to get the heating element without much hassle:
- Armed with a socket wrench, unscrew the nut. The fastening is located in the very center of the shank, between its contacts.
- Grab both contacts of the old part and loosen it.
- Using a small hammer or the same wrench, hit the stud onto which the previously removed nut was screwed.
- Has the hairpin fallen in? Great, continue.
- Using a minus screwdriver, pry the part, thus displacing it from its place.
- Pull the contacts to remove the heating element from the groove.
Attention! Do not overdo it when removing the heating element: if the contacts break off, it will be more difficult to remove the heater.
Visual assessment and installation
Having taken out the heating element, you can immediately understand, without any special equipment, what condition the part is in. We are 95% sure that there is scale on it, and if black spots are visible, the heating element is probably burnt out.
Installing the heating element is as simple as possible:
- Check the resistance of the new element with a tester. You need to make sure that the part is not defective.
- Lubricate the seal with grease or machine oil. WD-40 is ideal.
- Install the part in place of the old one.
- Reinsert the temperature sensor.
- Connect the wiring.
Now you know that replacing the heating element in a Samsung washing machine will not require any special tools or special skills: even a beginner can handle such repairs.
Thermal sensor malfunction
The temperature sensor of a Samsung washing machine is usually located near the heating element; it supervises its operation. When the water temperature reaches the required value, voltage stops being supplied to the heating element, and vice versa, if the temperature drops below the set temperature, voltage is supplied to the heating element again. Using a sensor, the washing machine “understands” what temperature the water is during washing.
How does a temperature sensor work? It’s very simple: its resistance changes with temperature changes.
You can find out whether the sensor is working as follows: measure its resistance and ambient temperature. There should be a table in the service manual of the washing machine; you need to compare the readings.
It is also possible to understand “indirectly” whether the sensor is working or not. If it is heated or cooled, the resistance should change immediately; if it does not change, the sensor is faulty.
Additional recommendations
Before changing the heating element, check the hole in which it was installed.
Over the years, it can accumulate dirt, scale and debris. All this can prevent a new part from working stably. Take a cloth and clean the hole. You can also wear a thick glove and gently remove debris with your fingers.
Now you know how to change the heating element so that the washing machine heats the water normally. As you can see, there is nothing complicated about this. You can visually study the replacement of the heating element in a Samsung washing machine in the video: