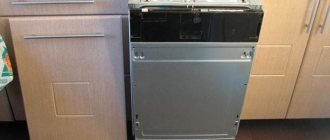
The difference between installing a built-in dishwasher and a freestanding model is that additional design is required for the front wall - the machine door.
It is assumed that the decorative panel is selected to match the surrounding interior, and then the facade is installed on the dishwasher.
Experienced craftsmen cope with a simple operation quickly, but beginners should carefully study the instructions and become familiar with some of the installation nuances.
Dishwasher front - what is it?
A dishwasher facade is a decorative panel that hides its body. It has not only an aesthetic, but also a practical purpose.
The advantages of such designs include:
- the ability to disguise equipment that does not fit the overall interior design;
- performing a protective function that allows you to protect the case from aggressive influences - high temperatures, humidity and greasy contaminants;
- the façade covers the control panel from small children who may press buttons out of curiosity;
- providing additional sound insulation.
Preparing a place for the machine
Many home craftsmen often ignore this important installation stage, starting immediately to install the PMM, without preparing a place for the equipment. This results in problems that arise during the connection - they could have been avoided if the place had been prepared in advance. Another misconception among users is that the place supposedly needs to be prepared only for the built-in model - even a regular stationary Electrolux dishwasher is difficult to connect without preparing the place.
First, think about how to install the equipment so that the proximity to all communications (electricity, water supply and drainage) is maximum. Please note that the distance to the water pipes should not exceed a 3-meter mark, otherwise an increased load will be placed on the PMM parts.
Also take care of the following points:
- a flat and strong base for the equipment - modern PMMs weigh from 17 to 60 kg, depending on their type and dimensions.
- There must be a connection point to a cold water supply .
On a note! If you decide to connect to a hot water pipe, first make sure that this option is provided by the manufacturer.
- Prepare for connection to sewer drains .
- And most importantly, prepare a reliable outlet for connecting to the network. It is not forbidden to connect the PMM directly to electricity, but it is safer to do this through a voltage stabilizer.
Important! Every year in Russia tens of thousands of pieces of equipment burn out due to voltage surges. Even if your power grid is stable, a preventive measure in the form of a stabilizer in the event of a surge will protect not only the PMM, but also other electrical appliances.
You should definitely think about a solid foundation for bulky equipment if the kitchen has weak floors - especially old ones, with creaky and wobbly floorboards. If the floor is quite ordinary (linoleum on a reliable base or tiles) with a minimum of unevenness, you can try installing a PMM.
Determining the dimensions of the decorative panel
To determine the dimensions of the facade, it is not necessary to perform complex calculations or create diagrams. This nuance is already provided by the manufacturer, and the instructions for the dishwasher include the required values (width, thickness, length, allowances).
In most cases, the width of the panel corresponds to the width of the device, because... the side door has the parameters of the body. For a standard 60 cm model you will need 598 mm. A 45 cm dishwasher front will have a width of 448 mm.
As for the height, it may differ depending on the placement of the facades of adjacent cabinets.
The use of surfaces with increased length is permitted if this is provided for in the design project. In this case, it is important to make sure that the remaining part does not interfere with the opening of the doors.
Provided that the panel is in contact with the base, it is better not to touch it, but cut off the edges of the base, following the contour.
How is the facade installed?
There can be several ways to install dishwashers: installing the equipment in a ready-made kitchen unit or separately from it. You will only need to hang the door in the first case, and performing such a manipulation is very simple, since well-known manufacturers have described in detail all the necessary steps in the instructions.
To hang a facade on a Bosch machine, follow the following algorithm:
- To begin with, the equipment is mounted in the designated place at the required height using special screws. It should be noted that built-in models are already equipped with ready-made templates, using which you can easily install the furniture facade to the door of the dishwasher.
- Fastening elements are attached to special grooves located on the machine body. Next, you will need to replace the small “original” screws located on the inside of the door with longer fittings with nuts. Thanks to this, the furniture facade will hold more firmly. Finally, all that remains is to attach the handle and decorative elements to the door.
- Installation of the facade can be done in another simple way. Before directly fixing it to the bolt, you need to apply double-sided adhesive tape. Experts also recommend that when connecting equipment to the electrical network, use a cable that has a cross-section of 1.5 mm. As for the outlet, it must be grounded. The required parameter is 16 Amperes.
Connection features
So, step-by-step instructions on how to connect a dishwasher in stages:
- If you are installing a built-in PMM, then first you need to prepare a niche, which, as a rule, should be 60 cm wide, and for narrow models 45 cm. You can level the machine with the level of the cabinets by removing the tabletop and adjusting the legs of the lower cabinets. You also need to drill holes in the cabinet body for the drainage hose, water intake hose, and electrical wires.
- Installing a dishwasher under the hob is prohibited;
- The installation location is selected so that the length of the drainage hose does not exceed 1.5 meters. An increase in length up to 5 meters is allowed, but stable operation of the equipment in this case will be difficult to guarantee.
- The next step is connecting to electricity. Please note that the socket must be of the Euro type. You need to replace the socket if it does not meet the standards (but not the plug of the machine). Do not forget that we ensure safety when connecting, and the dishwasher has significant energy consumption. This determines the ban on the use of tees and extension cords. Installing a socket involves using a wire with a diameter of more than 2 mm. In addition, a 16A circuit breaker is additionally installed in the electrical panel. Grounding is also carried out using a 3-core wire, and it cannot be connected to pipes.
- Next is connecting the dishwasher to the water supply. To do this, the water is shut off, a tee is connected to the pipe, then a filter, a ball valve and a hen. All threaded joints are insulated with foam - it must be wound in at least 10 layers.
It is also necessary to install a coarse filter, as it will prevent sand and rust from the water pipe from getting inside the machine.
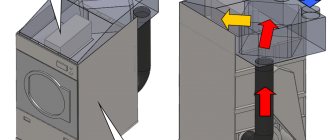
- As for connecting equipment to the sewer system, you can go the simple route by installing a siphon with an additional outlet and valve. In order to protect the device from water entering from the sewer pipe, you need to place the drain hose in a special way - at the point of exit into the sewer network, it is placed at a height of 600 mm along the wall, and then bent to ensure water flow.
- The final stage in connecting a dishwasher is checking the device for functionality. In this case, the machine is tested idle, controlling the rate of water flow, its heating, and operation in drying mode. The test is carried out without dishes, but with the obligatory addition of regenerating salt and detergents.
- How to choose a dishwasher - getting ready to buy
- How to choose built-in appliances for the kitchen
- Common dishwasher sizes
- The dishwasher is broken - can I fix it myself?
- Using the dishwasher correctly
- Major dishwasher cleaning in 7 steps
Types of materials and decor of furniture facades for a dishwasher
Various materials are used to produce dishwasher fronts.
Basically it is MDF. Since it is he who is able to withstand temperature changes and high humidity that occur during operation of the equipment. In addition, they are safe and do not contain substances harmful to human health.
Natural wood is rarely used in the production of furniture for a built-in dishwasher, since it is a very expensive material that requires a high-quality top covering.
If you want to save money, you can purchase a facade made of chipboard - it will cost the least. But keep in mind that if the integrity of the protective layer is damaged, the product will quickly lose its shape. In addition, when heated, it will release toxic fumes.
It is advisable that the facade of the machine be made of the same material as the doors of other kitchen items.
To give the structure the desired color and texture, a decorative coating is used. Modern solutions make it possible to disguise a dishwasher in such a way that it will be impossible to understand that behind the façade there is hidden equipment and not an ordinary cabinet.
The facade for a built-in dishwasher can be finished with the following materials:
- enamel coating;
- plastic;
- glass;
- metal;
- veneer (thin layer of wood).
It is not recommended to use PVC film for gluing the facades of dishwashers - under the influence of heat and moisture it quickly peels off.
Errors and rules
1Connect the dishwasher in the 220V panel from the machine.
Remember that all equipment and devices in your house and apartment that are interconnected with water and electricity - a boiler, instantaneous water heater, washing machine, including a dishwasher - must be connected through:
automatic combination + RCD
or automatic differential
There shouldn’t be any simple modular machines, much less traffic jams, here. Reliability of protection and your safety in the event of an electrical breakdown of the wiring should come first.
2
As a result, the supply or drain hoses may become pinched, impairing water circulation. An error will constantly appear on the display.
And you won’t even guess why. Therefore, the minimum distance from the wall should be at least 5cm.
3
If the installation is uneven, you will have problems with the quality of washing dishes. There may even be a water leak.
For example, Electrolux models allow a deviation from the horizontal of no more than 2 degrees. This whole thing is checked at the building level.
And it is regulated by twisting and twisting the legs.
The back leg of most models is adjustable from the front. Using a special screw in the lower central part.
When adjusting the legs, according to the instructions, the machine must be raised to the maximum so that there are no gaps left between it and the table top.
4
Although this may seem like the closest and most convenient place to connect the power plug, try to avoid this type of connection.
The slightest blockage and subsequent leakage guarantees a short circuit and fire. For the same reason, it is not recommended to place the extension cord directly behind the dishwasher.
If the factory cord is not enough to reach a stationary outlet, then connect the carrier away from the hoses, at the greatest possible distance.
5
Remember that not every PMM can be connected to a hot water supply system. Be sure to read the instructions, otherwise the device will fail much earlier than its warranty period.
In addition, the water temperature in this system may be higher than that for which the sink is designed (usually no more than 60 degrees). Even if it supports such a connection.
Also keep in mind that the hot water in our pipes is dirtier than cold water. Therefore, experts recommend connecting to cold water.
6
It may well happen that the factory hose, which has a standard length of no more than 1.5 meters, is not enough for you. Therefore, you will have to buy more footage.
The most important thing is not to bite off, unscrew or throw away the main one. It can come with leak protection.
Wires are hidden inside it and when a break occurs, a short circuit occurs and the valve installed at the end automatically shuts off the supply.
Therefore, when lengthening, simply extend the existing one.
7
If you are not a plumber and do not know how to properly and in what quantity flax is wound to seal threaded connections, then it is better for you not to use it.
You may encounter this when reworking the connection of the dishwasher to the siphon and installing a tee for the cold water supply.
If used in excess, the flax will eventually swell and the flimsy union nut may burst, ultimately leading to a flood.
In such places it is better to use a factory rubber gasket or fum tape.
Sources – https://cable.ru, Kabel.RF
How is installation done?
The façade canopy is made only if the dishwasher needs to be installed in a ready-made kitchen. Due to the fact that many of these devices come with installation instructions, this should not be a problem.
To install the facade, a handle is first attached to it, which will open the Bosch, Electrolux, Kandy, Ariston or Indesit dishwasher. After this, it is necessary to install fasteners adapted to engage with the door of the device. On the facade element to be installed there is a special paper overlay, which indicates exactly where the holes need to be drilled in order to apply the fasteners. You can drill directly according to the drawing to eliminate the possibility of error.
After all the holes are made, you need to install special fasteners. After this, the front is simply attached to the dishwasher. This happens by inserting fasteners into special grooves on the dishwasher door.
But the installation of the facade is not yet complete, since this hanging element needs to be secured. To do this, first open the car door and then unscrew several bolts from the inside of the door. They are replaced with longer ones, which will allow the facade to be attached. At the same stage, you can adjust the tension of the machine door springs by turning the screws. By looking, you can get a more accurate idea of the process.
Basics of installation and model selection
There are three main types of dishwashers:
- Freestanding.
- Partially built-in.
- Fully built-in.
If free-standing machines are placed anywhere in the kitchen, then other types of PMM “Electrolux”, “Ikea”, “Gorenye” and other brands are built into the furniture set. Initially, decide on the installation location and prepare a niche for the dishwasher. How to connect the PMM correctly, read one of the previous articles.
Useful tips
Here are some useful tips for your attention that will not only allow you to connect your dishwasher correctly, but will also extend the life of the equipment:
- Installing a drain hose into a sink is extremely unsafe, although it makes the connection process much easier. The danger is that the waste water drain may fall out of the sink and flood the neighbors below.
- Electrolux equipment is very demanding in terms of installation rules. The maximum tilt to one side should not exceed 2 degrees, so be sure to check this point with a building level.
- If you decide to buy any model from Siemens, be sure to look at the dimensions of the case and check it with the manufacturing standards of the furniture into which it will be installed. Very often, Siemens neglects technical standards and creates non-standard dimensions, as a result of which difficulties arise when installing a dishwasher in a finished kitchen.
- Do not connect the grounding contact to gas or water pipes under any circumstances. The grounding must be connected to the grounding bus of the apartment panel. We talked about how to make grounding in an apartment in a separate article.
- The air gap between the wall and the back wall of the equipment should be at least 5 cm, which is quite enough for air circulation.
- The kit necessarily contains connection rules and a visual diagram for a specific model. You only need to rely on it, because... All conditions are purely individual, although they have much in common.
- It is not recommended to use surge protectors (extension cords), because they very often cause accidents and fires. If there is no other way to supply power, it is recommended to make an electrical extension cord yourself. This method of connecting a dishwasher via an extension cord can be used as an exception.
- If you decide to place a free-standing dishwasher next to a stove, refrigerator or oven, connect a separate line from the distribution box to each appliance so as not to overload the outlet installed near all devices.
We also recommend watching the visual video instructions for proper use of the dishwasher:
Dishwasher operating tips
https://youtube.com/watch?v=vUIT6ixqu18
That's all the instructions on how to connect a dishwasher to the water supply, electrical network and sewerage system with your own hands. We hope that the information was useful and interesting for you. We also recommend that you familiarize yourself with the main malfunctions of dishwashers, so that in the future you will be familiar with how to repair appliances at home!
Types of facades, functions
The facade for PMM is decorative cladding that harmonizes with kitchen furniture. Attaches to the car door. MDF panels are practical and durable. They can be laminated, covered with colored film, attached with original fittings and various decorative elements. Hanging chipboard or PVC is a big risk. These materials are easily deformed by vibration, high temperature, and moisture.
Sheathing functions:
- Simplifying the choice of technology. You don’t have to worry about the color of the case, but focus on the technical characteristics, since the dishwasher won’t be visible anyway.
- Child protection. A car hidden behind the door will not become a “victim” of children's curiosity.
- Noise isolation. An additional panel absorbs noise. German built-in models, such as Siemens, Bosch, Miele, Hansa, are equipped with special noise-absorbing gaskets that are inserted between the door and the front panel.
Types of fastenings
The casing can be attached to the door with self-tapping screws (option for fully built-in models), or secured on hinges (for partially built-in models). Slider mounts are often used in Gorenje, Ikea, Electrolux, and Beko modifications.
Sheathing dimensions
Depends on the dimensions of the PMM. The standard width of the machine is 60 cm (full size), 45 cm (narrow). The common height is 82 cm. Dimensions may differ greatly from standards. We recommend purchasing the set after purchasing a dishwasher. So that it can fit perfectly under the countertop and lock into place. For example, Ikea kitchens fit all models of dishwashers; they sell custom-made household appliances. If the façade is larger than the door, it will rest against the plinth when opened.
Door and front dimensions. Canopy and mount
The dimensions of the decorative panel depend on the size of the dishwasher. This can be narrow - 45-60 cm, full-size - from 60 cm or compact equipment - height 50-60 cm.
What to do if the dishwasher front is too long? You won't be able to cut it, as you will ruin the appearance of the set, because it is laminated on top and covered with decorative film.
What you will need for work:
- Screwdriver Set;
- roulette;
- fasteners;
- door handle.
Attached is a full-size template drawing, screws, self-adhesive tape, and fastenings. You can figure out how to secure the panel by following the instructions. For an experienced master this will take no more than 10-15 minutes.
Sequence of work when mounting
- Place the dishwasher in the prepared niche.
- Attach the cabinet to the cabinet panels.
- Make connections to the drain and water supply.
- Prepare holes for the handle using a Phillips screwdriver and an awl.
- After fixing the handle, you need to calculate the distance (Z), which will help place the facade flush with the rest of the kitchen doors.
- Take a tape measure and measure the distance between the door of the adjacent cabinet and the countertop, as shown in the figure (X).
- Then measure the distance from the mount to the tabletop (Y). Calculate: Z = X-Y.
- Place the template on the inside of the door.
- Use an awl to mark the locations for the fasteners.
- To make the fastenings more secure, drill holes ¾ of the way through the door.
- How to remove old screws? Sometimes the panels are tightened with short screws, but their length is not enough to fasten the facade. Therefore, you need to hang the panel, unscrew the old screws and install long self-tapping screws.
After installing the dishwasher under the façade, try closing the door. If the decorative part rests on the base, it means there was an error in the calculations. In this case, you can make a gap in the base as thick as the facade.
You can attach a decorative panel to Hansa and Miele appliances yourself.
Adjust the mechanism: tighten the bolt that secures the tension cable. Since the door is hinged, it should close easily with a gentle push of your fingers.
The video will help you make the correct hanging:
Facade purposes
The facade of the dishwasher is a decorative panel element made from furniture materials. The main purpose of the facade is to hide the dishwasher in the kitchen furniture, making it part of the kitchen interior.
- Facade purposes
- Dishwasher front size
- Self-installation of facades
Dishwashers that are fully built-in are usually 450mm or 650mm deep. The hanging facade of such devices has the following advantages:
- there is no need to select the appropriate color of the machine; it fits perfectly into the interior, since it is a common part of the kitchen;
- the control panel buttons are almost invisible, children will not press them randomly;
- has soundproofing properties, the sound of the dishwasher is not so audible.
Dishwasher panels are made from a finely dispersed fraction; this is a medium-density wood fiber board. The thickness of the board is usually standard 16 mm (furniture thickness) and is covered with a film that completely replicates the texture, texture and color of the furniture.
In some dishwasher models, the open door can only be locked after the appliance plate is installed.
What do we need
Before you build the dishwasher into a niche under the countertop or connect a stationary model, prepare the tools and plumbing fixtures.
Tool:
- Pliers, or better yet an adjustable wrench;
- Insulating tape (vinyl or cotton), it is wrapped around the metal threads on pliers so as not to damage the fastenings when tightening;
- FUM tape for waterproofing;
- Knife;
- Drill;
- Clamps.
Plumbing fittings:
- Drain siphon with 1 or 2 fittings – 2 fittings will allow you to immediately connect the washing machine;
- Tee, ¾ thread;
- A filter that provides rough water purification;
- Ball valve;
- Hank connecting pipe.
Design features of built-in PMMs
The range of models integrated into kitchen units is much wider than their free-standing counterparts. This is explained by the principles of ergonomics and space saving inherent in the concept of constructing a kitchen interior. To get acquainted with the best brands specializing in the manufacture of built-in PMM models, please follow this link.
To install a built-in dishwasher, you will need a separate cabinet, or rather, a niche in the set. It differs from a regular kitchen cabinet in that it does not have a back wall or bottom.
The equipment is built inside furniture modules and decorated with facade panels so that when closed it is completely hidden. This installation method allows you to maintain the kitchen interior in the same style.
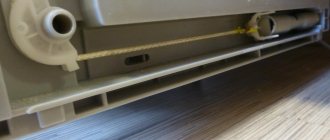
The machine is installed directly on the floor, on 3 or 4 support legs. The absence of a rear wall allows for free placement of the water supply and drain hoses.
The cabinet must have reliable walls to which the dishwasher body is attached, and a “roof” - the countertop. The front panel is not fixed to the walls, like conventional cabinets, but directly to the car door.
How to install a dishwasher in the kitchen
There are two options for installing the PMM: in a finished kitchen or in a pre-designated place in the kitchen unit.
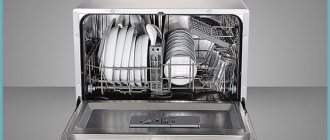
Dishwashers vary in type and size: Compact. Holds from 3 to 5 sets of dishes. Dimensions 50x60x50 cm. Installed on the countertop or under the sink.
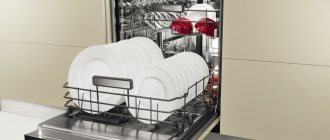
Narrow. Width 45 cm, capacity from 6 to 10 sets. Can be fully or partially built-in.
Full size. Dimensions 65x65x90 cm, holds from 10 to 15 sets of dishes. Can be built-in or free-standing.
Typically, manufacturers provide space for placing equipment in any kitchen set. To do this, take the dimensions of a narrow dishwasher and add 5-10 cm to them on all sides. If your kit does not include a special cabinet, then it is better to choose a freestanding machine. You can install it in any convenient place, even between the cabinets.
If you have prepared drawings in advance for placing a Samsung, Miele or other brand dishwasher, there will be no problems with installation. Otherwise, for embedding, select a cabinet close to the sink. Please note that the distance from the PMM body to the rear wall must be at least 5 cm for normal ventilation.
If you have a small family and the kitchen area does not allow you to install a full-size model, choose a tabletop option. You can put it under the sink, and the connection rules do not differ from other models.
Useful tips when choosing and installing PMM
- Before purchasing built-in appliances, measure the dimensions of your kitchen cabinet.
- The legs of the dishwasher can be adjusted in height. Use a level to position the machine level. Some Hotpoint Ariston and Whirlpool models are very sensitive to a tilt of even 2 degrees. This may affect their future work.
- Mount the machine near a sink. This will make it easier to connect the drain and water without having to extend the hoses. Experts say that extending the hoses can lead to leakage and will also put more strain on the drain pump.
When built into furniture, install a metal plate under the tabletop to protect the wood from steam. In built-in models, the plate is included.
At what stage should the façade be attached?
The dishwasher is installed in several stages. The main connection is considered to be connection to communications: water supply, sewerage system, dedicated power line.
Decorating the front side is usually done at the very end, when the rest of the work has already been completed.
The housing is pulled out of the niche to provide access to the car door from all sides. But during the fitting process, it is better to push the machine into place so that the panels of the dishwasher and neighboring modules are at the same level
Is it possible to run the dishwasher without the decorative trim installed? It is not recommended to launch before installation work is completed for several reasons.
Only a dishwasher that is completely closed on all sides can fully perform its functions; in addition, the panel plays the role of an additional sound and heat insulator.
Sometimes they mask the machine first and then make the connection. This option is appropriate if there is a delay in connection for objective reasons, for example, at the same time the riser in the toilet is being replaced or a new power line is being laid.
In order not to waste time, decorate slowly.
Nuances of installing built-in equipment
Free-standing units are simply installed in the place provided for them, and then connected.
Built-in models need to be integrated into a furniture set. Here are some useful tips that may come in handy during the installation of built-in appliances:
- the dimensions of the built-in cabinet must correspond to the dimensions of the dishwasher body; for comparison, you need to check the diagrams provided by the manufacturer;
- be sure to use the protective devices that are included in the kit - a metal strip to strengthen the tabletop, a vapor barrier film;
- to level the body, twist the legs, usually there are three of them - two are in the front and one in the back;
- do not forget to insert the side bushings and secure the body with self-tapping screws;
- Fix decorative panels strictly according to templates or stencils, which are also included in the delivery set.
Dishwashers from different manufacturers may have structural differences, so you should rely only on the instructions for the specific model.
This article clearly outlines how to properly install a dishwasher, in what order you need to carry out the installation and connection of communications.
Preparation of tools and materials
No special tools are required to secure the façade trim.
The same items that are used to install the dishwasher as a whole will be useful:
- drill;
- screwdriver;
- awl;
- screwdriver;
- tape measure or ruler;
- pencil or marker.
If you don’t have a power tool, then one screwdriver is enough - you can screw in the screws by hand if the holes for them are pre-drilled.
The drill bit is selected according to the diameter of the screws: the holes should be a little tighter so that the fasteners are held firmly in the sockets
The work is simplified by the presence of a stencil for the façade overlay included in the delivery set. It is a large sheet of thin paper with marked attachment points.
The stencil is placed on the back side of the decorative panel and the places where the screws are screwed in are marked.
In addition to the tools, you will need double tape. Several “Velcro” pieces of tape will come in handy when you need to try on the facade. It is not recommended to immediately “mount” it on screws, since an error of 2-3 millimeters will mean all the work is in vain.
Don’t forget about the handle, without which opening the door will be problematic. It is also fixed with self-tapping screws, which are screwed into the back of the panel.
To ensure that the surfaces of the door and facade adjoin as tightly as possible, the heads of the screws should be recessed into the canvas.
It is easier to attach the workpiece than a homemade overlay. If you make the panel yourself, you may need carpentry tools, sandpaper for sanding, antiseptic impregnation and paint to finish the entire surface or just the ends.
Professional installation advice
To avoid the most common mistakes, we suggest using recommendations from experienced furniture makers:
- be sure to use a tape measure or ruler, do not use your eye, do not be lazy to check the even position of the template and the panel - the appearance of the kitchen facade as a whole depends on this;
- choose the correct length of the screws: they must fit confidently and deeply enough into the panel surface, without coming out from the front side and not deforming it;
- when using a paper template, be sure to secure it on all sides;
- you can use a regular screwdriver, but using a screwdriver speeds up the process;
- Attach the handle, focusing on the location of the handles on adjacent cabinets, try to maintain not only the position (parallel/perpendicular to the floor), but also the height;
- To prevent the PMM door from closing during installation work, place a couple of large books or another heavy object, such as an iron, on it.
If a former cabinet door is used as a dishwasher front, when trying it on, pay attention to the location of the old holes.
You need to make sure that they do not come into contact with the new mounting holes, otherwise the screws may pop out and the panel may partially come off.
Determining the dimensions of the decorative panel
The final result of the work depends on how correctly the dimensions of the facade panel and its type are selected. To do this, you need to take into account the dimensions of the machine itself. The standard width of the device is 60 cm, the width of narrow models is 45 cm. The height of such household appliances is in the range of 80-85 cm, although there are examples with a height of no more than 50 cm. As a rule, such compact devices are chosen by owners of small kitchen spaces.
Experts emphasize the importance of choosing a front panel that matches the height of the machine. The upper part of the overlay should be level with the tabletop, a deviation of several centimeters is allowed so that the design looks organically with the facades of adjacent cabinets. In this case, you need to make sure that the doors open freely and that the remaining part does not interfere with this.
There are device models whose dimensions differ greatly from accepted standards. Therefore, it is better to equip a niche for appliances or buy a new kitchen set after purchasing a car. Only in this case can you make sure that the equipment will be perfectly installed and fixed in the box. If the height of the panel is slightly larger, it is not worth cutting it, since after removing the protective film, moisture will get inside the material and cause its rapid deterioration. It should be noted that the height of the dishwasher legs can be adjusted. This allows you to change the height of the equipment by a couple of millimeters.
Often, in order to determine the optimal dimensions of the decorating panel, you just need to read the instructions. This is where information is provided that may be useful in selecting a panel. The manufacturer specifies the required width, thickness, length and allowances of the product so that it fits the device accordingly. This is very convenient, since there is no need to make any calculations or measurements.
Basic installation details
To avoid having to install it again, you need to carefully select the facade. An incorrectly selected product will need to be adjusted to the required size or purchased a new one. Be sure to check that the fasteners are marked correctly, otherwise the doors will not close properly. When installing, use a ruler or tape measure, but do not do it approximately, only then can you determine the mounting locations with an accuracy of up to mm. The screws should be of such length that the panels and doors are securely fastened, but so that they do not stick out. To make the correct markings, use a stencil.
It is necessary to take into account the fastenings of the handles that are needed to open the facade panel. They are installed at the same level with the fittings of adjacent cabinets.
Manufacturers produce different types of PMM. The built-in dishwasher is especially popular; many people are interested in how to attach the façade to it.