Options for installing a dryer above a washing machine
Both washing machines and dryers are large. In a cramped apartment, there is usually simply not enough space for horizontal installation of devices. Therefore, they practice installing a column, placing the dryer on top of the washing machine. There are several options.
On special mounts
Since installing units in a column is very popular, manufacturers usually offer special shelves for securing the dryer above the washing machine. The device looks like a flat board made of durable plastic, but it is used as follows:
- placed on top of a washing machine installed on the floor;
- securely fixed to the surface using latches and a screw in the back;
- put a dryer on top;
- push the legs of the unit into the holes provided for this;
- check the structure for strength.
Some dryers are already equipped with a mount for installation in a column upon purchase. But even if the board is not included in the set, you can easily purchase it additionally. You just need to measure the width and depth of the washing and drying units in advance.
Factory-installed column mounts are suitable for washers and dryers of the same size. Important! Special mounts for installing the column include a retractable shelf. You can place a basin with laundry on it for more convenient loading of things into the dryer.
On slats
Mounting on metal slats is not the most popular option for installing a column. But sometimes you have to resort to it. If the devices differ in width and depth, and you need to install a dryer on a narrow washing machine, using a specialized device for the column will not work.
The main disadvantage of the design is that the slats are less reliable and there is always a risk of collapse
When using slats, they are fixed on the wall directly above the washing machine and form a kind of shelf, on which the drying unit is installed in the form of a column. The advantage of this design is the ability to freely select the diameter.
When installing a shelf to install a dryer in a column, you must carefully calculate the load on the structure. The slats must confidently withstand the weight of the device not only at rest, but also during operation under strong vibration.
Attention! When installing the shelf, you must make sure that the weight of the dryer does not damage the integrity of the wall itself. It is impossible to install slats on fragile thin partitions.
To a niche
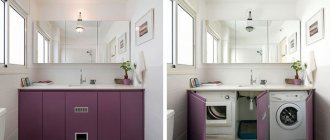
If there is enough free space in the bathroom or utility room, you can make a niche for a column from plasterboard. In this case, between the washing machine and the dryer there will be a fairly strong and reliable layer of building material, which will take on the role of a shelf. An additional advantage of a niche is that the entire structure will look more compact. In this case, there will be no extra unoccupied space on the sides of the column.
A niche is the most reliable and neat option for installing a column
In addition to drywall, to make a niche you need metal corners and fasteners to give the structure strength, as well as putty or tiles for finishing. Before installing the column, you need to think in advance how convenient it will be to pull out household appliances if necessary. Communications and wires will be located in the rear of the niche. You will definitely need to maintain access to them in case of emergencies.
Advice! A type of niche is to install a drying machine in a cabinet; doors on hinges are mounted in the front part of the structure, allowing you to hide household appliances.
To the rack
Another option for installing household appliances is to purchase a rack for the column, consisting of two or more compartments of suitable dimensions. A washing machine is placed at the bottom, a dryer is placed on top, the weight of which is supported by a strong wooden shelf.
A spacious rack allows you to place household chemicals and other accessories next to the units
The design turns out to be quite convenient. If a durable rack is equipped with wheels, then to gain access to communications in the rear, it will be enough to roll the entire column to the side. This will be much easier than pulling out a washing machine or removing a heavy dryer from a height.
Mounting options
Manufacturers of household appliances for the home have several types of clothes dryers in their line: exhaust, condenser and heat pump. Connecting a dryer of each type has its own characteristics, which is caused by the operating principle of the machines. For example, exhaust models perform drying by removing air with moisture into the ventilation system. Condensation products work as follows: heated air enters the chamber with laundry, collects moisture and passes through an installed heat exchanger. After this, the moisture settles in a special tray, which must be emptied after each turn on. As for machines with a heat pump, they essentially work in a similar way to the previous option. The only difference is that the moist air does not pass through the heat exchanger, but through the evaporator.
In private houses and apartments, exhaust dryers are most often installed, which need to be connected to ventilation and electricity. If it is not possible to remove the air duct, it is recommended to connect a condensation model, in which water is discharged either into a tray or into a sewer. Let's consider two existing installation options: for ventilation and for sewerage, but first let's talk about how you can install a dryer in a room.
You can see the functionality of these devices in a visual example:
Review of Bosch equipment
What you need to install a dryer
The set of materials and tools for installing the dryer depends on the chosen installation method. The easiest way is to use special fasteners; in this case, you will only need the factory shield itself from the manufacturer and instructions for it.
In other cases, to install household appliances in a column, you need to prepare:
- durable metal slats for mounting to the wall;
- a sheet of chipboard or a wooden shelf to create a stand;
- dense drywall - if you plan to create a niche;
- screws and self-tapping screws for fixing parts of the structure;
- a screwdriver with replaceable tips and a screwdriver for performing the work.
Important! To install a washing machine and dryer in a column, you need to purchase a rubber seal. It is placed under the upper household appliance to dampen vibration.
Installation methods
You can resort to three different ways to solve the issue of how to install a machine dryer and washing device. They look like this:
- Classic pallet with built-in fasteners;
- Installation of metal slats, which will provide the entire structure with a much greater level of strength (which is very, very important);
- Design a cabinet for a washing machine and a dryer. Or you can, for example, leave the washing machine open and make a cabinet for the top tier.
The choice here is entirely yours.
How to properly install a clothes dryer on a washing machine
Regardless of the chosen method, there is a general algorithm for the correct installation of household appliances in a column on top of each other.
The dryer is always installed on top of the washing machine, not vice versa. The reason is that the unit is lighter, and, accordingly, the design is more reliable. In this case, the washing machine below is set strictly according to the level, even if visually it seems that it is already located level. The slightest deviation from the plane will lead to unnecessary vibrations, hum, and ultimately to instability of the column.
When installing a column, you need to calculate in advance whether the cables from household appliances will reach the sockets
It is best to install the dryer on the washing machine on concrete or tile. A good option is also a wooden floor, which can be additionally reinforced with slats. But the column cannot be mounted on linoleum, thin laminate, and especially on carpet; a soft coating will not allow achieving the required stability of the structure:
- A special tray or homemade shelf is installed on top of the washing machine. It is strictly forbidden to place devices close to each other, without an intermediate layer. This will put extra stress on both the washer and dryer. A layer of sealing material is placed between the lower unit and the pan, which absorbs the vibration of the column during operation.
- A purchased or homemade stand is securely fixed with bolts. It should not move forward, backward or to the sides; the column must be absolutely immobile.
- The dryer is placed on a homemade shelf or stand from the manufacturer. If we are talking about using a special shield, you need to make sure that the legs of the unit fit exactly into the recesses intended for them.
Upon completion of work, both devices remain connected to communications and the electrical network. When using a column, it is recommended to start the dryer and washing machine alternately. This will not only avoid unnecessary vibrations, but will also reduce the load on the home network.
How to connect a dryer to communications with your own hands
After completing the installation of the drying unit, it is worth starting to connect it to the ventilation system or drain pipe, taking into account the principle of operation of the device.
Ventilation
The solution to the ventilation problem is quite simple. There is a ventilation opening on the body of the unit, to which a soft air duct must be attached. The connection is ensured using a special clamp included in the kit. The opposite end of the corrugated pipe is led into a ventilation shaft or window - in the absence of a ventilation hole. Bends of the corrugation by 90° are not desirable, since then the efficiency of the hood will be lower. We must try to connect the air duct with a minimum of bends and turns.
It is worth paying attention to one more important point. If you plan to install the dryer in a room with a high temperature, you should not route the corrugation along the top, as this will lead to the accumulation of condensation and the formation of an obstruction to the air outlet
Under such circumstances, it is worth considering another method, for example, making a hole in the wall at the level of the exit from the machine so that the corrugation section is located horizontally.
Before connecting the dryer, make sure that the length of the hose corresponds to the distance from the installation location of the unit to the outlet hole in the wall. If a corrugated pipe is used, it should not be in a tense state.
Connection process.
- Using a clamp, attach a flexible air exhaust hose to the dryer vent - in most models it is included in the kit and has a standard length. It is more convenient to tighten the clamp with a screwdriver, and at the end, tighten it all the way with pliers so that when you pull the hose, it does not fly off.
- Connect the second end of the hose to the outlet pipe of the air duct and also secure the attachment point with a clamp. The hose must be laid or tensioned so that there are no kinks or folds.
When installing dryers with powerful forced air exhaust fans, the exhaust hose can be routed through a vent or window if it is not possible to connect to a special ventilation shaft.
Sewerage
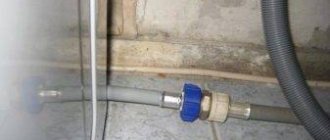
Condensation-type equipment involves collecting liquid during drying into a special tray, which must be manually emptied regularly. If you intend to simplify your life, you can create a connection for the dryer to the sewer. This installation option is possible thanks to a special drain hole connected to the sewer pipe using a regular hose. The connection technology in this way is similar to how a washing machine is connected. The hose is led directly into the drain or hung on the toilet, bathtub or sink.
The process of installing the drain hose of a dryer is similar to connecting a washing machine - one end of the hose is already securely fixed by the manufacturer in the body of the unit, while the other end is simply connected to the sewer system. For the dryer, it is advisable to build a separate tee into the plastic drain pipe - this will eliminate possible leaks at the connection point. It is necessary to check that the diameter of the outlet tube of the tee matches the diameter of the hose.
In some modern models, manufacturers provide the owner with the choice of using a built-in plastic container to collect liquid or connecting the installation to the city sewer. The first option is more mobile and does not require any work, but if possible, it is better to route the hose into the drain pipe - this will extend the life of the dryer. Thus, the constant excessive presence of liquid inside the structure, although to a small extent, still has a negative effect on electrical devices, metal and rubber elements.
Electricity
The final communication is the home electrical network. You can connect the dryer yourself to a separate line removed from the distribution box; the second method is to use an outlet. The use of the latter option is considered more logical, since the power of home devices, as a rule, is no more than 2.5 kW. A mandatory requirement for the outlet is that it must be grounded. In addition, the electrical network serving the drying must be protected by an RCD and equipped with a circuit breaker to protect the network from overload and current leakage. Usually it is sufficient to connect a 16 Ampere RCD and the same circuit breaker in the panel.
Installation of the machine in the panel
The technology for installing, fastening and connecting a dryer at home is not particularly difficult and does not require much skill. You can save on calling a specialist and do the work yourself.
Connection rules
When the column has already been formed, you need to connect it. The connection is made either to the ventilation system or to the sewerage system - depending on what type of drying it is.
If the connection is made to a ventilation system, this is easier. There is a special hole on the body of the dryer; you need to connect and secure the air duct to it. It is flexible (has the appearance of a corrugation) and is attached using a clamp, which is included in the kit. The other end of the corrugation leads directly into the central ventilation, and if there is none, then directly into the window. Of course, the window must be open while the dryer is operating. The corrugation can be bent, but you should not be overzealous with this, since the greater the angle of its bend, the worse the exhaust system will work.
If you installed the column in a room where the air temperature is quite high, then the corrugation does not need to be placed on top, this will contribute to the formation and collection of condensate. It is better if the corrugation goes at the same level as the drying.
Connection to the sewerage system occurs through the use of a special drain hole in the dryer, to which a regular hose is connected. The procedure for connecting to the sewer is absolutely identical to the procedure for connecting a washing machine. The hose is discharged either directly into the drain, or during operation of the device is placed in the sink or toilet.
After the connection to ventilation or sewerage has been completed, you need to connect the column to the home electrical network. To do this, you can organize a separate line from the distribution box, or you can connect using a socket. A socket is much simpler and more logical than drawing a separate line. You need to choose a socket that has a ground connection. Also, the electrical network must be equipped with protection in the form of an RCD and a circuit breaker so that it does not experience overloads and current leakage.