8675 0 0
Icer November 13, 2018Specialization: master in the construction of plasterboard structures, finishing work and laying floor coverings. Installation of door and window units, finishing of facades, installation of electrical, plumbing and heating - I can give detailed advice on all types of work.
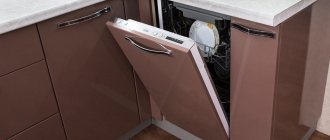
A dishwasher makes life easier for housewives if it is selected correctly and installed as it should be. In this review, I will tell you about all aspects related to choosing the optimal model and the features of installation in a cabinet. Read all the information carefully to navigate the topic and understand the difference between the main types of designs; this directly affects the choice of cabinet.
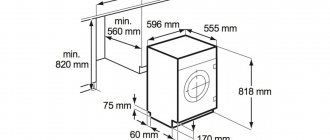
The dishwasher must be installed correctly and a special cabinet is required for this
How to install a 45 cm dishwasher - features of installation
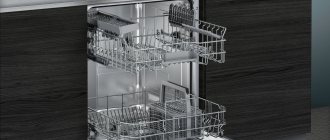
The dishwasher is allocated a place in the table or installed on the floor. For the built-in model you will need a kitchen cabinet. This type of technique has a number of advantages:
- lack of visibility of the housing, wires and hoses;
- reduced noise level;
- high hygiene.
She does not overload the kitchen interior with technical details. This is especially important if the room is small. For its long-term, uninterrupted and safe operation, it is necessary to check that the device is grounded.
This measure will prevent electric shock. The drain hose must be more than 2.5 meters long. If the length is shorter, then the pressure pump will be subject to increased load.
The device is not built under the hob. To protect the countertop from steam, you can fence it off with a metal plate.
Choosing a location depending on the type
They produce wide and narrow dishwashers. The first type of machine has a width of slightly less than 60 cm, the second - 45 cm. For a small-sized kitchen, a narrow machine is more suitable.
It is necessary to take into account the depth and height of the device. Often, kitchen sets that are made to order differ from the standards in the depth of the cabinets and the height of the countertop. You need to be careful, because if you make a mistake by just 1 cm, you won’t be able to insert the equipment.
You can put another furniture block. But in this case, you need to think about how to secure the equipment between two cabinets. The dishwasher cannot be inserted close in depth. There must be some distance left to route wires and hoses.
Manufacturers also produce very compact devices that differ in height. Such models are mainly placed in furniture modules, which are located in the second row, and not on the floor.
Communications for connection
The equipment must receive energy from the nearest outlet. The machine cannot operate without clean cold water. There should be a water pipe with a threaded connection nearby.
Used dirty water will be drained into the sewer, so there should be pipes nearby with the possibility of connecting another drain point.
Selecting a cabinet for PMM
First of all, you need to consider the location of the outlet where you will connect the PMM. The cabinet should be located close to the network. We wrote more about this in the publication “Socket for the dishwasher.” Let's repeat the important points:
- The socket with a moisture-resistant casing should be located at a height of 45 cm from the floor.
- Grounding is organized.
- The connection is made through a difavtomat.
Wiring and separate outlet not prepared? Then it’s better to start with organizing electrical communications. And:
- It is advisable to choose a cabinet near the sink. The length of the hose when connecting should not exceed 1.5 m - this is an additional load on the drain pump.
- The prepared niche should be at least 5 cm larger in size than the dishwasher.
Let's prepare a place for the built-in machine.
Connecting a built-in dishwasher
You can do a lot of the work yourself. But there are some that must be performed by specialists with experience and permission to carry them out. This applies to work related to electricity: running cables and installing sockets.
Installation in a prepared place
Before installing the dishwasher in a finished kitchen, you need to make sure that you can easily fit it into the prepared space, and there will be an area for hoses on the side or back. First, the equipment is placed opposite the prepared compartment.
The hoses that are built into it are pulled through the holes to the place of sewerage and water supply, and the power cord is pulled to the outlet. Next, install the device in the chosen location; before doing this, you should make sure that the length of the hoses and cord is sufficient.
Installation is carried out according to the attached step-by-step instructions for the specific model. You can also read forums and watch videos. Sequentially fasten the parts included in the kit:
- stick a vapor barrier film;
- sealing tape is fixed along the edges;
- install damper elements.
If the dishwasher body is not level, correct it by adjusting the height of the legs. Some equipment manufacturers, for example, Electrolux, Bosch and others, include noise protection with the kit, which must be secured to the bottom.
At the end, the device door is closed with a facade or a special decorative overlay. The front parts are adjusted and strengthened using self-tapping screws.
Electrical connection
The surge protector cannot be pulled through, so the device is connected to the closest power point. The cord has a standard length - approximately 1.5 m, so the socket should be located no further than this distance.
Extension cords cannot be used, because they will not be able to withstand the load and will melt. Do not use shared sockets that include other appliances. It is best to designate a separate point for the dishwasher and use grounded sockets with a separate bag.
The latter serves to protect against short circuits and network overload. It is impossible to build an electrical point close to the floor; if flooding occurs, a short circuit will occur. The distance from the floor to the place where the machine is located should be more than 25 cm.
Connection to sewerage
In order for the PMM to drain used water, it is connected to the sewer system. There are several methods. The first way is to connect it to the sink drain system.
If it is impossible to attach the hose directly to the sewer pipe, it is mounted in this way. In this case, it is necessary to change the siphon, so the option is considered costly and time-consuming.
The other method is very simple. It consists of installing a hose from the dishwasher to the cuff of the sewer pipe outlet. For fixation, a special tape is used, which provides excellent sealing. This method is used if there is a free hole under the sink.
Connection to water supply
Most models can be connected to hot water, but experts do not recommend this because it is not of good quality. This will negatively affect both people’s health and the device itself, which will fail faster.
Before connecting to the water supply, turn off the water on the riser. To install the tee, unscrew the mixer hose. The mixer is installed at one of the splitter inputs, and the cleaning filter is installed at the other.
Install a shut-off type ball valve. A hose that comes from the dishwasher is connected to the faucet. The joints are wrapped with special tape. It prevents water from flowing through.
Installation of the “facade”
The front side of the built-in dishwasher must be covered with a panel. As for the facade, it must be made in accordance with the design of the room.
The kit for such household appliances comes with a special fixing element and a pattern, which are necessary for installing the panel. It is mainly made to order. The work of installing the facade can be easily done independently.
Take a sheet of paper and mark on it all the necessary places and areas where the fasteners are to be installed. This layout is applied to the front door, and the decorative panel is marked. The necessary places are marked using a regular awl.
Then the paper sheet is removed and holes are drilled for the screws. The front door handle and latches are installed in the required places. This guide is suitable for installing fronts of any size.
After the panel is assembled, it is put in place. A decorative element is fixed on the dishwasher door and the prepared screws are screwed in.
Source: https://make-a-choice.ru/kak-vstroit-posudomoechnuyu-mashinu-v-gotovuyu-kuhnyu
Equipment connection steps
It is worth considering in detail the correct step-by-step steps for installing a dishwasher in order to avoid problems with subsequent operation:
- Install an electrical outlet. Craftsmen recommend installing it in the back, at the bottom. In addition to the dishwasher, you can connect other equipment to the outlet. Before installing an electrical outlet, you need to find out the type of plug in the appliance. After this, select the required outlet.
- Water mains are connected. Cold and hot water supply must be connected. A drainage system should be provided. You need to think through these connections in advance.
- The location is selected. A cabinet of the required size is adapted to accommodate a dishwasher. After this, it is installed at the place where this equipment will be operated.
- The machine is connected to all systems. Runs to check performance.
If you follow the detailed instructions, prepare the cabinet correctly and place it in the right place, then using the dishwasher will be most effective.
Types of dishwashers
There are several main models based on the type of installation and dimensions. Partially or fully built-in (Electrolux ESL 4500 LO, Bosch SKE 52M55, Whirlpool ADG 658/1 IX). Can be easily placed in a kitchen unit. For example:
- Under the sink. The advantage is proximity to communications; the dimensions of the equipment often coincide with the location. The downside is the likelihood of buying a new siphon.
- In the closet. In this case, the device is completely hidden behind the facade. The advantage is that the design of the room is preserved; there is no need to carefully select the colors and suitable appearance of the PMM. When built into a finished kitchen, it may be necessary to remodel furniture elements.
- In place of the niche is a headset. One module is dismantled and the machine is installed. You need to choose the ideal size of the equipment, while reducing the space for storing kitchen utensils.
Compact (Bosch Active Water Smart SKS41E11RU, Candy CDCF 6-07). Easily fits into any kitchen set. Their dimensions do not exceed a conventional microwave oven. The PMM model can be placed on any surface, taking into account the convenience of connecting to communications.
Freestanding dishwashers (Bosch SRS 45T62 EU, Indesit DSG 051). Not intended for installation in furniture. To save space, you can place it under the countertop if you remodel or dismantle the cabinet.
The operation of the PMM requires connection to water and electricity. Therefore, when installing it yourself, you need to follow the instructions.
This is important to know!
- The dishwasher is built into a modern standard element of the furniture set.
- If the furnishings in the kitchen are modern, there should be no difficulties with installing a dishwasher in the cabinet. The new cabinets are adapted to modern household appliances, so you can install a dishwasher without any problems.
It is important to follow the sequence exactly as prescribed in the instructions.
You need to prepare the tools and materials needed for installation only after you have managed to plan where and how you will place the dishwasher, and how you will connect hoses and electrical communications to it.
There may not be ready-made alternatives for installing a dishwasher. Therefore, you should work with a hammer, hacksaw or other tools, adjusting the existing cabinet to the parameters of the washing machine. Or you can make a brand new dishwasher cabinet with your own hands.
The whole process begins with preparatory work.
In addition to tools, you also need some materials, the list of which will also depend on the specific situation.
The following aspects of installation must be considered;
- take care of grounding;
- It is prohibited to place the device near the hob;
- you need to put a safety iron plate under the table top.
Manufacturers recommend sticking a metallized protective film to the back of the countertop before installing the device.
If you are concerned about the safety of the household appliances in your kitchen, you need to add a stabilizer to this list.
Before finally installing the dishwasher, you must:
- measure the installation section again (this is done to make sure that the dishwasher body fits freely with the section);
- check the gaps between the walls of the cabinet and dishwasher;
- Having removed the back wall in the cabinet, you should find out how spacious the area for wiring and hoses is;
- check the presence of the safety plate under the tabletop;
- insert the device block body into the section;
- level the device.
And one more thing - it is best to tighten the adjustable legs of the machine so that the unit lowers to the end, that is, to the floor.
If your kitchen does not have a normal outlet for connecting a dishwasher, you will have to make one.
Advice. It is better to first calculate the mounting locations for the dishwasher. It is necessary to drill holes of small diameter, as if outlining them. This will help screw the screws into the body.
In principle, the answer to the question of how to build a dishwasher into a finished kitchen with your own hands is practically given.
We connect the output wires to the machine, and then to the contacts of the socket; we enclose the wire in a plastic cable channel.
After completing installation, you should test the operation of the unit at idle. Once you are sure that the mechanism is working properly, you can safely show the work to friends and acquaintances, because installing a dishwasher in a cabinet yourself is something only a real man can do.
There are still some small nuances related to the connection.
And you don’t have to wait for repairs to install such a device.
Features of self-accommodation
Let's consider two possible options for installing equipment in the interior. This is installation into a new set, the design of which takes into account the order of a special niche for the dishwasher. And also, placement in an old kitchen, taking into account the presence of ready-made cabinets.
Installation in a new kitchen
Typically, built-in PMM models are made narrower. When ordering a kitchen, it is much easier to provide a place for the appliance in advance, otherwise it will be difficult to fit the appliance into the set without remodeling the furniture.
If there is nothing in the room except the walls, then make a sketch of the future kitchen. Consider the space for household appliances, the possibility of convenient connection (location of sockets, proximity to communications).
Have you already decided on your choice of dishwasher (Bosch, Whirlpool, Kandy)? If you want to fit the device into an Ikea kitchen, then measure the dimensions of the model in the store, enter the results into a sketch and pass it on to the furniture makers. Don't forget about space for ventilation.
The walls of the PMM should not come into contact with the furniture. A minimum gap of 5 cm is left on the sides and back. It is important to remember about connecting hoses and wires. Therefore, the cabinet can be ordered without the back. The thickness of the facade is included in the calculations.
This is a headset panel that will help hide your equipment from prying eyes. The method of attaching it to the dishwasher is taken into account. These can be bolts or self-tapping screws.
Accommodation in a finished kitchen
If space allows, move the kitchen cabinets apart to a distance of 45-60 cm. It is important to choose a place close to the sink. Also consider the distance of the outlets. A conventional PMM on legs with wheels makes installation easier.
You can put it in a cabinet or under the sink, and adjust the height of the legs. Additionally, there may be fastenings for fixing the case to the walls of the headset.
The installation of a free-standing machine under the countertop should take place in the following way:
- The top panel of the PMM is located close to the tabletop. But this should not prevent the door from opening.
- The desired height is set by adjusting the legs. If the legs are static and you need to raise the equipment, then fit a wooden box under the base.
If the depth of the niche allows, move the dishwasher deep enough to hang the cabinet door. Prepare the cabinet for installation:
- remove the front part;
- remove all drawers and shelves;
- unscrew the back wall, it will no longer be needed.
No free cabinets to place your equipment? Then the only option left is with a sink. This may be a corner location, the main thing is that the dishwasher fits into the hole.
To gain extra space, install a new siphon that drains water back and then down. If the sink is too deep, it can be replaced with a shallower one.
Possible embedding options
A cabinet for embedding a PMM may look different. We suggest considering several popular options that are convenient for installation.
Image gallery
Photo from
The dishwasher is traditionally located under the countertop
The machine is built into a separate module
Compact dishwasher integrated into the middle tier
Dishwasher in the middle of the kitchen - in the “island”
Each type of installation is associated with difficulties. To minimize them, it is important to comply with the above conditions and requirements specified by the manufacturer in the instructions. We offer several recommendations for installing a dishwasher in different places.
Solution #1 - built into a closet
If there is a cupboard with a width of more than 45 cm next to the sink, then it can be used to install a dishwasher. The advantage of installation close to communications is the ability to integrate machine hoses into an already installed system under the sink.
Dishwasher connection option: extended cold water supply pipe with shut-off valve, drain hose outlet into the washing siphon, separate electrical outlet
You will have to remove the shelves and back wall from the cabinet, and, if necessary, the bottom panel. The built-in housing must be brought into a strictly vertical position; for this, adjustable legs are used.
Then you need to connect the machine one by one to the communications: sewerage, water supply and power supply. If necessary, an additional water seal with a drain pipe should be installed.
The decorative front panel, which is attached to the machine door, is usually assembled from removed cabinet doors or ordered additionally. Partially built-in models do not need to be decorated, so their installation is a little easier.
Solution #2 - installation in a separate module
If there are no free cabinets for new equipment, but there is enough space in the kitchen, you can order a separate module, but you need to install it near the communication nodes.
A cabinet for additionally purchased equipment – a compact washing machine and dishwasher. The module is installed as close as possible to the sink, which facilitates connection
It is important to level and secure the unit so that it does not vibrate during operation or move the cabinet. Hoses and pipes are laid along the wall, but they are easier to access. To get to the communications, you don’t have to dismantle the car, but simply move the cabinet away from the wall.
If the dishwasher is installed under a common kitchen countertop, it must be removed for maintenance, since otherwise the hose connections cannot be reached.
Solution #3 - installation in a niche
If the kitchen has a niche for installing a microwave, oven or other small equipment, it can also be used to install a dishwasher. Dimensions of the compact model along with drawings can be found in the installation instructions.
If the niche is located far from communications, you will have to stock up on long flexible hoses to supply cold water and drain used water
Built-in compact models should not be confused with free-standing models. The latter do not have to be placed in a niche - any horizontal surface is suitable for their installation. So that the dishwasher is not conspicuous and is hidden like the rest of the equipment, the front part is covered with a decorative overlay in the style of a facade.
Developers usually think through various options for installing equipment, so the installation instructions include drawings and diagrams with dimensions, useful tips, and technical recommendations.
It’s easier to find a place for a compact model, but don’t forget that a mini-machine is not able to serve a large family.
Solution #4 - if embedding is not suitable
What to do if there is absolutely no space in the kitchen to install a built-in model? It remains to consider free-standing options, the design of which does not require special installation.
They can simply be installed on the floor, countertop or niche, leveled, and then connected.
Image gallery
Photo from
Compact dishwasher on the table
Freestanding dishwasher in open module
The dishwasher is conveniently located under the sink
Small area for a narrow machine
There are still ways to fulfill your own dream of installing a built-in dishwasher - installing a facade on a free-standing model, completely renovating the kitchen unit, with possible repairs or relocation of communications. It is more expensive and requires not only financial investments, but also time.
Tools and parts for embedding
Depending on the installation location, you will need the following components: Euro sockets (moisture resistant);
- copper three-core cable with a cross-section of 1.5 mm (for supplying wiring to the outlet);
- brass tee;
- drain and inlet hose of increased length (connections are not allowed, it is better to take one-piece hoses); corner tap;
- difavtomat for 16 A (in case of independent preparation of electrical communications);
- rubber gaskets, clamps, tow, fum tape;
- siphon with two outlets (for installation under the sink);
- water filter (will extend the life of the device).
Prepare your tools in advance so that everything is at hand:
- adjustable wrench;
- pliers;
- a set of screwdrivers (phillips and slotted);
- building level;
- roulette;
- screwdriver;
- hammer drill (for grooves for wiring).
It is recommended to install a stabilizer on powerful equipment, which will protect the model from damage during a power surge.
Source: https://cosmo-frost.ru/posudomoechnye-mashiny/kak-vstroit-posudomoechnuyu-mashinu/
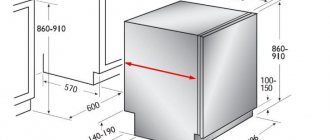
What requirements must a cabinet for a dishwashing machine meet?
A kitchen cabinet for a dishwashing machine must be equipped with a ventilation system. It can be provided either by a specialized grille placed on the back or side walls, or by holes in the furniture body. Some designs are not equipped with a rear wall to provide more powerful air outlet.
The size of the cabinet for the dishwashing machine should always be larger than the dimensions of the equipment - for free air circulation to remove moisture and heat.
The standard parameters of furniture for appliances are:
If you are concerned about the topic of cabinet TV stand. Follow the link.
- depth - from 50 to 60 cm;
- width - from 60 to 120 cm;
- height - from 75 to 80 cm (floor-standing cabinets), from 140 to 220 cm (single-door cabinet).
How to choose a dishwasher cabinet
Often, when you buy a dishwasher, you may not have the option to remodel the cabinets to accommodate it. For example, there may be such a situation: you have already remodeled the kitchen, and only then purchased a dishwashing unit.
And vice versa: you bought a dishwasher and decided to choose a cabinet for it to build in the device. We will talk about the solution to the last issue, when the problem of integrating a dishwasher into ready-made cabinets arises.
Which kitchen set should I buy? With or without a hob? 45 cm or 60 cm? Made by Ikea or something else?
Educational program about cabinets
So, you purchased a 45 cm or 60 cm dishwasher and you need to install it. You can see in the photo how you can do this yourself.
Often, there is not enough space in the kitchen to install the unit separately, placing it next to the oven.
This option means that you will have to sacrifice a piece of kitchen furniture into which you will build a dishwashing device with your own hands. The solutions here would be:
- You can install a dishwasher in an Ikea set with a sink.
- You can integrate the unit into an Ikea set with a hob or oven, as well as a piece of furniture where you store cereals and food.
- You can install the device in a cabinet hung above or next to the sink, or place the dishwasher under the oven.
Let's consider installation options
In the first case, everything will be quite simple, because the dimensions of the furniture for the sink can coincide with the dishwasher 45 cm and 60 cm.
The disadvantage is the following: in this option, the dishwasher will be small in size, and you will not be able to wash a lot of dishes in it. In addition, you will need to route the water supply in such a way that it goes behind the unit, and does not stretch above it.
In the second case, everything will be simpler. A compact and large dishwasher, both 45 and 60 cm or more, will fit perfectly into an ordinary kitchen set.
The size of the kitchen furniture with a hob, or the oven into which you decide to build the unit will play a role: a kitchen cabinet for a dishwasher can be large or small.
This option implies that the cabinet for the dishwasher will be occupied by the device, and you will have to make room in terms of food storage, because there will be clearly less space for storing cereals and vegetables.
The only important thing here is not to buy a lot of products that have a long shelf life, otherwise you will simply have nowhere to put them.
In the option of installing a dishwasher in a wall cabinet, there will be many disadvantages. First of all, such a piece of furniture must be securely attached to the wall, otherwise it will not withstand the load.
Another drawback is that in this case the water pipes will stretch along the wall itself, and this will not look nice. Well, there is one more minus: you will not be comfortable using the unit, loading plates and mugs into it, and the dimensions of the device itself will be small.
But some people stop at this option, which is why we mentioned it in our material.
Furniture selection criteria
- You should position the cabinet for your built-in dishwasher so that you can easily connect all the services without extending the hoses.
- There must be sockets nearby: then you can power the dishwasher. If you do not provide for this item, you will need to stretch the wires.
- The dimensions of the cabinet must be compatible with the dishwashing device: 45 cm or 60 cm.
Preparing the furniture
Before installing a dishwasher into a kitchen cabinet with a hob or oven, you will need to dismantle this piece of furniture. We will look at an example of how to build a unit measuring 45 cm and 60 cm with your own hands:
- Using a screwdriver or screwdriver, unscrew the hardware holding the cabinet and countertop together;
- Unscrew the fastening elements between the cabinet and the pieces of furniture standing next to it;
- Make sure you remove all the fasteners and pull the cabinet towards you to pull it out of its socket;
- Remove the shelves, back and top covers of the cabinet, leaving only the side elements and doors;
- Remove the front and rear plinths, leaving only the side elements;
- Using a drill, drill a hole in the back of the side panel where you will extend the hose and electrical wiring;
- Place the side walls and the base element, securing them with ties.
That's all for installing a dishwashing device into kitchen furniture. By the way, you can lay a film with a metal coating in the cabinet under the dishwasher 45 cm, inside the piece of furniture itself, so that the steam does not damage the furniture.
After all, when you open the unit, hot, humid air will come out of it, which can damage the cabinet with the hob or oven.
Installing a dishwasher
Now we will tell you how to install the unit itself. There is nothing complicated here:
- Lower the legs of the device;
- Push the device into the cabinet, threading the hoses and electrical wiring into the special holes made for them;
- Tighten the legs of the device so that the dishwasher fits tightly to the countertops
- Connect the unit to the water supply;
As you understand, you can easily build a dishwasher into a kitchen cabinet yourself. Finally, test the device: then you can make sure that the dishwasher is functioning correctly and that you have connected everything correctly.
Source: https://gold-meb.ru/matrasy/ustanovka-v-shkaf-posudomoechnoj-mashinki-45-sm-obzor-i-razmery.html
How to choose a cabinet and install a dishwasher in it
Very often, buying a dishwasher does not coincide with the time of remodeling the kitchen and ordering new furniture. The fact is that the kitchen may have already been remodeled, but at that time they didn’t even dream of a dishwasher, or vice versa, in order to make kitchen furniture for a dishwasher, you need a lot of money, but they simply don’t have it, but this is not a reason to refuse an assistant for kitchen.
This is where the question arises: how to integrate a dishwasher into an existing kitchen, be it old or new, what cabinet to choose for this?
The best built-in dishwashers 45 cm
Let's start with the largest and, accordingly, the most popular category. Built-in models allow you to hide them in a furniture set or simply organize your kitchen space better.
At the same time, their capacity is not inferior to standard models, and in terms of cost, this class of devices is located in approximately the same price range.
BEKO DIS 25010
The budget dishwasher DIS 25010 is an ideal everyday helper for a family of 3-4 people.
It holds up to 10 sets of dishes, and at the end of its door there is not only a control panel, but also an information display, which indicates the number of the selected mode and the time until the end of the work.
By the way, there are 5 programs available here at once, ranging from intensive for heavily soiled dishes, and ending with delicate, with which you don’t have to worry about the safety of fragile things.
An inexpensive but good BEKO dishwasher can be connected to both cold and hot water. However, in the second case, its temperature should not exceed 60 degrees, which is typical for most such equipment. You can find some minor flaws in DIS 25010.
But if you consider that this good built-in dishwasher costs about 15 thousand rubles, being the most affordable in the review, then we are ready to forgive the shortcomings found and can recommend it on a limited budget.
Advantages:
- complete protection against leaks;
- holds a lot of dishes;
- very affordable price;
- easy to control;
- there is a possibility of half loading;
- beautiful appearance.
Electrolux ESL 94200 LO
Another good option for users who expect high efficiency, great design and a reasonable price from a 45 cm wide dishwasher. The ESL 94200 LO model has 5 washing programs and 3 temperature settings.
The device's water consumption is limited to 10 liters, and the machine needs no more than 2100 W of electricity. For safety, the model under review has complete protection against leaks.
An inexpensive narrow dishwasher from Electrolux offers condensation drying. Compared to automated options, the user will have to wait longer for the dishes to dry. But this allows you to save energy.
The user can adjust the height of the dish basket. Thanks to this, even large pots and pans fit into the unit’s chamber. But what unpleasantly surprised us was the complete absence of a delayed start.
The noise level, according to reviews from buyers of the Electrolux dishwasher, is also not too low (51 dB according to the passport data). But the unit washes dishes very efficiently and efficiently.
Advantages:
- excellent assembly;
- quality of dishwashing;
- build quality and reliability;
- presence of a sound signal for the end of the cycle;
- reasonable cost;
- moderate electricity consumption;
- ease of installation and configuration;
- water consumption level.
Flaws:
- there is no delay timer;
- makes more noise than its competitors.
Siemens iQ300 SR 635X01 ME
If you want to buy a dishwasher for your home of the highest quality and you are not at all worried about its cost, then the ideal solution would be the iQ300 SR 635X01 ME model from the German company Siemens.
But, nevertheless, not everyone is ready to allocate almost 32 thousand rubles for the purchase of a dishwashing machine, and we gave this unit second place.
The door of the best 45-centimeter dishwasher is stylized as wood, and even the handle here is reminiscent of those in ordinary kitchen furniture sets.
Opening the camera door, the user will see an information screen with three indicators and a digital zone, which displays the operating time of the program, as well as a control panel.
Since the user does not have the opportunity to look at the display during operation, the manufacturer has provided a projection of the beam onto the floor when the program is completed.
Other advantages of a narrow dishwasher include complete protection against leaks, a 1-24 hour timer, a water purity sensor and a moderate noise level not exceeding 48 decibels.
Advantages:
- washes dishes cleanly;
- ease of installation and configuration;
- almost no noise during operation;
- superbly decorated;
- beam on the floor after the program;
- high quality assembly;
- excellent equipment;
- complete protection against leaks.
Flaws:
- high (but fair) price.
Weissgauff BDW 4140 D
Leading the list of the best narrow dishwashers is the quiet built-in model produced by Weissgauff. The cost of BDW 4140 D is approximately 24 thousand rubles. And although this is not the lowest mark in this category, in terms of price-quality ratio, the Weissgauff dishwasher is definitely more interesting.
The model under review offers 8 programs and 5 temperature settings. Upon completion of the unit operation, the user will see an indicator beam on the floor.
The maximum power consumption of the BDW 4140 D is limited to 2100 W, and the noise level is 47 dB. And the car is really very quiet, so you can start it even at night without fear of waking up your loved ones and neighbors.
If you don’t have time to wash the dishes before work, you can use the delayed start (up to a day).
Advantages:
- ideal price-features ratio;
- quality of washing and drying dishes;
- many programs to choose from;
- quality, reliability and practicality;
- there is a basket for cutlery;
- almost complete silent operation.
Source: https://expert-kachestva.ru/luchshie-tovary/tehnika-dlja-kuhni/rejting-luchshix-posudomoechnyx-mashin-45-sm.html
What to look for when choosing dishwashing equipment
The advantages of a built-in dishwasher over a free-standing one are that it significantly saves kitchen space and fits harmoniously into the finished design. All you have to do is decide what size machine you need and correlate the dimensions of the equipment with the location of its intended location.
Choosing a size
Built-in dishwashers come in several sizes, and, accordingly, can accommodate different amounts of dishes.
Table 1. Dimensions of dishwashers
| Size | Dimensions in centimeters | Maximum capacity (in number of place settings) |
| Mini | 50/50/55 | 5 |
| Narrow | 45/55/85 | 8 |
| Full size | 60/60/85 | 17 |
Please note: different equipment manufacturers may vary in size by up to 5 cm.
How to plan the installation of built-in units of various sizes, drawing
Mini dishwashers are convenient because they can be built into a small kitchen even under a sink or in a pencil case, since it is similar in size to a microwave oven and its location at eye level is quite convenient. Narrow units should only be purchased if you do not have a large family. It is advisable to choose full-size ones if you have a lot of relatives and the house is full of guests. But, you need to understand that such a machine will take up more space in the kitchen.
There are different types of machines, the body dimensions of which may vary.
Energy efficiency classes and labeling
Electricity consumption and energy efficiency are also important points to pay attention to when purchasing. Manufacturers are required to indicate the energy efficiency class for each product.
As a rule, it is indicated on a sticker that is pasted on the device itself or placed in a package with documents for the equipment. Classes are marked with Latin letters: A+++, A++, A+, A, B, C, D (until 2010, the markings were indicated by the letters A, B, C, D, E, F, G), where, respectively, class A +++ – the most economical model in terms of electricity and water consumption.
How energy efficiency classes are marked for various types of dishwashers
But the price for such models will be significantly higher than for a product with a subsequent gradation of classes. The sticker should also indicate:
- product model and brand;
- water consumption in liters per cycle;
- electricity consumption per cycle (kWh);
- drying class (A - G);
- number of sets of dishes;
- class of noise produced in decibels.
Explanation of the symbols found on the sticker that is equipped with the dishwasher body
Tips for connecting hydraulics
All dishwashers have the same hydraulic connection diagram. For example, a 60 cm built-in dishwasher is connected in the same way as a 45 cm wide dishwasher. Here are some tips:
- The standard length of the drain hose is usually sufficient with a large margin. If the machine is located far from the entry point into the sewer, then you will have to additionally install the sewer pipeline closer to the machine.
- To seal connections, use special plumbing sealant.
- To work with a pressure hose you will need certain skills. If you have never done this before, it is better to invite a specialist. This will provide you with quality and reliability.
- If you need to additionally secure the hoses to the wall, then use special anchor clamps. Attach the required number of clamps to the wall and attach the hoses to them. To secure it to the wall you will need a hammer drill.
Recommendations for correct installation
Very useful information on how to install a dishwasher can be found in the rules and recommendations from the manufacturers. For example, a Bosch built-in dishwasher (45 cm wide) comes with a whole package of necessary instructions.
Before you begin the installation yourself, find all the information available. Watch a couple of videos on how to install and connect. You must do everything correctly and competently.
Some useful nuances:
- Grounding must be done. This is a mandatory norm.
- The length of the drain hose should not be more than 1.5 meters. Otherwise, the injection pump can quickly fail as a result of increased load.
- Do not install a dishwasher under a hob.
- Be sure to install a protective metal plate under the countertop. It will protect it from hot steam and protect it from swelling and deformation.
Remember, a mistake can cost you dearly. It will be unpleasant to flood your neighbors with water or receive a slight electric shock if there is no properly grounded connection. Be careful.
Tools and materials
To install a dishwasher, you will need the following set of tools:
- Phillips screwdriver.
- Adjustable wrench.
- Knife.
- Drill.
- Wire cutters.
- Building level.
Prepare the following materials:
- Brass tee for connecting a pressure water hose.
- Tow for sealing.
- Ball valve.
- Clamps.
If you need to increase the length of pipelines, prepare everything you need in advance.
It is recommended to use tow to seal threaded pipe connections. It is more reliable and durable than rubber fum tape.
Electrical connection
Attention! Carry out all electrical installation work with the power supply turned off. Check the position of the machine switch. To be absolutely sure, use an electrical tester.
Use special plastic plugs to connect electrical wires. They are usually included in the package.
Power connection sequence:
- Unscrew the electrical cover latches on the rear of the machine.
- Connect the wires. Be sure to connect the ground wire.
- Put on protective plastic caps. Simple electrical tape is not suitable.
- Reinstall the electrical cover.
All. You have fully connected the dishwasher. Now push it into the furniture niche and secure it. Turn on the electricity and water. Check functionality. You should be fine.
Source: https://remontonly.ru/kak-ustanavlivat-vstraivaemuyu-posudomoechnuyu-mashinu.html