A faulty bearing is the number one cause of costly breakdowns in Bosch washing machines. German quality truly offers an impressive service life for all parts of the mechanism. However, even the most proven products sooner or later become unusable.
You can avoid this either in a more expensive way, by calling professional craftsmen (for example, us: Washing machine repair Kazan), or in a more optimal way - with your own hands. Of course, the second option will have to be approached as thoughtfully and responsibly as possible. After all, without preliminary preparation, all efforts can easily lead to even greater problems.
Often, several months after repairing the bearing assembly on their own, equipment owners still turn to Bosch washing machine repair shops. This happens because there are a lot of nuances in such repairs:
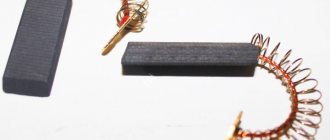
- the quality of the bearings or seals themselves (the same French SKF ones can be of both high quality and not so good - you need to know how to choose);
- lubricant - many use lithol or grease instead of special lubricant. And the special one is quite expensive;
- pressing out and pressing - it is necessary not just to hollow out the bearings, but to carefully press them out without damaging the seat. Even WD-40 spray does not always help. And in fact, even experienced craftsmen sometimes cannot cope with the stuck outer ring;
- The bushing is a very important moment. Often you have to change it too, but the average person will not be able to distinguish when it must be replaced.
These are the main points in which both owners and novice masters make mistakes. But since the article is about replacing Bosch bearings with your own hands, let’s begin.
Causes and signs of bearing failure
If the Bosch machine begins to make a lot of noise during operation, you can hear knocking and grinding noises that intensify during the spin cycle, this indicates the need to replace the bearings. During operation, the seal covering these units wears out over time, and water begins to enter the bearing seat through it. It washes away the bearing lubricant, resulting in increased friction and deformation of the bearing.
To finally make sure of the diagnosis, you need to open the car hatch, bend the cuff and manually turn the drum or shake it. Significant play will be noticeable.
To replace bearings and seals yourself, you need to assemble a tool and purchase spare parts, as well as prepare your Bosch washing machine for repairs.
Signs of bearing failure
Most often, the bearing begins to collapse after the cuff is damaged and the lubricant is washed out. With such a malfunction, extraneous noise is heard in the drum, a metallic grinding sound, and increased vibration of the machine is felt.
To diagnose bearing failure, simply spin the drum by hand. If it turns with difficulty, has significant play and you can hear the steel balls spinning, then you will have to disassemble the washing machine and work on the bearings. Since they cannot be repaired, these parts will need to be replaced.
In cases where the drum completely stops spinning and the machine starts to leak, we advise you not to risk it and have the washing machine repaired by professionals.
Preparation for repair work
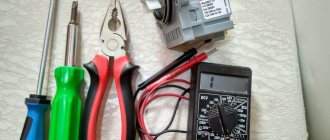
The first thing you need to do before carrying out troubleshooting work is to prepare the necessary tools. To replace bearings on a Bosch Maxx 5, Bosch Maxx 4 or other series you will need:
- set of Phillips and slotted screwdrivers,
- set of socket heads,
- pliers,
- needle nose pliers,
- hammer,
- bit,
- rubber mallet,
- WD-40,
- silicone sealant.
You will also need a basin or other container to drain the remaining water in the washing machine and dry rags.
In addition to the tools, you need to purchase spare parts. Bosch service centers sell special repair kits that include bearings and seals, as well as special bearing grease. In order not to make a mistake when choosing, you need to tell the sellers the brand of the washing machine and model, this is the only way they can select the right set of spare parts as accurately as possible. In addition to service centers, you can purchase replacement parts in a specialized store or online.
If the washing machine has served for many years, it is recommended to first disassemble it, inspect the components, and only then go to the store. It may be necessary to replace other components in addition to the bearings. It is better to do this right away so that after a while you do not have to disassemble the machine again to replace one or another part.
Before you start disassembling the washing machine, you need to disconnect it from the network, disconnect it from the sewerage system and water supply and move it to a spacious place so that nothing interferes with the repair. You need to place one or two tables nearby to put the removed parts on them.
When disassembling a Bosch washing machine, it is recommended to take photographs of each step so that there are no problems during assembly. First of all, this concerns wiring. If the connection is incorrect, a short circuit and contact burnout may occur, which will lead to additional expensive repairs, and in the worst case, to the purchase of new equipment.
Diagnostics
Most modern models of Bosch washing machines, for example the Maxx 5-6-7 series, are equipped with a self-diagnosis system, which greatly simplifies the identification of faults. In order to establish the nature of the breakdown, it is not necessary to contact the service center; it is enough to perform a few manipulations, and your machine itself will “tell” what the problem is. So, let's start performing the service test:
- Close the sunroof, move the program selector to the “Off” position.
- Pause for 2-3 seconds, move the switch to “Spin” (clockwise).
- When the Start LED flashes, press and hold the Mode Speed button. Watch "Start" - it should start flashing again.
- Turn the switch to "Drain" (clockwise).
- Release “Revolution Mode” (you didn’t forget to hold this position, did you?).
- Next, put the switch in the position corresponding to testing any component of the washing machine (3 – motor, 4 – drain pump, 5 – tubular electric heater (TEH), 8 – main wash water inlet valve, 14, 15 – quick automatic test). Below is a diagram of the switch and the location of the numbers that correspond to the position of its handle.
Here is a schematic image of the switch and an explanation of the positions of its handle
Some models differ in the numbering of commands: for example, in the Bosch Logixx 8 washing machine, the engine is checked in the 4th position (by the way, in this washing machine you can carry out quick diagnostics by setting the switch to number 3). When the test is completed, an error code will appear on the display, which the instructions will help you decipher. In older models without a display, the error can be recognized by the glow of the LEDs, after which you can begin to repair the Bosch washing machine.
The photo shows the control panel of the Bosch Logixx 8 washing machine; Diagnostics of breakdowns in it is carried out according to the Bosch Maxx principle, only the numbering of commands is slightly different
It is somewhat more difficult for owners of older generation models - they will have to determine the breakdown based on its symptoms.
Signs of malfunctions and their causes
Devices from earlier years, for example Bosch WFT 2830 or Bosch WFF 1201, cannot independently diagnose problems, so the user will have to do this based on their characteristic symptoms:
- Water is collected slowly or not at all . This occurs due to the accumulation of debris in the inlet filter or a malfunction of the fill valve. The culprit of the breakdown may also be the water level sensor - pressure switch;
- the water doesn't drain well . The problem most often lies in a clogged drain filter, failure of the drain pump or pressure switch;
- the water does not heat up . The heating element is almost always to blame for this. The heating element burns out for two reasons - natural wear or scale formation. Sometimes there is no heating due to problems with the control board or a malfunction of the temperature sensor;
- The drum does not spin . A belt drive transmits torque from the engine to the drum. If the belt falls off or breaks, the drum will not move. A more serious option is engine failure;
- loud noise during spin cycle . The reason usually lies in the destruction of the bearings.
In the photo Bosch Maxx 4 WFC 2060 is a model equipped with a self-diagnosis function
Any of the listed problems can be caused by a failure of the control module (electronic controller). Unfortunately, it is very difficult to repair this unit yourself; it is better not to try. Contact a service that provides repair services for Bosch washing machines at home. Specialists will resolder the board or replace it with a new one.
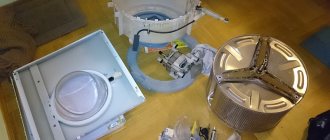
Disassembling a Bosch washing machine
To replace bearings and seals, the Bosch machine will need to be completely disassembled. This process is very similar for different series (Bosch Classixx5, Bosh Avantixx or other) and looks like this:
- Unscrew the screws from the back of the washing machine, move it forward a little and remove the top cover.
- Remove the detergent drawer.
- Unscrew the three screws behind the cuvette and one from the inside that hold the control panel.
- Take a photo of the wiring connection, disconnect the wires, remove the panel.
- Remove the plinth panel located at the bottom of the front of the machine.
- Unscrew the screws located behind it.
- Open the hatch.
- Unclench and disconnect the clamp holding the cuff.
- Tuck the cuff inside.
- Unscrew the screws holding the UBL, stick your hand inside, pull out the locking device, disconnect the wiring and remove the part.
- Lift, remove and move the front panel to the side.
- Disconnect the compartment into which the detergent cuvette is inserted, loosen the clamp securing the hose for supplying detergent to the tank and remove the pipe.
- Unscrew the fasteners, remove the counterweights installed at the top and bottom.
- Take a photo of the heating element wiring and disconnect it.
- Unscrew the nut holding the heating element to the edge of the bolt and push it inward, then pull out the heating element.
- Substituting the container so that the remaining water does not spill onto the floor, remove the pipe going from the tank to the pump.
- Disconnect the wiring, unscrew the fasteners, remove the pressure switch.
- Remove the wiring fasteners, move the wires to the side so as not to interfere with the removal of the tank.
- Unscrew the fasteners and remove the back cover of the Bosch machine.
- Pull the belt to the side and, turning the drum, remove it.
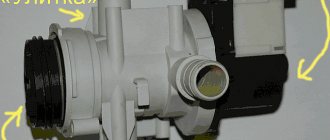
- Unclench the clamps holding the motor wires, disconnect the wiring, unscrew the fasteners and remove the motor.
- Disconnect the pressure tap chamber.
- Unscrew the lower shock absorber mount, disconnect and remove the part.
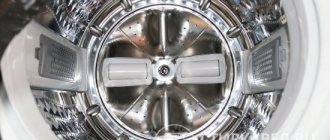
- Holding the springs, carefully remove the tank along with the drum and pull it out of the housing.
Getting to the tank
Having collected the tools, we prepare the workplace. We disconnect the washing machine from the communications and move it away from the wall, providing free access to both the front and rear walls of the case. Then we sequentially disassemble the equipment, getting to the drum.
Take photographs of the process of disassembling the machine to avoid mistakes during reassembly.
- Remove the top cover by unscrewing the two retaining bolts from the back and lightly tapping the panel.
- We take out the powder receptacle by holding the “tongue” with your finger.
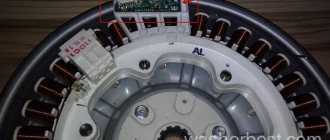
- We release the dashboard by unscrewing three bolts under the powder receptacle and one on the right side. We press out the plastic latches, using a screwdriver, and remove the board. There is no need to unhook the wiring - just carefully hang the module on the housing.
- Disconnect the wire leading to the intake valve.
- After loosening the central bolt, unhook and remove the upper counterweights.
- Open the hatch door, loosen the outer clamp and remove the cuff.
- We turn off the UBL by unhooking the corresponding wires.
- We remove the technical hatch door to the side.
- Unscrew the mounting screws holding the bottom bar and remove the panel.
- We unscrew all the screws around the perimeter of the front panel, and then disconnect the end from the body.
- Using pliers, unfasten the clamp from the pipe connecting the tray and the tank, and also free the other hoses and wires connected to the drum.
- We remove the intake valve and pressure switch.
- We dismantle a pair of metal upper strips.
- Remove the front counterweight.
- We release the wiring from the heating element and the pump.
- We unhook the shock absorbers.
You can remove the tank now, but it’s better not to rush. The fact is that without dismantling the electric motor the drum will be very heavy. In order not to strain, you should remove the back wall of the case, remove the drive belt, turn the machine on its left side and loosen the motor with a ratchet. All that remains is to pull out the engine and move it to the side.
Then we lift the tank and take it out of the machine. The next step is to halve it. The reservoirs on the BoschMaxx 5 are equipped with disposable latches in the form of plastic latches . You can get through them in several ways: knock down the latches with a flat-head screwdriver and a hammer, or squeeze them out, unscrewing all the screws on the surface of the tank.
Bearing replacement
Now you can start replacing the bearing in your Bosch washing machine. To do this you will need to disassemble the tank. On most models of Bosch machines it is collapsible, only on some devices halves of the tank are soldered.
- Turn the tank over with the pulley facing up, unscrew the bolt, remove the pulley, then screw in an old bolt of similar diameter and knock out the shaft using a rubber hammer. Apply blows strictly at right angles so as not to damage the shaft.
- Remove the bolts holding the tank halves.
- Release the latches.
- Divide the tank into two parts.
- Get the drum.
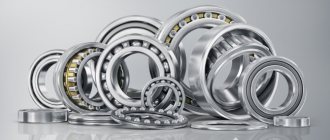
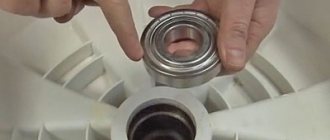
The drum bearings are located at the rear of the tank. Before you begin replacing parts, you must inspect the shaft, bushing and crosspiece for damage. They can be damaged if the machine has been running for a long time on deformed bearings. If a breakdown is detected, the faulty parts must be replaced. Next you need:
- Take a hammer and chisel and knock out first the outer, then the inner bearings. The old seal will be removed along with the second bearing.
- Wipe the seats from dirt and lubricate thoroughly.
- Carefully lubricate and replace the bearing installed on the outside of the tank. To do this, you need to install it on the seat and drive it in with hammer blows in a circle; they should be applied only on the outside of the part.
- Next, the internal bearing is replaced.
- Now a new oil seal is installed. It must be thoroughly lubricated and all voids filled with lubricant.
Reassembling the Bosch machine is done in reverse order. When connecting the halves of the tank, the joints must be thoroughly coated with silicone sealant and allowed to dry after assembling the machine for the recommended time. When connecting the wiring, you must use the photographs that were taken during disassembly to avoid mistakes.
Why does a Bosch washing machine break down and when is it needed to be repaired?
Bosch washing machines have to be repaired for several popular reasons; of course, some of them can be eliminated with your own hands, having knowledge of the operating principle of the device and its assembly algorithm. Let's look at why an automatic machine may break down and determine in which cases it is better to entrust servicing to a specialist:
- Failure of the inlet pump, drain pump, clogged filters and drain hose. Such malfunctions manifest themselves in the absence of water in the tank and the problem of its collection. A similar problem can also be caused by a water hose being kinked or damaged.
- The noise produced inside the drum raises a lot of questions about whether the machine can continue to be used. This often happens if a small hard object (changes, nails, stones) gets into the drum container or due to faulty bearings.
- Stopping the drum is often caused by a violation of the integrity of the drive belt or contact in the controls and electronic modules. A motor breakdown requires serious repairs (this rarely happens in Bosh washing machines).
- When the machine refuses to drain water and symbolizes this error with a sound indication, the cause may be a faulty water sensor, or a broken drain pump. A similar malfunction also occurs due to a clogged drain filter.
Helpful information!
The Bosch washing machine engine may not start due to a broken lock on the door or a loose closure. In this case, the water may also not fill the drum.
Having studied the listed reasons and signs of a breakdown of the washing machine, try to carry out repairs yourself; if this is beyond your power, then immediately go to a service center.
Why should a Bosch washing machine be repaired at Rusmaster?
The Rusmaster workshop has been working in Moscow for many years and travels to people within the capital. The company has competitive prices and high quality. We are ready to fix the problem with modern automatic devices, as well as with older models.
You can consult with our employees by phone and find out the cost of repairs. Our employees name the exact amount only after conducting a comprehensive diagnosis.
For additional information and to place an order, please call +7 (495) 146-84-83
Or leave a request on the website. We will contact you within 10-15 minutes.
How much does it cost to repair a Bosch washing machine - review of prices for different types of services
Prices for repairing washing machines are usually divided into low, medium and professional. Let's look at popular breakdowns and prices for their repair in the table.
| Photo | Type of repair | Duration, min. | Average price for repairs, as of June 2018 |
| Replacing the hatch | 30-40 | 2,000 rub. | |
| Heating element repair | 40-70 | 2,300 rub. | |
| Replacing the pump | 50-80 | RUB 2,250 | |
| Replacing bearings and shock absorbers | 60-180 | 3,600 rub. | |
| Complete drum replacement | 60-120 | 3,100 rub. | |
| Clearing a clog in the drain pump | 60-80 | 2,800 rub. |
Please note that repairing a Bosch washing machine has a separate cost. If it is impossible to repair a damaged part, it must be purchased for additional financial resources. Dear readers of our resource, if you are interested in something or have something to discuss regarding the information from this article, you are welcome to comment. Our team will promptly respond to your request.