Share on social media networks:
Even the simplest washing machine can significantly facilitate the daily work of the housewife. And if it is a unit from a well-established manufacturer, then both the quality of cleaning and the effort and time spent on it will be significantly less. Therefore, in order to make the right choice when buying a washing machine, you need to study its main characteristics, as well as become familiar with the strengths and weaknesses of this model. Let's look at the Indesit wiun 100 - the manufacturer's instructions will tell you all the advantages and possible disadvantages of the model, which are important or not so important for a particular user.
Preparing for launch
Now is the time to load the laundry items into the drum.
Please note that the maximum weight of laundry indicated on the body of the washing machine is a rather arbitrary value - it rather indicates the volume of the drum. For each washing mode, the operating instructions provide its own maximum permissible weight of laundry
In any case, in order for your equipment to serve you for a long time, you should not load the drum more than halfway.
Do not load too much laundry into the washing machine drum
After the laundry is loaded, close the washing machine door until it clicks. It happens that things fall into the hatch opening and the door does not close completely. In this case, under no circumstances should you apply force - you need to eliminate the obstacle and only then close the hatch.
In top-loading washing machines, the drum itself is closed first, and only then the top cover.
The next stage of preparation is adding detergent
Please note that powders and especially gels are highly concentrated, and you should strictly adhere to the dosage indicated on the packaging of the product
To measure the amount of washing powder you need, use a measuring cup
For automatic washing machines, it is better to choose only specialized products with the appropriate mark on the packaging. Never use powders intended for hand washing. There will be too much foam from them, a leak may occur and the unit will stop working.
Before adding the product, you need to read the instructions and find out what each compartment in the washing machine tray is for. The powder is usually poured into the first sector on the left, and the conditioner into the first sector on the right.
How to properly operate a washing machine?
Of course, starting your washing machine for the first time is of great importance, but it is equally important to always monitor it. If you follow the recommendations below, the machine will last for a very long time from the moment of purchase:
- If unusual strange sounds are heard from the device during initial startup, there is no need to try to repair it yourself. She has warranty service and repairs must be performed free of charge. It is enough to dial the number of the service center indicated in the documents and explain what happened. A repairman will definitely arrive or the unit will be taken away for repair.
- Under no circumstances should you use hand washing powder for automatic washing machines. Use only specifically designed products. Otherwise, the effect of increased foaming will damage the unit.
- Overload should not be allowed, as the device may simply not work, and if it starts, the parts will wear out more. Some functions may fail, such as spin.
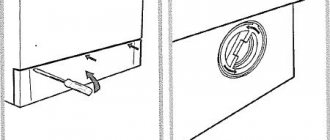
- There is a drain valve at the bottom of the housing, which requires regular cleaning. Otherwise, the drain hose may become clogged.
Important! Before putting laundry into the drum, be sure to check the pockets to ensure there are no small items in them. Due to their small size, they can get into the gap between the tank and the drum, which will lead to jamming of the latter
- After finishing washing, you should leave the hatch open. This is necessary to ventilate and dry out any remaining moisture. Otherwise, mold may form and an unpleasant odor may appear.
- Descalers must be selected very carefully. If they are of dubious origin, they can lead to the destruction of the seals, and then the bearings. It is also possible that the coating on some parts may be damaged.
Important! Washing and cleaning the washing machine must be carried out separately. Be sure to follow the instructions for the product
Now you are convinced that the first wash in a new washing machine is not a difficult task. By adhering to the above rules and tips, already from the second wash you will be able to get an armful of things that smell fresh and clean from a pile of dirty laundry.
Having purchased a new washing machine, you should not start it on the first program that comes across and randomly go through the program selection buttons. Although all washing machines are equally identical, they still have a number of distinctive features. It all depends on the manufacturer and model.
Before the first wash in the washing machine is carried out, you need to make sure that it is properly prepared and its installation meets all the requirements for safe operation:
Transportation bolts - we check whether the stoppers are removed, which prevent the drum from spinning during transportation; if you start the wash with them, the machine may fail. Read the instructions carefully - depending on the manufacturer and type of machine, the instructions for the first start may differ in some respects, it is worth pay special attention to text blocks marked “important”. Find out if you can use anti-scale additives during the first wash Connections - check that everything is connected properly
Water, sewer and electricity. In addition, the machine must be grounded, since this is a potentially belt-loading machine that works in direct contact with water, and the slightest internal leakage can result in a short circuit. Remove all packaging and tape that was used to secure the moving parts for transportation.
Instructions and manual for Indesit WIE 107 in Russian in English
Before you begin installing the washing machine, you need to check it for external defects, so that if any are found, you can hand the “home assistant” back to the seller. Next, you need to remove the plugs with spacer washers and unscrew the fasteners that were intended for transporting the washing machine. We insert the plugs where we unscrewed the bolts, and then put away the removed parts, they may be useful in the future.
We will not touch the hoses attached to the body for now, so that they do not interfere with moving the machine.
Now you should leave the machine alone for a while and work on the place where you plan to put the machine. In a good way, you should start preparing a place for the machine during a major renovation of the premises.
- Lay pipes and arrange connections for connecting the inlet hose.
- Install a siphon with an outlet for the drain hose or a sewer pipe outlet for the same.
- Provide separate grounded and circuit-protected wiring for the moisture-resistant outlet.
- Strengthen and, if possible, level the floor under the future machine. The stronger and smoother the floor, the less vibration, accordingly, the quieter the machine will operate and the longer it will last.
- And of course, you need to make enough space for the future “home assistant” so that nothing stands in front of her hatch and does not interfere with putting laundry in the drum, so that there are gaps around the body (1 cm on the sides and top, 10 cm on the back). In general, the idea is clear!
We drag the car into place. By the way, you shouldn’t do this alone, you might tear your navel. Let's move the surrounding objects apart so that there is access to the washing machine body from all sides, otherwise it will be inconvenient to connect.
We release the hoses from the fastenings and install the inlet hose. What does it mean to equip? We insert the rubber seals into it, having previously lubricated them with grease (in case they have dried out). We screw one end of the hose to the filling valve (machine body), and the other to the outlet of the water pipe. Usually a tee tap is placed at the outlet of the pipe so that the water flowing into the machine can be shut off. Checking the quality of the connection.
Next, we connect the drain hose that comes from the pump to the sewer. By the way, the pump pumps water out of the machine quite quickly. So if you do not secure the hose properly, the waste water will splash out onto the floor. Do not tighten the hose; if the length is not enough, it is better to extend it using a hose of the same diameter.
Now we just have to connect the machine to the outlet. Be careful, if you live in a village where there are frequent power outages and frequent voltage drops, it is better to connect the machine through a voltage stabilizer. This will seriously protect your new “home assistant”.
Control panel, starting the wash
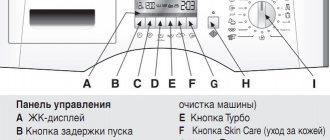
If the connection was successful, it's time to try out your new machine. To begin with, it would be a good idea to study its control panel to understand which knob and which button are responsible for what. So, the Indesit WISE 10 CSI washing machine has 4 categories of elements on the control panel, not counting the dispenser. What is it about?
- Pens. This model of the Indesit washing machine has only one handle and it is used to switch programs.
- Buttons. There are eight buttons, with their help the washing machine is turned on, the washing program is started, and various functions are activated.
- LED indicators. Three LED indicators illuminate the function buttons: “light ironing”, “extra rinse”, “stain removal”.
- Display. There is only one screen on the control panel and all information useful to the user is displayed on it.
The Russified control panels of Indesit WISE 10 CSI washing machines contain a lot of useful information. In particular, all programs and functions available are signed.
Let's start the wash. Press the large button located in the upper right corner of the machine, which activates the control panel. Under normal conditions, we will need to load laundry, but this should not be done during the first wash. Let the machine run the program idle and wash the inside.
We turn our selector so that the arrow is opposite the number 2. Press the corresponding button so that the desired function is activated (you don’t have to do this during the first wash). Add powder to the dispenser. Click the button that is in the top row, second from the right. This button activates the washing program. Then all you have to do is wait for the machine to wash.
How the dispenser works
It would be nice to also see how the dispenser is designed so that you know which compartment to fill with what product. Almost all Indesit brand machines have the same dispenser. It is designed very simply. Pull-out plastic drawer, divided into three compartments. The first compartment on the left is rarely used. It is needed when activating the “soaking” mode. When running regular programs, you should not put powder there. The middle compartment is always needed, because it is for washing in the main mode. The far right compartment is for rinse aid.
There is also a whitening compartment. It is placed directly in compartment number one when you need to turn on the “whitening” function. It is rarely in demand, so the manufacturer deliberately made this compartment clip-on.
After washing
Well, you know everything you need to do laundry using the new Indesit washing machine. However, in order for the washing machine to work for a long time and not lose its aesthetic appearance, it needs to be looked after. You don't have to do anything special. You only need after each wash:
- dry the inside of the machine by leaving the hatch and dispenser open;
- wipe the rubber bands and all other wet parts with a rag so that the moisture does not stagnate and an unpleasant odor does not form;
- rinse the powder receptacle from any remaining gel or powder.
These measures will help maintain the neat appearance of the washing machine, but this is not enough. In order for the washer to work properly, you need to periodically clean the debris filter. You can read how to clean the filter in an Indesit washing machine in the article published on our website.
So we have published a short version of the instructions for this washing machine. Perhaps you find it insufficiently informative, then the factory instructions are at your service, which we have placed immediately below the text of the publication. Good luck!
View full instructions
- Strong vibration during spinning, half of the detergent remains in the dispenser, the quality of washing leaves much to be desired.
- After six months of use, no problems have been detected yet.
- Programs are glitchy, loud drain
- In a separate “Spin” mode, the maximum speed is 800 rpm, although in general the machine supports a maximum of 1000 rpm. It is not comfortable! The “Quick Wash” mode does not rinse the laundry well. Special black, you always take out everything in white stains, with smeared powder, reducing the amount of powder does not help, so you always have to set the Additional rinse in advance, which lengthens the washing time
After several washes, powder accumulates under the powder loading tray; if you remove the tray, you can see that there is a small pile of powder in the middle; you have to periodically remove it. Several times the machine indicated that it had finished washing, but at the very last moment before opening the door, I noticed that there was half a tank of water... It turns out she didn’t leak it, but she writes
There was no systematicity in this - I could wash it every day for a week without any problems, and then it would malfunction for a couple of days. They called a technician, came and looked, listened to the symptoms and reported that there was a problem with the electronic unit, a new one would be available in 5...7 days. 5 days later he brought a new unit and replaced it. For almost 5 months it worked like a clock, 3 days ago it malfunctioned again and did not turn the ram. if glitches op
Special
Additional, also called special programs, are found on the latest models of cars. Such programs involve washing a certain type of clothing. Here is their list:
- “Jeans” program - washing denim products at a temperature not exceeding 40C, with a load of no more than 2.5 kg and at reduced spin speeds.
- Express 15 is a quick wash mode for 15 minutes, which allows you to refresh no more than 1.5 kg of laundry at a temperature of 30C.
- Sports shoes - with this mode you can wash sneakers, sneakers made of suede and fabric. The heating temperature is only 30C, loading no more than two pairs per wash cycle. The process lasts 50 minutes.
- Sportswear is a delicate wash of sportswear at 30C for 1 hour 18 minutes. The machine drum load in this mode is approximately 2.5 kg.
Additional functions of a washing machine of this brand also include:
- additional and gentle rinsing;
- spin;
- drain without spinning;
- Eco Time – this function will reduce washing time by optimizing water consumption. The function is compatible only with one of the cotton washing modes and synthetic washing modes.
How to choose a mode
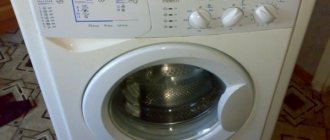
The choice of washing modes is carried out using the programmer knob. The program numbers are indicated around the handle, and the decoding of these programs is given on the left side of the washing machine. On very old models there is no verbal decoding, but there is a decoding in the form of symbols that should be intuitively clear. The picture below shows such a control panel for an Indesit machine.
In the column on the left, numbers from 1 to 7, programs for washing cotton products are offered. In the next column, programs numbered 8 to 10 are programs for washing synthetics. In the last column (on the right) program number 11 is a delicate wash.
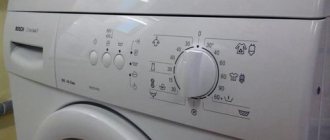
The photo below shows another control panel of the Indesit machine. It has the following functions (circled in red):
- pre-soaking;
- easy ironing;
- delayed start;
- additional rinse.
Thus, the peculiarity of the modes of Indesit washing machines is that they are all divided into two or three groups, regardless of the machine model, and are numbered. These are programs for washing cotton, synthetics and special modes. In order not to make a mistake when choosing a program, you need to carefully read the labels on the clothes, all the information is there. Have fun washing!
Minuses
The disadvantages of Indesit wiun 100 are noted in the following points:
- noisy during spinning;
- increased vibration;
- small laundry capacity, small drum;
- no countdown timer.
Important! Two of these disadvantages can be neutralized or made less significant:
- to prevent vibration, install special pads on the legs or place an anti-vibration mat under the washing machine;
- You can make the noise less noticeable by installing the device in the bathroom and using it with the doors closed.
Connecting a washing machine in a house without running water
You can pour washing water into the automatic washing machine through the compartment designed for supplying powder to the unit. The technique is simple, but truly tedious. You will have to constantly be near the machine and add water to it as needed. All the comfort from operating an automatic unit, as you understand, disappears.
Another way is to place above the machine (for example, on the second floor of a building or in the attic) a sufficiently capacious container from which water will be supplied. The option looks reasonable. But in practice it is often very difficult to translate into reality. After all, the container should be located at a high altitude (ideally 10 m). It is with this raising of the tank that a pressure of 1 bar will be created in it, which is necessary to supply water to the washing unit. In addition, you have to constantly carry water to the second floor and fill the container. Considering that one wash requires from 100 to 200 liters of water, such physical procedures are not suitable for every summer resident.
Reservoir for supplying water to the washing unit
And in the case when the attic space in the house is unheated, the option with a tank is completely eliminated. In winter, the water in it will simply freeze. You can also drill a well in your country house and connect the washing machine to it. The solution seems good. You have a constant source of water for which you don’t have to pay. But the costs of constructing a well (calling drilling specialists, conducting geodetic surveys to search for an aquifer, installing pipes, a storage tank and a special pump) can, without exaggeration, be prohibitive.
True, the cost of such a station is quite high. Not everyone wants to suffer with its arrangement because of the washing machine. For thrifty owners who do not want to spend excessively, there is only one way to connect an automatic machine in the country. We talk about it further.
Washing machines SM-2
Washing machines of this type differ from previous ones in their larger sizes and the ability to wash up to 2.5 kg of laundry. The body of the rectangular machine is made of metal coated with paint. The activator is usually located on the side. To remove and replace it, you need to perform the following sequence of actions:
- Unscrew the back cover of the case and remove it.
- Remove the belt from the pulley.
- Unscrew the bolt holding the pulley to the activator shaft.
- Hold the activator with one hand and remove the pulley.
- Press the shaft together with the activator disk into the washing machine tank.
- Get the activator.
- Reassemble the machine in reverse order using a new activator.
Automatic washing machines with drum and activator
As a general rule, automatic and semi-automatic washing machines that do not have a drum are called activator ones, since the water in the tank is set in motion using an activator, and machines with drums opposite the activator do not have them, since they operate using a rotating drum. But there are exceptions to this rule - Daewoo top-loading washing machines. They have both a drum and an activator. How to remove a broken activator on such machines and replace it with a new one?
- In this case, dismantling the drum is not required. To remove the activator you will have to remove the drum rim, otherwise it will interfere. Move the plastic clips to the sides and remove the rim.
- Now you need to unscrew the nut holding the activator. It is located right at the bottom of the drum, so you will need a socket wrench.
- Having unscrewed the nut, pry up the activator with a screwdriver, and then pull it out along with the nut and washer.
- We purchase a new original activator, put it in place of the old one, and then secure it with a nut.
Changing the fin punch
Replacing the fin punch is not difficult; almost anyone can handle this task. What do we have to do?
- Take a stiff wire (or spring).
- We bend its tip with a crochet hook.
- We insert the wire into the hole of the rib punch, press on it and feed it towards ourselves.
- The rib punch should come off the latch and be removed.
- The new drum finner is put on by hand. We feed the part slightly upward, and then put the mating part on the hooks.
- Now the hooks need to be tightened; to do this, take an awl, thread it through the holes in the rib punch and tighten the fixing hooks.
To summarize, we note that you can replace the washing machine activator with your own hands, without the involvement of a specialist. The main thing is to buy an original spare part and take into account all the advice of experts. Of course, if you are not comfortable with technology and doubt your abilities, invite a specialist, and he will do everything in a few minutes.
Solution
What to do and how to fix error 08? First, decide what the reason is.
Malfunction of heating element or temperature sensor
First of all, you need to ring the heating element using a multimeter:
- Unscrew the back wall of the washer.
- Disconnect all wires and make sure that the device is completely de-energized.
- Set the multimeter to 20 ohms and measure the resistance.
- If the value is more than 20 ohms, then everything is in order.
- If the number 1 appears on the screen, then there is a break inside the heater and it needs to be replaced.
How to troubleshoot and solve the problem:
- Disconnect the heating element from the wires and unscrew the fasteners.
- Replace the heating element.
To remove error f08 on the Indesit washing machine, check the temperature sensor for traces of rust and corrosion. If any are found, you will need to replace the heating element along with the sensor; cleaning is useless.
Control module failure
If previous tests were unsuccessful, there may have been a failure in the control system. Due to this, the machine does not receive commands to heat up.
Why did the crash happen? There are many options, a professional will help you determine the right one. The board is a complex and expensive part, so it is better to trust a specialist.
The reason is the wiring or the motor.
High humidity conditions provoke oxidation of the motor contacts, which leads to an error code.
What to do? You will need to ring the motor, then remove it, inspect the contacts, clean and blow off dust from the brushes. Also check the wiring leading to the motor. Perhaps this will help reset error 8.
Knowing what the fault code means, you can quickly find out why the breakdown occurred. But it’s up to you to decide whether to repair it yourself or call a specialist.
Let's get ready first
Before you start the first wash, you should inspect the machine to make sure it is completely ready for use.
It is important to carefully study the user manual to understand the basics of operating the unit, the main cleaning modes, available options and additions
Also, before the initial start, it is recommended:
- Check that the inlet and drain hoses are securely attached. The drain sleeve must be secured with special care. When actively draining waste liquid from the tank, it can jump out of the hole and cause flooding;
- Make sure all shipping bolts have been removed. The purpose of these elements is to ensure the safety of the machine during transportation. The transport bolts must be removed before starting the washing machine. Special plugs supplied with the equipment are inserted into the resulting holes. The number of bolts must be specified in the instructions for the device. Even one bolt remaining inside can cause the machine to quickly fail;
- open the hatch door and carefully inspect the surface of the drum. Make sure there are no foreign objects or debris there;
- see if all the adhesive tape has been removed from the washer body. Usually it is used to fix machine parts.
At the end of the inspection, it is necessary to slightly open the valve on the inlet hose. This will ensure the possibility of drawing water from communications. This is the mandatory order of preparatory actions before the initial launch of the SMA.
Features of Smart washing machines from Candy
The Italian manufacturer of appliances, keeping up with the times, has equipped modern laundry devices with pleasant bells and whistles. The Candy Smart washing machine has the ability to perform mobile diagnostics and control washing using a mobile device via NFC technology.
Other features:
- updated space design, which is embodied in a gray or white body color and a stylish volumetric hatch with chrome trim;
- quick dialing of programs, which is carried out in the standard way - using the scroll lever and additional option buttons;
- built-in automatic weighing sensor KG DETECTOR, which itself determines the degree of loading of the centrifuge (based on the data obtained, the optimal washing program is selected and the amount of water is calculated);
- a digital display will provide the user with information about the completion of a specific washing stage and tell you how much time is left until the end of the work;
- there is an easy ironing function, using which you will get things with a minimum number of folds (in some cases you will not need to carry out post-processing with an iron);
- you can manually adjust the spin speed, temperature and even time within the selected mode;
- there is a delayed start option, which is convenient for very busy people;
- In terms of protection, there is a voltage stabilizer, protection against leaks and child intervention.
To determine whether the washing machine belongs to the Smart series, look for a special blue icon on the detergent container.
A special icon on the panel indicates the ability to connect to a mobile device
Manufacturer Candy Hoover Group is confident in the quality of its machine, which is why it provides an additional 12-month warranty for the entire Candy Smart model range.
Stage #3 – leveling the washing machine
In order for the automatic machine to serve with maximum efficiency, the installation and connection of the washing machine should be approached with the utmost care.
The floor base requires special attention, which must meet a number of criteria:
- strictly horizontal surface;
- durable structure;
- sustainability;
- protection from vibration and other influences inevitable during operation of the unit.
If the foundation does not meet these criteria, it is better to take measures to meet them.
In addition to levelness and reliability, the base for installing the washing machine must also have anti-vibration properties. If you are going to install it on a tiled or wooden floor, then it is better to carry out the whole process using devices that dampen vibration:
On fragile surfaces, it is advisable to make a cement-sand screed or strengthen the existing floors in the place where the washing device is supposed to be installed.
Adjustment of the position of the washing unit is achieved by changing the height of the support legs: to increase the distance from the floor they can be unscrewed, and to decrease they can be screwed in
After making sure that the base meets all the previously mentioned requirements, you can begin installation. The fully unpacked machine with the fasteners removed is placed in the selected location.
The horizontal installation is determined by the top panel, while the angle of deviation, which is checked by the top cover, should not exceed two degrees. Exceeding this indicator leads to a sharp increase in vibration, which has a very negative effect on the condition of the components and significantly reduces the service life of the machine.
Placing improvised materials under them that could slip out from under the supports during work is strictly prohibited. This may lead to an emergency situation. At the same time, it is allowed (and even recommended) to place a thin rubber mat on the sliding tiled surface.
As soon as the body of the machine is in a perfectly horizontal position, you should tighten the locknuts counterclockwise, fixing the optimal height of the support legs.
When leveling the machine, it is recommended to consider the following factors:
- The greatest degree of stability of the unit is achieved with the adjusting supports screwed in as much as possible, but this option is only permissible on a perfectly flat surface.
- When installing the machine on an inclined floor, it is advisable to use fixing parts to secure the supporting structures.
- To check whether the unit is installed correctly, you need to try to swing it diagonally. If the process is done correctly, there is no free play or its amplitude is the same for different diagonals.
Once you are sure that the unit is in the correct position, you can proceed to the next steps.
Washing machine loading: large and small
If you need to wash a bulky item - a blanket or, say, a down jacket, we recommend adding several smaller items to the drum. The fact is that the uniform distribution of laundry in the drum ensures high-quality washing, good spinning and quiet operation. Is it really possible to ensure uniform distribution if one down jacket, huddled in a large and heavy lump, is spinning in the drum?
In machines equipped with an auto-balancing function, the drum will wobble or spin slightly in different directions before spinning to distribute the items in the drum. If this does not happen, the spin cycle will either be canceled altogether or will be performed at low speeds. This, on the one hand, will protect the car from damage, but on the other hand, it will leave you alone with a heavy and very wet thing.
Correct loading of the washing machine also requires a reasonable ratio of the volumes of the drum and the laundry. You shouldn’t try to cram in more things, even if their weight seems to fit the standards: things in the drum should be placed freely, and they should be placed there without effort
It is also important that the hatch door closes freely. Otherwise, the wash may be of poor quality, and tightly packed laundry will be damaged.
Correct loading of laundry into the drum
Dimensions
The dimensions of Indesit wiun 100 are 85*60*33 cm. That is, the model is quite narrow, does not take up much space, and is easy to place in a small bathroom or kitchen.
Front loading makes it easy to load things into the tank and monitor the process if necessary.
Important! As for the design, it is classic for such household appliances. Of course, you shouldn’t expect any frills here, but when choosing a unit in a low price segment, you are unlikely to count on an ultra-modern or non-standard appearance.
How to clean a washing machine?
To extend the life of the machine, it is important to know how to clean the washing machine. Once a month you need to wash the container for detergents (mold and plaque often form in it) - the container can be easily removed from the compartment
The drum itself needs to be wiped from time to time to remove any remaining powder. It is worth looking under the rubber bands covering the hatch - dirt also accumulates in them. If your machine has a small debris filter, it may need to be cleaned occasionally. It is located in the front left corner behind the panel.
How to disinfect a washing machine?
In order to use the equipment for many years, it is important to know how to clean an automatic washing machine so that scale does not form in it. It causes failure of many parts
Once every three months, equipment is given a dry disinfectant wash:
- To do this, you can use professional descaling products or citric acid. You need to pour 50-100 g of the drug into the device dispenser, turn on the wash without laundry at 90°C.
- To clean the drum from dirt, plaque and lime deposits, you can use bleach - pour 100 ml of the product into the drum, run the wash without laundry at a temperature of at least 60°C.
https://youtube.com/watch?v=y5zcJqAIWe4
How to remove odor from a washing machine?
If there is an unpleasant smell in the washing machine, how to get rid of it in order to use the equipment normally:
- Pour 100 ml of apple cider vinegar or regular vinegar into the powder compartment and run a long-term wash without laundry at maximum temperature.
- Prepare a solution of soda ash and water 1:1. Rub the mixture onto the drum, the rubber gasket around the hatch, and the detergent compartment. After half an hour, wash everything off, run a dry wash and you can continue to use the equipment.
- Take 6-7 dishwasher tablets, put them in the drum, turn on the boiling mode. In the middle of the process, pause without draining the water and leave the machine to soak for several hours. Then turn off the pause and end the program.
Let's start the first wash
During a test wash, you can also check for leaks, that is, whether the washing machine is properly connected to the water supply and sewerage system. If you have a leak, stop washing immediately and force drain the water. After this, call a technician to fix all the problems.
After such a test wash, you can immediately proceed directly to washing the laundry. When washing clothes for the first time, strictly follow the recommendations specified in the instructions for the washing machine. So, the manual clearly states the maximum volume of laundry and the amount of washing powder and other detergents. For each type of fabric, you should choose a temperature and washing mode that will not harm them.
As soon as you have loaded the laundry and powder into the machine, selected the washing mode, check that the door is tightly closed and safely press the “Start” button.
It should be noted that the descaling agent contains acids, which can damage the coating of some elements of the washing machine. If the parts are faulty, the washing machine may damage the laundry during washing, so it is better to clean the machine separately from washing. When descaling, always follow the directions in the product's instructions, otherwise you will have to repair your machine ahead of time.
When installing the washing machine, it is very important that it stands steadily, otherwise during the spin cycle it may jump a lot or even “move” out of place. To avoid such jumps, place the machine on a level, solid place
Congratulations on purchasing a new home assistant! Now that you have become the happy owner of such a useful device for household use, you can start your first wash in automatic mode. But before that, you will need to install your machine.
If your new washing machine was installed by specialists, then the recommendations below can be freely skipped. If you installed the machine yourself or your good neighbors/friends/colleagues did it without the necessary education, then you should make sure that everything was done correctly.
Instructions and manual for Indesit WISN 100 in Russian
Before you begin installing the washing machine, you need to check it for external defects, so that if any are found, you can hand the “home assistant” back to the seller. Next, you need to remove the plugs with spacer washers and unscrew the fasteners that were intended for transporting the washing machine. We insert the plugs where we unscrewed the bolts, and then put away the removed parts, they may be useful in the future.
We will not touch the hoses attached to the body for now, so that they do not interfere with moving the machine.
Now you should leave the machine alone for a while and work on the place where you plan to put the machine. In a good way, you should start preparing a place for the machine during a major renovation of the premises.
- Lay pipes and arrange connections for connecting the inlet hose.
- Install a siphon with an outlet for the drain hose or a sewer pipe outlet for the same.
- Provide separate grounded and circuit-protected wiring for the moisture-resistant outlet.
- Strengthen and, if possible, level the floor under the future machine. The stronger and smoother the floor, the less vibration, accordingly, the quieter the machine will operate and the longer it will last.
- And of course, you need to make enough space for the future “home assistant” so that nothing stands in front of her hatch and does not interfere with putting laundry in the drum, so that there are gaps around the body (1 cm on the sides and top, 10 cm on the back). In general, the idea is clear!
We drag the car into place. By the way, you shouldn’t do this alone, you might tear your navel. Let's move the surrounding objects apart so that there is access to the washing machine body from all sides, otherwise it will be inconvenient to connect.
We release the hoses from the fastenings and install the inlet hose. What does it mean to equip? We insert the rubber seals into it, having previously lubricated them with grease (in case they have dried out). We screw one end of the hose to the filling valve (machine body), and the other to the outlet of the water pipe. Usually a tee tap is placed at the outlet of the pipe so that the water flowing into the machine can be shut off. Checking the quality of the connection.
Next, we connect the drain hose that comes from the pump to the sewer. By the way, the pump pumps water out of the machine quite quickly. So if you do not secure the hose properly, the waste water will splash out onto the floor. Do not tighten the hose; if the length is not enough, it is better to extend it using a hose of the same diameter.
Now we just have to connect the machine to the outlet. Be careful, if you live in a village where there are frequent power outages and frequent voltage drops, it is better to connect the machine through a voltage stabilizer. This will seriously protect your new “home assistant”.
Control panel, starting the wash
If the connection was successful, it's time to try out your new machine. To begin with, it would be a good idea to study its control panel to understand which knob and which button are responsible for what. So, the Indesit WISE 10 CSI washing machine has 4 categories of elements on the control panel, not counting the dispenser. What is it about?
- Pens. This model of the Indesit washing machine has only one handle and it is used to switch programs.
- Buttons. There are eight buttons, with their help the washing machine is turned on, the washing program is started, and various functions are activated.
- LED indicators. Three LED indicators illuminate the function buttons: “light ironing”, “extra rinse”, “stain removal”.
- Display. There is only one screen on the control panel and all information useful to the user is displayed on it.
The Russified control panels of Indesit WISE 10 CSI washing machines contain a lot of useful information. In particular, all programs and functions available are signed.
Let's start the wash. Press the large button located in the upper right corner of the machine, which activates the control panel. Under normal conditions, we will need to load laundry, but this should not be done during the first wash. Let the machine run the program idle and wash the inside.
We turn our selector so that the arrow is opposite the number 2. Press the corresponding button so that the desired function is activated (you don’t have to do this during the first wash). Add powder to the dispenser. Click the button that is in the top row, second from the right. This button activates the washing program. Then all you have to do is wait for the machine to wash.
How the dispenser works
It would be nice to also see how the dispenser is designed so that you know which compartment to fill with what product. Almost all Indesit brand machines have the same dispenser. It is designed very simply. Pull-out plastic drawer, divided into three compartments. The first compartment on the left is rarely used. It is needed when activating the “soaking” mode. When running regular programs, you should not put powder there. The middle compartment is always needed, because it is for washing in the main mode. The far right compartment is for rinse aid.
There is also a whitening compartment. It is placed directly in compartment number one when you need to turn on the “whitening” function. It is rarely in demand, so the manufacturer deliberately made this compartment clip-on.
After washing
Well, you know everything you need to do laundry using the new Indesit washing machine. However, in order for the washing machine to work for a long time and not lose its aesthetic appearance, it needs to be looked after. You don't have to do anything special. You only need after each wash:
- dry the inside of the machine by leaving the hatch and dispenser open;
- wipe the rubber bands and all other wet parts with a rag so that the moisture does not stagnate and an unpleasant odor does not form;
- rinse the powder receptacle from any remaining gel or powder.
These measures will help maintain the neat appearance of the washing machine, but this is not enough. In order for the washer to work properly, you need to periodically clean the debris filter. You can read how to clean the filter in an Indesit washing machine in the article published on our website.
So we have published a short version of the instructions for this washing machine. Perhaps you find it insufficiently informative, then the factory instructions are at your service, which we have placed immediately below the text of the publication. Good luck!
View full instructions
Basic
All washing modes/programs are divided by the manufacturer into standard (main) and special (additional). The main ones are found on almost all models of washing machines, these include:
- cotton washing modes. One of them involves washing with pre-soaking at a high temperature of 90 degrees, with the maximum load for which the machine is designed, lasting 2 hours 51 minutes. Suitable for kitchen towels, napkins. The intensive cotton washing mode differs only in that the time is reduced due to the lack of soaking; the laundry is washed in approximately 2 hours 35 minutes. It is most suitable for heavily soiled white linen (tablecloths, towels, bed linen). The third cotton mode involves washing items at a temperature of 40 degrees for 2 hours 27 minutes, with this mode it is better to wash colored laundry;
- synthetic washing modes. There are two of them, intense at a temperature of 60 degrees, lasting 1 hour 25 minutes, and gentle at a temperature of 40 degrees and lasting 1 hour 11 minutes. The load in this mode is usually half of the maximum indicated on the front panel of the machine. Approximately from 2.5 to 3.5 kg on different models;
- wool washing mode. Involves washing wool and cashmere products at a temperature of 40 degrees for 55 minutes, with a load of 1-1.5 kg, with reduced spin speed;
- silk washing mode. In this mode, curtains, viscose products and underwear are washed in the machine, the water temperature is 30, the duration is 55 minutes, the load is no more than 1-1.5 kg. There is no spin in this program.
On some washing machines, the names of the cotton modes may be: prewash, normal (everyday) wash, intensive and delicate wash. In this case, for each program the water heating temperature is indicated.
Stage #6 - connecting to the electrical network
Specific information on how to properly connect a newly purchased washing machine to the power supply can be found in the instructions
Particular attention must be paid to safety rules, since the device has a high level of power consumption (1.5 - 2.5 kW) and also comes into contact with water
To connect the unit to the electrical network, it is important to carefully select the outlet. The device must be grounded; in addition, it is advisable to choose a model with a cover. As a rule, to connect a washing machine yourself, you need a three-wire socket, which has a phase, a neutral and a carefully insulated ground wire
The distribution board is grounded by using a special bus with a cross-section of at least 0.3 cm
As a rule, to connect a washing machine yourself, you need a three-wire socket, which has a phase, a neutral, and a carefully insulated ground wire. The distribution board is grounded by using a special bus with a cross-section of at least 0.3 cm.
When connecting, it is advisable to follow several recommendations:
The best option is an individual power supply. In this case, the washing machine is powered from the distribution panel via a separate input, and electricity is supplied through additionally laid power cables. To prevent wires from spoiling the interior, they can be placed in neat plastic boxes.
Use of specialized electrical protection devices. In addition to the mandatory circuit breakers, it is recommended to additionally install a residual current device (RCD) into the power supply line of the automatic machine.
Strict compliance of all electrical circuit components with requirements/technical/operational specifications
For wiring, it is important to use three-core cables, and the cross-sectional area must exceed 1.5 sq.cm.
Connect the socket according to the diagram specified in the instructions. It is important to comply with a mandatory condition - the presence of protective grounding
The wire must be connected to the grounding bus of the distribution panel.
Connecting a conductor to heating or water supply lines is strictly prohibited, as this can lead not only to failure of the machine, but also to the creation of emergency situations.
It is better to give preference to sockets with IP44-IP65 when choosing models that have a high degree of safety; It is desirable that they have a lid that protects from moisture and a ceramic base.
Extensions, tees and adapters should be avoided when connecting a washing machine: the additional connections inevitable in this case can provoke an increase in temperature in the contacts, which leads to breakdown of the unit.
It is undesirable for the socket for an automatic machine to be located in rooms with constant high humidity. If the electrical cord is long enough, it is better to place the power supply in an adjacent space, for example, a corridor.
User manual
All operating instructions for the brand in question have been translated into Russian. Therefore, there are no problems with studying them. Among the features we note the following:
- The book in question must be included in the delivery package.
- On the Internet you can find electronic versions. You can simply download them.
The document in question is being developed by specialists. However, some points are not indicated, you have to look for additional information.
Security measures
The Indesit manual may contain a large number of different sections, most of which are of a general nature. The main safety precautions include the following:
- instructions related to grounding the device;
- rules for using a dishwasher.
The first pages contain basic information that must be strictly followed. Failure to follow recommendations may result in malfunctions and costly repairs.
Correct installation
The dishwasher can be installed independently, because... the sequence of actions is indicated in the operating instructions. Common recommendations include the following:
- High-quality preparation of the base is carried out. The main criteria are the absence of unevenness and strength. If the dishwasher is not installed level, there is a possibility of vibration. It is recommended to carry out waterproofing.
- The main communications are being installed. The cold water pipe must have a tap that can be used to shut off the system if necessary. The water quality must be high.
- The drainage system is represented by a separate pipeline, which is often created from PVC pipes. This ensures the required slope.
- Particular attention is paid to connecting to the electrical network. The basic rule is that the equipment must be grounded. In this case, it is prohibited to conduct grounding through pipes. Some experts recommend laying a separate line, but after the appearance of class A+ and A++ models, this is not necessary.
When connecting the device, you need to pay attention to the reliability of the connection of all elements. The threaded connection is additionally insulated with special tape.
Loading the machine
User recommendations have been created to improve the performance of the device. You can fill the basket and trays to the maximum if all the dishes are positioned correctly. Separate recommendations are given regarding washing silverware:
- All items are inserted into special devices with the handles down. This ensures high cleaning efficiency.
- It is recommended that knives and other similar products be positioned with the handles facing up, which will eliminate the risk of injury when unloading.
The instruction manual often contains information represented by layout diagrams of all products.
How to turn it on
It is quite easy to turn on modern equipment; following the recommended sequence will extend the service life of the product. The inclusion section contains the following information:
- A detailed description of the programs that are installed in the machine.
- How to properly turn on the device.
- Ways to change the program at the time of operation.
- What to do if dishes have been forgotten. The correct algorithm of actions in case of machine shutdown.
Do not forget that when opening the door there is a risk of skin burns. However, the door lock function is not available on all models. The algorithm for turning on the dishwasher is as follows:
- All communication connections are connected and checked.
- The required mode is selected. All containers are filled.
- The internal space is being loaded.
- The door closes and the wash cycle begins.
After the cycle is completely completed, you need to be careful, because... Too high a surface temperature on the cookware can cause burns upon contact.
Operation and management
In the section under consideration there is information regarding a complete description of the instrument panel and the unit itself. It is as follows:
- Dimensions. When installing the device, the dimensions of the equipment are taken into account, because it's built in.
- Essential elements. The complete design description applies at the time of repair or service.
- Materials used. Different materials are used to make different parts. Particular attention is paid to seals.
- Assignment of keys and other controls.
You can use the dishwasher correctly only if you have detailed operating instructions.
Stage #7 - test activation
Having completed all the work described above, you need to check the correct installation by starting the washing machine one by one to operate in all modes.
The final stage of work is to check all systems of the washing machine. It must be carried out strictly according to the instructions and affect all sides of the connection.
To do this, you need to inspect all the assembled components, and then conduct a test run of the machine without laundry, during which you need to pay attention to the following options:
- the period of time (it should be short) during which the tank is filled;
- no leaks;
- correct functioning of the drain;
- uniform rotation of the drum;
- good spin;
- full heating of water, which occurs 5-7 minutes after the completion of water collection.
At all stages of operation of the unit there should be no extraneous sounds.
You can install and connect to communications yourself not only a washing machine. We suggest that you read the installation instructions for the dishwasher. The step-by-step guide we offer will provide effective assistance in carrying out the work yourself.
Safety
The washing machine is designed and manufactured in accordance with international safety standards and is equipped with features such as:
- Imbalance control;
- Foam level control;
- Protection against water leaks.
Important! There is no protection against children, but as mentioned above, based on the volume of the tank, this model is more suitable for a small family of 1-2 adults.