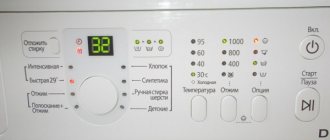
New generation washing machines from Bosch, LG, Samsung, Electrolux and others are equipped with displays that display the functions performed by the machine at the current time. Early models display the function with indicator lights located opposite the icons depicting the operating modes.
Roskontrol
Diagnostics in test mode allows you to highlight the exact code that the machine issued during operation. The fact is that the codes are encrypted into groups E0, E10, E11...E90 and after stopping the machine E10 may appear, but during testing it will turn out to be E12 or E14, i.e. we get the exact error.
Test mode: what is it and why is it needed?
A service test is one of many algorithms stored in the device’s memory. His task is to check the equipment, identify a failure and inform the owner about it through an indication. This mode is launched by a simple combination of buttons, the result of the work is displayed on the display. Units of older releases or simple models, for example, produced by Candy, inform the owner with a combination of LEDs on the display panel.
This mode allows you to quickly identify the problem and more or less accurately find out the reason for the device failure. After the test has been completed, the final decision on repairs can be made.
Possible causes of the LE error
As noted above, there are quite a few reasons for the occurrence of the LE error. These reasons are, one way or another, related to the electrics of the LG washing machine. Before looking for the reason why this error occurs, look at what moment this error occurs - when starting the machine, during operation at maximum load on the electric motor, or at any of the indicated moments
All this is very important. So, what are the reasons why the LE error appears?
- Problems with the sensor or motor winding. If the electric motor sensor does not make good contact or its winding is broken due to overload, the display may show a CE or LE error.
- The wiring that supplies power to the engine is broken or does not make contact.
- There is a problem with the power filter of the LG washing machine.
- Voltage drop in the electrical network. If drops occur frequently, then the LE error will pop up often, perhaps it will alternate with the PF error.
Procedure for checking the electric motor and wiring
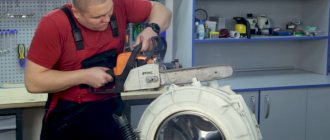
Only a real master can immediately guess the nature of the LE error. To do this, we need to get to the engine of the LG washing machine, test it for faults, test the wiring, and only then draw conclusions. First we need to get to the washing machine motor.
- We disconnect the washing machine from communications and turn its back wall towards us.
- Unscrew the fasteners holding the back wall and remove it.
- The motor on LG direct drive washing machines looks different and is located directly in the center of the drum. We find the engine - it is a large round metal disk located in the very center and begin to check it.
Repairing and checking the washing machine engine is described in detail in the article of the same name, which you can read on our website. We will not describe the process again. It’s better to talk about how to check the wiring through which power is supplied to the motor, because direct drive motors are very reliable and it is less likely that they are the problem.
- We find two bundles of wires going to the engine and disconnect them.
- We take a device called a “multimeter” and check the resistance of each wire.
- If you find a broken wire, consider that the problem was there; if the wires are intact, you need to look further.
Checking the surge protector and understanding the electrical network
The LE error may be caused by faults in the washing machine's power filter. What to do in this case? How to check the surge protector for short circuits. First, you need to get to it.
- Remove the top cover of the LG washing machine.
- The surge protector is located on top, exactly in the place where the power cable is connected.
- We check the contacts of the filter and the wire for breakdown with a multimeter. If the surge protector is working, you need to look further.
The LE error can also be caused by an unstable power supply. Our Russian electrical networks are simply designed to disable electrical appliances. Constant failures and power surges break equipment not only in individual houses or apartments, but also in entire neighborhoods. How to protect your “home assistant” and other equipment from such risks? It is necessary to install a difavtomat and a stabilizer for the washing machine.
In general, it is better to have a professional electrician check the wiring in your home and install the necessary protections. It is better, of course, to do this before purchasing a washing machine, so that later its connection will be as safe as possible. Serviceable and suitable electrical wiring and means of protecting electrical networks are the key to uninterrupted operation of the washing machine.
To summarize, we note that the LE code, which suddenly appears on the display of the LG washing machine, can be generated by various malfunctions, but they are all related to the electrical system, and not to the water supply, as code 1E tells us. Be careful and decipher error codes correctly.
Preparing to run a service test
Before you start checking, you need to perform a number of simple operations. The first step is to make sure that the machine is connected to power, water supply and sewerage. Besides:
- remove and wash the detergent tray;
- completely empty the drum of laundry;
- close the loading hatch and push in the tray.
After this, you can proceed directly to testing. Starting is done using a combination of buttons; it is different for models from different manufacturers.
LG washing machines
Running diagnostics on LG devices is easy. You must simultaneously press three buttons: “Power on”, “Temperature” and “Spin”. The activation of the mode is indicated by the glow of all lamps on the display panel. Switching modes is done using the “Start” button. The progress of the work and its results will be displayed on the screen.
During testing you can:
- check the motor for rotation in both directions;
- test the drum in pre-spin mode;
- start the engine at maximum speed;
- check the details of the water intake system;
- test the heating element;
- check the temperature sensor;
- test the motor in normal mode;
- check the details of the drainage system.
During the test, information about the drum rotation parameters and data in the form of three-digit numbers can be displayed on the screen. Explanation of this information, as well as error codes, can be found in the accompanying documentation for the specific model.
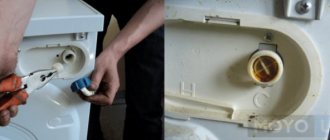
Drain pump
Another device whose failure can cause an error is the drain pump (pump). By the way, it is easier to determine the malfunction of this unit “by ear”. The reason for this is simple - during drainage the pump makes a loud noise. If you can’t hear its operation, or you hear crackling and other sounds unusual for the pump, it’s likely that you won’t be able to do without a replacement.
Structurally, the drain pump consists of two parts: an electric motor and an impeller. Both parts can cause the drain to not work. Troubleshooting should begin with the mechanical part. To do this, you need to remove the pump and remove it from the housing. Often the cause of impeller jamming is threads that are wound around the shaft.
The impeller and pump housing are cleaned of dirt and washed. Next we need to tackle the engine. It is easy to check the windings using a multimeter in resistance measurement mode. If the device shows an infinite value, the pump needs to be changed.
Replacing a pump is not a difficult task, but it is important to buy a quality replacement. You shouldn’t try to save money, you should only choose original spare parts
This guarantees a long service life of the machine and protects you from unplanned expenses.
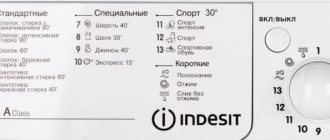
Modern Indesit models
The Indesit device test program performs the same task, but its launch is carried out differently. To do this, you need to set the mode switch to position “1” and press the “Power” button, move the selector to position “2” and turn off the device. Return the switch to “1” and turn it on again, then move the selector to position “3” and turn it off. Again position “1”, button “Enable” then “Drain”. Diagnostic mode is activated.
The program allows you to check components and assemblies in a fully automatic mode. The algorithm for performing the check is approximately the following.
- Check the fill valve.
- Make sure the pressure switch operates correctly.
- Perform test switching on and off of the heating element.
- Start the motor and the drum will rotate at normal speed.
- Check temperature sensor.
- Drain the water (check the pump).
- Turn on the motor and start the drum at maximum speed.
At the end of the test program, the drum will stop and the machine will turn off. If malfunctions were identified during the test, their codes will be displayed on the screen.
Fault prevention
Most breakdowns and malfunctions can be avoided if you strictly follow the operating instructions and choose programs and modes wisely. Trust the installation of your washing machine only to professionals. When operating, we recommend following the rules:
- control water quality;
- check the voltage in the electrical network and turn off the device during power outages;
- adhere to the optimal load load of laundry;
- use high-quality laundry detergents;
- check pockets before washing to ensure that small parts do not fall into important elements of the washing machine;
- Clean the filter at regular intervals.
How to check Bosch models
Owners of Bosch household appliances, in this case washing machines, can also check the performance of their device using a test program. To start it, you need to set the switch to position “0”, wait two seconds, turn the knob clockwise to position “8” and the “Start/Pause” indicator will start flashing. Next, you need to press and hold the “Spin Speed” button and simultaneously turn the program selector to position “9”. You can remove your finger from the button, the diagnostic mode is activated.
A selector is used to select a specific node. Positions “1” and “2” are not used, the rest trigger the following modes:
- floor. 3 – the motor is checked at different speeds;
- floor. 4 – the drain pump is being tested;
- floor. 5 – testing the heating element;
- floor. 6-9 – water supply system;
- floor. 10 – control of sound alarm operation;
- floor. 11 – automatic testing (starts with spin);
- floor. 12 – main automatic test;
- floor. 13, 14, 15 – different types of quick tests for services.
As in previous cases, information about detected faults will be displayed on the screen or displayed using LEDs on the control panel.
Why testing is needed
It is not for nothing that manufacturers of washing household appliances include testing programs in their devices. This, firstly, makes life easier for the consumer, since most of the labor-intensive and complex processes associated with verification are performed automatically by the machine. Secondly, the user has the opportunity to independently check the device and identify the cause of any problems without resorting to the help of specialists.
This test also helps technicians quickly find faults and improve the quality of work when repairing a washing machine. Read here: how long can a washing machine last and how to extend its service life.
Test mode of Samsung washing machines
To check the condition of the components and assemblies of a Samsung machine, you need to simultaneously press three buttons: “Spin”, “Options” and “Power on”. Activation of the mode is indicated by a sound signal and the lighting of all diodes on the control panel.
The choice of mode for checking the motor and sensors is made using the program selector:
- “Spin” – pressure switch test;
- “Rinse + Spin” – testing the temperature sensor;
- “Quick wash” – control module test;
- “Hand wash” – basic check of the motor and drum;
- “Synthetics” – drum rotation at high speeds.
Modern Samsung models offer additional features, which can also be checked using a service test. The list of acceptable modes, as well as the list of buttons for activating them, can be easily found in the instructions for the washing machine.
Every owner of an automatic washing machine, be it Electrolux, Indesit, Samsung, should know how to turn on the service test. This is the best way to quickly identify a breakdown and find the problematic unit. Knowing what exactly went wrong, it is much easier to decide what to do next: call a specialist or correct the situation on your own.
Options for solving the problem
If the LG washing machine has stopped and the error code tE appears on the display, urgent action must be taken. You can call a specialist or take the car for repair, or you can try to cope on your own. Whatever option is chosen, before moving on to active actions, you should simply reload the machine.
To do this, turn off the washing machine, unplug the power cord from the outlet and wait a few minutes. This event will help in case of a software failure that could occur as a result of a voltage surge or drop.
Rerunning the program may be successful, but not necessarily. If the error remains, it’s time to look for the technician’s phone number or take up the tool yourself. That’s right, it will not be possible to get rid of the tE error in the LG SMA without partial disassembly.