Electric water heating devices are widely used by modern people to solve everyday problems. Their main element, which ensures heating of water to the required temperature, is a tubular electric heater (TEN). The wire spiral located inside the TEN has a high resistivity and heats up when an electric current passes through it, transferring heat to the body of the device through the thermally conductive filler. If a washing machine, electric kettle or other household appliance stops heating water, then the cause of the problem is most often a breakdown of the thermoelectric heater. In this material we will talk about how to check the heating element with a multimeter to make sure it is faulty or to establish that the problem is not in the heater.
What are the types of heating element malfunctions?
Malfunction of the heating element can be caused by several reasons:
- a burnt-out filament located inside the tube;
- life-threatening short circuit of a burnt wire connected to the device body;
- the formation of a thick layer of scale, which interferes with the heat transfer process and leads to overheating of the heating element.
How to check a water heater? First of all, you need to inspect it for any damage or cracks. A rupture of the heating element shell indicates poor quality of the part. If minor damage or roughness is found, the device cannot be repaired. It just needs to be replaced. If there is no visible damage, a ring is made using a multimeter.
Main types of breakdowns
The functionality of the device may be impaired for a number of reasons. Characteristic signs indicate problems with the heating element.
Types of faults
The following phenomena are observed:
- The water takes a long time to heat up.
- The liquid does not reach the required temperature.
- The user is “pinched” by an electric current.
- The heating element turns on frequently.
- A hissing sound is heard as the water heats up.
- At the outlet, the water has an uncharacteristic odor and color.
If the water takes a long time to heat up and does not reach the required temperature, this indicates a breakdown. You should stop using the boiler and carry out repairs.
Causes of malfunctions
Heaters are susceptible to the following types of breakdowns:
- Burnout.
- Scale fouling.
- Insulation breakdown.
The substance has low thermal conductivity, as a result of which:
- The heating element is overheating.
- The rate at which heat enters the water decreases, which increases the operating life of the product.
If the scale is thick, the heater may burn out.
This is a consumable material: it gradually dissolves and therefore requires regular replacement. The average service life of this part is 15 months.
Where is the water heating element located?
If we consider different brands of machines (Indesit, Bosch, LG), then the heating element in each type of model can be located in different places, and it is most convenient to approach it either through the back panel or through the front.
But if you are not aware of this, you can still find it yourself:
- The back panel of the machine is inspected. If the lid is large, then the heating device is located behind it;
- The machine must be placed on its side and the bottom inspected. This may be how you detect the heater;
- The easiest way is to remove the back panel. If there is no heating element there, then it will be easy to install it in its place.
There is another option - use a flashlight to illuminate the inside of the drum of the machine. If you have good vision, you can determine the exact location of the heater.
Having found the heating element, you need to make sure that it is working. Note that for such a procedure there is no need to dismantle the element.
Features of gas connections
When connecting gas stoves, water heaters and other types of equipment, flexible hoses are also used. Unlike water models, they are yellow and are not tested for environmental safety. For fixation, end steel or aluminum reinforcement is used. There are the following types of devices for connecting gas appliances:
- PVC hoses reinforced with polyester thread;
- made of synthetic rubber with stainless steel braid;
- bellows, made in the form of a corrugated stainless steel tube.
The Santekhkomplekt holding offers engineering equipment, fittings, plumbing fixtures and devices for connecting them to communications. The assortment is represented by products and materials from well-known foreign and domestic manufacturers. Discounts apply for bulk purchases, and product quality is confirmed by standard certificates. For information support and assistance, each client is assigned a personal manager. The ability to arrange delivery within Moscow and to other regions of the Russian Federation allows you to quickly receive the purchased goods without unnecessary hassle.
What do you need to know before taking measurements?
If you have a multimeter, you can test the heater of a broken household appliance yourself.
But first you will need to find the technical data sheet of the faulty product and find out the nominal power value of its heater.
This is important, since to test the electric heater we will need to know the nominal value of its resistance, which is calculated from the formula of Ohm’s basic law:
R=U²/P,
where R is the desired electrical resistance (Ohm);
P – heating element power (W);
U – operating network voltage (V).
The operating voltage of the home electrical network is mainly 220 V. The power of the heater can be found from the passport data of the household device (W). The resistance value is obtained in Ohms. Now you can start testing the electric heater.
Flushing
After the heating elements are removed, the boiler itself must be rinsed with clean water to remove all the rust and dirt that has accumulated inside. Therefore, for a quality replacement, the water heater still has to be removed from the wall.
Rinse the insides with an ordinary tap hose. Pour only a little water, since the boiler with a volume of 50-80 liters will still have to be lifted manually to drain all the scraps. Some people add citric acid when washing, others don’t.
Washing tip: It is best to rinse the tank in the bathroom, placing it vertically on a linen board. Twist the watering can from the mixer shower and insert the hose into the hole where the heating element was.
Checking the current leakage of the heating element
First of all, the search for the cause of the malfunction must begin with checking for current leakage. Usually, if this happens, immediately when connected to the network, the RCD or differential switch is triggered and the line is de-energized.
The leak search is performed as follows:
- Unplug the electrical appliance being tested from the outlet;
- We disassemble it to gain access to the electric heater terminals;
- Turn on the dial mode on the multimeter and insert the probes into the “COM” and “VMa” connectors;
- We first ring one contact on the device body, then the other;
- Possible results:
– There is a signal , the indicator on the display is close to “0” – the heating element is faulty;
– No signal , “1” on the display – no leakage;
Unfortunately, by calling in this way, you will not always be able to detect a breakdown. Quite often, this is detected only by a specialized tester - a megohmmeter, which tests circuits with high voltage. Minor insulation damage is detected only in this way. The multimeter will only detect obvious defects, for example, when the phase conductor touches the neutral conductor.
Often, a leak can be detected by measuring the heating element when it is turned on. But I don’t recommend doing this unless you are 100% confident in your electrical skills.
If you find a leak , a connection between one of the contacts and the housing, you need to look for the location of the breakdown. I advise you to disconnect the power wires from the electric heater and take measurements without them. Then you will understand whether the heating element or other elements of the power circuit are to blame.
Video lessons
If the boiler does not heat the water, then you need to check the heating element of the water heater according to the following instructions:
If you need to ring the heating element of your washing machine, then you should proceed to study the instructions below:
So that you can check the iron with a multimeter, you need to disassemble the device body and touch its terminals:
If you don’t know how to ring the kettle, then the instructions can be seen below:
As you can see, the check is quite simple. The videos that we have provided for your attention will help you do everything correctly. We hope that the information was useful and informative.
How to ring a heating element for an open or short circuit
To check the heating element, you must first calculate its resistance using the power value P. Its value can be found in the technical documentation. The voltage U in the network is taken equal to 220 V. Resistance R is calculated using the well-known formula: R = U2/P.
The check is carried out according to the following algorithm:
- set the multimeter to a resistance range of up to 200 Ohms;
- touch the wires of the measuring device to the terminals of the heating element;
- if it is in good condition, it will show a resistance value close to the calculated value;
- the value “0” indicates the presence of a short circuit inside the heating element;
- value “1” – indicates an existing break.
At the next stage, the presence of a breakdown of the heating element to the housing is checked:
- the tester switches to sound mode;
- one of its wires touches the output of the heating element, and the second - its body;
- the appearance of a sound signal indicates a breakdown of the housing, that is, it is necessary to replace the heating element in the water heater.
How is the resistance indicator of the heating element determined?
To check an element, it is not enough to know how and with what instruments this is done. It is necessary to have information about the value of its resistance. To begin with, it is recommended to calculate this value. To do this you will need the following information:
- Voltage supplied to the water heating element. As a rule, this indicator (U) is equal to 220 V. This voltage is present in the household electrical network of our apartments.
- The heater power indicator is R. It can be easily determined, you just need to look at the operating instructions. The second option - the power of the heating element can be checked on the Internet based on the model of the machine.
Having all the necessary information, we determine the resistance R using the special formula R=U²/P. The resulting resistance indicator is formed in the heater during operation. If the heating element is working properly, then the figure obtained by the formula will appear on the multimeter screen.
Calculation example
So, for example, when measuring you got a result of 20 ohms. Substituting into the formula, we calculate:
P, W Heating element power = 2202 V household voltage squared / 20 Ohm resistance of the heating element = 2,420 W
Accordingly, the power of the heating element that we tested is 2420 W, which fully corresponds to the declared indicator in the passport. And considering that it passed all other tests successfully, it means that the problem is not in it and you need to look further, for example, ring the electrical circuits or measure the voltage in the socket.
If the multimeter shows a result of 100 Ohms, then the power will be only about 500W. This is naturally not enough for normal operation and full heating of water. An increase in resistance can be caused by various processes: a decrease in the cross-section of the conductor, oxidation or contamination of contacts, etc. In any case, such a measurement will give you the necessary information for further search for causes.
As you can see, checking the operation of the heating element is quite simple; for this you only need a multimeter and a little free time. Many problems will be revealed by a simple test, and if this does not help, then by measuring the resistance parameters of the heating device.
And if you encounter any problem not described here, want to add something or find an error, write in the comments, it will be useful to many.
Application of Ohm's law in the repair of washing machines
To repair household appliances that run on electricity, you simply need to know basic safety rules and have an understanding of the physical processes occurring in this equipment. And one of the most important laws is, of course, Ohm’s Law, which we so much did not want to learn at school.
Please don’t find fault if anything, I’m not a writer, I’m just learning. On the forum, some semblance of a dispute arose about the current consumption of the heating element when the mains voltage changes. I won’t go too far into theory, I’ll try to get closer to life. Let's look at it in relation to our practical activities: Power formula P = U*I volts multiplied by amperes, Resistance formula R = U/I voltage divided by current. P – power (watt), U – voltage (volt), I – current (ampere), R – resistance (ohm). For craftsmen involved in the repair of various household appliances, they constantly have to check the serviceability of various loads. (In the future, I will call any active load a heating element) Meeting for the first time or rarely, we forgot “sclerosis”, oven, glass ceramics, washing machine, etc. It is necessary to determine the integrity of the heating elements, i.e. its resistance, for this you can always find nameplates indicating the power in watts and the rated voltage, calculate the resistance and use a tester to check the serviceability of the heating element (be sure to also check for leakage to the body - the risk of uncontrolled heating or electrical injury) Determining the resistance of the heating element
The formula for calculating resistance at U network = 220 volts is simple: 50 divided by the power in kilowatts. Approx. A 2 kW heating element resistance will be 50 / 2 = 25 ohms. This is the result of the formula R = U? / P The error of such a calculation is less than 5%, suitable for a quick calculation without using a calculator. Or the classic school version from Ohm’s law follows: I = P / U and, accordingly, R = U / I For U network = 220 volts. The calculated resistance will be 24.2 ohms plus the manufacturing tolerance of the heating element, the multimeter error, the contact resistance of the probes, temperature, etc. the same 5%. Current change with voltage change
Let's look at this issue through power consumption, we can look at all this through current, but it seems to me that this is more clear. P = U?/ R resistance of the heating element (load) does not change! When the network voltage is halved, the power will drop by 4 times (since U?) Approx. Power consumption P1 = 2 kW at U1 = 220 v, when the voltage decreases to U2 = 110 v, power consumption will decrease to P2 = 500 W. Therefore, when the network voltage decreases to less than 200 volts due to a drop in power, problems arise in starting refrigerator compressors, washing machine pumps and other machines, and the operation of transformer power supplies... Accordingly, when the network voltage doubles, the power will increase 4 times, i.e.
Application
Power consumption P = 2 kW at 220 v, when the voltage increases to 380 v (phase-to-phase voltage), the power consumption will increase to 6 kW. In life, this happens when the neutral wire breaks, as a result, due to the interphase voltage, everything that was plugged into the sockets burns out. Our conclusion is that in order to avoid this problem, it is advisable to install circuit breakers to protect against overvoltage and undervoltage. They cost from 400 rubles, a penny compared to the consequences. If there is a phase imbalance, especially in the private sector, long-term operation of equipment with increased network voltage is possible. In washing machines, at high voltages, triacs of thermoelectric hatch interlocks often fail, the 275 V varistor has not yet opened, and the UBL triac has already overheated due to the increased current through the thermistor and thermal breakdown of the junctions occurs, as is known in semiconductors, with increasing temperature, the maximum permissible decreases sharply current. Hence, when repairing modules, the current triac should be set to no less than the one being replaced; if a more powerful triac is installed, then you need to take into account that the triacs are controlled by current, look at the datasheets so as not to overload the control circuit, do not overestimate the power of faulty resistances replaced in the triac control circuits, they often act as a fuse during UBL disasters. The easiest way to solve this problem is by switching to another phase (at low voltage this is the cure for phase imbalance), it is the sacred duty of electrical networks to evenly distribute the load across phases, and there is an option to buy a network stabilizer for money (and at low voltage too). It is better to recommend a so-called electronic stabilizer, in which a solid-state relay switches the transformer windings at the moment the sinusoid passes through zero, i.e. quickly and with minimal interference over the network, which is critical for equipment with electronic modules.
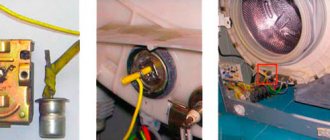
How and with what to ring the heating element?
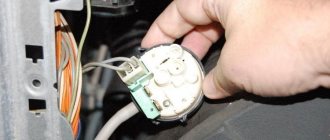
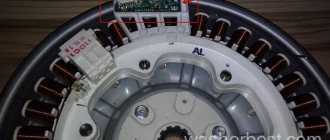
You need to find out which side the heater is located on. Inspect the body of the washer. The large rear hatch probably hides a TEN behind it. In the publication “How to replace a heating element in a SM” we gave an example of placing an element in different models.
Once you get to the part, disconnect the power wires from the contacts. It is not necessary to dismantle the product for diagnostics.
How to check the heating element in a washing machine with a tester:
- Calculate the resistance of the part. It may differ for each manufacturer. To do this, take the operating voltage (220 V) and power (indicated in the manual). For example, the power is 1800 W. Make the calculation using the formula: R=220²/1800=26.8. It turns out that the normal resistance of the heating element should be 26.8 Ohms.
Checking the operation of the heating element of a washing machine with a multimeter is carried out as follows:
- Set the toggle switch to resistance detection.
- If the screen shows normal values (about 26.8), then the part is working.
- Number 1 on the screen indicates a broken spiral. The product cannot be repaired, only replacement is needed.
- A value of 0 means a short circuit.
Now you need to check for a breakdown in the housing.
Important! Failure of the dielectric can lead to sparking and fire of the machine.
Switch the tester's toggle switch to buzzer mode. Place one probe on the contact and the other on the ground. The buzzer beeping means a breakdown. The heater must be replaced.
When replacing a part, remember the heating element connection diagram. During the disassembly process, you can photograph the stages of work. Here is a detailed inspection video:
If you do not have a multimeter at hand, then it is better to contact a specialist. Without the device, diagnostics will not be possible.
Procedure for replacing an electric heater
Having made sure that the heating element does not work, they begin to dismantle it. During the disassembly process, it is recommended to photograph the main stages - this will make it easier to return the new heater to its original place. The procedure for replacing a burnt heating element is as follows:
- Unscrew the fastening nut - it is located in the center of the block and attracts the grounding wire.
- Press the released bolt inward, which passes through the rubber plug and rests its head against the pressure plate. In a compressed state, this design ensures the tightness of the tank at the point where the heating element enters it. When the bolt is released, the plug returns to its original shape, coinciding with the contour of the seat.
- Use a knife or screwdriver to carefully pry up the heating element so as not to damage the tank. Remove the heating element to replace it with a new one. Limescale deposits and rust complicate dismantling - you need to pull out the tubular structure one by one from each side, moving a fraction of a millimeter.
- Installing a new heating element is not difficult: the rubber retainer of the heater easily fits into the socket, where it is clamped with a fastening nut. Excessive force is inappropriate here - you cannot squeeze the sealant or break the thread.
Do you turn off the water tap after washing?
Oh yes! No.
Upon completion of the heater change, the CMA tank is checked for water leakage through the installation socket. After this, the power wires and grounding are connected. The previously removed panel is installed in its original place, the machine is connected to the electrical network and other communications, and a test run of the washing mode is performed.
You should not delay checking the serviceability of the water heater: a breakdown can develop into a major accident, which will entail the need for expensive repairs. Self-diagnosis is available to many home craftsmen, and the information provided here will help you replace a faulty heating element.
Dialing methods
There are methods that allow you to evaluate the serviceability of the device if you do not have a multimeter at hand when problems are detected. They give a less accurate result than working with a digital meter, but it is quite possible to assess the need to replace a part with their help.
The simplest method to check the heating element on a water heater does not require the use of any tools. However, it will be necessary to remove the element from the heating device. The heating element must be carefully examined. If the assessment of the condition is hindered by accumulated scale, it is dissolved by soaking the part in water with vinegar or citric acid. It needs to be kept in acidified liquid for about 6 hours.
Scale deposits cause a number of common problems with equipment - because of them, the heating time of water increases, and the part itself, if not promptly cleaned, soon burns out.
If scratches, any deformations or dark spots are found on the heating element, it should definitely be replaced.
Using an indicator screwdriver on the battery is also allowed for checking. Before testing, be sure to disconnect the equipment from the current and disconnect all conductors from the heating element. The first terminal clamp is touched with a finger, and the tip of the tool is brought to the second supply clamp, touching the end contact. If the indicator lights up, the heater has not failed.
Heating elements are tested with special test lamps. This option is suitable for professional electricians or people who have sufficient experience in handling circuits. You can assemble the circuit yourself using a 220 V incandescent light bulb. It is screwed into a socket to which single-core copper wires are connected with probes screwed to them. The lamp is connected to the network between the device being tested and the power source. If it lights up, the unit is functioning normally. To check the heating device, a mains neutral is supplied to one of the contacts, and a phase wire with a connected lamp is supplied to the other.
Checking the heating element with a multimeter
To begin the testing process, you must first secure your work by disconnecting the household unit from the network. You just need to unplug the electrical power cord from the outlet, and for an electric kitchen stove with a separate line, perhaps turn off the circuit breakers in the apartment electrical panel. In any case, you need to turn off the power to the equipment.
It would be more correct to proceed according to the following algorithm.
- Provide access to the electrical heater terminals. It may be that in some cases the heating element will have to be completely removed from the unit for ease of testing.
- Disconnect the wires from the heater.
- If there is scale on the device, then it is necessary to clean the heating element from it.
- After this, carefully inspect the heater for cracks, swelling or other signs of damage.
- Prepare the tester (multimeter) by switching it to the electrical resistance measurement mode. The measurement range must be selected depending on the result obtained, which we calculated using the formula for the nominal resistance for the heater of our equipment.
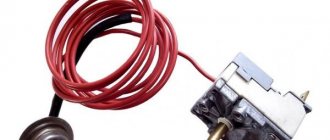
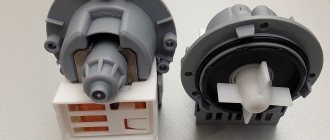
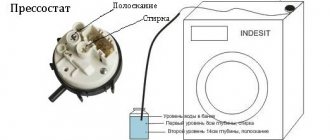
Failure or failure of the pressure switch
Although the pressure switch is responsible for filling the tank with water, it can cause the washing machine not to heat. How to determine whether the pressure switch is faulty without disassembling the washing machine:
- If there is a self-diagnosis system, an error code is displayed on the screen.
- The washing process starts, but it is clear that there is very little or no water in the tank.
- There is too much water in the tank, and therefore the washing machine does not have time to heat it.
- The rinse mode does not start or the water is not drained completely and after the end of the wash the items are not wrung out in accordance with the set speed.
Pressostat
To check the pressure switch manually, you can perform the following steps:
- Disconnect the washing machine from electricity and turn off the water supply.
- Remove the top cover and find the pressure switch.
- We disconnect the device from the wires (after photographing it) and the hose.
- Check the hose from the washing machine for blockages. If necessary, we clean it.
- To check the mechanics of the device itself, you need to connect a small tube to the fitting and blow hard into it. If there are no blockages inside, you can hear one or more clicks from the contacts actuating.
- To check the relay operation, you must use a tester in resistance measurement mode. We connect the probes and relay contacts in series, while blowing into the tube from time to time. If the relay operates, the resistance value should change.
It should be noted that the technical documentation of the washing machine, as a rule, does not indicate the electrical circuit of the pressure switch. Therefore, without having a diagram of a specific model, you need to go through all the options for pairs of contacts. In this case, service center workers can carry out both diagnostics and repair of devices much more efficiently and quickly.
Replacing the pressure switch
Replacing a pressure switch with a new one has certain nuances. Installing a new device yourself and connecting it does not cause any special problems. However, most devices require additional configuration for a specific washing machine model. Depending on the model, the sensor may have up to three screws. They regulate the amount of water required during the washing process for each specific program that the washing machine runs. It is almost impossible to determine the required volume on your own. Therefore, if you are not one hundred percent sure that the pressure switch you purchased is already configured to work for a specific model of washing machine, it is better to entrust its installation and configuration to the technicians from the service center.
Non-standard ways to check heating elements
If it is not possible to check the heating element using one of the above methods, then you can connect the wires from the cord with a plug directly to the terminals of the heating element and insert the plug into the socket for a few seconds. If the heating element starts to heat up, then the coil is intact. Be careful not to get burned with your hand when checking the heating temperature of the heating element.
To check the insulation resistance, one of the ends of the cord, with the plug removed from the socket, must be disconnected from the heating element output and connected through a fuse designed for a protection current of no more than 5 A to the heating element tube. Then insert the plug into a household electrical outlet. There is no time limit here. If the fuse does not blow immediately, then there is no short circuit between the coil and the housing and the heating element is working.
It is simply unrealistic to list all possible ways to check the heating element. The heating element can even be checked using a landline telephone by connecting it to a break in one of the wires with which the telephone is connected to the network. If after connection there is a signal in the removed tube, then the heating element is working. You can even not pick up the phone, but call him from your mobile phone. The presence of a bell sound will confirm the integrity of the heating element coil.
Multimeter models
It doesn't matter which tester or multimeter you use to diagnose the heating element. There are digital and pointer models, and their cost does not in any way affect the quality of the test. The main thing is to use working equipment to check the heating element.
Article on the topic: The story of one self-leveling floor, made by yourself
It is also worth paying attention to the integrity of all wires coming from the multimeter probes to the device itself. If you use a multimeter for work purposes, and not for home repairs, then to check the heating element’s functionality, you must choose a model equipped with a special signaling device
Using such devices, you can determine the integrity of the electrical circuit using an audible signal, without being distracted from the immediate repair.
The simplest solution would be to replace the heating element with another element, the serviceability of which you are absolutely sure of. To do this, turn off the electric heater and remove the device for diagnostics. A new heating element is installed in its place, preferably of the same brand.
If there is no spare heating element in the house, you need to use a digital multimeter. The heating element is removed and the multimeter is connected to the outputs of the heating element. If the norm deviates or the indicator light on the multimeter lights up, we can conclude that the heating element is fully operational, which means that the cause of the malfunction and improper operation of the water heater must be sought in other parts of the device.
If the above testing methods did not help determine the serviceability of the heating element, you can “ring” it using a multimeter. To do this, you need to set the “ring” to a certain value and then, by connecting multimeter probes, check it. Most often, the multimeter readings correspond to the minimum, and if there is a built-in sound signal, the tester will start beeping.
Next, you need to test the heating element for performance. Multimeter probes are attached to the contacts of the heating element, and when they are touched, resistance readings appear on the tester: for example, 0.37 or 0.71. If you see one on the left side of the screen, it means that the coil in the heating element has broken and the heating element needs to be replaced.
There is another way to check: you need to remove the heating element from the water heater and moisten its copper tubes with water. Place one probe to the tube, and the other to one of the outputs. If the heating element is faulty, the device will show an overestimated or, conversely, a minimum value. If it is working properly, the tester shows one!
Article on the topic: How to properly install plastic windows on a loggia - increasing the level of comfort with your own hands
Advice: if you have any doubts about whether you can correctly remove the faulty heating element and install a new one in its place, then contact a professional. When checking and repairing the water heater, be sure to follow all safety rules to avoid dangerous situations!
Other verification options
You can check the heating element for a break without a multimeter or a tester, using a control light:
- one of its contacts connects to the network;
- the second - to the electrician's light bulb;
- if there is no break, the light will light up.
The serviceability of the heating part can be easily checked with an indicator screwdriver, without even removing it from the device:
- disconnect extraneous wires;
- touch one of the element contacts with your fingers, and the other with the tip of a screwdriver;
- at the same time, the finger of the other hand must be pressed against the metal patch at the end of the screwdriver;
- If the indicator light does not light up, there is a break in the heating filament.
If problems arise with the insulation of the heating element, current may leak into its body. If a current protection unit is installed in the system, it will start to operate when it reaches half the rated value. But the multimeter does not detect it, since there is no short circuit to the housing. To check the insulation and measure its resistance, use a megohmmeter in the measuring range of 500 V. One probe touches the contact of the element, the second touches its body. Normally, the indicator will be more than 0.5 Mohm.
Water heaters with dry heater ^
The “dry” heater technology helps make the water heater more reliable, safer and easier to maintain.
The heater spiral in such a device is enclosed in a special metal flask. This completely prevents contact of live parts with water.
Thanks to this solution, a water heater with a “dry” heater received the following advantages:
- Safety. A boiler with a conventional heater in the event of a “breakdown” or short circuit could produce an electric shock when a person’s skin comes into contact with water.
- No need for protection against electrochemical corrosion. Since a “dry” heater does not come into contact with water, it does not need to be protected with a magnesium anode. Accordingly, the need to periodically open the water heater and check the condition of the anode has disappeared.
“Dry” heating is an expensive technology and is not used in budget models.
As a rule, when purchasing a water heater with a “dry” heater, the buyer receives a device with “advanced” automation and reliable components made from expensive materials.
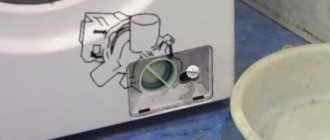
How to change the heating device?
We found the heating element and made sure that it should be replaced. First, disconnect all wires. To avoid confusion in the future, it is recommended to first record the order of their connection with a camera.
To remove the heating element, you need to unscrew the nut located in the middle part of the device. Now you need to pry the heater with a screwdriver and carefully remove it, rocking it in different directions. It is now recommended to immediately remove scale from other elements surrounding the water heater. The new heating element is carefully installed on special mounts. If you make a mistake, it will touch the tank during operation. All that remains is to connect the wires and assemble the machine to run it for testing.