Let's prepare thoroughly
If you decide to do the renovation yourself, you should be thoroughly prepared. First of all, we collect or purchase the required minimum of tools. Fortunately, the list is standard:
- a set of screwdrivers (flat, Phillips and indicator);
- saw or hacksaw for metal;
- mites;
- pliers or pliers;
- set of open-end wrenches (8-18 mm);
- set of heads;
- puller (car version is suitable);
- socket wrenches;
- hammer;
- awl;
- chisel;
- multimeter
After collecting the tools, we begin to prepare the workplace. If the washing machine is installed in a spacious bathroom, then you can work here. In small rooms where it is difficult to turn around, it is worth looking for another option - an entrance hall, kitchen, workshop or garage. It is necessary to provide at least two free square meters, otherwise disassembling the machine will be problematic. In general, we act like this:
- disconnect the machine from all communications (electricity, sewerage, water supply);
- move the washing machine to a place convenient for repair;
- we cover the space surrounding the equipment with oilcloth, rags or newspapers;
- pull it towards you and remove the detergent tray from the body;
- Having unscrewed the garbage filter, drain the residual water from the tank.
For convenience, it is recommended to allocate a separate place for small parts - bolts, screws, clamps and other fasteners. Having completed the preparations, we proceed to directly troubleshooting the problem.
What's the use of this?
We figured out exactly how to remove the top cover of the Beko washing machine. But in what situations may it be necessary to dismantle it? What parts of the machine can be replaced or repaired if this part of the body is removed?
By removing the top of the washing machine, you will have access to the fill valve. It must be checked if there are problems with the flow of water during operation of the machine, there is too much or too little of it. This part is located in the upper right corner of the case near the back cover. You can check the valve coil and other elements of the mechanism. If necessary, by removing only the top part of the washing machine, you can completely replace the fill valve with a new one.
If the washing powder is poorly removed after washing, you need to check the condition of the powder receptacle. To do this, remove the cover as described above, then remove the pipe or clean it. When required, you can completely replace the failed part.
At the top of the body there is another important element of the washing machine - the pressure switch. It is required for normal water drainage. If the washer refuses to drain the liquid or does it at the wrong time, showing an error on the screen, the problem lies in this particular part. To replace it, you need to unscrew the mount and disconnect the pressure switch from the wires, then install a new spare part.
When you remove the cover of the washing machine, you will have access to the upper counterweight. Of course, it breaks infrequently, but it can still cause an operational problem. If you need to repair this part, there is no way to do without removing the housing cover.
If desired, you can even remove the drum and tank. True, lifting the top cover alone in this case will not be enough. You will have to remove the front part and unscrew the service hatch at the back. However, the dismantling procedure will begin from the top.
Thus, the ability to remove the upper part of the washing machine body can be useful in many situations involving equipment breakdowns. This is the starting point for repairs of any complexity. The instructions will certainly be useful to the home handyman who does not want to overpay for the services of a technician.
Share your opinion - leave a comment
Wash does not turn on
Self-repair of a washing unit begins with determining where the program stops. So, in some cases it is not possible to start washing equipment.
Let's look at some possible reasons:
- The washing machine door does not close. Until the relay is activated, the washing process will not begin. In this case, it is necessary to push the door and press it tightly against the body. If this does not help, there may be a foreign object in the lock or the latch may be faulty.
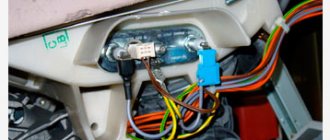
- Voltage too low or no power. It is necessary to check the integrity of the cord, socket, and plug. You should check the contacts on the terminal block where the power cord is connected; there are cases of oxidation. To fix the breakdown, you need to remove the cover of the washing unit, find the block, inspect the contacts and, if necessary, clean them.
- The time relay does not work. It is very difficult to diagnose this malfunction. To do this, you simply need to switch the program several times - if at some stage the washing process begins, then this breakdown exists, and the time relay is really damaged.
- If all points are diagnosed, no malfunctions are observed, but the washing equipment still refuses to function, then the problems may be in the control board. When installing a new work board, you can identify this problem.
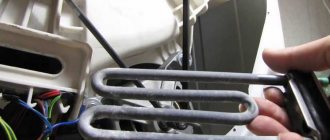
Checking and replacing the heating element
The thermoelectric heater is the part that breaks more often than others. The cause of this problem may be scale, which is formed from low-quality water. If there is an excessive amount of it, the machine does not do its job well due to the fact that the scale does not transfer heat well. Heating elements that do not have the ability to give off their heat will soon burn out. The fact that the heating element in the unit is broken is usually indicated by the breakdown code on the display - H2, H3. To replace a part, you should follow these steps sequentially.
- Remove the back cover by unscrewing the bolts that hold it in place.
- Use a wrench to unscrew the fasteners and remove the wires that hold the heating element.
- It is worth removing the old device with special care.
The car vibrates a lot
How to repair a Veko washing machine with your own hands? If the washing unit vibrates strongly, then, as a rule, such a malfunction occurs in the spin mode, which is characterized by the fact that the equipment begins to jump and knock. In such a situation, independent repairs are very rarely required. Very often the reason is that the unit is overloaded or the laundry may clump together in one pile and not be completely distributed throughout the drum. In this case, we stop the washing machine, if it is overloaded, we empty it of some items or evenly distribute the laundry in the drum. After this, turn on the unit and continue the washing process.
If these reasons are not confirmed and the equipment is constantly knocking, then the following malfunctions may occur:
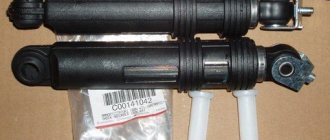
- suspension springs broke;
- shock absorbers are out of order;
- The ballast has become loose.
The solution to these problems is to replace the shock absorber or suspension springs and tighten the ballast bolts.
Open with cord
This method should only be used in situations where it is known for sure that the door will not open due to a broken handle. To save the laundry you will need a cord or rope with a diameter that will exceed the diameter of the loading hatch.
The rope is placed in the gap between the side of the machine and the lid. If necessary, you need to use a screwdriver to push the rope deeper into the gap. This should be done along the entire diameter. Afterwards, you need to firmly but gently pull the ends towards you. The door should open.
Electrical repair
Only users with electrical repair skills can cope with this task. If there is a break or oxidation of contacts somewhere, they will quickly fix the problem. All you need for Beko electrical repair work is a circuit diagram. Where can I get it? It is enough to know the exact name of the model to find it on the manufacturer’s website.
It is much more difficult with electronics - to repair or replace the control board, you need special knowledge and skills. The cost of the electronic module is high - reaching a third of the price of the entire SMA. Therefore, it is not recommended to touch it - it is better to trust a specialist. If the repair is minor, then repairing the module will not cost much. But independent experiments can lead to complete failure of the module - you will have to purchase a replacement for it, and a simple problem will transform into expensive repair work.
Is it possible to fix the breakdown yourself?
Theoretically, all automatic washing units of the Veko brand can be repaired, and it does not matter at all what drum load they are characterized by, how old they are, or whether they have a control display.
But in practice a completely different picture emerges. So, sometimes there is a situation when it is impossible to carry out repairs on your own, or it is not practical due to the high cost, or there are no suitable spare parts. In any case, if you have identified a problem and are ready to fix your washing equipment yourself, you need to consider these factors to avoid losing valuable time and money.
Important! In order, for example, to replace a washing machine bearing, it takes a qualified specialist several hours. Think about how long it will take you to make such a replacement and whether you will be able to do it correctly.
Experts advise performing only simple repairs, such as removing blockages or replacing simple parts. To eliminate other faults, it is better to invite qualified specialists to avoid the risk of spoiling something.
Let's look at what typical breakdowns you can fix yourself:
- you can clean the drain filter, removing dirt and debris that interfere with the normal functioning of the washing unit;
- you can replace the drain pump, but only when you are sure that the old pump has failed;
- replace the heating element;
- check and replace the intake valve, but to do this you need to make sure that the problem is not the control board.
Water does not fill
If water does not flow into your household appliances, you should first check the presence of water and the presence of pressure in the water tap - to do this, open the tap and assess the pressure. After this, we check the water supply hose, which may be pinched.
It is possible that the water supply filter is clogged.
Do-it-yourself repair of the Veko washing machine must be done in the following way:
- Shut off the water supply to the washing unit.
- Remove the supply hose from the nozzle.
- Using pliers, remove the filter.
- Rinse under running water.
- Reinstall.
- Put on the hose.
If the inlet valve is clogged or broken, then to solve this problem you should turn off the water and then remove the hose. In addition, you need to remove the cover so that you can get to the valve, which is located after the location of the inlet pipe. It needs to be removed, washed and checked, for which:
- Connect to the inlet hose - since it is normally closed, the water can be opened.
- Direct the valve into a tank and alternately apply power corresponding to 220V to the relay windings:
- If power is present, the relay is activated, resulting in water appearing.
- If there is no water, the winding is faulty, which means the valve must be replaced.
When using the device for a long time, harmful microorganisms very often appear in it. And to solve this problem, learn how to clean mold and black mildew from your washing machine quickly at home.
Door locked due to power outage
If the washing machine door does not open after there was a power surge in the house or the lights were turned off completely, then do not be upset. This situation happens quite often, and manufacturers have provided the ability to protect you in the event of a power outage.
Imagine that your lights were turned off, you didn’t notice it and thought that the washing machine had simply finished the program. The consequences of opening the hatch in such a situation can be quite unpleasant and dangerous: water will pour out on you, or when the power is supplied, a new wash cycle will begin, and at this time you are unloading the laundry.
In order for the door to open, you need to restart some program after the power supply is restored : you can simply start a spin cycle or drain the water.
After this procedure, the hatch will be unlocked.
How to clean the filter?
Preventative cleaning of the drain filter is never superfluous. Debris and dirt that become trapped on the screen prevent the tank from filling properly with fluid. Before installing the filter in place, it is also worth inspecting and cleaning the hose. Step-by-step cleaning of the Beko unit filter is carried out as follows.
- Disconnecting the washing machine from the electrical network.
- We look for a filter on the unit, dismantle the hatch cover or remove the false panel from the bottom of the washing machine.
- Having prepared a rag, you can begin to drain the remaining liquid from the washing machine. An emergency hose can be used for this procedure.
- We are engaged in unscrewing and removing the filter.
- Clean and rinse the filter mesh.
- We check the drain pump.
- We mount the filter in its original place.
- We turn on the “washing machine” to the electrical network and check it for leaks.
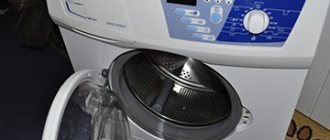
Let's start disassembling the machine
To disassemble the washing machine, you need to prepare a screwdriver, Phillips and flathead screwdrivers. Using these tools, you can remove all parts of the machine and get to the washing machine tank. The algorithm of actions will be as follows:
- disconnect the device from the power supply;
- remove the top cover of the case, and to do this, unscrew the 2 screws located on the back;
- remove the powder receptacle from the unit;
- Unscrew the screws holding the control panel and move it to the side;
- unfasten the lower decorative panel from the body;
- unscrew the 3 screws located behind the decorative panel;
- Unclench the wire clamp holding the cuff, move it to the side and tuck the elastic into the drum;
- Unfasten the front wall of the case.
- unfasten the filler pipe;
- disconnect the wire leading to the dispenser and disconnect the tray from the body;
- remove the upper metal false panel that opened after disconnecting the control panel;
- lower the counterweight down a little; to do this, loosen its mounting bolts;
- disconnect the thermistor by resetting its terminals;
- remove the power and ground wires from the contacts of the tubular heater;
- remove the heating element from the housing;
- loosen the clamps holding the plastic tank cover;
- remove the cover and set it aside.
The main stage of analyzing the SMA has been completed, as you understand, you can do the work yourself, it is not necessary to transfer the washing machine to a workshop. To change the bearings, you have to remove the drum from the housing and gain access to the worn parts.
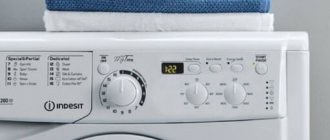
Select temperature and operating mode, Operating modes, Shelf position (depending on model)
- Image
- Text
Select temperature and operating mode.
1
Function selection knob
2
Thermostat knob
The operating mode of the electric oven is set using the function switch. Temperature
adjustable using the thermostat knob. To disable any of the
oven functions, set the corresponding button to position
"Off" (up).
1. Set the desired temperature with
using the thermostat regulator.
2. Set the desired operating mode with
using the function switch.
» After heating the stove, it will
maintain the set temperature. During heating, the temperature indicator lights up.
Turning off the electric oven
Turn the function switch and
thermostat control to position
"Off" (up).
shelf. The wire grill should be installed so that it fits into the hole on the wire shelf as shown in the figure.
Operating modes
The sequence given here
operating modes may not coincide with the one used in your
device models.
Heating from above and below
Top and bottom heaters are on. Products are heated at the same time
up and down. Suitable for baking cakes, as well as for baking cakes, rolls and casseroles in molds. Cook with only one baking sheet.
Heating from below
Only the bottom heating element is turned on.
Great for cooking dishes that need to cook on the bottom, such as pizza.
Heating from above and below with convection
Includes top and bottom heating elements and a fan located on the rear wall. Using a fan hot air
quickly and evenly
distributed throughout
oven volume. Prepare
with only one baking tray.
Shelf position (depending on model) It is important to correctly install the wire grill on the wire
22 I Vi
We install new bearings
To purchase suitable components for the washing machine, you need to know the full name of the automatic machine model. When purchasing bearings, you should provide this information to the manager. Another option is to contact a specialized store with the elements already removed and ask specialists to select identical parts.
A bearing of a smaller diameter is installed on the outside of the tank (this can be done through the removed rear wall of the housing). It is hammered in with a hammer and a drift. You should rest solely on the outer frame of the part and, tapping with a hammer, carefully press the element inside the tank.
Having attached one of the parts, you can proceed to installing the second element. To begin, insert the bearing into the hole and fix its position with one blow of a hammer.
Then, using a drift, hammer the element into place. After installing the bearings, it is necessary to “plant” the oil seal in place. The rubber ring is treated with a special lubricant, this is necessary to improve performance characteristics and extend the service life of the seal.
After the oil seal is securely fixed, it is necessary to treat the drum bushing with a lubricant. Lubrication will ensure water tightness and heat resistance of the connection, extending the life of the bearings and sealing ring.
The replacement has been made, now it is necessary to put all the elements of the system into the housing. First of all, the drum is installed in place, the pulley is attached, and the drive belt is put on. Next, the rear wall of the unit is screwed into place. Subsequent assembly is carried out in reverse order. As you can see, it is possible to replace bearings with your own hands. To do this, you need to prepare all the necessary tools and strictly follow the instructions for action.
Source
Replacing a bearing in a Beko washing machine by service center technicians
Most often, people are driven to repair their washing machine themselves by fear of financial expenses. Indeed, replacing a bearing by a professional can amount to 30% of the cost of a new washing machine. However, if you do not have the funds to buy a new car, there are still benefits when contacting a specialist. Firstly, you will not need to spend money on spare parts and tools. Secondly, you won’t have to waste your time and nerves. And most importantly, you will be confident in the quality of the work performed. After all, with one illiterate action you can nullify all your efforts and end up with more complex and costly repairs, or be left without a washing machine altogether.
Handmade repairs
In any case, a person, with diligence, can repair a washing machine on his own. Let's look at the most popular situations.
Drain problems
You need to understand that after washing, the drain water is not transparent. To prevent any debris from accumulating in the pump after prolonged use, special filters are installed, which are removed after some time.
Do-it-yourself repair of Beko washing machines can be done as follows:
- Find the same filter that is causing the breakdown. Most often it is located at the bottom of the machine behind the main panel.
- Next, you need to place a basin under the machine to drain the recycled water.
- Most car models have a special hose next to the filter for draining water. It is much more convenient for them to drain water than through the filter itself.
- If there is no hose, the filter can be easily removed; just unscrew it counterclockwise. Afterwards it needs to be cleaned.
- You can also clean the pipe by picking up a screwdriver. This is the space in which the filter is installed. It also often becomes dirty and accumulates silt deposits.
While the tools are at hand, for preventive purposes you can use them to clean another filter, which is usually located on the water supply. Small debris, rust, sand also accumulate in it; all this can interfere with the collection of water.
After this procedure, you should not put everything in its place. It is advisable to check whether the drain pump is working.
However, there are also breakdowns that are invisible to the device’s sensors, for example, a loose impeller jams, which can be heard through a strong hum.
To check the pump, it is advisable to run the equipment in the “drain” command, and then observe the process through the hole in the filter plug. In working condition it rotates. If not, the pump needs to be cleaned at best, or replaced at worst.
Water does not heat up
The heating element installed in washing machines is a very vulnerable component because it is exposed to high temperatures and salt water. Salts, with each new heating, crystallize and are deposited on it like a hard coating, in common parlance - scale. It begins to retain heat in the heating element, like a fur coat, as a result it burns out from overheating.
Even if there is no plaque in it, it can still burn out from normal production, since the incandescent lamp may deteriorate. A washing machine from this manufacturer can signal a malfunction with a special code on the display - “H2”, which means a malfunction of the heating element, and also “H3” means that the element is constantly working without the ability to turn off.
To accurately determine whether it is broken or not, you will have to get to it. On some car models, this will require removing the back cover, on some – the front cover.
Most likely, to an inexperienced person, repairing a fault with your own hands may seem difficult, but in fact, to do this you only need to be able to remove the cuff of the loading hatch. This must be done extremely carefully; any damage will damage the sealant and leaks will form.
There are 2 contacts attached to the heating element from the bottom of the tank. The wires should be disconnected and it is advisable to measure the resistance between them and the heater. At room temperature this figure is approximately 25-30 Ohms.
Sometimes, based on the test results, the heating element turns out to be working.
In such cases, you need to pay attention to the temperature sensor. It should be located immediately under the top cover; to remove it you need to unscrew a few screws
Measure its resistance, usually the indicator is approximately equal to 4.8 kOhm, and when the water heats up it begins to decrease.
If the thermostat is faulty, replace it. To dismantle the device, remove and disconnect the dispenser hopper intended for powder. Afterwards you need to remove the control panel, but before that you need to disconnect the handles and command apparatus from it.
https://youtube.com/watch?v=ifSyB_JCsaE
Design and diagnostics
Despite its apparent complexity, this device has a very simple design. All working elements are installed in a special heat-resistant cabinet made of alloy steel.
Photo - electric stove design
The operating principle of the electric stove is based on heating the heating element by flowing electric current through it. The device is equipped with heating elements that are necessary for cooking. They are ceramic, tubular, halogen, solid.
Photo - structure of burners
- Ceramic burners are presented in the form of a tube, so they can be used for any electric stove and they are very easy to repair yourself. The spiral is placed into a hole in the slab and secured using special parts. Nowadays, glass ceramics are increasingly used, which are more affordable and durable, in addition, they can be washed;
- Halogen burners are considered economical; they operate using halogen lamps with reflectors. These lighting devices are installed in various areas of the hob and provide fast heating and low electrical energy consumption;
- In old domestic tiles (Dream, ZVI and others) cast iron spiral heating elements were often installed. They warmed up slowly, but after switching off they gave off heat for a very long time. Separately, it should be noted their durability and resistance to moisture and high temperatures;
- The tubular spiral is made of a hollow pipe. When heated, it not only gives off heat, but also promotes the circulation of warm air inside itself, which improves the efficiency of the device. This type of burner is the most difficult to repair yourself.
To power the stove, a power cord is used, which is connected to all burners. In addition, they are also connected to regulators and thermostats, which act as a safety system for the device. After switching on, the wire begins to transfer energy to the heating element, which is necessary for cooking. You need to control the heating level and the burner using the appropriate knob. Many household stoves Ardo (Ardo), Indesit (Indesit), Electrolux (Electrolux), Zanussi (Zanussi) and others, in addition to these devices, also have built-in timers and alarms. They help control cooking time.
Photo - modern stove with halogen lamps and sensor
Unlike gas stoves, electric stoves are considered quite safe for everyday use. Their repair and maintenance can be easily done independently, and in terms of durability they are much better than gas models. In particular, this is because they can be cleaned at home, rather than waiting for a specialist to come.
Typical faults:
- There is a burning smell when working. If you are bothered by the smell of burnt food, then no repairs are needed; you just need to clean the cooking surface. If it smells like plastic or rubber, then you need to urgently call an electrician;
- The burner does not heat. The reason may be a lack of voltage, a problem with the coil or the control handle. Repair of the burner or its wire will be required;
- The heating temperature cannot be adjusted. This will definitely require repair of the mode switch;
- The burner does not heat up. A common problem with tabletop and stationary stoves is that their spirals crack. They can be destroyed as a result of an impact or from a sharp temperature change (for example, the spiral got hot and cold water accidentally got on it). This is the reason why the burner does not heat up or the food is not heated evenly. Self-repair of the spiral is very easy to carry out without the help of a specialist - most often it just needs to be replaced;
- Poor oven operation. Most likely, the problem also lies in the breakage of the spiral.
It should be noted right away that the branded service will not undertake warranty repairs after outside intervention. Therefore, if you do not have such experience, then it is better to immediately contact specialized workshops.
“Symptoms” of typical breakdowns
Before using a Beko washing machine, study its instructions, and before disassembling it, study its structure. If you entrust your washing machine to a specialist, there is no doubt that he will quickly find the cause of the problem and offer the optimal solution to the problem. High prices for services force home craftsmen to figure out on their own what’s broken in the machine? Many problems can be fixed without the help of specialists, especially if you have tools, instructions and a diagram of the device at hand. Almost all modifications can be repaired with your own hands - WKB 51001 M, WKB 61031 PTYA, WKB 61001 Y, etc.
Considering the prices for repair work, why not try to cope without the participation of specialists, especially if the washing machine is 10 years old and it’s no longer so scary if it breaks completely: it’s still time to update the “park”. Below are typical breakdowns that owners of Turkish washing machines encounter:
- The water does not heat up to the value provided by the program or set by the user. Items are washed in cool water, regardless of the program. The opposite effect is also possible - overheating of water above the desired temperature.
- The liquid slowly fills the washer. Or it doesn't flood at all.
- The Beko washing machine does not start due to an uncovered hatch.
- At the end of the cycle, the liquid is not drained. This condition may be accompanied by a strong hum.
- The drum makes a loud noise as it rotates.
- Programs and modes do not start, and the indicators all blink at the same time. Or the light is on, but the SMA does not start washing.
- Pressing the start button does not start the machine, but the power cord is plugged into the outlet.
- Beko washing machine models that have a display display error codes - H1, H2, H3, H4, H5, H6 and H7. SMA does not work in this case.
These are not all the “symptoms” of problems that occur with Veko machines - we have listed the most common ones. Let's look further at how to fix the most common breakdowns.
Causes of malfunctions
Disassembling a Beko automatic washing machine is impossible without knowledge of its structure - the instructions that come with each unit of product allow you to familiarize yourself with it. According to statistics from service centers, SM Eyelids break due to the following reasons:
- Dirt accumulates in drainage paths. Or the pump is broken - 30% of all calls.
- Problems with the electronic module - 20%. Moreover, budget-class models with an Invensys board most often break down. The element is made of low-grade material that is prone to cracking, which damages the conductive paths. The most common ones that break down are the semistors that control the operation of the heating element, filler valve, and electric motor.
- Breakdown of temperature sensors - 15%.
- Depressurization and, as a result, leaks - 10%.
- Extraneous noise - 10%. They appear due to faulty bearings or foreign bodies entering the device.
Problems with draining water
It is clear to everyone that waste water is not crystal clear - this is the specificity of the operation of a washing machine.
To prevent dirt from accumulating in the pump, a drain filter is installed in its path - this is what gets clogged most often. This problem is dealt with as follows:
- First you need to find the drain filter, which is always located at the bottom of the machine behind a decorative hatch or panel.
- Now you need to place a sufficiently capacious container under the machine into which we will drain the waste water.
- Some models of Veko brand washing machines have an emergency water discharge hose next to the drain filter. If there is one, you should use it - it’s more convenient to drain water than through the filter hole.
- The filter should be removed by unscrewing counterclockwise, thoroughly cleaned and rinsed under running water.
- Using a screwdriver, you can also clean the pipe into which the filter was installed - usually it is also heavily clogged with dirt and silty deposits.
Since you had to take up the tools, at the same time, for the purpose of preventive maintenance, you can clean the filter on the water supply, which can be easily found at the place where the inlet hose is attached to the body of the machine. Particles of sand and rust that accumulate in it over time can interfere with the collection of water. After cleaning the drain filter, do not rush to install it in place, first you need to check the functionality of the drain pump. In fact, the Veko washing machine, thanks to the built-in self-diagnosis function, in many cases can itself detect a pump malfunction, displaying the error code “H5” on the display.
But there are breakdowns that the machine “does not see,” for example, jamming of a loose impeller (the appearance of strong play can be guessed by the characteristic hum).
To check the pump, you need to run the machine in drain mode, observing the impeller through the hole in the filter plug. It should rotate. If this does not happen, the pump must be cleaned or replaced.
The drum does not spin
If the drum does not spin, there are several reasons. The most common is motor burnout. To diagnose, check the presence of voltage at the terminals. If it is missing, the motor is damaged.
There are other reasons, but they are not so global:
- If the washing equipment has a rotary drive, the drive belt may slip or weaken. Some models have the ability to adjust belt tension. To do this, loosen the bolt that secures the engine, pull it back a little and secure it. In this case, you need to ensure that there is no strong tension, which can cause rapid wear of the bearings.
- We put the belt on the pulley. If you have to make a replacement, you need to pull the belt away from you and turn the pulley counterclockwise. In order to remove it, you need to do everything in reverse.
- The cause may also be a foreign object that has gotten between the drum and the tank and is blocking rotation. In this case, you will need to disassemble the drum and remove interfering objects.
Typical causes of eyelid failures and their individual solutions
As we have already noted above, malfunctions of washing units can easily reveal this through their external symptoms with incorrect operation or complete failure. But how can these breakdowns be correctly associated with certain breakdowns? Here you will already need some knowledge and advice from leading experts, which we will be happy to present in this article.
If you notice that washing is done in cold water instead of the set 40
or 60 degrees - this indicates a breakdown of the water heating element (heating element), or the control board.
You can come to this conclusion if you set the washing temperature to 30 degrees Celsius, and the machine persistently brings it to a boil, thereby mercilessly spoiling your items made of delicate fabrics. In this case, it is more likely that the board is faulty than the heating element, but just in case, check both.
When you start a program, the machine should begin to fill its tank with water. All this will happen with varying intensity, which directly depends on the washing mode you choose. To take a look at the process of filling water, look through the tank window. But if you notice that after twenty or thirty minutes the machine may freeze and stop the execution of the program, displaying some kind of error code. There are four different reasons for this development of events:
- The lack of water in the water supply system is easy to check if you simply go into the bathroom and try to open the tap.
- Clogged water filter, which is located at the base of the inlet hose (if you have one, of course).
- Fill valve failure.
- Control unit element malfunction.
If a problem arises with the hatch locking device, you need to carefully press down the hatch with your knee and turn on the desired washing program again, because there is a possibility that the locking hook simply does not reach the end of the desired part and the fixation does not have time to occur.
After the washing program is completed, the washing device should itself begin to rinse off the soapy water and pour in fresh water for rinsing. This process is usually accompanied by the hum of the drain pump.
The draining takes place quite quickly, after which the machine again begins to draw clean and fresh water. If the machine just can’t drain the water, and then it just stops and freezes, or it tries to drain the water, the pump starts to hum louder, but the draining never starts, then the problem is the following:
- At the pump.
- There is a blockage in the sewer or drain hose.
- On the management board.
If the machine is very noisy, and the drum rotates with a terrible grinding, clanging and knocking noise, then perhaps the bearings in the VEKO washing machine have broken or a standard body of foreign origin made of metal has gotten into the tank, stuck between the walls and the wall has begun to jam. This type of breakdown must be corrected immediately by first turning off the machine.
The machine may also not turn on completely or the indicator lights will begin to “blink”, and if this happens over and over again, and rebooting does not help, then this is a sign that at the moment it may:
- The on/off button of your washing device is broken.
- The power supply breaks down.
- The network cable is broken.
How to understand what exactly is broken in the washing machine
First you need to determine the cause of the malfunction, and then take action. A beginner in the field of repairing household appliances can identify a breakdown by the following signs:
- The water has stopped heating, so things are washed in cold water - probably the problem is in the heating element.
- The washing tub takes too long to fill with water or does not fill at all. There may be a problem with the pump or hoses.
- The door does not close until it clicks, preventing the washing process from starting. For door problems see here
- The water does not drain after the wash is completed, and the machine can make a very loud noise at this moment. There may be a problem with the pressure switch.
- When washing, the drum may make strange sounds: knocking, grinding. A foreign object may have entered the drum.
- It is not possible to start the washing program. After turning on the machine, all the indicators blink strangely. Sometimes you can still select a program, but the wash still does not start. The motor or control module may be broken.
- After pressing the power button, the equipment does not start, even though it is plugged in. There is probably a problem with the control module, power supply, or power supply of the machine.
- Sometimes the washing device may show an error on the display and it will not perform its functions. It is better to look for error codes in the instructions for the corresponding model.
Attention! The types of faults are very varied. Several components can fail at the same time
Above are examples of the most popular cases.
If the beko washing machine malfunctions with a load of 5-6 kg, you should stop the washing program as quickly as possible, or unplug it from the socket. Then you need to remove excess weight from the drum and find out the true cause of what happened.
Failure of the hatch locking device
If the power indicator on the washing machine is on, the control module allows you to select a washing program, but after activating it, an error message like “Error” appears on the display, then you need to check the functionality of the hatch locking device - UBL. It is a latch whose operating principle is based on the movement of a bimetallic plate. Long-term use and constant temperature changes can deform the plate and damage the device.
The first sign of a UBL malfunction is the absence of a click when closing the loading hatch door. For a deeper check, you need to partially disassemble the washing machine and disconnect the device. This is done as follows:
- The fixing clamp is removed from the hatch cuff.
- The cuff is bent from the UBL side.
- The two fixing bolts are unscrewed and the lock mechanism is removed from the inside.
- The wires are disconnected.
- The value is measured on the lock contacts with a multimeter.
If the UBL is faulty, then we replace it with a new one. The cost of such a part is quite low, and there is no particular need for repairs. If the blocker is working, then the reason for the failure of the washing machine may lie in the electronic control unit or command device.
UBL
There are cases of UBL failure during the washing process, or when the hatch door is closed. To unlock the door, you need to remove the top cover of the washing machine and press the door latch protruding from the hole on the back of the lock.
In some cases, the terminals of the connector connected to the blocker burn out. They need to be replaced, since a poor connection between the contacts quickly leads to repeated burnout of the device.
Typical malfunctions of Beko washing machines
By entrusting the inspection of your car to an experienced technician, you can rest assured that he will quickly and professionally find what the problem is. But due to the high prices for services, many home craftsmen are trying to save money and repair the Beko washing machine themselves.
Almost any SMA model can be repaired at home: ELB 57001 M, RKB 58801 MA, LNU 68801, etc.
This approach is quite justified - often repairs are exorbitantly expensive, and sometimes the price is such that you can buy a new machine. At the same time, even the most “killed” car can last for several more years after repair.
The design of the Beko washing machine also determines the nature of its breakdowns. Let's look at typical malfunctions of washing machines of this brand:
- The water does not heat up to the set temperatures; washing is done in cold water on any program. Or vice versa - the water overheats.
- Water slowly fills into the tank or does not fill at all.
- The Beko washing machine does not start because the hatch does not close tightly enough.
- There is water standing in the tank at the end of the wash (this may be accompanied by a strong hum).
- The rotation of the drum occurs with grinding, roaring, clanging and other uncharacteristic sounds.
- Not a single washing mode starts - all the lights on the machine blink. Or the program works, the indicator lights up, but the machine does not wash.
- It is not possible to start the machine with the power button (with the power cord plugged in).
- Models with an electronic display display error codes H1, H2, H3, H4, H5, H6 and H7. The machine doesn't work.
Veko washing machines: pros and cons according to customer and specialist reviews
Like any other equipment, the brand’s products have their own advantages and disadvantages, which are noted by both ordinary users and specialists in the field of repairing Veko washing machines at home. The advantages include the following positive points:
- reasonable price, which makes the brand attractive to a large number of buyers;
- high-quality assembly, especially for models that were assembled in Turkish factories;
- variety of energy efficiency. The range of devices includes machines with classes A++, A+ and B, which allows you to choose the ideal option if you need to reduce the consumption of electricity, water or washing powder;
- rich functionality, suggesting the presence of many options, for example, pre-soaking, enhanced rinsing, easy ironing mode or delayed start;
- presence of an informative display. Almost all models are equipped with an easy-to-read LCD display, which displays not only the current operating mode, but also the time until the washing process is completed, the current temperature and other important indicators;
- drum volume. Even narrow machines provide an increased load of laundry compared to similar models in the price segment.
Despite the abundance of advantages, Veko washing machines, which are not difficult to buy in the Russian Federation, have their own disadvantages:
- many users note increased noise, which, however, is not critical;
- The lack of models with vertical loading is considered a big drawback, since all machines of the brand are only front-loading;
- Dirt and debris often accumulate on the sealing rubber;
- most models do not have a notification about the completion of work;
- Strict adherence to the operating rules, which are given in the instructions for Veko washing machines (for 5, 6 and even 7 kg of laundry), is required, otherwise there is a high probability of breakdown.
Most often, the cause of the problem is an incorrect calculation of the detergent, which does not completely wash out the powder, and lumps accumulate inside the dispenser.
Washing machine "Kandy". In a special publication on our portal we will tell you in detail about Kandy washing machines. You will learn the advantages and disadvantages, the main functions of standard “Candy” automatic machines, criteria for choosing a unit: editors’ recommendations, the best models from the line in various categories and malfunctions of “Candy” washing machines, possible do-it-yourself repairs.
Let's start disassembling the machine
To disassemble the washing machine, you need to prepare a screwdriver, Phillips and flathead screwdrivers. Using these tools, you can remove all parts of the machine and get to the washing machine tank. The algorithm of actions will be as follows:
- disconnect the device from the power supply;
- remove the top cover of the case, and to do this, unscrew the 2 screws located on the back;
- remove the powder receptacle from the unit;
- Unscrew the screws holding the control panel and move it to the side;
- unfasten the lower decorative panel from the body;
- unscrew the 3 screws located behind the decorative panel;
- Unclench the wire clamp holding the cuff, move it to the side and tuck the elastic into the drum;
- Unfasten the front wall of the case.
- unfasten the filler pipe;
- disconnect the wire leading to the dispenser and disconnect the tray from the body;
- remove the upper metal false panel that opened after disconnecting the control panel;
- lower the counterweight down a little; to do this, loosen its mounting bolts;
- disconnect the thermistor by resetting its terminals;
- remove the power and ground wires from the contacts of the tubular heater;
- remove the heating element from the housing;
- loosen the clamps holding the plastic tank cover;
- remove the cover and set it aside.
The main stage of analyzing the SMA has been completed, as you understand, you can do the work yourself, it is not necessary to transfer the washing machine to a workshop. To change the bearings, you have to remove the drum from the housing and gain access to the worn parts.
SPECIFICATIONS
General parameters Main color - black; The total number of burners is 4; Oven volume - 65 l; Maximum power consumption - 9.9 kW; Type of control - rotary mechanism; Display - yes; Drawer for utensils - yes; Oven Timer - yes; Grill - yes; Convection in the oven - yes; Maximum temperature - 250 °C; Oven cleaning is traditional; Number of oven door glasses: 3; Oven lighting - yes;
Hob Working surface - glass ceramics; Number of dual-circuit burners - 2; A burner with an oval heating zone - yes; Burner sizes: 12 cm, 14 cm, 17 cm, 18 cm; Cover - missing;
Features Control panel lock - yes; Timer type - electronic; Watch - yes; Protective shutdown - yes;
Additional information Availability of power cable/plug - no; Additionally - 3D heating;
Dimensions and weight Width - 60 cm; Height - 85 cm; Depth - 60 cm.
Typical faults and solutions
There are 5 common problems with the door and in all these cases the device is easy to fix.
Parts that may be damaged:
UBL malfunction
If the hatch locking device stops working, it could become clogged. Disassemble the element, check for obstructions and clean. Most often, the UBL stops blocking normally due to overheating. In this case, the part cannot be restored.
To dismantle the device and install a new one, you will need two screwdrivers: a Phillips and a slotted one.
- Pry up the clamp with a slotted screwdriver and remove. It looks like a circle made of a steel spring and wire.
- Remove the part of the cuff in the area where the lock is attached.
- Unscrew the pair of screws that secure the lock.
- Take out the device by hand and pull off the chip.
- Install the new UBL by placing it inside the washing machine and tightening the screws.
- Put the cuff back on.
- Install the clamp into place using two screwdrivers. After completing the steps, everything should work.
Latch problem
If the door breaks, check the lock of the washing machine. A problem may be indicated by the absence of a click when the hatch closes. The lever that fits into the hole may become nicked. Because of them, the device stops closing.
Unscrew the door and place it on the table. Remove nicks with a file. Apply graphite lubricant, and then remove the excess so as not to damage your clothes with it during washing. All that remains is to install the door.
If the latch is severely deformed, it is easier to replace it with a new one than to repair the lock. This procedure can take a lot of time and there is no guarantee that it will be possible to get the washing machine into working condition. It's better to spend a little money than to be caught off guard by a lock that doesn't work properly. Sometimes the problem is not the latch at all, but loose fasteners and hinges. In this case, adjust the position of the hatch so that the latch fits easily into the hole.
Glass damaged
If the glass in the door is removable and you can order a new one, this will be the best option. If it is not possible to remove the glass, all that remains is to repair the damaged element of the washing machine. To do this you will need polyester or epoxy resin.
To remedy the situation, tape the polyethylene to the front side of the glass, leaving no gaps. Cover the damaged area with reinforcing tape, which is used for plastering work. Prepare the resin: mix the base and hardener in the specified proportion.
Pour the mixture into the damaged area and wait for polymerization. After a day, remove the plastic wrap. Remove smudges with sandpaper and the glass will look like new.
Broken plastic support
Even in good washing machines, the plastic deteriorates over time due to neglectful use of the machine. If the support breaks, the hatch may not fit tightly, creating a risk of flooding. If this part becomes damaged, remove it and secure the damaged part with a vice. The diameter of the nail should be 4 mm. Cut it to the desired length, if it is different.
Drill a 3.8 mm through hole in the support. Hold the nail with pliers and heat to 180ºC. After this, insert it into the drilled hole and wait 3 minutes for the nail to cool. All that remains is to assemble the door and install it in place.