Water leaks in a washing machine are always unpredictable. As usual, you loaded the laundry, selected a program and started the wash, but after a while you suddenly discovered a puddle near the unit. The situation is unpleasant and requires immediate action. This article explains why the washing machine is leaking and how to fix this problem.
A leaking washing machine can create a real flood in the room.
Causes of leakage during washing and spinning
Since the technological operations during the washing and spinning process are fundamentally no different from each other (draining during spinning occurs according to the same scheme as during washing), it makes sense to consider the reasons for the appearance of water in the machine together.
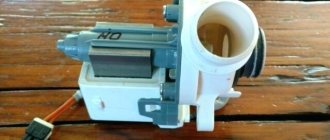
One of the most common causes of leaks during operation of a washing machine is a malfunction of the drain pump or filter. The first element is necessary for directly pumping water out of the working volume during any operation, and even the smallest solid object found inside the washing machine can damage it.
Due to its small size, it can not only fly through the drain pipe, reaching the filter, but also knock it out due to its enormous speed (the average rotation speed of a washing machine drum is 1,000 rpm, so a conventional coin has a very decent starting speed) , which can damage the pump. Obviously, for the same reason, the filter can quickly become unusable.
Figure 3 – Drain pump
If water mainly accumulates at the back wall of the device, the cause is probably a malfunction of one of the two seals. The oil seal is another sealing device that is designed to prevent the formation of leaks from the drum bearings, which, in turn, ensure quiet operation of the machine. Therefore, if a leak is accompanied by a multiple increase in noise compared to what usually comes from the machine, this is a sure sign that the problem lies either in it or in the bearing.
Note: manufacturers strongly recommend that such an oil seal device be lubricated annually with a water repellent, as this will ensure a better degree of sealing of the structure.
How to make repairs yourself
Nowadays everyone in the house has a washing machine. It, like any other equipment, sooner or later begins to break down. You have to spend money not only on spare parts and tools, but also in order to call a specialist who is ready to carry out repair work.
You can prevent leakage due to an incorrectly set housing level by simply carefully following the manufacturer's recommendations.
Just remember that half of all problems can still be solved at home, absolutely on your own. There are not many parts in the washing machine, so you need to find just one and solve your problem.
You should know that most often the lock, valve, shock absorber, heating element and water sensor can break.
Important! When trying to fix something, your actions can cause even more damage to your equipment.
Before you start repairing, you should always have the following tools at home for this situation:
- Phillips and flat screwdriver;
- Pliers;
- Ticks;
- Long nose pliers;
- Flat wrench (19 and 8/10).
Washing machine leaks when filling with water or spinning
With the advent of washing machines in our homes, we can no longer imagine how our parents could do without this miracle of modernity. It seems only at first glance that her work is invisible, but as soon as a problem occurs with this mechanism, the lack of clean things affects all family members. Therefore, any breakdown of the washing machine is a serious problem for many. What to do if the machine is leaking?
First actions
Before you think about repairs, you should take a number of steps to eliminate the danger.
First you need to turn off the power to the washing machine. This means not just pressing the power button, but unplugging the cord from the outlet. If it is not possible to do this safely (for example, there is a risk of touching water), then you will have to turn off the electricity at the distribution panel.
Next you need to close the water supply valve to the machine. If this is not the case, then we shut off the water supply to the entire apartment or house.
Next you need to see if there is water in the washing machine. If the wash is stopped halfway, then you need to drain the water through the drain filter and only then remove the laundry. The filter is located at the bottom of the machine on the right (closed with a lid).
When all the dangers are leveled, you can begin to identify the reasons why the washing machine is leaking.
Determining the causes of the leak
A leak can be caused not only by a failure of the machine itself, but also, say, by the appearance of a defect in a pipe. If everything is fine with the pipes, then you need to check the communications leading to the “washing machine”.
In fact, a leak can appear when drawing water or during a spin cycle.
Therefore, it is very important to pay attention in the first minutes of detecting a leak, where the water comes from
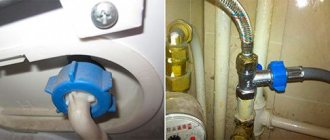
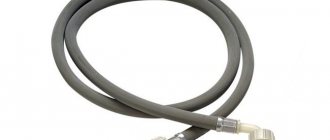
Often the problem lies in the hoses. Connections may become depressurized for various reasons, then they should be sealed. Or it could be a problem in the hoses themselves. Therefore, they need to be carefully inspected along their entire length.
If the problem is actually found in the hose, then it will have to be replaced. However, this time you should purchase the highest quality product from a reputable manufacturer in order to protect yourself from such problems in the future.
After all, in such cases you can flood not only your bathroom, but also your neighbors.
It should be noted that some brands provide a guarantee for their products with such conditions that in the event of flooding of neighbors due to a broken hose, the manufacturer will compensate all repair costs. Therefore, by buying a high-quality hose, you can relieve yourself of responsibility for a low-quality product and the consequences that a leaking washing machine can bring.
If everything is in order with communications, then you should pay attention to the machine itself, there must be a problem there
Causes of washing machine breakdowns
There are a large number of such reasons, because a machine is a complex mechanism that consists of many parts. Therefore, we will analyze the most “popular” reasons.
So, first you need to inspect the product. Sometimes it happens that some of the laundry remains at the door. It could be some kind of scrap that is stuck between the door seal and the drum. As a result, a stream may form at the bottom of the door. This is the most “pleasant” reason why a washing machine may leak. If there is nothing in the door, but there is a leak, the seal may have become leaky.
If the machine leaks during the spin cycle, you should check the drain filter. It may not be tightly screwed. If the device leaks from the dispenser when drawing water, then the blockage in the detergent bin should be removed. It is also possible that there is excessive water pressure, which can be eliminated by tightening the supply valve a little.
If the washing machine is leaking from below, then the cause may be damage to one of the pipes. If when collecting water - from the inlet valve to the dispenser or from the latter to the tank. If during spinning - drain pipe.
There are many reasons, but they will have to be eliminated
As you can see, if the washing machine is leaking, there can be many reasons for this. And it is not always possible to identify the real one for a number of reasons. Therefore, very often you still have to call a specialist. However, the first steps to turn off the power and water supply must remain unchanged.
When you need a master
If your washing machine is leaking from below, and you don’t know how to use the tools, and if you simply don’t want to cause even more damage to the washing machine, then you shouldn’t do everything yourself. You need to call a specialist who is ready to help you with your difficulties at any moment.
In some cases, the cause is not a hardware failure, and it is quite easy to fix.
Possible damage
Leakage - although in essence it is one and the same thing, leakage is still different. I mean, it’s equally unpleasant, but the solution to the problem may be different.
For example, if your washing machine is leaking from below, the problem may be in the drain hose. If it leaks when drawing water, the pump is most likely to blame.
Here is a list of the most common injuries:
- Inlet hose - a leak will be detected even at the stage of drawing water.
- The same picture will happen if the problem is in the pump pumping water into the tank.
- The drain hose is most likely damaged if the leak appears while the washing machine is spinning clothes or draining water.
- If your washing machine leaks while filling with water, the pipe that runs from the detergent container to the fill valve may be damaged.
- When a leak comes from below when draining water, it is necessary to check the drain pipe connecting the drum to the drain pump.
- Often water flows from under the door - this is a signal that it is time to change the rubber seal that secures the hatch during the washing process.
- It is rare, but it still happens that the car leaks after the cycle has completed. Moreover, you don’t see exactly where it’s dripping from. And after a short time you find a puddle on the floor. In this case, it is necessary to inspect the tank for cracks. Sometimes the integrity of the housing is damaged, which can cause the device to leak.
- If the washing machine leaks during the spin cycle, and, in addition, during the cycle you hear a characteristic metallic grinding sound - as if rusty chains are clanging - most likely the problem is in the bearings.
Sometimes a leak can be fixed in a matter of minutes. For example, if you discover in time that the drain filter is clogged, which increases the pressure on the hose and it cannot fully drain the water. In other cases, a thorough inspection of the washer is necessary.
Hatch rubber
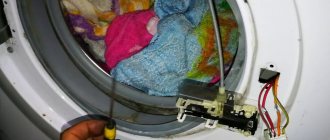
If you see that a leak is leaking through the door, most likely the problem is in the sealing lip. In such a situation, water flows out from under the hatch and flows in a small stream along the front wall of the machine. It is necessary to carefully inspect the rubber band for damage.
Do not mistake the specially provided recess located in the lower part of the cuff for a defect.
You can try to repair the seal; if there are significant cuts, it is better to install a new rubber band. To prevent this type of damage, it is necessary to check the pockets of items before placing them in the drum. Coins, paper clips, hairpins and other items that can harm the gasket are often forgotten there. Minor cuff defects can be removed by using special patches and waterproof glue.
What measures to take
And now the diagnosis has been established - what to do, you ask? If the machine is under warranty, I recommend entrusting the repair of the breakdown, no matter how difficult it may be, to a specialist. If you have signed up for an “exchange service” in the store, then it’s time to use it. In the case when the device is “a hundred years old,” you can try to repair it yourself.
The only thing you should not touch with your own hands is the bearings. Firstly, this is a rather labor-intensive process. Secondly, if you are not a washing machine repairman, you are more likely to destroy the unit than replace the bearings yourself.
And yet, how to fix the leak yourself. You can replace damaged parts: pipe or hose.
To replace the pipe, you need to determine whether it is attached with glue. In this case, take out a new part, if necessary, clean it from dust, dry it and wipe it with acetone to improve adhesion. Coat the joint with waterproof glue or epoxy resin, using a thin layer. Carefully glue the piece into place.
When replacing the drain hose, ensure free access to the pump by turning the machine on its side
Carefully unscrew the end of the tube from the pump using pliers and pull it out. Then disconnect the part of the hose connected to the body, first remembering how it is attached
In the same sequence, attach the new hose on both sides. Make sure the mount is well secured.
Take care of your equipment and it will last you longer. Have a good mood, I’ll be happy to help again!
What to do if the washing machine vibrates a lot during the spin cycle? Read this article...
Stay up to date with the news
Pipe branch
If, for unknown reasons, water continues to accumulate near the washing machine, it is worth checking the pipes.
These parts are very fragile, and manufacturers often make them from low-quality materials. With proper care and regular cleaning, they can last up to 10 years. However, when the owner of the device never does this, the pipes begin to function poorly.
A leaky structural element for pouring water into the main tank may result in a leak. The pipe is needed for the normal functioning of the washing machine, without it there is no way, but the unit will not work with a damaged part.
This element is located under the device body. First you will need to remove the back cover by unscrewing all the mounting bolts.
When replacing, be sure to turn off the water and electricity supplies.
When you reach the pipe, carefully loosen the clamps that hold it. Then take it out and inspect it for damage.
After removing the blockages, put them back in place. If the pipe is damaged, replace it with a new part.
Common causes of Samsung washing machines leaking
As for another South Korean company, in this case there are slightly more reasons for leaks on the floor. Firstly, on several forums, owners of equipment from this manufacturer complain about the insufficient quality of the inlet hose, in particular, the fastening element that directly connects the hose and the device itself.
Secondly, for some reason, in Samsung washing machines, the device that controls the level of liquid poured into the dispenser - pressotate - often fails. Being one of the main indicators of the processes occurring in the machine, the pressotate, if it breaks, can cause a huge number of troubles:
- The system collects an excess amount of water, as a result of which it can spill out through the hopper and dispenser;
- Incorrect determination of the amount of water in the working space may result in its not being removed, and a new fill with the machine loaded to the top can squeeze out the “extra” water through the sealing collar.
Finally, a leak may simply be caused by poor assembly. As practice shows, the quality of execution of the same model very much depends on a specific plant: for example, a plant in China supplies the market with devices that are better assembled than the plant in Kaluga, from which goods began to be supplied to Europe only in 2016.
Main tank damaged
Tank defects often occur when not only clothes, but also shoes and belts are washed in the machine. Clothes with metal inserts, bra wires, and other sharp and hard objects left in pockets can also damage the main container.
If a crack occurs in the tank, expensive repairs will be necessary with a complete replacement of the element.
It may not just be a defect. The tank is constructed from different parts fastened together. An integral part of the connection is the gasket. Over time, the elastic band loses its properties and begins to let water through. In this case, the sealing element will need to be replaced.
Crack in the hose
First of all, you need to determine at what stage the leak started. If this happens after starting the program, then the water supply hose may be the cause. It is necessary to check its integrity. This can be done using thin paper or a napkin. In this case, it will be possible to detect even the smallest leak and quickly eliminate the problem.
If the hole from which water oozes is located at the junction of the hose with the body, then simply replacing the gasket is enough. A damaged hose can be sealed using a rubber gasket and high-quality rubber glue. You can temporarily cover the defect with electrical tape, but in this case you will need to make a replacement, and in the coming days.
If there is waste water on the floor
When the water under the machine is not clean, but dirty, it is worth admitting that the inlet hose is not to blame. Darkish liquid indicates a leak in the lower parts of the machine: the tank, pipes, pump or drain system. Let's start checking with the drain: all you need to do is start the drain or rinse mode on the washing machine and take a closer look. If the situation repeats, we seal the cracks in the hose with a rubber patch or replace it with a new one.
It is easy to purchase a fully functional hose, since the vast majority of elements of the Samsung drain system have standard dimensions and are available in all plumbing stores. We pay special attention to the connection points with the pump, volute and siphon. It is likely that the fixation has weakened. The solution will be to replace the gaskets, strengthen the fastenings with an additional clamp and use waterproof sealants.
Why is water leaking from under the washing machine?
The main reasons for this defect are: violations of the rules of operation of the SMA, the use of low-quality washing powders, as well as defects that arose during the manufacture of components and parts. If we talk about specific malfunctions, these include:
- violation of tightness at the connections of the inlet and drain hoses, violation of their integrity;
- leak in the drain pump (pump);
- damage to the tank body (crack or hole);
- violation of the tightness of the connections of the filler and drain pipes inside the SM housing;
- damage to the elastic cuff of the hatch door;
- wear of the oil seal that seals the bearings on the drum shaft;
- There is a blockage in the hopper of the washing powder dispenser tray.
Destruction of bearings and oil seal
If the Indesit washing machine leaks during the spin cycle, you will have to change the seal. Over time, it wears out and begins to leak water. To inspect the seal, you will have to disassemble the SMA tank. During diagnostics, it may be revealed that the drum bearings also require replacement.
There is another, easier way to check the oil seal and bearings. It is necessary to remove the back wall of the case (or just the technical hatch cover, it all depends on the Indesit SMA model). After this, you should carefully inspect the back surface of the tank. If rusty or oily smudges are visible on it, then we can absolutely talk about a seal defect.
Leakage due to dispenser
If water starts flowing out after the water has been added, then the problem is in the dispenser. This is a special retractable device on top where washing powder, rinse aid, stain remover, and conditioner are loaded. The reason why problems occur in the dispenser is due to a clogged grate or excessive water pressure. The grate becomes clogged if the incoming water is very dirty, which creates sediment, or the grate becomes clogged with grains of powder.
To eliminate such a breakdown, you need to remove the dispenser and thoroughly clean it along with the hopper. Then return it to its place and start the device. If water comes in under high pressure, you need to tighten the supply tap a little. If the problem persists, the inlet valve must be replaced.
Prevention of the problem
Prevention is necessary to ensure that your washing machine does not leak from below during washing. It needs to work for a long time and correctly. And to prevent any damage you need a little more time than washing. Moreover, it is not so difficult to do this, because you can do it yourself.
- Use water filters;
- Do not load a lot of clothes into the compartment;
- Check your clothes before loading. Changes, paper money, keys or any other things can greatly damage the washing machine;
- Use laundry bags;
- Don't go far when the laundry is done;
- After you take out the clothes, the hatch should remain open for some time;
- Maintain the filter once a month.
It is important to follow the recommendations and regularly perform self-cleaning of equipment, which helps to avoid blockages of the system from the inside.
Low prices
| Service | Price |
| Diagnostics | |
| When ordering repairs | For free |
| In case of refusal of repair | 1 standard hour |
| Full product diagnostics (functionality check) | 2 standard hours |
| Major renovation | |
| Replacing the electric motor | 1.5 standard hours |
| Replacing the drum pulley | 2 standard hours |
| Replacing shock absorbers without removing the tank | 1.4 standard hours |
| Replacing the electrical harness | 2.2 standard hours |
| Replacement of supports, crosses | 2.2 standard hours |
| Replacement of drum, tank | 2.5 standard hours |
| Replacing bearings | 2.5 standard hours |
| Installation of counterweights | 1.3 standard hours |
| Replacement of housing elements | 2 standard hours |
| Repair of medium complexity | |
| Sealing or replacing pipes | 1 standard hour |
| Replacing the drain pump | 1.2 standard hours |
| Removing clogged drain pumps and hard-to-reach pipes | 1.2 standard hours |
| Replacing the solenoid valve | 1.5 standard hours |
| Replacing the heating element | 1.5 standard hours |
| Replacing the pressure switch | 1.2 standard hour |
| Replacing the level sensor | 1.1 standard hours |
| Replacing the display unit, electronic module | 1.7 standard hour |
| Replacement (installation and dismantling) of KSMA | 1 standard hour |
| Electrical circuit repair | 2 standard hours |
| Configuration (firmware) of the electronic unit | 2 standard hours |
| Replacement of signal lamps of the dispenser, front panel | 1 standard hour |
| Belt replacement | 1.1 standard hours |
| Cleaning the dryer | 1.5 standard hours |
| Replacing the drying heating element | 1.5 standard hours |
| Replacing the thermostat, drying timer, suspension springs, hatch lock | 1.5 standard hours |
| Closing the drum curtains | 2.5 standard hours |
| Removing foreign objects from the tank | 1.6 standard hour |
| Minor repairs | |
| Removing the transport fasteners | 1 standard hour |
| Replacing the hook, hatch handle, hatch fastening, glass | 0.8 standard hours |
| Replacement of door seal, hatch cuff | 1.6 standard hours |
| Opening the loading hatch door | 1 standard hour |
| Replacement of the power button, capacitor, surge protector, power cord, repair of the KSMA indicator | 0.7 standard hours |
| Replacing the drain hose | 1.2 standard hours |
| Replacing the aquastop (hydrostop) | 1.2 standard hours |
| Minor repairs (without disassembling the machine) | 0.5 standard hours |
| Maintenance | 1 standard hour |
| Related | |
| Repair of units, modules | 50% of the price of new |
| Installation and dismantling of the built-in device | 1 standard hour |
| Cleaning the system | 1 standard hour |
| Markup coefficient | |
| Embedding | 1,8 |
| Premium model | 1,8 |
| Urgent departure (within 15 minutes) | 1,5 |
| Cramped working conditions | 1,5 |
| Any repairs involving complete disassembly of the product | 2,5 |
| Basic values | |
| Standard hour (rounded up to half an hour) | 1000 |
| Final provisions | |
| ● When repairing the control board, the technician takes the board, after the repair he returns it and installs it ● Spare parts and consumables are paid separately ● Travel outside the city - 40 rubles/km ● The final price of the repair is determined by the technician, based on the complexity of the breakdown and the volume of work performed | |
Let's take a look at the pump at the same time.
Here we also check the drain pump. To do this, disconnect the pump from the volute and pipe, clean it of debris and replace it with a new one. Do not neglect the accumulated dirt - it is often the source of damage to the part.
When the pump does not cause suspicion and looks intact, clean and functioning, we turn our attention to the snail. There should be no cracks or water on its surface. If there are any, most likely, due to a manufacturing defect, the coil burst and began to leak drops. Only replacing it with an undamaged part will help here.


