After purchasing a washing machine, it must be connected to water supply and sewerage. To do this, it is possible to use a number of additional elements, one of which is a faucet for a washing machine. When connecting the unit to a water pipe, this is an extremely important fitting unit.
We will tell you how to select and install a tap that allows you to open/shut off the water supply to the washing machine. We'll tell you what type of device to choose and how to install it correctly. Our recommendations will help home craftsmen cope with the work themselves.
What is it and what is it for?
The washing machine should be disconnected from the water supply very often. The best time is always when it is not needed. This is due to the fact that unexpected emergency pressure surges occur in water supply systems, and as a result of water hammer, the hose or valve inside the device can be damaged. Damage may also occur during prolonged use. As a result, you can flood both your own and your neighbor’s apartment. And no one needs a flood in a private house.
In principle, you can shut off the cold water supply pipe using the first faucet or valve of a suitable diameter that you come across. But you always want all the equipment in the bathroom or kitchen to be stylish, comfortable, beautiful and of the same type.
Accommodation options
There are several places where you can put a washing machine:
- toilet;
- bathroom or combined bathroom;
- kitchen;
- corridor.
The most problematic option is the corridor. Usually there are no required communications in the corridor - no sewerage, no water. You will have to “pull” them to the installation site, which is not at all easy. But sometimes this is the only option. In the photo below there are several interesting solutions for how you can place the typewriter in the hallway.
Option for installing a washing machine in a narrow corridor Making something similar to a portal is also a solution Hide it in a bedside table Integrate it into hallway furniture
The toilet has all communications, but in typical high-rise buildings the size of this room is such that it is sometimes difficult to turn around - there is no space at all. In this case, washing machines are installed above the toilet. To do this, make a shelf so that when sitting on the toilet it does not touch your head. It is clear that it must be very strong and reliable, and the automatic transmission must have very good shock absorbers. The washing machine must be installed perfectly, otherwise it may fall during operation. In general, with this method of installing the washing machine, it doesn’t hurt to make several strips that will prevent it from falling off the shelf.
The shelf is solid and reliable, but slippery - a rubber mat is needed under the legs for shock absorption. Powerful corners are built into the wall, with a washing machine installed on them. The plastic stops were removed from the legs, and holes were drilled in the corners for the remaining screws
The installation is reliable, the only important thing is that the vibration does not tear the corners out of the wall. You can close it with vertical blinds. This is already a whole cabinet. The only thing missing is the doors
The bathroom is the room where the washing machine is most often placed.
However, in some apartments the bathroom area is too small, barely fitting a washbasin and bathtub. For such cases, there are alternative options.
Recently, washing machines are increasingly being installed in the kitchen along with other household appliances, where it is also possible to connect to water supply, sewerage and the electrical network.
To make everything look organic, you need to choose a machine of such a height that it fits into the size, and the sink itself is better square - then they will be wall to wall. If there is not enough space, you can slide at least part of the body under the sink.
Place the washing machine next to the sink. Nowadays fashionable countertops in the bathroom can be decorated with mosaics. If space allows, simply place the machine next to the sink.
There is a more compact way - to place the washing machine under the sink. Only the sink needs a special shape so that the siphon is installed at the back.
To place a washing machine under the sink you need a special sink One of the sinks under which you can put a washing machine
The next option for installing a washing machine in the bathroom is on the side of the bath - between its side and the wall. Today, case sizes can be narrow, so this option is a reality.
Narrow bodies are no longer a rarity Between the bathtub and toilet The sink should not be smaller than the body No one bothers to install a sink on top
One thing, installing such equipment in bathrooms or combined bathrooms is not the best idea. Humid air negatively affects the body, which quickly begins to rust. However, there is usually not a lot of space, although in principle you can put the machine under the washbasin or hang shelves above it. In general, it's up to you to decide.
Another popular place to install a washing machine is the kitchen. Built into the kitchen set. Sometimes they close the doors, sometimes they don't. This is at the discretion of the owners. There are several interesting photos in the gallery.
Doors with a cutout for a “porthole” Place in a kitchen cabinet In a kitchen unit, the washing machine looks quite organic
Purpose and scope
About 20 years have passed since the widespread use of household automatic washing machines in the post-Soviet space. Nowadays there are washing machines in almost every house or apartment. A large number of options for installing units in apartments and houses have appeared: with and without a stationary supply, with corner and direct-flow taps, with connection to a mixer and a water tap.
At the moment, a whole collection of special fittings has been developed that allows you to connect the machine to the water supply network at any point convenient for you.
There are also more powerful industrial machines that also require the use of locking devices for their connection. Fundamentally, the connection method does not differ from the household one (adjusted for the fact that cold and hot water is permanently supplied to them and large taps are required).
The role of the tap when connecting the washing machine
The tap that is used to connect the washing machine to the water supply network plays an important role. With its help, you can instantly turn off the water in case of unforeseen circumstances, for example, if the machine breaks down, which can lead to leaks.
An even greater danger is posed by water hammer in water pipes: it can disrupt the integrity of the elastic hose of the washing machine, resulting in a large-scale flood that will cause justified indignation among neighbors.
To ensure complete safety of using the automatic machine, it is recommended to close the tap connecting the unit to the water pipe immediately after completing the wash.
To prevent this from happening, you need to connect the machine through a tap. It is recommended to place this part in a visible place so that you always have quick access. In an extreme situation, this solution will allow you to gain a few minutes, which can be decisive in preventing flooding.
Characteristics
There are no special requirements for connecting home washing machines, so ball valves are almost always used: sealed, reliable, simple, quickly shutting off the flow of the medium, and having a low cost. Valves with diameters of 15-20 mm are not installed in everyday life; valves that require longer turning to close and open water and which reduce the pressure somewhat more than ball designs are also practically not installed. Conical structures are also practically not used in everyday life.
Types of cutting devices
Specialized stores offer a varied assortment of taps. Let's take a closer look at the most commonly used types.
Among them are multi-turn valves, which block the flow of water due to the movement of the plate, as well as ball valves, which are turned on and off by moving a small ball installed inside the structure.
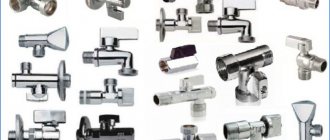
To connect automatic machines, various types of cranes are used, differing in configuration, size, shape and design
Ball valves have a number of advantages:
- high tightness;
- prompt response, allowing you to quickly block the flow of water;
- simplicity of design, contributing to prolongation of the operational period.
It is also worth noting the small size of this type of cut-off devices, which allows them to be used even in the most cramped circumstances.
What materials are they made from?
The range of materials from which shut-off valves are made is large: steel, cast iron, titanium, brass, bronze, ceramics, PVC, polypropylene, polyethylene. The machine is used almost every day; plastic products are not very designed for everyday opening and closing; cast iron and ceramics are bulky, steel is prone to corrosion, titanium and stainless steel are expensive to use. There are also silumins, but they are not very durable.
The almost optimal choice is brass (bronze is a little more expensive and a little more fragile). In addition, brass products are sold absolutely everywhere and are quite affordable in price.
Which faucet is better to buy?
When selecting shut-off valves for connecting equipment to the water supply system, attention is usually paid to the following:
- material of manufacture;
- mechanism design;
- connection location;
- pipe diameter size, thread selection;
- external parameters of the crane.
When choosing a mechanism design, as already mentioned, you should give preference to ball valves. They come with internal and external threads. This parameter is selected depending on the thread that is already on the pipeline. If cutting on pipes is just being carried out, then this parameter is not of great importance. When purchasing a device, you need to pay attention to ensure that the diameters of the pipe and the outlet on the shut-off valve match in size. And which faucet is better to take - an angle, a pass-through or a tee, then the choice here is individual. It depends on the specific conditions and the most convenient location for connecting the equipment.
As for the material of manufacture, the taps can be made of brass, silumin or powder alloys. Brass can be called the most preferred option. And although brass taps are more expensive, they are reliable and durable.
Attention! When choosing a faucet made of powder alloys or silumin, you need to remember that they are quite short-lived and fragile. When exposed to mechanical forces, cracks can appear very quickly.
The external characteristics of the crane are also very important. When choosing a device, you usually pay attention to the angle of rotation of the handle. After all, if it turns towards the wall, using the tap will be very difficult or even impossible. It is also important that the handle does not slip, fits comfortably in the palm and turns without much effort.
Advantages and disadvantages
Brass ball products have many advantages, while household taps have practically no disadvantages:
- very compact dimensions;
- reliability;
- durability;
- simplicity of design and maintainability;
- low cost;
- good tightness;
- low hydraulic resistance;
- corrosion resistance.
There are virtually no disadvantages when used in home plumbing systems. You just need to pay attention that when a faucet with a cantilever handle is located along the wall, there may not be room to turn the handle - you should think about convenient placement at the planning stage.
Differences between a faucet and a valve
Gate valves are more reliable than taps, but they are much taller, heavier, more expensive and inconvenient to use. In addition, it is unrealistic to find ¾° or ½° valves in stores.
The fundamental difference is that when the steering wheel rotates, the locking organ in the form of a plate is lowered and raised – for a long time and with some physical effort. The use of valves in home systems simply does not make sense.
Types and designs
There are three main design options for the device:
- conventional straight-through ball valve. On one side there is a pipe with a ¾" external thread for screwing on the union nut of the washing machine hose, on the other there is, most often, an internal thread for connecting to the water supply;
- Angle faucet is a variant of a regular straight-through fitting, only the water flow is rotated (usually 90°). Convenient when placing the machine in a corner, placing pipes close to the wall, concealing the pipeline in the wall, or to prevent the hose from bending;
- three-way valve made on the basis of a tee. It has two fundamental modifications:
- a tee, the body of which is installed in the pipeline and is its flow part; on the third branch pipe there is a tap and a thread - it is to this that the hose is screwed;
- a tee through which two water consumer devices are connected, and the tap allows you to turn off any consumer or both at once. A typical example is a fitting quickly installed on a bathroom faucet: a machine hose and a shower hose are connected to it. The same device can be used to permanently connect a washing machine and dishwasher located nearby in the kitchen.
Marking: the following is marked on the fitting body:
- DN - diameter in mm (sometimes duplicated in inches, on small diameters without strokes);
- PN - working pressure in bar.
Types of ball valves
There are several types of ball cutters. Let's look at the main ones used to perform the process of connecting a washing machine at home.
Option #1 - pass-through
Such a mechanism has outlet holes on both sides, which allows you to shut off the water, dividing the branch into two parts. Devices belonging to this category can be installed on a separate pipe, which extends from a common riser to any piece of plumbing, or used for tapping.
Straight-through ball valves are often used to connect washing units, but they are also suitable for other plumbing devices, for example, they are often used to connect toilet tanks
Option #2 - tee (three-way)
As the name implies, such a device is equipped with three inputs and outputs. One of the holes is directly responsible for shutting off the water flow, the other two serve to combine all water supply outlets into a single system.
A three-way tap is often used to connect dishwashers or washing units to the water supply network. The use of this element allows you to provide autonomous water supply for several devices simultaneously
Such components, which can come in a variety of sizes, shapes and configurations, are typically used for tapping into water pipes, where they are often combined with other fixtures, such as a faucet. This function is not available to a conventional flow-through faucet due to its design.
Option #3 - corner
The design of this element corresponds to the features of the pass-through fitting. Using this tap, you can divide the outlet pipe into two independent branches located at right angles.
This element is most often used when installing toilets, but is also well suited for connecting non-standardly located washing machines.
An angle type ball shut-off valve can be used if it is necessary to connect the unit to a water pipe laid against a wall. In this case, it is extremely difficult to perform a direct retraction
The faucets of all categories include sealing rings, fixing nuts, as well as rotary handles, with the help of which the water is shut off and access to it. The last element is attached to the body of the part with a locking nut.
Life time
The service life of brass products depends on the frequency of opening and closing (other conditions are stable - cold water, operating pressure in household networks 1.6 MPa). If you don’t turn the tap every day, you can count on 15-20 years. If you have ten children and you spend the whole day loading things into the washing machine, sorted by all the colors of the rainbow, and at the same time opening and closing the water supply every time, then the faucet may die before the washing machine.
In general, it is advisable to change the shut-off valves along with the washing machine (i.e., once every 10-12 years).
Tips for choosing
Valves take a long time to close, and leaks occur more often. Gate valves – does not make sense (see above). Cast iron is cumbersome. Steel rusts. Titanium and stainless steel are expensive and make no sense. Silumin - will not live long, but the stingy pays twice. Plastic is not designed for everyday torsion. In general, the well-known brass ball products are the best choice. Yellow or plated with nickel or chrome is a matter of taste; you need to focus on the overall style of the bathroom. But it is worth considering the fact that brass tarnishes over time.
Our production or imported? Our mid-priced products are no worse, and the exclusive design behind the machine body is usually not visible.
The choice of design depends on the installation location of the unit, pipe material, and repair plans. If the house has plastic pipes, it is easy to cut them, install the required piece of pipeline by inserting a tee and installing a direct-flow tap. If there are old steel ones and you plan to replace them in the next couple of years, then you should screw the fitting to the nearest mixer or tap and not have to worry about cutting into steel pipes. There are different fittings: some are screwed between the faucet body and the shower hose and gooseneck; some consist of a tube and a three-way compact faucet and are screwed between the eccentrics and the mixer body (a tube for hot water, a tee with a faucet for cold water).
If the metal is in good condition and no repairs are planned, it is better to cut in, add a piece of pipe (plastic can be used) and connect the machine permanently.
Direct-flow models are used when a suitable threaded pipe (or a suitable section of pipeline) is available. Angular products are used in the same way - their use is determined by the location of the machine.
Three-way taps are installed to connect two units, for example a washing machine and a dishwasher; or with a temporary connection from a mixer.
Prepare for the process
The owner of the machine needs to know the specific procedure for installing the unit to the water supply.
After all, a breakdown of a special tap may occur, which will need to be replaced in the future, or if the machine needs to be moved to another place in the house. Even a beginner in this matter can cope with the task quite well if he remembers the list of important points.
Choose a prominent location for the tap
When installing an automatic washing machine, it is possible to use stopcocks of a fairly simple design.
The installation of such taps is carried out in a visible place so that the owners can turn off the water flowing into the washing machine at any moment out of control.
The machine automatically performs various actions, heats up the water, having previously taken it from the system, at this time various types of breakdowns can occur, which can only be prevented if the tap is in a visible place, and then it becomes possible to turn the valve and stop the water supply.
In most cases of car breakdown, it is necessary to turn off the water, and if this is not done, then there is a possibility of flooding the apartment (house) and neighbors.
Types of shut-off valves
When connecting your washing machine, you can use shut-off valves, the types of which are divided into two categories:
Walk-through taps They are cut into an existing water supply system, which goes to other objects (mixer, boiler, etc.);- End valves They are placed on a branch of the water supply system and are specially made for automatic machines.
Filter for water supply system
It would be better for the washing machine if it received water from the water supply running throughout the house with exactly the same cross-section.
It is advisable to install a filter in the system - it will purify the water that will flow into the machine.
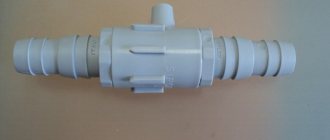
The filter is a mesh that is very easy to install. Don't forget to clean it periodically.
We recommend turning off the water supply to the machine after washing, and turning it on only before starting it.
Or you can install a whole filter system. But this is subject to the availability of material resources.
Which hose is better?
It may be that the manufacturer provides a special hose for connecting to the water supply, and if one is available, then it is better to install it. The length of the provided hose may not be enough, so you should not immediately connect it in two parts, because in this case it will soon be broken.
The best option is to buy a new, longer hose in a special store from the manufacturer of your machine. It is better to buy a hose in a company store, because cheap analogues in ordinary stores, as a rule, break very quickly.
Rules for installation and operation of the crane
Installing a faucet for a mixer is no more difficult than installing an ordinary coupling faucet, and can be easily done with your own hands.
Required tools and materials
To install a brass faucet you will need:
- gas and two adjustable wrenches;
- gaskets and FUM tape;
- die for cutting threads of the appropriate diameter;
- the drive complete with a nut and a long coupling is made of brass, the long thread on the drive should have 20-30 turns;
- coupling ball valve made of brass with internal threads on both sides;
- grinder with cutting wheels, file;
- for installation in a system of polypropylene pipes - a welding machine with nozzles, MRN, American nut, fitting;
- for installation in a system of cross-linked polyethylene pipes - compression or press fittings, crimping press, American nut, fitting.
Work progress
If you have to cut pipes when installing a fitting, you need to draw an exact diagram and think through all the details.
Connecting a washing machine using a fitting to a faucet is usually not difficult: unscrewing the shower hose or gooseneck, winding the FUM tape onto the threads, tightening the fitting and the unscrewed faucet component - everything is quite simple. Installation into XLPE systems using compression or press fittings is also not too difficult. Inserting into polypropylene networks is also not too difficult.
Difficulties begin if the networks in a house or apartment are made of metal - installation requires some effort.
First you need to drain the water from the system. Twist the tap and the squeegee together - “try it on”, measure their length. It is not always possible to use an American nut instead of a drive. Then decide on the insertion location: if there is an unused end pipe in a convenient place, you can use it. It’s worse if you need to insert a tap-tee into a flat section of the pipe - after all, it won’t be possible to do the insertion as easily as with plastic. Use a grinder to cut the pipes in the right places and remove any burrs with a file. The length of the cut section of the pipe should be approximately equal to the length of the outlet and faucet assembly or 1 mm longer). Then cut with a thread die.
If you need to connect a direct-flow or angle valve to a branch pipe, wind the FUM and screw on the fitting. Check.
Installation of a three-way product as a tee
Determine where the water comes from. Screw the FUM tape onto the thread on this side of the pipe so that the direction of winding coincides with the direction of screwing the reinforcement (and continue to follow the direction of winding). Then screw the tap on 4-5 turns or more. Wind FUM tape onto the short thread of the squeegee and screw the squeegee into the fitting 4-5 mm. A gap is formed between the drive and the thread on the other side of the pipe, approximately equal to the length of 4-5 thread turns. Look at the photo for the drive.
Wrap the FUM tape around the thread at the second end of the pipe. Screw the coupling onto the pipe thread. Screw the FUM onto a piece of long thread between the nut and the coupling. Tighten the nut so that it almost rests against the coupling.
Then fill the system with water and check for leaks. The easiest way is to wrap the insertion site with paper towels or toilet paper - the leak site will be clearly visible. If it leaks, you need to try tightening the connections. If it doesn’t help, take it apart, wind up a little more FUM tape and twist it again. Check the system again (pressure test).
Screw the union nut of the washing machine onto the corresponding pipe. The use of FUM tape is not necessary - the nut has seals.
In principle, it is possible to use an American union nut instead of bending, but in practice this is only feasible if it is possible to move the ends of the pipe apart - and with a steel pipe this is practically impossible.
Design
The ball valve has a simple design, a high degree of water resistance, small size and easy to use, the main structural elements of the standard product are:
- Frame. The typical collapsible design is made of nickel-plated or chrome-plated brass; the inlet and outlet pipes have external threads for connection to the pipeline and plumbing fixtures, electrical equipment.
- Ball. Made of ground and polished brass, coated with chrome, inside its body there is a rectangular recess on top into which the stem is inserted.
- Stock. It is a brass rod with sealing rubber rings installed on the body; a tap is attached to one of its ends. There is a hole at the top for screwing in a fixing screw, or the pulley has a thread for attaching the handle to the nut. The opposite side of the stem has a rectangular cross-section and is designed for insertion into the ball valve body.
- Seat and seal rings. Seat rings located on both sides of the ball at the inlet and outlet of the passage channel provide a tight seal, preventing water from entering the outlet pipe when closed. A rubber ring placed on one of the parts of the body prevents it from leaking when connected to another part.
- Pen. The rotary handle is made in the shape of a butterfly or an elongated lever, attached to the rod with a screw or a self-locking nickel-plated steel union nut. It is made of aluminum, nickel-plated steel, coated with polymers in a liquid plasticizer (plastisol).
Characteristics and materials of a typical valve
Frequent errors and problems during installation
When installing a tap in plastic pipelines, it is imperative to install fastening clips at a distance of approximately 100 mm - after all, you will have to turn the handle frequently and the pipe should not move at the same time.
When installing, it is imperative to check that the arrow on the fitting coincides with the direction of water flow.
It is imperative to clean the ends of the pipes from burrs - otherwise they will clog the pipes.
Washing machine installation
Connecting the machine to the water supply is carried out in two stages:
- the first is to install the tap;
- the second is in the connection between the tap and the washing machine.
Faucet installation
To install the faucet you will need:
- adjustable wrench;
- fum tape to make the joint airtight. More rarely, flax is used to seal the joint;
- flow filter that purifies water and prevents contamination and damage to the washing machine;
- bench for cutting threads.
If the faucet is installed on plastic pipes, then an additional calibrator will be required. The faucet installation process is as follows:
- The water supply to the cold water supply pipe is shut off. The tap that stops the water supply to the apartment must be installed when installing the water supply system. As a rule, it is installed on a riser or inlet pipe;
A device that shuts off the water supply to an apartment
- All remaining liquid is drained from the pipes, as they can interfere with further work;
- a section of the pipeline is cut out. For plastic pipes, special scissors are used. You can remove a section of a metal pipe using a grinder;
The size of the cut section should correspond to the length of the tap, increased by the length of the filter.
- threads of the required diameter are cut at the ends of the pipes;
Preparing the pipe for a threaded connection
Initially, a filter is installed to protect the machine from impurities contained in the water; a water supply tap is installed. If the faucet is mounted on plastic pipes, then before installation the pipe must be expanded using a calibrator; nuts are tightened with an adjustable wrench
In this case, it is recommended to pay attention to the strength of fixation. An overtightened nut, as well as a poorly tightened one, can lead to water leakage.
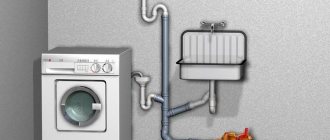
Faucet installation diagram for a washing machine
All connections are sealed using O-rings included in the faucet (filter) and fum tape.
The faucet under the washing machine is installed. You can proceed to directly connecting the washing machine. You can learn more about installing a faucet yourself by watching the video.
Connecting equipment to the crane
Now let's look at how to connect a washing machine to a faucet. For connection, use the inlet hose, which is included with the machine. Depending on the installation location, the length of the hose is selected. As a rule, the device included in the kit is short in length and made of single-layer material.
In order for the hose to last for a long time, it is recommended to purchase a two-layer hose with reinforcement. The length of the product should be equal to the distance from the tap to the washing machine plus 10% for free placement.
Durable inlet hose for the machine
To connect the tap you will need:
- adjustable wrench;
- fum tape.
The connection diagram looks like this:
- one end of the hose, which has a nut installed with a bend, is connected to a special hole in the washing machine located on the back side of the body. The bending nut is designed to reduce the distance between the machine and the wall. Before connection, the transport plug must be removed;
Connecting the inlet hose to the washing machine
- the second end of the hose is connected to the tap. If the tap is located in another room, for example in the toilet, and the device is in the bathroom, then you need to make a hole in the wall to lay the hose.
Connecting the inlet hose to the installed tap
When arranging connections, we must not forget about additional sealing of the joints. Otherwise, leaks will form.
Before using the washing machine, it is recommended to check all connections for possible leaks. If a water leak is detected, the connection must be completely redone, installing additional gaskets if necessary.
You can connect the washing machine yourself. This will require a minimal set of tools and a small amount of knowledge. Carrying out the work is not difficult even for a beginner.
In order for the connection to be made correctly, it is necessary to install a special tap that can disconnect the machine from the central water supply system in the shortest possible time. The selection and installation of a crane is made on the basis of the simplest rules and recommendations given in this article.
Expert advice
It is advisable to install a mesh filter before connecting the washing machine. If there is not enough room to turn the long handle, you need to choose a model with a more compact handle.
When choosing a tap, it is necessary to take into account the fact that the diameter of the union nut of the machine hose has a diameter of ¾”, other standard sizes are not available.
You cannot connect the washing machine to the heating system - in apartment buildings, softeners are added to the water and it is not suitable for washing.
Faucet for washing machine connected to water supply
Connecting a washing machine with installing a water supply tap
Purchasing an automatic washing machine involves performing the necessary installation work to connect it to communications: water supply, sewerage and the electrical network. The installation and connection of the unit can be entrusted to a specialist or done independently. How to install a faucet for a washing machine and connect the unit, ensuring its uninterrupted operation, we suggest you learn from this article.
Content
The main task of a faucet for a washing machine is to shut off the water supply in case of repair of the hydraulic unit, its rearrangement or removal from its previous premises. At the same time, it will not affect the passage of water to the mixer, ensuring an uninterrupted water supply.
On sale there are faucets for washing machines made of silumin and brass. It is preferable to choose brass taps. Although they are an order of magnitude more expensive than their silumin counterparts, they are able to withstand constant loads and serve regularly for decades.
When purchasing a tee, you should also pay attention to the type of thread (internal or external), as well as the diameter of the pipes involved in installation.
The outlet on the tee must have an external thread D = 1/2 inch.
But in any case, after installation, the tap must be kept closed during breaks between operation of the unit. Because the water pressure can tear off the hose in a matter of seconds. The consequences of this can be very dire: in 10-15 minutes, water will flood the apartment and rush to the neighbors below. Washing machines are equipped with hoses for supplying and draining water, as well as an electrical cord. In addition to purchasing a three-way faucet for your washing machine, you will also need:
- additional hoses (if the hose included with the unit is not long enough for installation);
- additional coarse filter;
- siphon with outlet for drainage;
- moisture-proof socket;
- FUM tape;
- adjustable wrench.
When choosing an installation location, you should be guided by the ability to connect the unit to communications without much hassle and enough space for its comfortable operation.
When removing the packaging from the machine, you should check for scratches and dents, and also make sure that the drain hose and power cord are intact.
Using a wrench, unscrew the transport bolts, first lifting one and then the other edge of the machine.
Unscrew the adjusting feet as far as possible. Then the transport screws with spacers are unscrewed on the rear panel, and the remaining holes are covered with plugs. Only after this the unit is installed, maintaining a distance of 5 cm between the back wall and the wall of the room. Having installed the hydraulic unit, use a level to level its position in order to reduce vibration during the spin process.
First of all, use the inlet valve to turn off the water in the apartment, and drain the remainder by opening the taps.
It is good if a circuit with a ball valve is provided. In this case, the connection is reduced only to installing the hose. If this is not equipped, it is necessary to make an insertion into the pipe and install a tee to connect to the flexible connection of the sink.
To supply water you need to use a pipe through which cold water passes.
Using an adjustable wrench, screw a tee onto the pipe, sealing it with FUM tape or flax. After this, install the flexible line and secure the hose from the washing machine, the straight end of which is equipped with a plastic nut. A coarse filter is installed on the bent end of the same hose and connected to the machine.
Tip: the nuts on the hose itself should be tightened by hand without applying additional force: the tightness of the connection is ensured by a rubber gasket.
The machines come with plastic hooks for securing the drain hose and draining into the sink or bathtub. If this method does not suit you, the drain can be connected to the sewer system. To do this, the hose is led directly to the pipe through a siphon - a plastic elbow with a special outlet to which the hose tip is attached. The drain hose at the outlet is raised to a height of about 60 cm and fixed using special fasteners.
Important: The outlet is placed above the curved section of the elbow to ensure communication with the atmosphere and prevent the occurrence of a “siphon effect”, in which the unit simultaneously begins to fill and drain water.
Since in most cases washing machines are installed in rooms with high humidity, it is better to use waterproof sockets to connect them. It would also be useful to have a grounding conductor in the outlet.
To do this, cut the pipe at the required level and make a thread, or disassemble the connection made from the pipe and flexible wiring, installing connecting fittings into the gap.
It is better to conduct electrical wiring for connecting a washing machine through an RCD with a leakage current within 30mA.
Having connected all communications, all that remains is to carry out a test wash. During the first wash, it is important to monitor the connection point of the hose for supplying water from the water supply to the machine, as well as the drain hose. The water supply tap to the washing machine should not vibrate or make any extraneous sounds. If a leak is detected, after completing the washing process, you should once again check the connection points and the tightness of the gaskets.
Selecting and installing a tee tap for a washing machine
A very important, and perhaps the main stage of installing a washing machine is connecting it to the water supply. If you choose the wrong components and do the job poorly, it will all end sadly for you and your neighbors. Moreover, all the lower floors can be flooded. As part of the article, we will talk about choosing a faucet for connecting a washing machine to a water supply system, other components, as well as connection diagrams.
Choosing a tap to connect a washing machine
Many people, when purchasing components for installing a washing machine, often wonder why they should buy a tee tap. Why can’t you do without a tap, or, for example, choose a regular flow-through tap? Of course, you can do without a tap, but you just need to be prepared to make repairs to the neighbors below.
People familiar with the phenomenon of water hammer in a water supply system do not need to explain how this unpleasant, but quite common phenomenon tears metal and metal-plastic pipes at the seams. Imagine for a second what would happen to the flexible inlet hose of a washing machine connected directly to the water pipe? It will tear in seconds and within 15 minutes your apartment and your neighbors’ apartments will be flooded with torrents of water.
So, you can’t do without a tap, but why a tee tap? Such a faucet allows you to connect two or more household appliances, such as a washing machine and dishwasher, to one tap into a water pipe. A regular flow faucet will not allow you to do this.
It is very important to pay attention to the following points when choosing a faucet.
- The material from which the faucet is made. Faucets made of brass and silumin are available for sale. It’s better not to take the latter; they won’t last long.
- On the design of the closing mechanism. The design of the valve mechanism can be either ball or multi-turn. It is better to choose a ball valve - it will last longer.
- On the valve design. The valve is needed to quickly shut off the water entering the machine. Therefore, the valve handle should be large enough and comfortable so that the hand does not slip and precious seconds are not lost in the event of an emergency with the machine.
- Double hose. If your washing machine comes with a regular inlet hose with one wall, we advise you not to install it, but to purchase a hose with a double wall and wire reinforcement - it is much more reliable. In addition, before purchasing, consider the required length of the hose; short hoses are often included with the machine.
- Flow filter for water purification. Such a filter is connected to the tap thread and installed on a branch of the water pipe. You understand that the quality of tap water leaves much to be desired, therefore, the more filters there are on the way from the riser pipe to the washing machine, the better.
- O-rings, nuts, windings, etc. Components necessary to ensure reliable and tight connections of all pipes and hoses.
- Adjustable wrench. We will need it to tighten all the nuts, ensuring connections between pipes and hoses.
- Calibrator for plastic pipes. Needed to fit and install the tap into the pipe insertion.
Note! Silumin taps wear out about 4 times faster, but they cost less than brass ones, so it’s better to overpay 1.5 USD once. than to deal with the consequences of the flood later.
What other taps are suitable for a washing machine?
If you do not use a tee to connect a washing machine, then what other taps are potentially suitable for connecting household appliances to the water supply? Depending on the position and number of outlets, taps for washing machines are divided into: straight-through (flow-through) taps, tee taps, corner taps.
Flow taps with two outlets. They are installed on a separate pipe that goes from the main water supply pipe to the washing machine. Two-way taps divide the pipe branch in half, cutting off the household appliance from the communications.
Tee tap. Based on the name of this faucet, it has not two, but three outlets. In this case, only one exit can be blocked. The other two outlets are flow-through and serve to connect the water pipe with its branch. There is an option when two branches have taps, but one outlet does not close, and the shape of triple taps can also be different.
Angle tap. This is a two-outlet faucet of a modified design that allows you to divide the outlet pipe into two parts, while turning it 90 0. Quite convenient if you connect the washing machine to a water pipe in a cramped space where it is not possible to place a direct outlet. In addition to washing machines, using such a faucet you can connect a toilet flask, a bidet and other plumbing fixtures to the water supply.
Note! Manufacturers of washing machines often recommend components (including taps) for connecting their household appliances to water supply and electrical networks. Perhaps you should listen to their recommendations.
How to connect a washing machine to the water supply?
Having selected a suitable tap, you can begin connecting the washing machine to the water supply system. Before starting work, you need to stock up on tools and components. What will you need?
Having selected all the necessary components and tools, you can begin installing the washing machine to the water supply, having previously selected the appropriate connection diagram. Let's start with the diagrams for connecting the machine to the water supply.
Connection via a tee tap with a tap into the pipe. Turn off the water by closing the cold water riser. We cut out a section of pipe, calculating the length of the tee valve (excluding threaded connections). We put the mounting nuts on the pipe; these nuts must first be removed from the tap. Using a calibrator, we widen the holes in the pipes and install a tee valve, not forgetting to tighten the joints of the pipe and the valve outlets with tightening rings. We connect the inlet hose of the machine to the outlet that is closed by the valve.
Connection via a two-way tap. A two-way tap can be used when a pipe outlet is specially installed for the washing machine. Typically, such an outlet already has a threaded bushing, so our task is only to screw a two-outlet tap onto it, connected to a flow-through filter, and you can already connect the inlet hose of the washing machine to the filter. It's a matter of 5 minutes!
Connection via corner tap. This diagram for connecting the machine to the water supply is in many ways similar to the above diagram. The only difference is that we attach not a straight two-outlet valve to the pipe outlet, but an angular one. You can read more about connecting a washing machine to water supply and sewerage in the article about installing the machine yourself.
To summarize, we note that it is quite possible to select and install a tee tap for a washing machine without the involvement of a specialist. If you intend to do all the work yourself, pay attention to the tips given in this article. Good luck!
- Share your opinion - leave a comment
Add a comment Cancel reply Installing taps to connect the washing machine to the water supply
Successfully connecting the washing machine to the plumbing system is one of the most important stages of its installation. It is imperative to install a special faucet for the washing machine. This is an important safety measure that will minimize damage in the event of a possible equipment breakdown. Knowledge of the peculiarities of the procedure for connecting an automatic machine to the water supply system will be useful if such a tap breaks down and needs to be replaced, or if a decision is made to move the machine to a new location. Even a novice plumber can cope with this task quite satisfactorily if he takes into account a number of important points.
When installing a washing machine, you can use shut-off valves of the simplest design. They should, of course, be installed in such a way that the owner or hostess can turn off the valve at any time and stop the flow of water into the washing machine. Typically, such a tap remains open while the washing machine is operating, which takes water from the system, heats it and performs other actions automatically. But in case of breakdowns, very often the water must be turned off immediately, otherwise it will flood the entire surrounding area and flood the neighbors, if any.
There are two types of shut-off valves that can be used when connecting automatic machines:
- Walk-through taps that cut into an existing water supply leading to another object (water heater, mixer, etc.);
- End taps, which are installed on a separate branch of the water supply, intended specifically for the washing machine.
It is best if water flows to the washing machine through a water supply pipe of the same cross-section as throughout the house. It is also recommended to include a filter in the system so that water enters the machine with additional purification. The filter is a mesh and is not difficult to install. At the end of the washing cycle, when the machine turns off, it is recommended to turn off the tap and turn it on only before starting the next wash. In addition, care should be taken to regularly clean the installed filter.
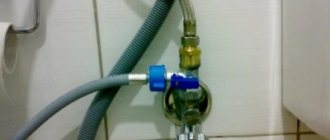
Such an end valve for a washing machine is installed on a separate branch of the water supply system, which is intended specifically for this purpose.
This is what a walk-through stopcock for a washing machine looks like. It makes it possible to supply water to the device from a water pipe to which another device is already connected
If the manufacturer supplies a special hose for connecting to the water supply, this should be used. If the hose is not long enough, you should not extend it in two parts, since such a hose may soon break. It is better to purchase a longer one-piece hose, and it is recommended to make a purchase at the equipment manufacturer’s company store. Cheap analogues of inlet hoses, which are sold in plumbing stores, fail quite quickly.
Connection to hot water supply
There are models of automatic washing machines that have a double connection to the water supply: not only to cold, but also to hot water. Most often this is equipment from Japanese or American brands. This solution allows you to save electricity, which is used to heat water in the washing machine. However, in practice in Russian realities, models of this type rarely cope with increased load.
The fact is that this technique is very demanding on the quality of the incoming hot water. In centralized heating systems, the water is usually not clean, which leads to rapid filter clogging, equipment breakdowns, etc. In addition, the quality of washing may be completely unsatisfactory. In some cases, rust stains and other contaminants appeared on washed laundry, and cases of damage to delicate fabrics were also observed.
In conditions of individual water supply, the water is usually much cleaner. However, even in this case, before purchasing a washing machine, you should still conduct a thorough analysis of the water and assess its condition. You may need to improve your existing cleaning system to prevent breakdowns of expensive appliances.
Installing an end valve to a branch
To connect a faucet to an existing metal water supply, a mortise clamp, which is a tee, is most often used. It is very simple and easy to use. You will need to purchase a clamp with a guide sleeve and a rectangular rubber gasket, as well as stock up on a metal screwdriver, a file and a drill. Of course, the water will have to be turned off before installing the tee.
The clamp with the bushing is carefully and carefully screwed to the pipe, while the guide bushing is pushed out, forming the required hole. The pipe is then drilled using a drill and attached to a tee or pipe section. An end valve is most often mounted at its end. To do this you need:
- cut a thread of the appropriate size and type at the end of the pipe;
- wrap the edge with the external thread with a sealant, for example, FUM tape;
- screw the tap onto the pipe using noticeable force;
- screw the hose that comes with the washing machine to the second end of the tap;
- connect the second end of the hose to the machine;
- check the structure for the presence/absence of leaks.
This process is clearly described in the following video:
If screwing the tap onto the thread with the seal is too easy, you need to remove the tap and add a few more turns of the seal, otherwise the tightness of the connection will not be sufficient.
Both ends of the hose for connecting the washing machine to the water supply are equipped with special rubber gaskets that should not be lost. Typically, one end of such a hose is straight and the other is angled. To connect to the water supply, the straight end is usually used, and for the angled end, the hose is connected to the equipment, since it is usually installed almost close to the wall.
How to use a walk-through tap?
In pipe-hose connections, straight-through taps are often used. Let's consider several options for placing a structure of this type.
Situation one: in front of the hose there is already a tap with a tap to another object (for example, to a toilet cistern). In this case, the tee tap can be installed either before or after the already installed tap.
Situation two: the hose to which you plan to connect the washing machine leads to the water heater. In such a situation, the tap for the automatic machine should be placed in front of the tap that shuts off the water for the heater. Otherwise, you will have to turn off the hot water in the house every time you do laundry.
Situation three: the washing machine is installed in the kitchen, next to the sink. Here, a walk-through tap can be installed in front of the mixer. To do this, remove the mixer, screw a tap onto the cold water pipe instead of a flexible hose, and then install the mixer again.
When choosing a walk-through valve, you should take into account the direction of water flow (it is indicated by an arrow on the body), as well as the location and size of the control lever. You should choose a model whose handle will not rest against a wall or other objects when opening or closing the tap.
If you select a tap with a long handle to connect the washing machine, you should make sure that the device will be comfortable to use in both the closed and open positions.
The technology for installing a walk-through valve is as simple as when working with an end structure: a sufficient amount of sealant is wound on the threads, then the valve is screwed, then the sealant is wound again and the other end is screwed.
If the technician is positioned facing a pipe with an external thread, then the seal should be wound clockwise. At the end of the work, it is necessary to check all connections for leaks, and before starting work, of course, the water should be turned off (a banal, but not useless reminder).
This diagram allows you to understand the procedure for connecting a pass-through water tap for a washing machine. In this case, a tee is used, since the pipe leads to another point of consumption
Installing a tap before the outlet to the toilet cistern makes sense if the machine is placed in a shared bathroom or in a toilet. In the latter case, an interesting solution might be to install a small horizontal-loading washing machine not on the floor, but on a special stand.
In this case, the housewife will not have to bend over to load or unload laundry, and it will be more comfortable to use the equipment. You can also place the machine on a specially mounted shelf, but then you should remember that such a structure must withstand a load of about 150 kilograms.
An option to install the washing machine in a niche above the toilet to make its use more convenient. In this case, it makes sense to connect the pass-through tap to the pipe that leads to the toilet cistern
Installing a faucet on a mixer
The attitude of professional plumbers to the idea of installing a pass-through tap to connect the washing machine to the water supply on the mixer can be called ambiguous. This design does not look very aesthetically pleasing, since the filling tap of the machine is difficult to place beautifully in such a situation. In addition, the position of the faucet usually changes, it moves forward, and it may not be as convenient to use as before. Finally, additional loads arise for which the mixer was not designed, and its service life will be reduced.
Installing a faucet for a washing machine on a mixer is a relatively inexpensive and simple solution, but it creates additional loads on plumbing equipment and is not recommended for permanent use
However, such a solution is quite possible when it is necessary to temporarily connect a washing machine. Of course, there is nothing more permanent than temporary solutions, but equipment owners must take into account the risks posed to their plumbing.
If the faucet will be installed in front of an old Soviet-era mixer, which is mounted directly on the pipes, it makes sense to install a new mixer. This will facilitate installation and increase the reliability of the entire structure. Otherwise, you will simply have to install a mortise clamp on the pipe, which is more expensive and more difficult to install than a regular straight-through valve.
Sometimes it happens that the ends of the pipes have been damaged by corrosion over time and become uneven. There are two ways to fix the problem. The easiest way is to file the ends to make them straight again. Then the hose gasket can be securely pressed to the pipe. Another way is to install an extension cord. It will hide the uneven ends, and the hose with the gasket will be secured to a new, undamaged surface.
Installing a washing machine under the sink can save space in a small bathroom, but connecting the device to the faucet can ruin its appearance
Some craftsmen, as an experiment, install a pass-through tap not on the cold water pipe in front of the mixer tap, but after the taps and in front of the spout from which warm water flows. This is done so that already heated water enters the washing machine, which allows you to spend less electricity on heating. The solution is non-trivial, but technically not entirely correct.
When you turn on the tap with this placement, there will definitely be a mixture, i.e. the flow of cold water into the hot water supply pipe. As a result, the quality of hot water supply to the neighboring apartment may deteriorate. The problem could be solved by installing check valves in front of the mixer, but then during washing (i.e. for several hours) it will be impossible to open the mixer taps.
If the washing machine is equipped with an “Aqua-Stop” type system (it may be called differently by different manufacturers), then you can completely avoid installing a tap. On such models, the end of the inlet hose is equipped with special magnetic valves, which are controlled by the machine and connected to it with special wires. In this case, the control system itself will shut off the flow of water if necessary, and also ensure unhindered water intake. However, there is no such technology that does not break. If possible, you should still consider installing a crane even for such machines.
- Tee for connecting the washing machine to the water supply Purpose Types of taps Which one is better to install? Methods of connecting to a water supply Metal pipe Metal-plastic pipe…
- Faucet for connecting the washing machine to the water supply Connecting the washing machine with the installation of a water supply tap Purchasing an automatic washing machine involves performing the necessary installation…
- Connecting the washing machine to the water supply and sewerage system with your own hands Installation location Preparatory stage How to connect to the water supply system How to connect to the sewerage system Other installation stages...
- Washing machine height Standard height Will the washing machine fit under the sink? What other sizes are important when choosing? Not many people who…