A washing machine consists of many components, which, thanks to skillful hands, can find worthy use after the equipment “retires”. Working units and parts can still serve on the farm. You can, for example, adapt a pump from a washing machine to water your garden, lawns, or garden plot. With it you can build a small fountain in the garden. Read below about how to make useful homemade items.
What can be done from an old pump?
A homemade water pump will replace manual labor - with a little tinkering, you will create an electromechanical device that will free you from the need to carry watering cans and buckets. However, it is not suitable for a large plot - the pump power is too small, but in a small garden it will be very useful. It is also suitable for supplying water to a fountain and for creating a backup water source so that your flowers are not left without watering if the main pump breaks down.
What pumps are suitable?
To water the area, it is better to use pumps from old Soviet machines - only they are capable of dispensing up to 30 liters of water per hour. The pumps of new machines are not even capable of such a volume.
The principle of operation of the pump, its application and location
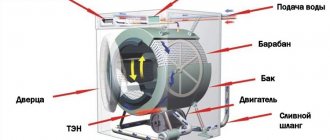
During operation of the washing machine, water is supplied inside the device under pressure, that is, the intake occurs automatically as soon as the necessary programs are selected and the “START” button is pressed. The process then proceeds according to the following scenario:
- the solenoid valve is brought to the open position;
- a pressure switch (sensor for monitoring the liquid level in the tank) measures the required volume of water;
- the path of the liquid runs through the compartments where the necessary detergents (washing powder) are located, water mixes with them, and thus enters the tank in dissolved form;
- the liquid under pressure enters in the required volume into the chamber where the laundry is stored.
During the process and completion of the wash, the water pump comes into play. It is he who drains and pumps out dirty waste liquid after washing or excess water after rinsing. The pump is involved in almost all washing modes!
As soon as a signal from the electronic module is sent to the pump, waste water will begin to be pumped into the sewer due to the impeller of the device. The fluid path is as follows:
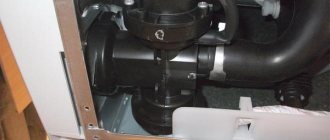
Water enters through a rubber pipe, which is connected to the tank and volute using special clamps, then the liquid enters the pump through a special filter located in the volute, it protects the pump impeller from debris, to avoid jamming of the impeller. Next, the liquid comes out through the drain hose, which is connected to the volute. The dirty liquid phase is pumped out until the waste liquid is completely pumped out of the washing machine tank.
During washing, the water is already in the lower part of the unit, which is why the end of the drain hose must be secured above the drain pump, since if this is not observed, the water will begin to drain from the machine by gravity. The drain hose must be installed at least 80 cm along its entire length!
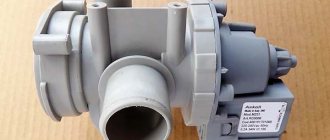
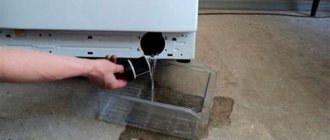
The electric drain pump is located at the bottom of the unit under the tank. It is attached to a plastic volute, usually with three screws, and the volute, in turn, is attached to the body of the unit from the front side. This arrangement is convenient for quick access to it, if, for example, you need to clean it of debris or drain liquid from the system.
There are two types of pumps used in washing machines:
- The circulation type of pump is used in conjunction with a conventional pump; they are used in new models of premium class machines such as Indesit, Ariston, etc. This option supplies water directly to the washing area and circulates throughout the system, which improves washing efficiency.
- machines from a more budget type or not of a new generation, such as the Daewoo bubble machine (Daewoo), are equipped with a simple pump, for example from Askoll, which simply drains the waste liquid into the sewer.
Repair of the drain pump of a washing machine, as a rule, is not carried out; most likely, spare parts in such devices will have to be replaced. That is, you will have to completely replace the broken pump with a new one.
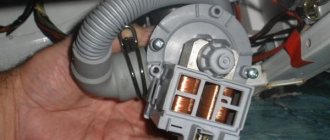
ATTENTION! You can also inspect the device yourself for blockages or pump failure. But when inspecting the internal mechanism, you must first disconnect the equipment from electricity. Using a special device, such as a multi-mmmeter, check the contacts going to the pump and make sure there is no voltage, and only then continue working. All these precautions are necessary because the work is carried out near an open source of water.
What do you need for homemade?
To build a mini-pumping “station”, you will need an arsenal of materials and tools. The pressure will be very modest, but it will be enough for flowers or washing a car. Before connecting the pumping device to the tank, you need to prepare the tools. Stock up:
- Wire cutters;
- Pliers;
- Screwdrivers;
- Soldering iron;
- Keys - sliding and open-end;
- Multimeter tester;
- With a knife.
You will also need a lot of parts and components:
- A short hose - pour water into the tank;
- Long hose - for supplying water to the beds;
- Plastic casing;
- 24 V relay - it can be removed from some old electrical appliance;
- Copper wires, with insulation;
- Cord for connecting to the network - you can use a cord from an old washing machine;
- Tee;
- Several clamps;
- Insulating tape;
- Water tank.
Design #12 - “homemade” for a small stream
This pump can operate on an ultra-low amount of energy. Of course it’s good if there is a river or lake. But what to do if the river becomes very shallow in the summer? A swing type pump will help.
Such a pump allows you to use very small amounts of energy from a small stream.
The main part of the structure is two buckets rigidly connected to each other through blocks (4). It is necessary to make a drainage system from the stream from galvanized steel (3). In order to reduce wear, a piece of plastic is placed under it. The drainage system is rigidly connected by a leash to a rope (5).
Leash 6 is made of rigid wire and the length is calculated so that the drainage system moves to the desired angle
The entire system must be adjusted so that when one bucket is filled, the drainage moves to the second bucket. The energy of the buckets is transmitted through the crank (8) to the pump (10).
Step-by-step instructions - how to make a pump with your own hands?
Before starting work, check the contacts of the electric pump and relay for compliance. This is done using a tester, one by one applying its probes to the wires. If everything is in order, the wires can be connected. Further procedure:
- We make a protective casing. Any plastic container, such as a jar, is suitable for this purpose. After making a hole in it to bring the wiring through it, place the relay inside the container. Here it will be safe - the plastic will protect the device from precipitation.
- We connect the pump to the power supply. Let's check its work.
- We install a tee at the pump outlet. We screw the hoses to it and secure the connections with metal clamps.
- Take a metal or duralumin plate. After drilling 6 holes in it for a 6 mm thread, secure the device. 4 holes - for attaching the pump, 2 - for attaching the plate.
- Make 2 holes in a 15x800 mm steel pin, 6 mm thick. Mount the pump on the plate, and connect it to the pin using two bolts. Stick the pin into the ground - now it is both a support and grounding.
- Check the work of the homemade product. Immerse the end of the short hose in a container filled with water. If you used a closed container instead of a barrel, make a hole in it for the hose. Seal the hole with sealant.
Design #6 - American or spiral type
The spiral pump uses the energy of the river flow. To operate, the minimum requirements must be met: depth - at least 30cm, flow speed - at least 1.5 m/s.
Option 1
Necessary materials:
- flexible hose d.50mm;
- several clamps according to the diameter of the hose;
- intake - PVC pipe 150mm;
- wheel;
- pipe reducer.
The main difficulty in such a pump is the pipe reducer. This can be found in decommissioned sewer trucks or obtained from factory equipment.
For greater efficiency, an impeller is attached to the pump
The flexible hose is attached to the wheel in a spiral using clamps. An intake made of PVC pipe 150mm is connected to one end. The second end of the hose is put on the pipe reducer.
Water is taken in by the water intake and moves in a spiral, creating the necessary pressure in the system. The lifting height depends on the flow speed and the immersion depth of the intake.
Option 2
Necessary materials:
- flexible hose d.12mm (5);
- plastic barrel d.50cm, length 90cm (7);
- polystyrene foam (4);
- impeller (3);
- sleeve coupling (2);
We cut an intake hole in the bottom of the barrel. Inside the barrel, it is necessary to lay the hose tightly in a spiral and connect it to the sleeve coupling.
Inside the barrel, the hose is laid tightly, pressed against the walls with a strip. The barrel can be metal with foam floats
To impart buoyancy, foam floats must be glued inside the barrel. Finally, screw on the impeller.
For this design option, the drain hose must be 25 mm. in diameter.
What can be done from an old pump?
A homemade water pump will replace manual labor - with a little tinkering, you will create an electromechanical device that will free you from the need to carry watering cans and buckets. However, it is not suitable for a large plot - the pump power is too small, but in a small garden it will be very useful. It is also suitable for supplying water to a fountain and for creating a backup water source so that your flowers are not left without watering if the main pump breaks down.
What pumps are suitable?
To water the area, it is better to use pumps from old Soviet machines - only they are capable of dispensing up to 30 liters of water per hour. The pumps of new machines are not even capable of such a volume.
Design #7 - wave energy pump
As the name suggests, such pumps use wave energy. Of course, the waves on the lakes are not that big, but the pump works around the clock and is capable of pumping up to 20 cubic meters per day.
Option 1
Necessary materials:
- float;
- corrugated pipe;
- two valves;
- mounting mast.
The float is a pipe, a log, selected depending on the rigidity of the corrugated pipe, experimentally.
Corrugated pipe can be made of plastic or metal. The weight of the log must be selected experimentally
Two valves operating in the same direction are mounted in a corrugated pipe.
As the float moves downwards, the corrugated pipe stretches, resulting in water intake. When the float moves up, the corrugation contracts and pushes the water up. Therefore, the float must be quite heavy and large.
The entire structure is rigidly attached to the mast.
Option 2
This design differs from the first option in that the corrugated pipe is replaced by a brake chamber. This diaphragm-based scheme is very often used in simple DIY water pumps. Such a pump is quite versatile and can receive energy from wind, water, steam, and sun.
The brake chamber should be disassembled and only two holes left for the valves.
Instead of homemade valves, you can use ready-made plumbing valves. The washers must be of sufficient diameter so that the diaphragm does not tear (+)
Manufacturing suitable valves is a separate task.
Necessary materials:
- copper or brass tube;
- balls of slightly larger diameter - 2 pcs.;
- spring;
- copper strip or rod;
- rubber.
For the inlet valve, cut off the tube and drill it out so that the ball sits tightly on the tube. It is necessary to ensure that the ball does not allow water to pass through. To prevent the ball from falling out, solder a wire or strip on top.
The design of the exhaust valve differs from the intake valve in the presence of a spring. The spring must be installed between the ball and the copper strip.
We cut out a diaphragm from rubber to the size of the brake chamber. To drive the diaphragm, you need to drill a hole in the center and stretch the pin. We insert the valves from the bottom of the brake chamber. For sealing, you can use epoxy glue.
It is better to find non-metal balls for valves, so they will not be subject to corrosion.
Option 3
Based on the design of the two previous options, you can think about building a more advanced model.
It is advisable to choose a log that is dry and not resinous, so it will be lighter, pay attention to the absence of cracks
For this pump it is necessary to drive four stakes (1) into the bottom of the reservoir. Then make a float from a log. You need to make cuts in the log so that it does not rotate when swinging on the waves.
For durability, it is recommended to treat the log with a hot mixture of kerosene and drying oil. It must be done carefully, processed in a water bath: there should be no open flame.
The log travel limiters (3) and (4) are nailed in such a way that the log does not damage the pump rod (5) during maximum movement.
What do you need for homemade?
To build a mini-pumping “station”, you will need an arsenal of materials and tools. The pressure will be very modest, but it will be enough for flowers or washing a car. Before connecting the pumping device to the tank, you need to prepare the tools. Stock up:
- Wire cutters;
- Pliers;
- Screwdrivers;
- Soldering iron;
- Keys - sliding and open-end;
- Multimeter tester;
- With a knife.
You will also need a lot of parts and components:
- A short hose - pour water into the tank;
- Long hose - for supplying water to the beds;
- Plastic casing;
- 24 V relay - it can be removed from some old electrical appliance;
- Copper wires, with insulation;
- Cord for connecting to the network - you can use a cord from an old washing machine;
- Tee;
- Several clamps;
- Insulating tape;
- Water tank.
Design #13 - Shukhov wick pump
The Russian inventor Shukhov became famous for many buildings, including the radio tower in Moscow. Below we will discuss another of his inventions - a water pump.
Pulleys are made composite. The depth of the groove should be slightly less than the swollen rope
The pump uses a special rope to operate. This rope consists of woven cotton threads with a total thickness of 5-6 mm, enclosed in a sheath. The thread is passed through the pulleys.
When movement occurs, the rope gets wet and wraps around the pulleys. The pulley (5) with the help of a spring (4) presses the rope against the pulley (3) with force. The squeezed water flows into the tray (7). Figure “c” shows sections of pulleys (3) and (5), respectively.
To operate the entire system, an electric motor of only 5-10 watts is required. Typically, such engines have 1500 rpm.
To reduce speed and increase force, you can use a worm gear, shown in figure “c”. It is quite possible to make it by hand. To do this, you need to find a suitable gear and make a worm from wire. Small forces on the shaft allow manufacturing inaccuracies.
With your own hands you can assemble not only a pump that pumps water for domestic needs, but also a device that can be successfully used in landscaping a site. The following article will present successful options for homemade fountain pumps.
Step-by-step instructions - how to make a pump with your own hands?
Before starting work, check the contacts of the electric pump and relay for compliance. This is done using a tester, one by one applying its probes to the wires. If everything is in order, the wires can be connected. Further procedure:
- We make a protective casing. Any plastic container, such as a jar, is suitable for this purpose. After making a hole in it to bring the wiring through it, place the relay inside the container. Here it will be safe - the plastic will protect the device from precipitation.
- We connect the pump to the power supply. Let's check its work.
- We install a tee at the pump outlet. We screw the hoses to it and secure the connections with metal clamps.
- Take a metal or duralumin plate. After drilling 6 holes in it for a 6 mm thread, secure the device. 4 holes - for attaching the pump, 2 - for attaching the plate.
- Make 2 holes in a 15x800 mm steel pin, 6 mm thick. Mount the pump on the plate, and connect it to the pin using two bolts. Stick the pin into the ground - now it is both a support and grounding.
- Check the work of the homemade product. Immerse the end of the short hose in a container filled with water. If you used a closed container instead of a barrel, make a hole in it for the hose. Seal the hole with sealant.
Design #11 - pump from a bicycle wheel
Productive pump based on two wheels.
Necessary materials:
- PVC sewer pipes and outlets;
- bicycle wheel;
- nylon rope;
- small pulley;
- several pistons;
- mounting rod.
The operating principle of this pump is similar to that of a dragline.
First you need to build a sleeve from a sewer pipe that will be immersed in water. A drain is placed on the top of the sleeve through which water will flow. Next, install a small pulley on the bottom (a wheel rim from a wheelbarrow will do) and a bicycle wheel on top.
We attach a series of pistons along the entire length of the rope, first passing them through the sleeve. The rope should go around the pulley and the bicycle wheel.
The device is very effective, especially if you use a bicycle drive. It will be much easier to twist your legs.
By rotating the bicycle wheel, each piston on the rope captures water and, like an elevator, lifts it upward. The water column pours into the outlet.
Why is this necessary?
In summer, watering the garden is necessary to get a decent harvest. In this case, there is no need to purchase a powerful electric pump, the cost of which is quite high. In certain cases, it is possible to get by with a pump made by yourself from parts left over after disassembling the washing machine. A particularly important element in this matter is the pump.
Modern washing machines are equipped with rather weak pumps, which are not suitable for watering the area because they are not suitable for heavy loads. But if you still have a pump from a washing machine made during the Soviet Union, then such a unit will be quite suitable.
Why is this necessary?
Watering your garden or vegetable garden in the summer heat is necessary, otherwise you won’t get a harvest. But oddly enough, to provide irrigation it is not at all necessary to buy powerful and expensive electric pumps. In some cases, you can get by with a homemade pump from washing machine parts; in particular, a pump from an outdated washing machine will do.
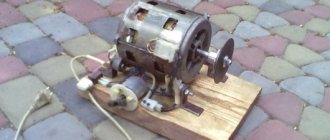
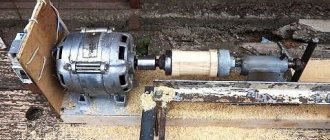
In general, the same electric motor from a washing machine can be used in many homemade products, for example, from such an engine you can make an excellent sharpening machine. Other parts of the washing machine are used less often, however, they also come in handy, sometimes at the most unexpected moment.
Modern automatic washing machines are equipped with very weak electric pumps, which cannot help us in any way in the difficult task of watering a personal plot; they are simply not adapted to heavy loads. Another thing is the pump from an old Soviet washing machine, for example, ENSM - 1u4. The unit is what you need - 50 Hz, 220V 30 l/min. Of course, the characteristics are not the ultimate dream, but they are quite enough for a small garden or vegetable garden, and most importantly, you will make the device yourself, spending mere pennies.
The power of the future pump will allow you to take water from a depth of no more than 2 meters, so you can forget about extracting water from an underground well.
A homemade pump made from parts of a washing machine will help us pump water from a reservoir (tank or barrel) directly to the beds through a hose. In this case, it will not be possible to provide strong pressure, but it will be sufficient for successful watering. You can use a homemade pump as a backup when something happens to the main one, because watering is necessary constantly, and you don’t want to get blistered hands carrying buckets.
What will it take to bring the idea to life?
First of all, we need a working pump from the car. The part is considered the main one, but in addition to it you will need to prepare:
- hoses of various lengths. The short one will take water from the barrel, the long one will supply it to the beds;
- housing made of plastic material for the electrical part. You can use a regular jar with a lid for these purposes;
- 24 volt relay. You will have to disassemble the old electrical device;
- power cord from the washing machine;
- copper wiring in insulation;
- through tee;
- cambrics, clamps for fixation, electrical tape.
Don't forget about the tool. All you need is:
Drain pump device
The drain pump for a washing machine has the following technical characteristics:
- power consumption - usually from 25 to 40 W;
- type of fastening to the volute - screw or fastening with latches;
- contact arrangement - paired or separate;
ATTENTION! When choosing a new pump, be sure to pay attention to the type and technical characteristics of the old pump, since the new one may not be suitable for some of the above parameters.
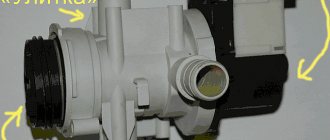
The pump in the washing machine differs not only in appearance, but also in the type of “snail” filter installed inside them. Very often the filter becomes clogged, and in this case the water is not completely drained from the chamber, then the dirty liquid stagnates and an unpleasant odor appears inside the drainage system. In this case, it is necessary to check the condition of the filter. You will need some tools, since the device cannot be removed with bare hands. The filter can be cleaned and the problem may be resolved.
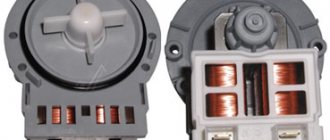
The internal structure looks something like this:
The pump rotor is a permanent magnet in the form of a cylinder, which is located in a plastic casing. When the system starts up, the rotor first turns on, then the impeller, located on the shaft at an angle of 180 degrees, begins to move. The impeller relative to the armature should have a small stroke; this is necessary for normal engine starting, since there is a load due to water.
How to make an irrigation system?
Before connecting the pump from the washing machine, you need to check the condition of the contacts on the relay and the electric pump. This is done with a multimeter, the probes of which are applied to the wires in turn. After this, the relay and pump wires are connected.
The further algorithm of actions is as follows:
- a container is being prepared from plastic material, from which a protective casing will be made in case of rainy weather;
- holes are made in it for the output of wires, a relay is placed inside;
- the pump from the washing machine is connected to the electrical network and checked for functionality;
- a tee is mounted at the outlet of the pump, on the reverse sides of which hoses are attached;
- all connections are fixed with clamps.
To ensure that the pump is secured comfortably, you can do the following. We take a plate of metal or duralumin and drill six holes. Using four of them, the pump will be installed, the remaining two are intended to fix the plate itself.
Now we take a steel strip 1.5 by 80 cm, the thickness of which is 6 mm. We drill a couple of holes in the pin for fastenings. We attach the pump to the plate, then screw it to the pin using bolts. The pin is stuck into the ground and performs not only the functions of support, but also grounding.
Remaking a washing machine - an automatic machine for working in a country house without running water. We are not looking for easy ways
Not every country home is equipped with a central water supply with constant water pressure, which makes it difficult to use automatic washing machines that require water pressure to operate. There are many ways out of the situation: installing a pumping station with a hydraulic accumulator or a container of water at a high altitude to maintain water pressure, or pouring buckets of water into the washing machine through the powder tray. Each method has its pros and cons, but I want to offer my own version of improvement. For it you will need: - a “Baby” pump, - radio components soldered out of all sorts of junk, - a desire to get inside the washing machine and screw around with a soldering iron. Preface
I live in a village, we do not have a central water supply. We get water from a well, which has become sandy over time and has to be settled in barrels. Therefore, it will not be possible to use a pumping station that will drive water and sand into the washing machine. It is quite difficult to install the tank at a height; you still need to settle the water in another container, from which you will have to fill it somehow, it is difficult to control the water level and when the water level decreases, the pressure will be lower and will not be able to pass through the inlet valves of the machine. There was only one thing left to do - pour buckets of clean water directly into the powder compartment. This is heavy, it is difficult to get from the bucket into the small tray and water begins to flow along the body of the washer, probably getting inside the body, contributing to the appearance of rust. In addition, the washing process loses its automaticity; you have to stand ready near it, catch the moment when the inlet valves begin to hum, and at that moment pour water into it. And then the era of self-isolation arrived, I had free time and I decided to make the washing process completely automatic.
Task:
a barrel of clean water stands on the ground, at the same level as the washing machine.
Water pressure can be easily created with a cheap “Malysha” type vibration pump located in a barrel. But if the pump operates while the washer valve is closed, the hose will be knocked out, and it is also impossible to hear when the valve is open and at the same time turn the pump on/off. This means that you need to make sure that the pump works only at the moment when at least one valve of the washing machine is open.
Development of an automatic pump switch
So, there is a washing machine LG WD-80150NU. This is a conventional diagram for switching on the valves: The inlet valve of a washing machine is essentially an electromagnet that opens the damper when 220V voltage is applied to it. The control signal from the washing machine processor is sent through a transistor assembly to a triac, which opens and turns on the electromagnet.
It would seem that the obvious solution is to connect the pump in parallel with the valve solenoid.
But since the power consumption of the inlet valve is only 30 W, the control triac is small, with a current of 1 A. You can connect a drain pump from another washing machine with a power of also 30 W and use it to pump water. But its power will be too small to draw water from a container standing on the ground. In this case, you can use it as an auxiliary one, but the water container should still be above the level of the washing machine. And if you connect the “Malysh” pump, which consumes about 300 W, in parallel with the valve, the triac will smoke and fail, pulling the transistor assembly with it, which I was convinced of when I first tried to do just that. I was not familiar with the circuitry of washing machines and for some reason I was sure that the valves were turned on using a relay. Repairing the electronic module of a washing machine
The control board of the washing machine is filled with silicone on both sides, plus plastic on the road side and SMD components. To get to the triac and the microcircuit of the transistor assembly, I had to use a soldering iron to melt the windows in the plastic casing in which the board is fixed, and in addition, carefully pick the silicone with a knife, trying not to damage the tracks.
I replaced the BCR8 triac with an SMD analogue, taken from a non-working board from another washing machine.
The same ULN2004 transistor array microcircuit was also found there.
At the same time, I soldered all the relays on the board (the washing machine periodically gave errors and did not want to erase in some modes; there was a possible solution to the problem on the Internet) and coated the exposed areas on the board with tsapon varnish.
After that the machine worked as before. It was lucky that the percent with all the loose powder was not damaged.
It became clear that we needed to make something like a transistor switch that turned on the pump using a relay. It is logical to remove the control signal from the output of the processor and apply it to the base of the transistor. But the triac is controlled by short pulses, so this method will not work, since the switch will be turned on by the same pulses. The idea arose to rectify the 220 V voltage supplied to the valve and apply it to the LED of an optocoupler, which would open the key at the moment the LED lights up. And since there are two valves, you need to make sure that the key works both when the first valve works (for pre-wash), and when the second valve works (for the main wash), and when both valves work simultaneously (so that water passes through the conditioner compartment during rinsing time). The following diagram was sketched out.
When the washing starts and alternating voltage is supplied, for example, to valve 1, it is rectified by the diode bridge VD1-VD4, and through resistor R1 it is supplied to the LED of the optocoupler DA1. Capacitor C1 smoothes out the ripples of the LED. The optocoupler transistor opens, and the +12 V supply voltage is supplied to the base of transistor VT1 through the resistor voltage divider R3R5. The transistor opens, relay K1 is activated and with its contacts K1.1 turns on the pump that pumps water into the drum. When the washer decides that there is enough water in the drum, it will turn off the valves, the optocoupler LED will go out, transistor VT1 will close and the relay will turn off the pump. The circuit works similarly when valve 2 is activated; a diode bridge VD5-VD8, an optocoupler DA2 and a divider R4R5 are used. When two valves are operating, the transistors in both optocouplers are open simultaneously, and the voltage divider is formed from resistors R3 and R4, connected in parallel, and R5. The +12V key power is taken from the washing machine board. Even during the repair process, I found a 7812 stabilizer on it and soldered two wires to its terminals on the side of the tracks.
The pump control circuit was soldered onto two small boards. Why on two boards? It’s just a long drive to go to a radio parts store for a normal piece of PCB, but I want to assemble it here and now. Found two small scraps at home. On one I mounted a transistor switch with a relay:
On the other are diode bridges and smoothing conductors. At first I used electrolytic 2.7 µF and 4.7 µF x 400V, but their capacity turned out to be too large, and after the voltage supply from the valves was stopped, the pump worked for another half a second, since the accumulated charge in the capacitor passed through the LED of the optocoupler. After the first tests, I replaced them with 470 nF X 250 V. I soldered them to the wires going to the valve electromagnets from the washing machine board to connect to the diode bridges:
And to the surge protector to receive 220 V power supply to the pump (two white wires). They go to a board with a key and a relay: I connected the two boards with wires, between which there were optocouplers with a resistor, hidden in heat shrink:
In the end, everything looked something like this: The circuit works, the pump turns on simultaneously with the valves and turns off along with them in any operating mode of the washing machine. I began to think about where to place this structure. I thought for a while. I took a soft plastic container from under the herring and glued two boards in it to a glue gun, twisting the connecting wires inside. I secured the container itself with one screw inside the washing machine on the left side.
The wire to the socket to which the pump will be connected was pulled through a natural hole at the back of the machine:
The automatic washing machine for the dacha is ready.
Video demonstrating the operation of the washing machine:
The scheme worked flawlessly for several washes, and I decided to modify the second washing machine in the same way, which is used as a backup - Vyatka-automatic 14.
But it's not that simple. Unlike the relatively modern LG, Vyatka has a mechanical command apparatus that controls all its components, including water intake valves. That is, there is simply nowhere to get 12 V from the machine to power the relay.
Scheme of Vyatka
And Vyatka also had not two, but three solenoid valves - one for each powder compartment.
The pre-wash valve did not work, and the problem was most likely in the command device - 220V was not supplied to the electromagnet. I decided not to bother with the command device and connect to the two remaining valves; I practically don’t use pre-wash.
The circuit diagram of the automatic pump switch for “Vyatka” looks like this: The difference from the circuit for a washing machine with an electronic control module is that it has its own power supply, consisting of a 220-12V step-down transformer and a rectifier. The machine is connected to the network at the same time as the machine. I also added LEDs to indicate when the pump and network are on. Otherwise, the scheme works the same as for LG. Since there is not much free space in the Vyatka, and it also shakes quite a lot during operation (especially during the spin cycle), it was decided to make the machine in the form of a remote device, connecting to the valves with wires led out through the body of the washer. This will also allow, if you replace the washing machine, not to bother with moving the automatic pump switch into the body of the new one, but simply connect through the connector to the same machine, soldering the wires with plugs to the new washing machine. I bought a normal piece of PCB for the board. I drew the paths with a marker and etched them in peroxide and citric acid. Radio components were also soldered from everything that could be found: from non-working circuit boards from LCD TVs, from the Mountaineer receiver, from any other rubbish. The relay was removed from a non-working board from another washing machine. Transformer from a universal power supply. Connectors for external connections from a non-working mainboard from an LCD TV. Smoothing capacitors C1 and C2 at 330 nF / 250V (at first one of them was 100 nF, there is a smaller yellow one on the board, but its capacity turned out to be small, the relay crackled at the mains frequency, since the optocoupler LED pulses were not smoothed out enough, after testing I replaced it with 330 nF).
I made the board before purchasing the box, so the dimensions of the board did not match the location of the mounting posts in the box. The heavy transformer was pressed with a metal bracket so that it would not peel off from the board.
I decided to use RCA connectors from the TV, also known as “tulips,” as connectors for connecting to the valves. They are smaller in size than wall outlets. I removed 4 female connectors from the DVD player board. They are connected together and there is a hole in the center for fasteners. I soldered a connector to them that connects to the machine board.
The LEDs were placed on a small board from the same player, which already had one LED and a button. I removed the button and replaced it with an LED.
The board was placed on the top cover of the junction box, gluing it to a glue gun.
The socket for connecting the pump and the power switch with the power cord were placed on the side wall of the box. I screwed them onto a metal base cut from the computer power supply case, and then screwed this base to the box. It didn’t turn out as neatly as I would have liked, since I have little experience working with metal.
The socket and power cord are connected to the board through connectors.
We connect the LEDs on the top cover.
And the device is ready to use. All that remains is to connect the automatic pump switch to the washing machine. I took an RCA cable with male plugs, disassembled the plugs and replaced the wire with a network one. Perhaps this was not particularly necessary, the current passing through the optocoupler LED is very small, but just in case.
I soldered the other ends of the wires to two working Vyatka valves. Yellow plugs go to one valve, red plugs to the other. The wire was brought out from behind the washing machine.
The machine gun body was screwed to the canopy beam. I connected the washing machine to the machine with “tulips”. Ready
Results Perhaps this is not the easiest way to convert an automatic washing machine for a summer residence. There are a lot of ways on the Internet to make a washing machine with a water tank work, for me this option is the most optimal: you don’t need to install the water tank at a height, the pump can be used for other purposes by plugging it into a regular outlet (I also draw water from this capacity), the washing machine itself requires a minimum of alterations (if the pump switching device is remote, like the Vyatka, then you will only need to solder to the valve electromagnets). Parts for the circuit can be removed from various trash; in my case, I only spent money on PCB and a junction box housing for the second project. The circuit is not critical to the ratings of the elements, you can use almost any npn transistor, if there is no transformer, then you can use a ready-made 12 V power supply or even charge from a phone, but in this case you need to use a 5 V relay and, possibly, reduce the values of resistors R3 -R5. Diodes for diode bridges connected to valves must have a reverse voltage of at least 400V. The only critical drawback is the very loud noise from the vibration pump.
Fountain from an old pump
Every homeowner dreams of a small fountain. Moreover, there is nothing complicated in such a design.
The main elements needed to set up a fountain are a water container and a pump from a washing machine. You will also need a closed water supply system through which water will circulate without stopping.
Having prepared everything necessary, we begin to assemble the fountain. The main difficulty is to ensure pumping of water, which will require a centrifugal electric motor, which can be found in an old washing machine.
The motor has a wheel with blades that spin water in the container. This will serve as a source of centrifugal force, pushing the water up towards the exit.
Design #3 - manual pump with side spout
The previous design has one, but significant drawback. The spout moves with the stem. This design is not much more complicated, but much more convenient.
The sleeve needs to be improved. Add a 50mm PVC tee to the design with a 35 degree bend. The tee must be inserted into the upper part of the sleeve. In the rod, near the piston, we drill several large-diameter holes, the main thing is not to overdo it and not to disturb the rigidity of the entire structure.
The piston moving upward pushes the liquid into the outlet pipe. The top cover serves as a support for the piston rod
Now water will begin to pour into the space between the rod and the sleeve. When the piston moves upward, water will begin to flow into the spout.
Washing machine pump for everyday use
A washing machine consists of many components, which, thanks to skillful hands, can find worthy use after the equipment “retires”. Working units and parts can still serve on the farm. You can, for example, adapt a pump from a washing machine to water your garden, lawns, or garden plot. With it you can build a small fountain in the garden. Read below about how to make useful homemade items.