Washing machines, also known as “washing machines,” are an integral attribute of any comfortable home, because they make life much easier, eliminating the need for heavy hand washing.
Over time, these assistants break down or become outdated, after which the question of their further disposal arises.
Selling scrap metal will bring pennies, but washing machines have a huge potential for turning into other items or tools that are in demand in the household, and all this can be done independently, using a minimal set of tools.
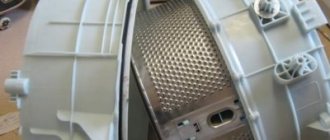
What does a washing machine consist of?
Any technique of this type consists of the following elements:
- There is a drum only in automatic or semi-automatic machines with horizontal loading; in machines with vertical loading, its role is played by the rotor.
- The water tank used to be made of stainless steel, but now plastic is used.
- An electric motor with a power of 150–350 W, and on older non-automatic devices it is an asynchronous AC motor, and on modern automatic and semi-automatic machines it is a brushed or brushless DC motor.
- The case made of steel or plastic depends on the size and cost of the equipment.
Each element can be adapted to something useful and necessary in the house or garden. For example, a motor can be turned into a sharpener or a lathe, and the tank can be turned into a container for technical water. Therefore, the use of elements depends only on your imagination and tinkering skills.
Popular REZ models
Such an abundance of washing machines as today was not observed in the last century. But there was a choice. The model range, readily purchased by citizens of the country, is characterized by the following indicators:
- "Riga-8" with a stainless steel tank with a capacity of 30 liters for 1.5 kg of laundry. Motor power is 350 W, powered from a 220 V network. A timer is set for 6 minutes; for the first time, drainage is mechanized using a pump. If desired, a mechanical spin could be used.
- "Riga-17" - stainless steel tank. A disk activator is mounted on the beveled bottom, providing 2 washing modes by rotating in one direction or another: soft for delicate laundry, hard for coarse fabrics. Equipping the model with a heater attached to the bottom of the tank increased the power consumption of the machine to 2 kW.
Are you unplugging your washing machine?Oh yes! No
- "Riga-13" has characteristics similar to other models in the series: 1.5 kg of laundry and 30 liters of water. The difference is in the hose that pumps the soap solution from the lower zone of the tank to the upper layer to enhance the washing effect of the device. Motor – 180 W at 1450 rpm. from a network of 220 or 127 V. Machine weight 25 kg.
- "Riga-60" - the model was developed on the basis of the R-55. Tank for 2 kg of laundry, improved mechanical spin: the distance between the rollers is adjustable, their length has been increased by 56 mm. Washing time – 2–4 minutes, rinsing – 1–2. The electric motor can operate at voltages of 127 and 220 V, its power is 150 W. Machine weight 30 kg.
Riga 60
From the above review it is clear that the qualities inherent in modern washing machines were already established at that time. This is the ability to drain the liquid with a pump and heat the water directly in the tank of the machine.
What can you make from a drum?
Here is a short list of what can be made from a drum:
- decorative lamp;
- coffee or coffee table with lighting;
- protective container for bulbs and other plants;
- smokehouse;
- barbecue;
- feather removal machine.
Decorative lamp
To make a decorative lamp from a drum:
- place a lamp or other light source in it;
- place it on a beautiful leg (floor lamp) or hang it from the ceiling near the bed (night light);
- Take the power cable and plug out.
Coffee or coffee table
In such a table, the drum serves as a cabinet on which the tabletop is fixed, which opens up enormous scope for creativity. For example, the tabletop can be made of natural or organic glass with a pattern on the back side , and a backlight lamp can be installed in the drum.
You can make the tabletop opaque, but place a lamp inside the drum, covered with a colored diffusion dome; after turning on the lamp, the cabinet will begin to glow, creating a feeling of mystery and romance.
Protective container for bulbs and other plants
If moles or any other pests damage ornamental or fruit plants in your area, dig a drum into the ground, then fill it with fertile soil .
Thanks to the small holes, water with nutrients dissolved in it will penetrate into such a protective container, and pests will not damage them, because they will not be able to get through the stainless steel walls.
Another method is to plant plants in a drum filled with soil and located on the surface of the site as a decorative flower bed.
The only drawback of such a container is that it slows down the soil regeneration process , so it is advisable to update the soil in it every year or every other year.
Smokehouse
If you need a smokehouse, then do this :
- make or use a ready-made smoke generator (for example, a potbelly stove); for hot smoking, a steel barrel with a diameter equal to the diameter of the loading hole of the drum is suitable;
- in the back of the drum, where the pulley is located, cut a hole whose diameter is equal to the diameter of the stove chimney;
- if you are using a barrel stove, then cut a hole equal in diameter to the loading hole;
- attach the drum to the smoke generator, then fix it;
- make submersible trays for storing food, you will lower these trays into the loading hole;
- make a steel lid to cover the loading hole (do not use the standard washer lid for this, because it is made of plastic).
Brazier
To make a grill from a drum:
- disassemble the semi-automatic machine;
- remove the tank with the drum from it;
- cut the tank and pull out the drum;
- remove all plastic parts from the drum;
- Place the drum on a flat dirt or concrete area.
To use the grill, load it with charcoal, then light the fire. Thanks to perforations in the bottom and walls, the coal will receive enough air for combustion .
If you prefer to heat the barbecue not with coal, but with wood, then cut them to such a length that you can lay them across the drum and they will not rest against its walls.
Feather removal machine
Such a device will be useful to everyone who raises poultry for food or for sale, because it reduces the time of plucking each carcass several times, and also eliminates the need to perform this operation manually.
are not very efficient due to their low engine power , so before plucking the carcass you have to soak it in boiling water, which is not always convenient.
The most efficient machine is made from a drum and tank from a semi-automatic machine and a 500-1000 W motor.
The principle of operation of the feather removal machine is that a rotating rotor with rubber fingers mounted on it causes the carcass to rotate along unpredictable trajectories, tearing some of the feathers out of it.
The additional fingers installed on the tank perform the function of a kind of brake, while also tearing out the feathers.
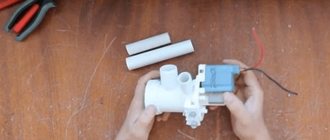
Tools and materials
To make such a machine you will need:
- an unnecessary activator washing machine with a working motor and belt drive or a tank and drum from a semi-automatic machine with a 500–1000 W motor;
- finger-beats 50–100 pieces, they can be ordered in the online store;
- plastic pipes or rubber hoses for the hearth
- steel pipes for making the frame;
- drill with a set of drills;
- Screwdriver Set;
- set of wrenches;
- grinder and welding inverter (only for converting a semi-automatic machine).
Procedure
To turn an activator machine into a pen removal machine, proceed as follows :
- Remove the activator, then drill 10-15 holes in it for the fingers, placing them at approximately equal distances.
- Make sure the drain works and clean it if necessary.
- Mark the body (tank), drill 4–5 rows of holes for the fingers on each side, 4–6 holes per row.
- Insert your fingers into all the holes so that they point upward on the rotor and inward on the housing.
- Replace the rotor.
- Modify the power switch so that the activator motor and the water drain electric motor are turned on at the same time; if they operate from the same motor, then modify the system for turning them on.
To turn a semi-automatic washing machine into a feather removal machine, do the following :
- Disassemble the device, remove the tank and rotor from it.
- Cut the tank crosswise to remove the drum.
- Check the condition of the bearings and replace them if necessary.
- Cut the drum so that only the bottom part remains, remove the rest.
- In the lower part, drill holes for the beat fingers, the optimal distance between the holes is 5–7 cm, space them evenly.
- Drill 4–6 rows of holes for fingers in the tank, the distance between rows and holes is 7–10 cm.
- Insert your fingers into the bottom of the drum and tank.
- Insert the drum into the tank, then install the drive pulley onto the shaft.
- Weld a frame from steel pipes on which the tank will stand vertically, with the loading hole facing up.
- Select an electric motor of sufficient power with such a number of revolutions that the drum rotation speed is 200–400 rpm.
- Install the engine, tension the drive belt.
- Mount the motor control device.
- At the bottom of the tank, tightly cut a pipe to drain the water.
- Attach a clamp for the supply water hose to the top of the tank (you can hold it in your hands, but it is easier to work with a fixed one), and position it so that it does not interfere with loading or removing carcasses.
- Make sure that the entire structure is firmly on the floor and install standard weights on the tank; if this is not done, the device will vibrate strongly during operation.
Remember, before pulling out a plucked carcass, be sure to turn off the engine and wait for the drum to stop completely, and while plucking, water the carcass with water , this will speed up the process of removing feathers.
After finishing work, be sure to clean the drum and rotor of feathers, and rinse with plenty of water to wash off the blood.
Price of the drum and other SM elements
The weight of the components will vary for different models of washing machines. The lightest stainless steel drums weigh 2.5-3 kg, the heaviest - 5-6 kg. Next, you need to find out at what price metal collection points in your city are willing to buy stainless steel with an admixture of nickel. On average, it is 100-130 rubles per kilogram, that is, you can hand over a knot for 300-700 rubles.
Now let’s compare how much buyers are willing to take away an old washing machine. Of course, it all depends on the model, but if the machine has visible damage or something is broken in it, they will offer about 500-1000 rubles for the entire machine. That is why many owners are willing to spend time disassembling the device - this way they can earn 2-3 times more money.
It is very important which stainless alloy the drum of your washing machine is made of. For example, the containers of Indesit machines, produced since 2005, contain no more than 4-8% nickel. This is very little, and the price for such metal is approximately 20-30 rubles per kilogram. Then the price for a knot weighing 5 kg will be about 100-150 rubles.
In addition to the drum, other heavy parts of the SMA can be delivered to the metal collection point: motor, pulley, etc.
It is also worth considering that many working parts of the washing machine can be sold. For example, for a working engine you can actually earn about 400-800 rubles, and for a drain pump another 200-500 rubles. Pressure switches, drain and inlet hoses, SMA doors, etc. are in demand on advertisement sites. The only thing is that you will have to wait until a buyer is found specifically for the components from your model.
Usually, if you disassemble a machine and sell its components in parts, you can earn more than what buyers offer. However, immediately assess how much money you will spend on transporting parts to a metal collection point, whether you have time to wait until the working parts are sold - after all, they will have to be stored somewhere.
Tank craft ideas
From a plastic or steel tank you can make :
- heater for summer shower;
- water dispenser;
- expansion tank of the heating system.
To turn it into a heater, do the following :
- paint it black on the outside so that it heats up more strongly under the sun's rays;
- place a summer shower on the roof;
- supply water to it with adjustable flow and a drainage pipe through which excess water will drain;
- connect the faucet with the sprayer;
- plug extra holes;
- Cover the top with a lid to protect the water from dirt.
To make a washbasin:
- raise the tank using a metal or wooden frame to a convenient height;
- connect the tap;
- plug extra holes;
- cover the top with a lid.
To make an expansion tank:
- lift the tank into the attic and connect it to the supply pipe (direct) of the heating system;
- connect a drainage pipe or hose to the hole located at the highest level;
- close the tank with a lid, even the standard lid of the washing machine will do;
- insulate the tank with mineral wool or polystyrene foam.
Advantages of free-standing and built-in washing machines
The design features of the equipment allow you to choose a model that ideally matches the layout of the room. According to the type of installation, all washing machines are divided into free-standing and built-in, and each of these types has its own differences.
Freestanding
A standard option that involves installation in any location convenient for the user. If desired, the washing machine, of course, can be placed under the countertop or under the sink, but such equipment is not intended for full integration into furniture. This is an excellent choice if the room is large enough.
Built-in
Built-in washing machines can be completely installed in furniture, while the front of the device will be hidden behind the doors of the unit. Functionally, they are no different from free-standing ones, but still have one important advantage. Thanks to the rigid attachment to the internal surfaces of the furniture, the equipment makes virtually no noise or vibration.
What can be made from an electric motor?
This part is often used to make:
- lathe;
- sharpener (grinding machine);
- grinder;
- juicers;
- drive for a manual meat grinder;
- feather removal machine;
- vibrator for concrete compaction;
- lawnmowers;
- feed cutters.
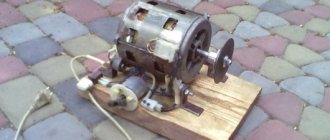
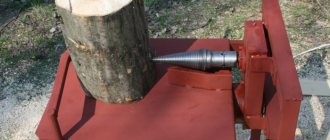
Wood lathe
Due to the insufficient power of the washing machine engine, it can only be used to make a wood lathe. With the help of such a tool, you will be able to carve or polish wood products yourself , which will not only be an interesting hobby, but will also be beneficial for your home.
Some DIYers suggest making a frame from wood, but such a machine will not last long, unlike a metal one, so we recommend making it only from metal.
Materials and tools
To make the machine you will need materials :
- steel pipes of various shapes and sizes;
- nuts, bolts and studs M6–M10;
- a conical stop for the tailstock, you can make it yourself or order it on the Internet;
- pieces of sheet steel 2–6 mm thick;
- a spindle from an electric drill or a pulley from a motor to create a headstock;
- motor driver;
- starting device.
And also the following tools:
- drill;
- Bulgarian;
- welding inverter or semi-automatic (if you decide to make a cone stop yourself, then both devices are needed);
- level;
- protractor;
- roulette;
- set of dies and taps;
- scriber;
- center punch
Procedure
Here is the general procedure:
- Determine the difference between the engine speed and the optimal machine speed; if they differ, then make a gearbox or use a ready-made one. You can increase the efficiency of the machine using an electric motor rotation speed controller; these devices are produced for DC and AC motors.
- Weld a frame from a steel pipe on which the motor with gearbox and headstock, tailstock, and workpiece will fit, so the length depends on the design of these elements and the size of the workpiece.
- Make a headstock; it can be made either from a drill spindle, into which a cutter for metal or concrete with a diameter of 15–30 mm is inserted, or from a pulley, into which 3 screws with sharpened edges are screwed. The headstock transmits the rotation of the part, so take its manufacture as seriously as possible.
- Attach the motor with the gearbox and the headstock to the frame, and the axis of rotation of the headstock should be parallel to the frame, otherwise you will not get good performance from the machine.
- Make a tailstock, its task is to hold the part and form the point of the axis of rotation. In terms of efficiency, the homemade tip and the part available on Aliexpress are the same, but the Chinese product will cost 300–400 rubles, although you will have to wait several weeks for it. Remember, the tip must move along the frame so that you can fix and remove the part, so provide for movement of both the axle with the tip and the entire headstock.
- Attach the tailstock to the frame and make sure that the guide and the tip are on the same axis.
- Set up a support for the chisel.
- Cover the motor and gearbox with any casing.
- Connect the device to a power outlet and ground it.
Forums and videos
Here are links to forums and video reports:
- www.chipmaker.ru.
- forumcnc.ru.
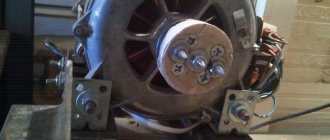
Sharpener
The main problem faced by everyone who converts a washing machine engine into a sharpening machine is related to rapid wear of bearings due to lateral loads .
After all, in a washing machine, the motor motor is connected to the drum, rotor (activator) or centrifuge through a belt reducer, which has its own bearings, which means the lateral load on the electric motor is minimal.
In addition, some washing machines produced after 2000 are equipped with electric motors whose shaft rotation speed exceeds 10 thousand revolutions per minute (rpm).
In this case, the maximum permissible rotation speed of the grindstone is 1500 rpm, and the optimal one is 1000 rpm. Therefore, installing an adapter sleeve with a cartridge for attaching a stone directly to the shaft is pointless - the stone will fly apart and damage the equipment , and perhaps even injure you. To reduce speed, a gearbox is needed.
The easiest way is to make a belt reducer with two pulleys, and the ratio of the pulley circumference should be equal to the gear ratio. A small pulley will be on the electric motor shaft, and a large one on the gearbox shaft, which is also the shaft of abrasive elements.
In order for such a gearbox to work well, consider changing the distance between the pulleys or adjusting the belt tension with an additional roller, because the tension during operation and when replacing the belt is very different.
Since the instrumental base and source materials are different for everyone, we will describe only the general procedure :
- Determine the location of the future machine and how it will be attached to the wall or table.
- Determine the configuration and gear ratio of the gearbox, as well as the number and method of fixing the abrasive elements.
- Draw up a drawing to determine the size and shape of the frame, taking into account the gear ratio and the method of attaching the bearings of its second axis. Don’t forget about the elements for fixing to the table or wall and the support areas in front of the abrasive elements.
- Using this drawing, make a gearbox shaft with support bearings, fasteners for abrasive elements and a drive pulley.
- Make a frame according to the drawing.
- Attach the motor and gearbox to it with the ability to change the belt tension. Remember, both belts must rotate in the same plane.
- Connect the power cord; some motors will require a driver or capacitor.
- Put on and tighten the belt.
- Run it without any abrasive elements.
- If there is no vibration, secure the machine at its permanent location; if there is vibration, determine and eliminate its cause.
- If everything is fine, install abrasive elements.
Grinder
The basic steps required to make a grinder are the same as in the previous section, the only difference is that instead of a sharpening disk you will install a sanding belt .
To ensure its normal movement, attach a feed roller to the gearbox shaft, and also place tension rollers around the perimeter.
A grinder with a washing machine motor can work with belts of different sizes, but the shorter the belt, the less friction loss, which means more motor energy will be spent on grinding or turning the product.
Juicer
This tool can only be made from a washing machine that has a spin function through a drum or centrifuge, so old Soviet washing machines, in which spinning was done manually with two rollers, are not suitable for making a juicer.
The principle of its operation is the same as that of conventional juicers - a grater rotating together with the drum grinds the vegetables or fruits that fall on it, and the crushed fragments fall on the walls of the drum, where under the influence of centrifugal force the juice is squeezed out of them.
Materials and tools
Here are the materials you will need:
- An unnecessary stainless steel pan or a scrap of this material measuring approximately 15x15 cm to make a grater out of it.
- Plastic or stainless steel pipe with an internal diameter of 50–100 mm (the larger the diameter of the drum or centrifuge, the larger the pipe can be used) for the product loader.
- Plastic tube and tap with a diameter of 20–40 mm for draining juice.
- Steel pipes or wooden blocks to create the frame.
- Alcohol or vodka to sterilize the drum and tank.
- Gauze for better filtration of juice. You can do without it, but then there will be a lot of pulp in the juice.
Here is a list of tools needed for such a conversion:
- a set of screwdrivers (flat and Phillips, different sizes);
- set of wrenches;
- metal scissors;
- Bulgarian;
- drill with metal drills;
- a set of cores of different diameters;
- riveter or welding inverter with a carbon dioxide cylinder;
- welding inverter;
- a wooden log or block to fill holes in the grater.
Procedure
Here is the procedure by following which you will turn the washing machine into a juicer:
- Disassemble the washing machine and remove the tank and drum assembly, as well as the counterweights (weights).
- Wash the tank and drum thoroughly, then steam and treat with alcohol or vodka.
- Make a frame that is sufficiently stable from bars or steel pipes. Remember, sometimes the drum or centrifuge creates strong vibrations and can overturn an unstable structure.
- Secure the tank so that the filling opening is directed upward.
- At the lowest point of the tank, drill a hole and cut a drain pipe with a tap into it at an angle of 45 degrees. It is desirable that the drain pipe extends beyond the frame, and the distance to the ground is enough to install a bucket or pan there.
- Make a grater from a piece of stainless steel, the diameter of which is equal to the diameter of the feed pipe (loader).
- Place a grater on a log or block and punch several hundred holes with the thickest core, forming sharp teeth on the other side.
- Attach the grater in any convenient way to the bottom of the drum strictly in the center. If you do not have a semi-automatic machine with a CO2 cylinder, then use a riveter and stainless steel rivets.
- Cut a piece of thick pipe of such a height that the lower edge rises 3–5 mm above the grater, and the upper edge rises 3–5 cm above the top of the tank.
- Make a quick-release fastener with which you will fix the supply pipe above the grater. Remember, while the grater is rotating, the products will bounce off it, hitting the walls of the pipe, so the fastening should provide reliable and rigid fixation, and its removal, for example, to clean the juicer, should take a minimum of time.
- Install the washer motor and put it on, then tighten the drive belt.
- Install a standard motor driver that ensures operation in spin mode. If there is no standard driver, use a purchased one or a homemade one. The best results are obtained by a device that regulates engine speed.
- Connect the structure to the power supply and start the engine, make sure that the drum rotates without vibration, otherwise replace its bearings.
Drive for manual meat grinder
For older people, using a manual meat grinder often becomes a problem, because muscles and joints do not tolerate such loads well. Therefore, a drive made from a broken washing machine will turn a hand tool into an electric one , thanks to which the process of turning meat into minced meat will take place without stress on muscles and joints.
The main problem that needs to be solved for this use of an electric motor is related to the optimal rotation speed of the meat grinder shaft and the possibility of its reverse.
If the engine of old Soviet or foreign washing machines produced 1.5–3 thousand rpm, then the optimal rotation speed of the meat grinder shaft (auger) is 100–300 rpm.
The engines of modern washing machines produce 10–15 thousand revolutions per minute. That is, for electric motors of old cars you need a gearbox with a gear ratio of 8:1-10:1 , and for more modern ones - 80:1-100:1.
The problem is that a belt drive with a 10:1 ratio and a small pulley diameter of 6 cm will require a large pulley with a diameter of 60 cm, which is not always convenient. If a transmission ratio of 100:1 is required, then a six-meter disk will be needed, which is generally unrealistic.
Therefore, they do it in two ways:
- several belt reducers are installed in series, but such a scheme leads to a large loss of power;
- They use a worm gear, that is, a gear wheel and a worm (a shaft with a thread of a certain pitch).
That is, for a worm with a diameter of 2–3 cm with a thread pitch of 2 mm, a gear of approximately the same diameter will be required, so such a gearbox will not take up much space. You can do it yourself, by providing a grease dispenser for supplying lubricant, or you can use a ready-made mechanism from some equipment.
Having found or made a gearbox, make a convenient stand for mounting all the equipment so that your parents can comfortably use such a meat grinder, and close the engine with any casing, leaving only the control buttons outside.
Vibrator for concrete compaction
The main problem that arises when pouring concrete is related to its viscosity, because the thinner it is, the weaker it will be after the concrete stone hardens .
Therefore, due to the high viscosity, air cavities are formed in the pouring, which reduce the final strength of the stone, and it is impossible to fill the voids manually, because you cannot see where they are and what shape they are.
The most effective way to compact a concrete mixture is vibration, which can be created using a vibrator, that is, a device that generates shocks with a frequency of 30–100 Hertz.
To make such a device, you need to solve 2 problems:
- turn the circular rotation of the motor shaft into vibrations;
- reduce the load on the motor shaft to extend bearing life.
The easiest way to do this is with an eccentric connected to the motor through a belt drive, so next we will talk about the general principles of manufacturing such devices, because each has its own set of materials and tools.
Here's the procedure:
- Make a frame from wood or metal; the size of the frame should be sufficient to install an electric motor, gearbox and eccentric shaft on it. Also, provide for the installation and fixation of both pins for sealing at depth and holes for fastening to the formwork.
- Place the eccentric shaft on the bearings, then attach the bearings to the frame.
- Place belt drive pulleys located in the same plane on the motor and eccentric shafts. If the engine speed is too high, install an additional gearbox. Remember, when installing two gearboxes, their coefficients do not add up, but are multiplied.
- Put on and tighten the belt.
- Connect the driver or engine starter.
Remember, the most effective is impact through the formwork, however, this method of compaction greatly increases the requirements for it . If you attach several steel pins to the frame, you can lower them into the concrete and transmit vibration through them.
Lawnmower
Despite the fact that a homemade lawn mower made from a washing machine is much inferior to purchased models in terms of cutting quality and ease of operation, it is suitable for mowing clearings and lawns covered with wild but well-groomed grass.
The basis of such a mower is a plywood or wooden platform with wheels, on which an electric motor with a starting device is installed.
A homemade or purchased knife with 2–4 blades with sharpened edges is attached to the bottom of the motor shaft through an adapter. There is a handle attached to the back of the platform, with which you can push it around the area and direct it in the desired direction.
The main problem that will have to be solved during the manufacturing process of the device is related to protecting the motor bearings from dust particles and cut grass getting into them, because in a washing machine there is no such threat, which means there is no protection against it.
In addition, homemade or purchased knives are not designed to rotate at speeds exceeding three thousand revolutions per minute, so a high-speed motor will need to be connected through any type of gearbox .
One of the options for solving both problems is to lengthen the platform and install a motor and gearbox (belt drive) on its upper part. In this case, only the gearbox shaft comes down from the platform, and its bearings can be closed with any suitable seals, for example, from cars.
Wheels for garden carts mounted on a common (front and rear) axle can be used as a chassis. Thanks to their large diameter (10–20 cm), they will provide the mower with high maneuverability and will easily move through any grass.
You can adjust the mowing height using two platforms , located one above the other, with the wheels attached to the bottom, and the motor and gearbox installed on the top. Both platforms are connected by pipes entering each other, with holes drilled in them for clamps - steel pins.
The advantage of this design is that an additional sliding bearing filled with grease can be installed in the lower platform, this will reduce the load on the main bearings of the gearbox.
If the motor of your washing machine produces optimal speed, then the additional bearing will sharply reduce the load on the main ones, so even without a gearbox such a motor will last for many years.
An adapter for installing knives will have to be ordered by a turner, because it must match the diameter of the motor or gearbox shaft, and also securely hold the knives. Also, be sure to balance the blades before installing them on the mower, and then balance the unit assembly. The less vibration, the longer this garden tool will last.
Feed cutter
Due to insufficient power, the motor from the washing machine is only suitable for making one type of feed cutter - a grater, which does not cut the feed, but rips off the top layer from it like a regular grater.
The disadvantage of this type of apparatus is that it is not suitable for chopping grass or hard products. However, it does a good job with fresh fruits and vegetables . The basis of the feed cutter is a grater disk, the manufacture of which requires stainless steel 1–1.5 mm thick.
Tools and materials
Due to the low power of the motor, the optimal disc diameter is 10–20 cm, so the device will be able to chop fruits and vegetables whose size does not exceed 5–10 cm (half the diameter).
Since all elements of the feed cutter are made of metal, the main tools will be :
- Bulgarian;
- welding inverter;
- drill with a set of drills;
- taps and dies;
- all kinds of wrenches and screwdrivers.
Procedure
Here's the procedure:
- Turn it yourself or order a turner a shaft for the disk with flanges and threads for the fixing nut, as well as two bearings - one in front, the other in the back. The distance between the bearings is 5–10 cm. Choose the diameter of the shaft so that common oil seals from Zhiguli or other inexpensive cars fit it. For example, the internal diameter of the gear selector rod oil seal from the G8 is 16 mm, and its average price is 30 rubles, and you can buy it in every car store.
- Cut a circle with a diameter of 10–20 cm from a sheet of stainless steel, then drill a hole strictly in the center for installation on the machined shaft.
- Using a drill with a diameter of 4–8 mm, drill holes on the disk in increments of 1–2 cm.
- Make a stand from hard wood or metal for forming blades, for which, on a flat surface, make a groove 5–10 cm long and 1–2 cm deep, while the width of the groove is 1–3 mm larger than the diameter of the holes.
- Insert a nail or drill into the hole, then tilt the disk against the direction of rotation until it stops and, placing it in the stand through a mandrel or spacer made of soft metal, strike the drill or nail to push through the stainless steel and form a float tooth. Do not confuse the direction of rotation of the disk, otherwise the feed cutter will not work.
- From sheet steel 2 mm thick, weld a round knife casing, that is, 2 disks with a diameter 3–5 cm larger than the diameter of the knife, as well as a sidewall connecting them 3–5 cm wide and 10–20 cm long less than the circumference of the disk.
- Weld the sidewall to one disk, then install any removable fasteners that would securely fix the second disk to the sidewall, but would not interfere with its removal if necessary.
- In the center of each disk, cut holes according to the diameter of the tubes into which you will insert the shaft bearings. Come up with a way to fix the bearings. These can be either inserts (rings), the outer and inner diameters of which are equal to the same parameters of the outer race of the bearing, attached to the pipe with screws or welding, or anything else.
- Weld tubes with bearing retainers into the holes of the disks.
- Insert and secure the bearings.
- Not far from the center of the removable (outer) disk, cut a feed hole and weld a feed tray to it in the shape of a truncated tetrahedral pyramid or cone (depending on the shape of the hole). The length of the feed tray is 30–40 cm, the expansion angle is 30–50 degrees.
- Weld legs (4 pieces) to the rear disk at an angle of 20–45 degrees to ensure maximum stability, as well as a platform for mounting the engine. Consider the dimensions of the drive pulleys, and for high-speed motors, use a worm gear so that the rotation speed of the grater disc is 100–200 rpm.
- Insert the shaft with the grater disc, then secure it with the outer disc.
- Install the engine and both pulleys with the belt (tension it with the necessary force) or gearbox.
- Connect the motor control device and carry out a test run.
- Place the crushed products in a tray, and collect the finished mass from below into a bucket or other container.
All about drive types
Among the nuances that are worth paying attention to, it is also important to note the type of drum drive. Modern consumers are offered two options: direct and belt drive.
Direct drive
In this case, the washing machine motor is connected directly to the drum, without using a belt. Direct drive technology has become innovative and provides users with many advantages:
- low noise level;
- excellent balancing providing minimal vibration;
- long service life;
- excellent washing quality;
- energy saving.
Belt drive
This is a classic option in which the drive belt connects the engine and the drum pulley, responsible for transmitting torque. A serious disadvantage of this type of drive is the fact that the belts wear out quite quickly, and washing and spinning are accompanied by noticeable vibration and noise.
Case products
The washer body can be used to make:
- a box for various small items or tools;
- porthole window;
- lockable dog house;
- flower beds for various plants.
Box for various small items or tools
Any semi-automatic machine with a horizontal load is suitable for making such a box.
To get a box from it, do the following:
- remove the top and back covers;
- remove the motor and tank with drum;
- measure the interior space;
- Make shelves according to these dimensions, taking into account the door protruding inward;
- in the upper part of the shelves, install a pair of 3-5 W lamps and connect them to the switch in the door lock, to reduce the load on the switch, use a relay;
- put the machine on its feet;
- insert the box inside it, secure it and replace the back and top covers;
- lay hidden wiring to the nearest outlet.
In the same way, you can make a minibar, then instead of light bulbs, install a New Year's LED garland with a controller. When the door opens, the garland will begin to flash, creating a unique play of colors.
Porthole window
To make such a window, you will need the door of a semi-automatic washing machine with horizontal loading and a part of the body with hinges and a lock.
The advantages of such a window are its unusual appearance, somewhat reminiscent of a ship's porthole, and its tightness when closed due to rubber seals.
To make such a window, disassemble the washing machine, taking out all the insides, then use a grinder to cut out the part of the body with hinges and a lock .
The cut piece can be of any shape, however:
- the round one looks more stylish, but cutting it out will require more effort;
- The square one is easier to cut, but it looks less interesting.
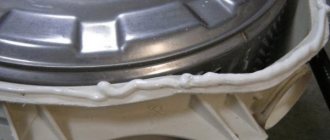
Remember, the size of the window opening into which you are going to embed the porthole must be larger than the rubber door seal. After installing such a window, carefully seal all cracks and voids with foam, but do not stain the sealant.
You can decorate the inside of such a window and hide the cut edges of the frame using wooden or plastic decorative overlays.
Closable dog house
The washer door and part of the frame with the lock and hinges can be used to create a lockable kennel for a small to medium sized dog. To do this, it is enough to cut out part of the body with the door and nail it to the booth in the area of the manhole.
Now you can close the dog so that it does not scare guests or dig up flowers in the garden. The animal's intelligence is enough to grasp the connection between digging up flowers, the owner's dissatisfaction and the inability to leave the booth.
Flowerbed-pot for various plants
The body of a washing machine, both semi-automatic and activator type, is a good flowerbed. To do this, remove all the contents from it and remove the door, then drill several dozen drainage holes with a diameter of 8–10 mm in the back wall.
Lay the body with the loading hole up and load it with a layer of crushed stone with a fraction size of 20–50 mm , then a layer of sand and fertile soil in which any plants can be planted. If you paint the body, the flowerpot will become even more interesting and attractive.
Do not use such a flowerpot without a layer of stones and drainage holes, otherwise you will not be able to properly regulate the level of soil moisture.
On the surface, under the influence of sunlight, the earth will dry out, while below, next to the back wall, excess moisture will begin to accumulate, which will lead to the appearance of pathogenic microflora and damage the roots of plants.
In addition, excess moisture will negatively affect the condition of the metal body of the washing machine, which will cause corrosion processes to begin in it and soon rust will eat through it so much that it will be visible even from the outside.
Establishment of Riga washing machine production
The construction of the Riga REZ plant in Latvia was carried out in the late 40s of the last century. The production buildings were erected by German prisoners of war and prisoners of the country's correctional institutions by decision of the Soviet court. The plant was launched in 1950, at which time the production of the first domestic washing machines began.
Riga 8
Models:
- “EAYA” and “EAYA-2” - on sale since the early 50s, but due to frequent breakdowns, production was discontinued;
- “EAYA-3” - replaced the previous models, assembled, like the previous ones, by hand;
- “Riga-54” - this brand was also developed on the basis of the EAYA-2 machine and became the first washing machine in the Riga series;
- "Riga-55" - copied from the Swedish SM Husqvarna, brought by the technical director of the plant from the Moscow exhibition.
The foreign model served as the basis for the creation of a number of machines of this series: “Riga-60”, 8, 13, 15, 17. The plant worked at full capacity and produced a huge number of washing machines for those times - up to 2 thousand machines per day. The state subsidized production from the budget: the cost of production was 1,500 rubles, and the price for the population was 600 rubles. for 1 CM.
Riga 13
Useful videos
We bring to your attention a video about how you can make an automatic machine from the electric motor of an old machine, namely, how the engine from such a device helped create a band saw machine:
Detailed video instructions on what can be made from a drum (tank) removed from an old washing machine, namely, how to make a barbecue:
How to make a sharpener (emery) from a car engine:
Another idea on what can be made from a washing machine motor, namely, how to make a grinder and use the engine for this:
And here’s how a lawn mower works, which can be made from the engine of a Malyutka car:
Semi-automatic Soviet washing machines
The first semi-automatic machine was the Eureka machine, released in the seventies.
This was a real breakthrough in the production of household devices. The product had improved functionality and a drum-type design. It made it possible to process a significant amount of laundry in one cycle. Things were loaded into a drum, which was then installed into the device. After this, hot water was added and the wash started. The waste water was removed through a pump, after which rinsing was carried out. Spinning did not require removing the laundry from the drum.
In the eighties, small-sized models became widespread. One of these devices was the Malyutka washing machine, developed at. Outwardly, it resembled a small box equipped with an electric drive. It did not take up much space, fit in a small bathroom and did its job perfectly. The product was suitable for students, bachelors and families who could not afford a full-size car. Residents of Khrushchevkas also loved her. The baby is still popular with some consumers today.
Also classified as a semi-automatic device is the Volga-10, produced at the Chapaev plant in Cheboksary. Today, such devices are present in many nursing homes. The main disadvantage of models of this type is that water must be poured into the washing container manually.