Despite the fact that the washing machine is constantly in contact with water, there are parts in it that should not get wet. To a large extent, this applies to drum bearings, which quickly wear out when the lubricant is washed out. The bearing is protected from water penetration by an oil seal - a hermetic seal.
Some users are wondering: do I need to lubricate the washing machine oil seal? Let's figure it out.
Why do you need an oil seal?
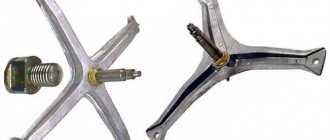
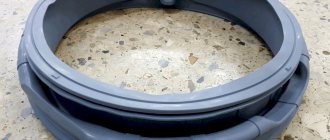
This is a round seal. Material: rubber. Its function is to seal the gaps between moving and non-moving parts. In an automatic washing machine (AWA), a sealing rubber ring is necessary to prevent leaks in the tank. Drum bearings are parts that protect against moisture. It is the seal that protects them from water.
To ensure tightness, a rubber ring, placed on the shaft and inserted into the bearing, is attached with maximum density - this prevents water from flowing out through the joint gaps. Rotation of the metal bushing with the seal attached to it leads to increased wear of the rubber. To slow down wear, you need a special water-repellent lubricant.
We make a replacement
Let's figure out how to get to the oil seal. Here are the step by step steps.
- After disconnecting the machine from the network and communications, drain the remaining water from the drain filter. It is located under the front panel, behind a small hatch.
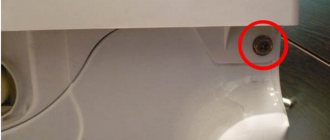
- Remove two screws from the back to remove the top panel. Now unscrew the screws around the perimeter of the back panel and set it aside.
- Remove the drive belt from the drum. Using the hammer handle to lock the pulley, unscrew its central bolt and remove it from the tank.
- Disconnect any wiring that may be attached to the drum. It is usually secured with plastic clamps, so use wire cutters.
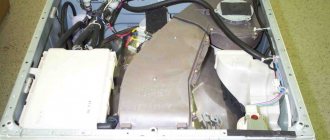
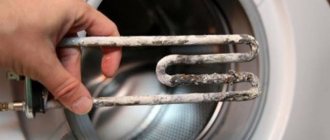
- After disconnecting the motor wiring, unscrew the fastening bolts and pull the electric motor out of the housing. Also unfasten the wires from the heating element.
- Remove the tank top counterweight bolts. Put it aside.
- Pull out the detergent dispenser by pressing the central latch. Remove all bolts that hold the control panel in place. Unlock the plastic latches, remove it and place it on top of the case.
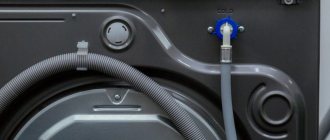
- Loosen the filler valve clamp and disconnect it from the tank. Pull out the powder hopper along with the filling valve. To do this, unfasten the wires from the valve and unscrew the mounting bolts from the back.
- Remove the pressure switch hose, which is usually attached to the tank.
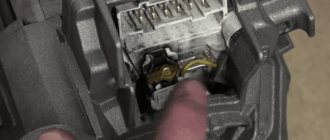
- Open the hatch door, bending the sealing rubber, remove the outer clamp. Tuck the cuff inside the tank. Unscrew the screws of the UBL lock, placing your hand behind the SMA body, pull out the lock and unfasten the wiring.
- Unscrew the screws around the perimeter of the front panel, pull it up and set it aside.
- Remove the counterweights from the tank by unscrewing the bolts.
- After unscrewing the shock absorbers, remove the tank from the hooks and pull it out.
You have completed the removal of the tank. Now let’s figure out how to properly remove and install the oil seal in the washing machine.
- Remove the screws around the perimeter of the tank. Using a screwdriver, release the latches and remove the top half.
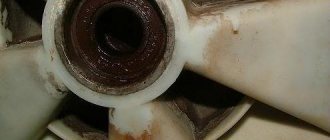
- By hitting the bushing several times, knock the drum out of the tank.
- Remove the oil seal by prying it with a screwdriver.
Before installing the oil seal correctly, apply lubricant. Begin to lubricate the outer surface with a thin layer. After installing the seal in place, use a syringe to apply lubricant to the inner surface.
You understand how to change and lubricate the oil seal. All that remains is to assemble the machine and enjoy its smooth operation. A video on the topic will help you:
What are the requirements?
Sunflower or other household oil is not suitable here. The substance used to lubricate the sealing ring has special requirements.
- High moisture resistance. Otherwise it will quickly wash out.
- No aggression towards rubber - it should not corrode or soften. By choosing the wrong substance, you will shorten the life of the seal.
- Heat resistance. Due to the friction of the shaft and the operation of the bearing unit, the rubber heats up. Hot water should also not affect the properties of the sealing element.
- Sufficient thickness. Liquid consistency is not suitable - it will leak out after some time.
Lubricants to avoid
Today there are craftsmen who believe that they can make the lubricant themselves. Moreover, in their opinion, the homemade substance is in no way inferior in characteristics to professional products. In reality, everything is not so simple. Manufacturers test their product many times, prove its reliability and protective properties, test numerous samples in order to ultimately offer customers a worthy product.
Also, newcomers to the repair business try to treat washing machine parts with automotive lubricant, but in this case it is even worse than homemade lubricant. Any compositions based on petroleum products are categorically unsuitable for servicing washing equipment. This is due to several factors:
- The average service life of such lubricants is 1-2 years. After this, you will have to disassemble the machine again and lubricate the oil seal. Why complicate your life when you can immediately treat the bearings with a decent and “long-lasting” product;
- Automotive lubricants are unstable when exposed to detergents.
Automotive grease will quickly wash out, leaving the bearings and oil seal unprotected.
If there are a few more products that experts do not recommend using for treating washing machine components.
- Solid oil, lithol. They are prohibited from being used when servicing washing machines. Some “craftsmen” still use the means, and then wonder why the bearings, after a short period of time, failed again. These compounds perform their functions only under certain loads characteristic of cars. In automatic machines, the working conditions are completely different, and grease and lithol simply become powerless and do not protect the parts.
- Cyatim - 221. Although this is a professional lubricant, it is characterized by low hygroscopicity, that is, it loses its properties upon prolonged contact with water. The interaction of the seal with the liquid is inevitable, therefore this composition is not recommended for treating washing machine components.
So, you should not save money by using grease, lithol, or homemade lubricant. It’s better to pay once for a high-quality composition and forget about problems with the oil seal and bearings of the automatic machine for a long time.
How to lubricate the oil seal?
Contact specialized stores for lubricants. Specify why you are taking them, and the seller will suggest a suitable option. But keep in mind that such a product is not cheap, as it is highly specialized.
Anderol for washing machines
Lubricant made in Italy. Chemically neutral. Excellent moisture resistance. Maximum operating temperature: + 190 degrees. Not afraid of heating. For any seals.
Amblygon - lubricant for oil seals
This is another Italian version. Works at the same temperatures as Anderol. Repels water, not aggressive. Packaged in syringes with a capacity of 2 ml, as well as in 100 gram tubes.
Litol-24 and 24 M
A universal product - suitable for different purposes. When heated, it does not become harder or stronger. High stability in mechanical and chemical terms. Range: minus 40 – plus 120 degrees. Properties of modification 24M - no compaction in an aqueous environment, mechanically stable, can be combined with other lubricating compounds.
Good substitutes
If you cannot find an original lubricant recommended by washing equipment manufacturers, you can find a worthy replacement. Fortunately, today the market is replete with professional tools for servicing machines.
The lubricant must be resistant to high temperatures, of high quality, not harm equipment, and retain its properties throughout the entire period of operation.
You can pay attention to the following products:
- Grasso is a silicone-based lubricant with good water-repellent characteristics. The composition is completely suitable for processing seals and bearings of washing machines of any brand.
- A German development by Liqui Moly, which has earned the trust of washing machine repair specialists. The lubricant can perform its functions at temperature changes from –40C° to +200C°. Practically cannot be washed off with water.
- This Russian universal lubricant is characterized by increased water resistance and can withstand chemical and mechanical influences. Does not lose its properties during its service life. Excellent resistance to temperature changes.
- "Litin-2" is produced by SHELL, which indicates the high quality of the product. This highly specialized formulation was originally developed for use in harsh environments. The lubricant is considered a worthy alternative to products made to coat seals and bearings of washing machines.
- "Ciatim-201" is an anti-friction lithium grease developed back in the USSR. The product can be used when servicing automatic machines. The composition is still used in the aviation industry, so the quality of the product is beyond doubt. The substance will withstand high thermal stress and will not lose its properties throughout the stated shelf life.
If it is necessary to process the parts of the washing machine, it is allowed to use the specified lubricants. The quality of the described compositions is undeniable. They will reliably protect bearings from the harmful effects of moisture and premature wear.
General information about valve stem seals
Oil seals (oil seals) are part of the oil distribution mechanism in the engine. The presence of oil is the most important condition for the operation of the internal combustion engine. But it doesn’t have to be everywhere. For example, the camshaft is always surrounded by oil mist during its rotation. But there should be no lubricant in the combustion chambers. There is only a fuel-air mixture, which burns. If you add oil to it, combustion will worsen, which will affect the increase in gasoline consumption.
In addition, carbon deposits will form on the bottom of the valves. As a result, the valve begins to close loosely. The same carbon deposits accumulate on the cylinder walls and on the piston rings. This phenomenon is called engine coking. Of course, all this does not improve its performance, but, on the contrary, reduces its service life. And it increases the cost of oil and fuel. Located on the stem, the cap (also known as the valve stem seal) removes oil from the valve during its downward movement and prevents it from entering the combustion chamber.
It is curious that this indicator practically does not depend on the manufacturer of the part itself: on expensive and budget cars they serve approximately the same. This will be useful for those who are thinking about the question: which valve stem seals are better? In this case, it is much more important to buy only those that match the engine and make of the car.
Repair of a non-separable tank
To repair the tank, which is a single whole, you will have to cut it. To do this, use a power tool to separate the front and rear halves. If done correctly, a ring with a rubber cuff should remain in your hands, which seals the tank. To replace the cuff, the elastic will have to be torn off.
During repairs, depending on the type of breakdown, the following actions are carried out:
- installation of new bearings coated with silicone grout;
- replacing oil seals and lubricating the front side with a special lubricant;
- cleaning of rust or complete replacement of the drum rotation axis.
Next, you need to carefully drill holes in the tank with a diameter of 3-5 mm every 5-9 cm, into which self-tapping screws are then inserted. After gluing the halves and securing them with bolts, the machine is assembled
Lubricating the parts is a prerequisite - this is the only way to achieve complete sealing of the tank. A day later, when the seam has dried, the tank is put back into the machine, it is collected and put into operation. It is better to fix serious damage in a specialized workshop, and small leaks in the tank can be repaired with sealant.