What is sandpaper used for?
An emery machine is useful for the following work:
- Restoring the cutting qualities of the drill. To avoid buying new drills, you need to know how to sharpen old ones. When working with a drill, the drill gets very hot, which is why it constantly becomes dull. Once you sharpen it on a machine, you can use it many more times.
- Sharpening knives, scissors, shovels and other tools. Thanks to a homemade machine made from a washing engine, your knives will always be sharp and your scissors will cut perfectly. You don't need to use any special effort for this.
- If you replace the emery wheel with a polishing wheel, you can easily process products and parts.
Using the motor from the washing machine, you can make a sharpening machine with your own hands. To do this, you will have to buy just one part - an emery wheel. All other components are located in the motor.
Result of work
The sharpener is ready.
The result is a sharpener like this, there are a lot of uses; if desired, you can make polishing wheels, emery wheels, etc.
How to make a flange with your own hands?
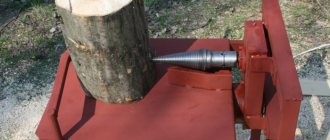
The most difficult task of the entire project was attaching the sharpening attachment to the motor shaft of the washing machine. The shaft does not have the required threads, and its diameter does not fit the hole in the stone. To eliminate the discrepancy, it is necessary to make an attachment for the electric motor.
Which engine is suitable for making emery?
Wondering what engine you can use? You can use any motor from a washing machine, even the brands “Vyatka”, “Riga” or “Volga”. The main thing is that it has sufficient power.
For normal operation of the sharpening machine, a power of 100-200 W, with 1000-1500 rpm, is enough. For particularly large parts, a 400 W motor is suitable. But if the engine speed reaches 3000 rpm, it needs to be adjusted or a very durable disc installed.
What you need to create emery from a washing machine motor
To make a simple sharpening machine you will need:
- washing machine motor;
- flange;
- sleeve;
- attachment to the electric motor (emery wheel);
- casing for protection;
- support;
- starting device.
When purchasing, it is better to choose a product with two circles: a finishing and a rough version.
You also need to make an adapter with a flange. Since the size of the shaft does not match the hole of the grindstone, an adapter must be made. It can be done on a lathe, having previously determined the dimensions and completed the drawing. On the diagram you need to mark the diameter of the shaft and the emery hole.
You can make a flange for the shaft yourself. A piece of pipe with a diameter of 32 mm, no more than 200 mm in length, will do. It should fit perfectly on the motor shaft. On one side of the flange there is a thread, the direction of which depends on the direction of movement of the shaft. When sent to the engine, the other end of the flange is heated and pressed.
After installation, be sure to secure the flange. This can be done by welding or bolting, drilling the flange with the shaft.
The shaft adapter is ready. It remains to install the element for sharpening the cutters.
Adapter
This is the only detail that cannot be made by hand. You will need a lathe and, accordingly, a person who knows how to work on it. What is the adapter for? The fact is that the size of the motor shaft is about 14 mm, while the mounting hole of the emery circle, as a rule, has a diameter of 32 mm. This means that their “direct” connection is absolutely excluded. The adapter seems to increase the washing machine motor shaft to the required size.
To make it, you will need a piece of round steel, approximately 65 mm long. and diameter 60 mm. The last figure is due to the need for the so-called flange - a fixed washer on the body of the part, into which a circle of emery rests on one side. Its thickness must be at least 4 mm. A seat with a diameter of 32 mm is machined in front of the flange. Next comes the “M20” thread, onto which the nut that secures the circle will be screwed.
For mounting on the engine, a hole is made in the adapter body with a diameter equal to the shaft. Then everything depends on how the pulley was fixed on the washing machine. There were two main options:
- Using a thread on the motor shaft and a large nut.
- Bolt 4, screwed into the adapter body, perpendicular to the longitudinal axis of the motor.
The part being manufactured must have one of the following mounting methods, depending on the type of engine.
Sometimes, home craftsmen try to minimize costs and make an adapter with a flange themselves. Most often, a pipe with suitable internal and external diameters is used as a base. You shouldn't do this without proper experience. The fact is that it is very difficult to select a suitable workpiece, so “beats” and distortions are inevitable. It will be unsafe to work with such emery. You should not save on your health, especially since the cost of a master’s work will not exceed 500 rubles, and if the part is made from its own material, it will cost even less.
Another adapter diagram for making emery from a washing machine engine
Steps for creating emery from a washing machine engine with your own hands
For a homemade device, a belt-driven motor is useful.
All that remains is to assemble the device correctly. After installing the flange, put the nut and washer on the shaft, then a large emery wheel, and then the nut and washer again.
Motor connection
How to connect the motor from an automatic washing machine:
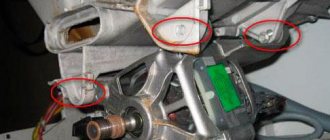
- Using a multimeter tester, look for the tachogenerator wires that show a resistance of 70 ohms (usually they are white). We will not use them.
- There are four wires left. Using a multimeter, you need to identify paired wires.
- Connect the wires leading to the stator and to the electric brushes. The remaining wires need to be connected to a wire and a plug at the end, and then connected to the network.
- Connections must be insulated.
Immediately after connection, the motor for home emery will start working, and you will be able to evaluate the functionality of the device.
Connecting the electric motor of Soviet-made washing machines differs from the previous version.
- Here you will find only 4 wires. We need to find pairs.
- Take a multimeter and measure the readings of each wire. You need paired wires with lower resistance that go to the working winding.
- Connect these wires to a plug and connect to the network.
- Now we need to make a trigger element. You can use any button, for example, a door lock. Connect one wire coming from the button to the starting wire (PO), and the other to the working wire (OB).
The motor is now connected. But before starting work, you need to thoroughly secure the machine to avoid an emergency.
Where to start making?
Homemade emery can be made at home, since there are quite a lot of recyclable washing machines. At any scrap metal collection center there will always be a dozen used household appliances. Engines rarely fail; more often, leaks occur or electronics break down.
The electronic boards used are comparable in cost to the machine itself. Therefore, after replacing the boards two or three times, users get rid of the device. They believe that it is better to buy a new one for regular use, and the old one is sent to a landfill.
For a nominal fee, it is not difficult to become the owner of several washing machine motors. If necessary, you can check them on site. You will need:
- a small piece of wire with a plug;
- some insulating tape;
- pliers;
- knife for stripping ends;
- switch.
Attention! The design provides for the use of an asynchronous motor. It is turned on using capacitors. Therefore, when removing the electric motor, you also need to remove the capacitors. Their connection diagram is indicated on the engines.
How to set up an emery machine and make a protection
How to secure the sanding machine and put protection on it? You can screw it to a workbench.
To do this, use the bracket that is in the washing machine. To reduce vibration during operation, rubber gaskets are placed on the corner, which can be made from a piece of hose.
If the device is installed on a wooden workbench, cover it with a sheet of metal on top to prevent fire.
For your own protection while using the machine, install a metal arc over the disk. You can also enhance the protection by attaching 5 mm thick plexiglass to the pendants. The glass can be raised and lowered using hangers.
Making a sharpening machine yourself is not difficult. The main thing is to secure it and connect it correctly. Also follow safety rules when working, use safety glasses and special clothing.
How to choose a motor for a sharpener
It is advisable to assemble some tools with your own hands. Most home DIYers know that an electric sharpener is too expensive. Therefore, craftsmen independently assemble this product from a frame with an electric motor, but choosing the right power plant is too difficult. This is worth doing for the following reasons:
- Models offered on the market disproportionately increase their cost as power increases. Usually, almost the most powerful modification is required, but it simply costs unrealistic money.
- The product has too many unnecessary accessories that increase the price significantly. These are various curtains for the button, protection that interferes with operation and a beautiful casing for the engine, which, to be honest, is completely unnecessary.
- There are often gaps in product lines. You need some power with the ability to hook a variety of circles, but the manufacturer does not offer what you need.
All these troubles can be removed if you select the engine yourself. This is not difficult to do if you have certain skills. Now you can quickly create a high-quality product, but for this you will need to apply a little intelligence and your own working hands.
What qualities should a sharpening engine have?
We do not take into account the possibility of modifying certain elements, because all this can be too dangerous. Try to choose a model that has the following characteristics:
- It is advisable to have an independent shutdown when jammed. This will avoid burnt brushes and self-starting after the work is completed. All this is fraught with unpleasant consequences.
- The engine must be protected from dust or be insensitive to it. Moreover, in most cases this dust is an excellent conductor of electric current. You can simply get burnt windings literally out of the blue. This fate often awaits craftsmen who try to adapt a household power plant from a washing machine or vacuum cleaner to their small industrial needs.
- There is no need to take a model with too many revolutions. Torque is important to you. Nowadays, defective sharpening stones are not uncommon. Centrifugal force can tear them apart, and the pieces fly with enormous force in different directions. Usually 1500–2000 per minute is enough; you can also set it to smooth adjustment to provide solutions to various types of problems.
- The motor shaft must be suitable for clamping the wheels. It will have to cut a thread for a bolt and a pressure washer. The direction of twisting must coincide with the direction of the circular movement, otherwise the circles will fall off all the time. The shaft must also allow holes to be drilled. Some models already provide this by default.
- If we talk about power, then 2 kW will be enough for almost any task. Don't forget that a circle has the ability to maintain momentum. You can compare it to a kind of flywheel that constantly helps maintain the moment of inertia. Moreover, the heavier the circle, the greater the impact it will have on the part being turned. The most important thing is that the engine has power reserves. The proposed option is optimal for turning blanks of knives and garden tools.
- Try to choose a model with a good support heel. This will allow you to correctly attach the product to the workbench tabletop or intermediate spacer made of PCB. When fastening, it is advisable to use spring washers to prevent unwinding. Some experts recommend pre-coating the threads with a special varnish. You can even install welding points, because the grinding machine is usually installed in one place for life.
Bushing (flange)
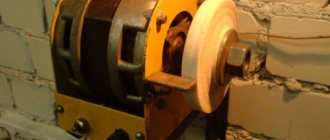
The bushing for seating the whetstone is the most complex component of our device. This sleeve is also called a flange
.
What is a flange? This is a piece of metal pipe, the inner diameter of which ideally fits the electric motor shaft and is securely fixed to it. The outer diameter of the flange must coincide (with small errors) with the mounting diameter of the grinding disc. A thread is cut along the outer diameter to secure the disk; the thread must be opposite to the direction of rotation of the shaft
. In other words, if the motor shaft rotates clockwise, then the threads must be left-handed. And vice versa, if the shaft rotates counterclockwise, then the thread on the sleeve should be right-handed, normal. That is why, just above, I advised connecting the motor with counterclockwise rotation.
If the electric motor has a fixed direction of rotation (old style) in the clockwise direction, then you will have to look for a lever for a left-hand thread. The fact is that if the directions of the thread and the rotation of the shaft coincide, then the probability of unwinding while moving is very high - the sharpening stone can easily fly off during work and injure others.
The best option would be to contact a turner you know and order the production of this bushing. Usually, a turner just needs to bring a pulley from the engine and tell him the mounting diameter of the grindstone. Most modern stones have an internal diameter of 32 mm. But it’s not for nothing that our web resource is replete with the motto “do it yourself” and it is quite possible to make a flange yourself. Of course, the quality will be worse than from a professional turner, but this does not require special skills or special tools.
You can also buy a suitable bushing from the Chinese.
So, the base will be a metal pipe “1/2” - a half-inch water pipe. According to GOST 3262-75, the internal diameter of this pipe is 15 mm, the external diameter is 21.3 mm. The outer one fits well with the mounting diameter of the grinder disc (22 mm), it may well come in handy. But the most important thing is that this diameter is well suited for a 32 mm nozzle, but more on that below. The inner diameter is 15 mm. does not fit any motor shaft and this discrepancy will have to be eliminated.
If the shaft rotates counterclockwise, you can use a plumbing pipe with a “1/2” thread as a pipe. If it is not possible to control the direction of the shaft and it rotates clockwise, then the thread will have to be cut independently using a left-hand thread tool. In any case, it is advisable to select a piece of pipe without a seam - a seam on the outside will not create any special problems, but thickening from the inside of the pipe will contribute to beating during rotation.
A piece of threaded pipe must be cut to the required length so that the thread is on one side. The inner edges need to be processed with a round file. When choosing the length of the future flange, you need to try to make it as short as possible, but so that all the components fit on it. It is worth taking into account the fixation bolt - there may be a recess or a cut edge on the shaft; the bolt on the sleeve in this place should not interfere with other parts.
As mentioned, the thread is only needed on one side of the sleeve, but the sharpening stone needs to hold something on the opposite side. A short piece of 32 mm polypropylene pipe is well suited for this purpose. must be marked SDR 6.0 (internal diameter 21.2 mm). A section of 1.5-2 cm must be cut as evenly as possible - this determines whether the stone will make figure eights during rotation.
A piece of PPR pipe needs to be placed on a metal bend so that there is a little less than a centimeter left before the thread - this is the place for the cleaning disc for the grinder. It will not be so easy to fit a plastic pipe onto a metal one. To do this, you need, firstly, to arm yourself with some kind of tube with a diameter larger than that of a metal pipe and smaller than that of a plastic piece - with this tube you can stuff a PPR pipe into a pipe. Secondly, the squeegee needs to be heated, for example on a stove, to a temperature that causes the water to hiss. A piece of PPR is hammered onto the hot pipe.
To securely fix the flange on the shaft, you need to drill a hole for the locking bolt. Naturally, the space for the bolt depends on the location of the recess on the shaft. It’s good when the location of the hole coincides with the mounted PPR pipe - there will be additional fixation. Perhaps there will be no space on the shaft at all for the fixation bolt, then this place is chosen arbitrarily and you need to try to drill the shaft a little directly through the bushing so that the bolt enters the hole a few millimeters. The flange itself is threaded for the bolt. To avoid cutting the thread, you can use a thick self-tapping screw with a fine thread pitch. Having cut the thread, the bolt or self-tapping screw is cut to the required length - so that it rests securely on the motor shaft, but also does not stick out too much from the sleeve.
Read also: Automat with protection against zero loss
Now it’s time to fit the bushing onto the motor shaft. The problem is that usually the shafts of electric motors from washing machines made in the USSR were produced in two diameters: 11 mm. and 14 mm. and these figures had quite large errors in the form of tenths of a millimeter. For example, in the photo in this publication the engine has an 11.9 mm shaft. Therefore, you need to look for a way to increase the shaft diameter to 15 mm.
In the case of a shaft with a diameter of ≈11 mm, a convenient solution would be a piece of 16 mm metal-plastic pipe. – the outer diameter can be sharpened directly on the motor shaft to 15 mm. And plastic generally fits well mechanically - the excess is simply crushed by a metal pipe. The internal diameter of the metal-plastic is about 12 mm. – if the shaft is thicker, then the pipe tends to stretch; if the shaft is too small (which is unlikely), then the additional thickness is achieved with one layer of electrical tape or heat-shrinkable tubing. A piece of metal-plastic pipe needs to be “pulled” onto the shaft with force, or rather even driven in - this is the result that needs to be achieved. We must not forget about the recess on the shaft for the fixing bolt and find a way to mark this point on top of the metal-plastic.
When the MP piece sits securely on the shaft, you can turn on the engine and lightly grind the surface. This is an important point: you must not remove excess - the metal strip must be hammered with force over the MP. When installing a steel pipe, you must not lose the place where it is fixed with a bolt, and align the hole on the sleeve with the recess on the shaft. When the hole and recess are aligned, the MP pipe must be drilled to the motor shaft directly through the hole in the flange. When pushing the bushing onto the shaft, in order not to break the thread, you need to screw a nut onto it. When the flange is mounted, fix it with a bolt (or self-tapping screw). With the engine running, we evaluate the presence of beats and the quality of alignment. The beating of the bushing is not as bad as the “reconciliation” of the PPR segment - you can straighten it with a file right on the go.
In the case of a shaft with a diameter of ≈14 mm, only about 1 mm needs to be filled. – this can be achieved with several layers of heat-shrinkable tubing, preferably adhesive.
Once the bushing is attached to the motor, the hardest part is over. All that remains is to make an attachment for the “32nd” stone, put on the washers and screw on the nut. The nozzle is made from the same 32 mm PPR pipe, with the difference that it will have to be “combed” a little from the inside to fit freely onto the sleeve. The M20 reinforced washer fits perfectly as washers
. I couldn't find anything better for the nut than a plumber's locknut. A regular M20 nut is too wide and inappropriate.
When test-running the entire assembly, you should pay attention to the runouts and “eights” of the stone, and not the washers and nuts - locknuts are rather crooked products, washers have a slight play on the inner diameter. Small beatings of the stone are eliminated by simply sharpening it, and figure eights are corrected by aligning the PPR segment, which acts as a stop.
How to make homemade emery for your own workshop
Often a situation arises when it is necessary to sharpen a tool or sharpen knives. To perform these works, a sharpening machine is best suited - it is also called a sharpener or an emery machine. This is the simplest power tool, which consists of an electric motor and an abrasive wheel. There are many options sold in the retail chain, which differ from each other in price and manufacturer, but are designed to perform one function - sharpening a cutting tool. Do not rush to purchase a factory-made electric sharpener: any home craftsman can make it with his own hands if he has the necessary spare parts.
How to Eliminate Car Noises in Under 20 Minutes
There are many moving parts that work with each other in every situation while operating a vehicle. These parts are machined and designed to slide or roll easily while working together, but when things break or wear out, they can cause grinding noise. Once you have discovered sanding noise, you need to determine the cause in order to begin the repair process. Also, take note when you hear a noise when the car is cold or hot, and if any action causes the noise, such as applying the brakes or turning on the ignition key. When the sound is detected, action must be taken immediately to prevent further damage.
Causes of noise during grinding
Let's start!
We have listed the most common grinding noise problem in order of popularity. The following instructions provide step by step instructions, your vehicle may be slightly different, but the procedures are similar in most cases. For specific directions, please ask one of our experts for instructions from an AllData or Mitchell1 repair manual.
Questions?
Our team of certified mechanics is available to answer your questions free of charge.
Article published 2020-03-25
Selection of electric motor
To make emery yourself, you first need to select a suitable electric motor. Most often this is a motor from an old-style washing machine, for example, Malyutka - it is perfectly suitable for this purpose . Such a motor meets certain requirements: its power is in the range of 100-200 W, and the speed does not exceed 1500 rpm. If the rotation speed is higher, there is a risk of destruction of the abrasive wheel.
High engine speeds are needed for polishing parts, but they are not suitable for sharpening.
To make homemade emery, you can use any other electric motor. It must meet certain parameters.
- Shaft rotation should be minimal. Motors with no more than 1,000 rpm are best suited.
- The motor power should be between 100 W and 1 kW. The most commonly used motors are 400 W motors.
- It is desirable that it has legs for fastening.
- A single-phase or asynchronous motor, designed to be connected to a 220-volt network, is best suited.
Adapter for electric motor shaft from a bolt
It is advisable to wrap the threads of the bolt attachments with electrical tape so as not to damage them when clamped in the socket. Try to choose a drill as close as possible to the diameter of the shaft so that the bolt fits tightly and the runout is minimal. To fix the adapter so that it does not rotate, we drill a side hole and cut a thread of a suitable diameter.
The master took an old Soviet bolt, which has seen many nuts in its lifetime, but in terms of steel strength, not a single modern plasticine shiny twin can compare with it. I didn’t clean it of rust, but only renewed the carvings for the veteran. Modern metal is very soft and a nozzle made from it will not last long, so a real master in his workshop has a jar or basin with similar wealth of different sizes.
Algorithm for assembling emery from a Malyutka washing machine motor
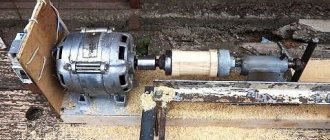
First of all, we make the frame of the future mechanism. It can be made from a thick wooden board, wood slab, suitable plastic, but a thick metal slab is best. The electric motor is attached to it using brackets, corners or clamps. The connection between the electric motor and the stone occurs via a flange.
Making a flange is one of the technically difficult operations when assembling homemade emery. It is usually done using a lathe. To do this, it is necessary to measure the diameter of the output shaft and the abrasive wheel that will be used in the sharpening machine. However, if you don’t have a lathe at hand, you can do without it. In the video below you can see how to make an emery flange from scrap material yourself:
The flange is secured to the shaft using a nut, bolt and washer. In this case, it is necessary to take into account the direction of rotation of the shaft: the thread on the nut should be in the opposite direction.
This is done for safety reasons so that during operation the nut does not unwind under the influence of vibration of the machine, which can cause the abrasive wheel to fly off and cause injury.
Finally, all that remains is to mount the electric sharpener in a permanent place and supply electricity. The emery from the Malyutka engine is ready.
In the case of using an engine removed from an automatic washing machine, you can make a sharpening machine in a similar way, the only difference is in connecting the electricity . The motor from an ordinary washing machine has four wires: two are connected to the working winding, and the other two are connected to the starting winding. To determine the working winding, it is enough to measure the resistance of both. The resistance of the starting winding is 30 Ohms, and the working winding has only 12 Ohms. The engines of modern cars have six terminals, two of which are the output of a tachometer with a resistance of 70 Ohms. Finding them won't be difficult. These wires must be insulated.
The connection diagram is as follows: both windings are connected in parallel and connected to the network, and a button is connected to the gap in the starting winding. To do this, you can take a starter or adapt a button from a doorbell.
Connecting (checking) the motor
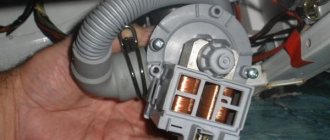
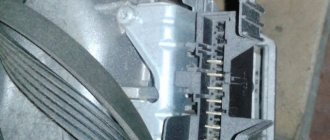
Naturally, before you start assembling something, the electric motor must first be connected and tested. In old washing machines, there are two versions of motors: an older and high-quality one, it has a closed housing with an impeller, with two supply terminals, and a newer one - four terminals, no impeller, cooling occurs through holes in the front and back, through which the windings are visible.
Read also: DIY furniture jig, drawings with dimensions
The old version does not require any capacitors for starting - the starting winding is cleverly connected and disconnected inside the engine using a special mechanism. Thanks to this, no connection difficulties should arise: both outputs are connected to a 220 volt network. The disadvantage of such a motor is that the direction of rotation of the shaft is preset by an internal connection and cannot be changed. Typically the direction is clockwise and therefore it will be necessary to use a left hand thread to attach the stone.
The newer version has four terminals of two windings: working and starting. You can distinguish them using a multimeter: the resistance of the working winding is about 10 Ohms, the starting winding is about 40 Ohms. Perhaps the resistances will differ from those indicated, but only slightly. The starting winding must be connected through a 4-5 µF capacitor for a voltage of at least 400 V. I have come across composite capacitors for similar motors: two connected in series, 10 µF each at 300 V. That is, in this way the maximum permissible operating voltage of the finished capacitor was raised. Using a composite capacitor of two with low voltages (at least 300 V) is possible, but not advisable. Capacitors should be non-polar!
You can check the engine without capacitors and starting winding at all: voltage 220 V. supplied directly to the working winding. With this connection, the motor will start without load in any direction. To set the direction of shaft rotation, you need to connect the starting winding and capacitor. For emery, you need to set the direction counterclockwise
. The connection diagram is shown below, if the shaft rotates clockwise, you need to change the connection of the starting winding.
In many publications on the network I have seen a statement that the starting windings do not need to be connected at all, and the direction of rotation must be set manually when starting. Allegedly, if the starting circuit is used, the engine will burn out. I can only explain these speculations in one way - one wrote something stupid, and the rest were copied from the first. I can say with confidence: the starting winding can and should be connected through a 4-5 uF capacitor, the starting circuit should always be connected, without any additional buttons. And if the motor is working properly, such a connection is safe and completely harmless for it.
How to adapt a drill and grinder to an electric sharpener
You can make emery not only from a suitable electric motor available. You can use a power tool for this - it could be an electric drill or a screwdriver.
The latter is less suitable for these purposes: it has insufficient power and a short battery life.
Making a sharpener from a drill begins with purchasing an attachment.
The sharpening stone is secured in it and then clamped into the chuck. All that remains is to secure it to a stationary base using a special mount, which can be purchased at a store that sells power tools. With the help of such an electric sharpener you can straighten an ax, sharpen a kitchen knife or thread a drill.
In case of emergency, a sharpener can be made from a grinder. To do this, you do not need to purchase special devices and mandrels necessary for attaching the emery. You just need to secure it in a horizontal position on a massive base, install a standard cutting or sharpening disk, and the sharpener is ready for use.
Mini sharpening machine
An electric sharpener is sometimes necessary if the master is engaged in modeling: during work it is often necessary to sharpen small parts. A large sharpener is not suitable for doing small work, so they often make mini-emery with their own hands. The assembly algorithm is as follows:
- take the motor from a computer hard drive or a children's toy;
- the tension sleeve of the spoke from the moped is soldered to the engine axis;
- a small grinding wheel is screwed to the shaft with a screw and washer;
- connect the power supply;
- fix the device on the bed, and the emery is ready.
Often, electric motors from a faulty sewing machine are used for these purposes. The advantage of this machine is that the motor has a speed controller, and this expands the capabilities of the device. It can also be successfully used as a polishing machine.
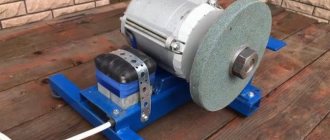
What to do after making the necessary parts?
Once all the necessary components are ready, begin assembling the emery. An adapter, a grinding wheel, a flange are put on the shaft, a nut is screwed on and the whole thing is secured with a bolt. The appearance of such a homemade emery is shown in Fig. 1. To connect to the network, you may need a long two-core wire and an electrical plug.
If the direction of rotation of the motor shaft needs to be changed, this is done by switching the corresponding windings of the asynchronous motor from the washing machine. If necessary, you can contact a familiar electrician to do this.
If the motor has 4 ends, then this will be quite simple: just identify the windings with a tester and change the ends on one of them.
When working with this device, you must follow safety precautions and wear safety glasses, etc.
Materials and tools for making emery with your own hands:
- Grinding and polishing wheels.
- Electric motor from an old washing machine.
- Cylindrical rod made of tool steel.
- Sheet round timber for flange and nut (metal).
- Bolt.
- Lathe.
- Electrical cable and plug.
- Vise.
- Tap.
- Calipers.
- Paper and pencil.
Making an emery tool for home projects is quite simple. The main thing is to take into account all the above recommendations. The homemade machine is so simple that it starts working right away. You can sharpen drills, knives and scissors at any time.
Safety precautions when working with a homemade device
When making power tools yourself, you should strictly follow safety precautions. If industrial units are equipped with protective equipment, then in home-made devices you will have to make them yourself. You should be aware that operating a sharpener from a washing machine engine without a protective casing is prohibited. It can be made from sheet metal 2.5 mm thick.
The working wheel experiences strong vibration during sharpening. To prevent the sandpaper from being destroyed during work, when installing the stone, cardboard spacers are placed under the metal washers. You should also make sure that the disc has no cracks.
While working, you should stand to the side of the circle so that if it breaks, the fragments do not fly towards the operator.
Do-it-yourself sharpening device: how to assemble emery from a washing machine motor
An old washing machine is an excellent material for constructing a large number of useful household appliances. From different parts of the unit you can make a barbecue, a smokehouse, a sterilizer for preservation, a grinding wheel and even a concrete mixer. Quite often, owners of Soviet-style washing machines assemble a sharpening device or emery from the engine. This is not difficult if the motor is in good working order, you have thought through the method of attaching the emery wheel to the shaft, and you have prepared all the auxiliary parts, tools and fasteners.
Sharpening device from a washing machine: selecting a motor for emery
In terms of its power and configuration, the electric motor from old-style washing machines is ideal for portable homemade emery. As a rule, motors from units such as Siberia, Volga or Vyatka are used for this purpose. Approximate characteristics should be:
- mains voltage - 220 V;
- power - up to 370 W;
- rotation speed - no more than 3 thousand rpm.
Attention! If you construct an emery from a more powerful engine, a significant number of revolutions can simply break the whetstone during operation.
The parameters of the engine are necessarily indicated on its body. To make emery, a device with a power of 100-150 W and 1-1.5 thousand rpm is sufficient. It will cope well with household sharpening of repair equipment and kitchen utensils.
Old engine
A faster grinder (for example, an emery machine based on common engines with 2.8 thousand rpm) is appropriate to use for grinding or polishing parts. In this case, the emery stone should be stronger, and the main fastening element, the flange, should be of better quality and stronger.
Assembling emery from a washing machine motor
The process of assembling the base of the future sharpening device takes place in a vice. After almost every action, fitting and adjustment are required so that in the future the device works without failures. When assembling the emery, you can rely on supporting photos and video instructions.
- Make a drawing based on the basic parameter - the dimensions of the engine. Consider the dimensions of the support and frame.
- Make a pattern of elements of supporting and fastening structures.
- Transfer the outlines to the metal corner. Cut out the parts using a grinder.
- Make a sandpaper support frame. Fix the rectangular-section corrugated pipe blanks on the workbench with a clamp. Cut where needed using a grinder. In a pipe with a larger cross-sectional area, grooves must be cut along the edges in order to connect it to the side of the pipes with a smaller area.
- In the larger pipe, cut a window, which will be a technological hole for the capacitors. You need two of them. Connect the terminals of the parts together with parallel wiring.
- Insert the capacitors into the notch. If everything fits together perfectly, disassemble the structure and carefully sand all metal surfaces.
- Weld all elements of the emery structure to each other.
- Make a table on which the part will be placed during the turning process. Metal 3 mm thick will be strong enough for these purposes.
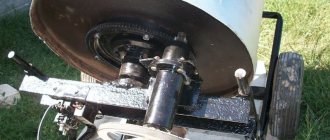
- Paint the bed. Secure the motor housing with the wheel to the machine, protecting it from sparks and scale. To do this, cut out a round casing from galvanized sheet metal.
The work is completed by assembling the electrical circuit and connecting it with capacitors. This is the easiest way to assemble emery from a washing machine motor yourself. The tool turns out to be reliable. If used correctly, it will serve you for more than one year.
Base
The frame on which the engine will be mounted does not require any special material costs, but this does not make it any less significant. The base must be well thought out, since making emery is not an end in itself; you still have to work on it. At the same time, all attention should be focused on sharpening the tool, and not on holding the motor jumping all over the workbench with your hand. Working like this is, at the very least, inconvenient, and in this case there is no talk of compliance with safety regulations at all.
Therefore, the base of the emery should be heavy enough, and most importantly, allow the motor to be fixed in the same way as it was fixed to the washing machine. It is best, of course, to make the frame metal. True, you will have to use welding for this. If this is not possible, then you should take a suitable piece of chipboard and bolt metal corners onto it to mount the engine. Even better, remove the motor from the washing machine along with the standard bracket and screw it to the base. The main thing is to use bolts and nuts for this; self-tapping screws can become loose and unscrew due to vibration.
There is one more key point. The height of the motor mounting should not only allow the emery wheel to rotate freely, but also provide a gap of 4 - 5 cm between it and the base. After the motor is securely mounted on the frame, you need to think about the support table. It must be metal; welding can be replaced with a bolted connection. If the starting capacitor on the washing machine was moved outside the motor housing, you need to provide a place for it on the base of the sandpaper.
Once the motor is securely fastened to the frame and all auxiliary elements are installed, you can proceed to the electrical connections. But first you need to make sure that the grinding wheel is securely fastened to the motor shaft, as well as that there are no various beats.