Electricity is an expensive resource, and its environmental safety is questionable, because... Hydrocarbons are used to generate electricity. This depletes the mineral resources and poisons the environment. It turns out that you can power your home with wind energy. Agree, it would be nice to have a backup source of electricity, especially in areas where there are frequent power outages.
Conversion units are too expensive, but with some effort they can be assembled yourself. Let's try to figure out how to assemble a wind generator with your own hands from a washing machine.
Next, we will tell you what materials and tools you will need for the job. In the article you will find diagrams of a wind generator from a washing machine, expert advice on assembly and operation, as well as videos that clearly demonstrate the assembly of the device.
How can you turn a washing machine motor into a 220 V generator?
Receive one of the most read articles by email once a day. Join us on Facebook and VKontakte.
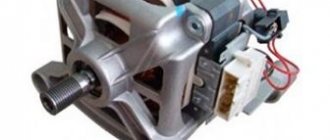
So, the washing machine engine has a classic commutator motor design. The device can operate on both direct and alternating current. Most motors have 6 pins on the connection block. The lowest pair is the rotor output. The middle pair is the stator winding. The upper pair is provided for the tachometer sensor. In order for the motor to start working, some force, a small voltage, must be applied to it.
The voltage on the motor will create a magnetic field, which in turn will create an EMF on the stator winding. All this means that wires can be connected to the rotor, which will subsequently transmit energy from the power source. A 12 V battery can be used as a source of energy for the motor. At the same time, to start the generator, if you turn it by hand.
This is the main problem. The washing machine motor is quite suitable for being used as a generator. However, (including) due to the lack of permanent magnets, it is impossible to stably create an EMF on it. Generating direct current requires high speeds, which can only be achieved manually. Therefore, it will be quite difficult to “attach” such a thing somewhere.
Comparing the pros and cons of installation
Wind generators have been used for many years, their designs are constantly being improved, and wind is an easily accessible source of energy.
Devices powered by it are absolutely safe for the environment and convenient, because... are located on masts and do not occupy useful space. They are easy to maintain and repair.
Due to the instability of wind generators, it is necessary to invent ways to provide homes with additional energy. A good option is a combination of wind and solar installations
Windmills make noise when operating. The sound may be louder or quieter, but it is always there. Sometimes this bothers home owners and even neighbors.
There are other inconveniences that can be noted. Wind is an unpredictable element, so the operation of generators is unstable and it is necessary to accumulate energy so as not to be left without electricity during periods of calm.
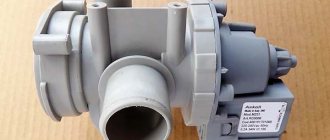
Homemade generator from a washing machine engine
Today we will talk about converting an asynchronous electric motor from a washing machine into a generator. In general, I have been interested in this issue for a long time, but there was no particular desire to remake the electric motor, since at that time I did not see the scope of application of the generator. Since the beginning of the year, work has been going on on a new model of ski lift. Having your own lift is a good thing, but skiing with music is much more fun, so I quickly came up with the idea of making such a generator so that in winter on the slope I could use it to charge the battery. I had three electric motors from the washing machine, and two of them were absolutely working. I decided to convert one of these asynchronous electric motors into a generator. Looking ahead a little, I will say that the idea is not mine and not new. I will only describe the process of converting an asynchronous electric motor into a generator.
The basis was taken from an electric motor of a washing machine with a power of 180 Watts produced in China in the early 90s of the last century.
I ordered the magnets from NPK Magnets and Systems LLC; I had previously purchased magnets during the construction of a wind power plant. Neodymium magnets, magnet size 20x10x5. The cost of 32 pieces of magnets with delivery is 1240 rubles.
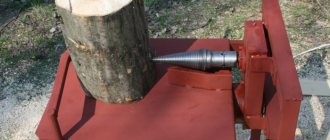
The alteration of the rotor consisted of removing the core layer (deepening). Neodymium magnets will be installed in the resulting recess. First, 2 mm of the core was removed on a lathe - the protrusion above the side cheeks. Then a 5 mm recess was made for the neodymium magnets. The result of the rotor modification can be seen in the photograph.
Having measured the circumference of the resulting rotor, the necessary calculations were made, after which a strip template was made from tin. Using a template, the rotor was divided into equal parts. Neodymium magnets will then be glued between the risks.
8 magnets were used per pole. There are a total of 4 poles on the rotor. Using a compass and marker, all magnets were labeled for convenience. The magnets were glued to the rotor with “Superglue”. I will say that this is a painstaking task. The magnets are very strong, I had to hold them tightly when gluing. There were times when magnets came off, pinched fingers, and glue flew into my eyes. Therefore, you need to use safety glasses when gluing magnets.
I decided to fill the cavity between the magnets with epoxy resin. To do this, the rotor with magnets was wrapped in several layers of paper. The paper is secured with tape. The ends are covered with plasticine for additional sealing. A hole is cut in the shell. A neck is made of plasticine around the hole. Epoxy resin was poured into the shell hole.
DIY windmill
Electricity problems do not only apply to remote regions that have never had a connection.
Worn-out and overloaded power grids cause failures, power surges or frequent outages even in suburban holiday or cottage communities. Everyone solves the problem in their own way; one of the options is to use a wind generator. This method of resolving the issue may turn out to be prohibitively expensive, since the prices for installations are high and there is no tendency to reduce costs. The way out is to make a windmill with your own hands . The result can surpass factory models in terms of performance or maintainability; the main condition will be experience and skills in using plumbing tools and some knowledge of electrical engineering.
A wind generator is a complex of equipment consisting of several units that perform their tasks. The main and most important of these is the generator, a device that produces electric current. How successfully the design of the generator is chosen, the entire installation as a whole will be effective.
How to choose and convert a washing machine engine into a generator
How to make a generator from an electric motor with your own hands? Not easy. You will need patience, as well as the ability to make some parts on a lathe.
From a conventional asynchronous motor of an automatic washing machine with a power of 170-180 W, it is possible to create a generator with a power of 1.5 kW. It is better to use the engine from the Vyatka washing machine and other Soviet-made models, since they are more powerful.
Tools and Parts
Also for work you will need:
- neodymium magnets of 20, 10 and 5 mm sizes – 32 pieces in total;
- rectifier;
- glue;
- lathe;
- sandpaper;
- cold welding;
- scissors;
- pliers, screwdrivers.
Work order
Magnets can be purchased either in specialized stores or on the Internet. If you don’t have a lathe at home, you can order the production of parts from a familiar craftsman.
- It is necessary to remake the rotor of an asynchronous motor so that magnets can be installed. To do this, the cores are removed, part of them is cut on a lathe to a depth of 2 mm.
- To install magnets, you need to make grooves in the core to a depth of 5 mm.
Core preparation is complete. Now you need to put the magnets in place. To do this, make a covering for the core from a piece of tin. This template must exactly match the located holes. Therefore, cut a piece exactly according to the diameter of the core, with holes in the right places.
Note! The magnets must be installed at equal distances from each other. Otherwise, during operation they will begin to stick together, causing the electric generator to lose power.
Installation of magnets and step-by-step assembly of the generator
Let's look at how to convert an engine into a homemade generator.
- Place the magnets on a strip of glued tin - at an equal distance. The magnets are also attached with superglue. It is important that they are all located level, without tilting. Since the magnets are strong and may come off during operation, wear safety glasses.
- Once the magnet template is positioned on the rotor, fill any gaps between them with cold welding. To do this, knead the mixture well and cover the entire space. You can also fill the space between the magnets with epoxy resin.
- Using sandpaper, sand the rotor surface until completely smooth. For convenience, you can clamp it in a vice.
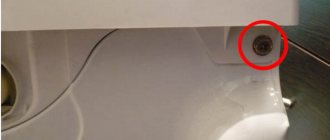
- Check the housing bolts and bearing, they may need to be replaced with new ones.
The remodeling work is completed. You have made a generator from a direct drive motor. You can start checking your homemade device.
Possible applications
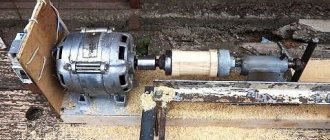
So, I managed to create a generator with my own hands. The savings in this case, according to the most conservative estimates, will be more than 4,000 rubles. After all, in the retail chain it costs from 6,000, and you will only spend money on purchasing magnets (1,200–1,400 rubles). The scope of use of the unit, which provides up to 2 kilowatts of power, depends on your imagination and desire. You can illuminate a country house by connecting it to the motor of a motorcycle or chainsaw.
Connect to a windmill or hydraulic turbine, creating a waterfall or fast stream on your site yourself. The benefit is undeniable!
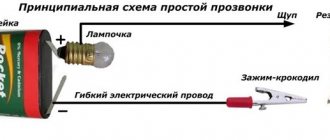
How to check the generator
What you will need to check:
Using a multimeter, find the two wires leading to the working winding; they should show the same resistance. We cut off the remaining wires as unnecessary.
Now connect the wires of the working winding to the rectifier. The latter is connected to the controller, which in turn is connected to the battery. To check how much power the generator produces, connect the leads of a multimeter (set in voltmeter mode) to the battery.
Using a drill or screwdriver, spin the electric generator at a speed of 800-1000 rpm. If the multimeter shows from 200 to 300 Volts, this is an excellent result. If the voltage is low, the magnets are most likely not installed evenly.
Testing
The current generated by a generator made from a brushed motor is supplied to the battery. It is connected to the charge controller and module. By using an inverter, the DC voltage from the grid is converted into AC voltage to power household appliances. To find out if your product provides the required 220 volts and 50 hertz, you need to conduct a test.
You need:
- battery;
- rectifier;
- controller;
- tester.
Using an ampere-voltmeter, test the terminals of the motor winding and find the two that are active after the alteration. Cut off the old ones.
Connect the found contacts to the controller via a rectifier. And the last one is with the battery terminals.
Connect the drill to the rotor with an adapter and turn it on at 1000 rpm. Measure the voltage at the battery input with a tester. If everything is done and assembled correctly, it will be the desired one - 220 Volts.
Important! Observe the winding for sticking. If it is high, the generator power will be low.
Use Cases
Now you have a generator, what next?
- By installing a generator to a chainsaw, you can get a small power station. Its energy is enough to illuminate 2 small rooms, operate a computer and TV.
- Connect to a water turbine, which can be installed in a home waterfall or fast stream.
Or you can install a wind generator to generate mechanical energy, which can be converted into electrical energy. You can use a generator from an asynchronous or commutator motor. This is a safe alternative power source that starts in winds of 2-3 m/s. Maximum efficiency can be obtained at 9-10 m/s.
However, for home consumption a wind force of 4 m/s will be sufficient, then you will get:
- At 0.15-0.20 kW you can illuminate rooms and watch TV.
- At 1-5 kW, connect a computer, washing machine, refrigerator.
- At 20 kW even start the heating.
It is recommended to install a windmill with three blades; it is considered the most efficient. For installation you will need a strong iron rod - it will serve as a support. A generator, rotor and blades are installed on it. It is also necessary to provide a protective casing for the generator from bad weather.
The moving part of the windmill is mounted on hinges. Then the mast is attached so that the entire structure is stable. A wire is laid along the mast to the generator, the other end is attached to the shield. After which the controller, battery and inverter are connected.
Read more about how to make a wind generator from a washing machine in the following article.
Source
Types of wind generators and their operating principles
Both industrial and homemade wind generators are different.
They are classified according to several criteria:
- Features of rotation of the rotor with blades attached to it - vertical or horizontal. The former react less to negative environmental factors, while the latter are characterized by higher efficiency.
- Number of blades. Three-blade installations are considered the most practical, but there may be more or fewer blades.
- Material . For the manufacture of blades, various materials are used - hard or sailing. The former are usually more durable, while the latter are cheaper.
- Blade pitch . It can be fixed or changeable.
When making a wind generator with your own hands, you have to decide on the design yourself. In this case, it is necessary to calculate the required power and take into account the operating conditions of the installation. We discussed the detailed calculation of a wind generator using formulas in this article.
The easiest way to make a horizontal wind generator. People without much experience choose just such a design, but some craftsmen prefer to put effort into making a low-noise and efficient vertical installation
Horizontal windmills are convenient because their creation does not require high-precision calculations; the design itself is easier to manufacture and starts at the slightest wind. Cons: loud noise during operation and bulkiness.
A vertical wind generator is suitable for people who are willing to spend time and effort on assembling and maintaining a complex but compact design. We recommend watching the step-by-step instructions for making a vertical wind generator with your own hands.
The converting devices of the wind generator transform the electric current, which leads to large energy losses. Depending on the characteristics of the devices, these losses can reach 15-20%
A wind generator operates by rotating blades attached to a rotor. The rotor itself is fixed on the generator shaft, which generates electric current. The energy is transferred to batteries. Here it accumulates and powers household electrical appliances.
The wind turbine is equipped with a controller that converts three-phase alternating current into direct current and controls battery charging. The installation diagram must take into account that an inverter must be connected after the battery.
Wind wheel
The blades are perhaps the most important part of a wind generator. The operation of the remaining components of the device will depend on the design. They are made from different materials. Even from a plastic sewer pipe. Pipe blades are easy to manufacture, inexpensive and not susceptible to moisture. The procedure for manufacturing a wind wheel is as follows:
- It is necessary to calculate the length of the blade. The diameter of the pipe should be equal to 1/5 of the total footage. For example, if the blade is one meter long, then a pipe with a diameter of 20 cm will do.
- Using a jigsaw, cut the pipe lengthwise into 4 parts.
- From one part we make a wing, which will serve as a template for cutting out subsequent blades.
- We smooth out burrs on the edges with abrasive.
- The blades are fixed to an aluminum disk with welded strips for fastening.
- Next, the generator is screwed to this disk.
Blades for the wind wheel
After assembly, the wind wheel needs balancing. It is mounted horizontally on a tripod. The operation is carried out in a room closed from the wind. If the balancing is carried out correctly, the wheel should not move. If the blades rotate on their own, then they need to be sharpened until the entire structure is balanced.
Only after successful completion of this procedure should you proceed to checking the accuracy of rotation of the blades; they should rotate in the same plane without distortion. Please allow 2mm error.
Generator assembly diagram
Connection
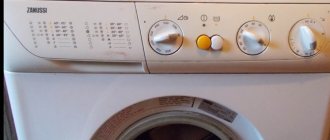
To connect the motor to a 220-volt network, you need to have a tester on hand: it will help us break the wires into pairs
and also measure the resistance in the windings.
Before connecting new models, you need to determine using a tester the wires that come out of the tachogenerator
and we will not need them during work. Finding them is quite easy - just measure their resistance: it should be about 70 Ohms.
Using the same device, we find pairs of other contacts. Now we connect one of the brushes to one of the wires,
and connect the second brush and another wire to the winding outputs. After connecting the motor from the washing machine to the network, the device will begin to rotate. To change the direction of rotation, just swap the brushes.
With older models, the situation is a little different: after determining the paired outputs, you need to determine the working and exciting windings
. The first has more resistance than the second.
We figured out how to connect the motor from an automatic washing machine to the network. Now let's see what machines and devices you can create yourself using it.
DIY assembly features
In addition to the generator, other elements will be required for installation:
- impeller
- mast
- rotation unit around a vertical axis for adjustment to the wind
These units are made from scrap materials available to the craftsman. To manufacture some of them, some technical base will be required (for example, a rotation unit around a vertical axis is best ordered from a turner). The impeller and hub are usually assembled independently, using an orange external sewer pipe of 16. Templates for making the blades are available on the Internet, so there is no need to dwell on this issue separately.
The height of the mast should ensure maximum efficiency in using the wind flow . For installation, it is recommended to choose a place on an elevation - a hill, a hillock or a suitable structure. You must first clarify whether there are any restrictions on the height of masts in a given region in order to avoid penalties.
Winding the reel
Having chosen a not very high-speed option, charging the 12V battery begins at 100-150 rpm. The number of turns for this should correspond to 1000-1200. Dividing the turns into all coils, we get their number for one.
If a large cross-section wire is used for turns, the resistance decreases and the current increases.
The characteristics of wind generators assembled by yourself are influenced by the thickness of the magnets on the disk and their number.
Coils, as a rule, are made in a round shape, but by slightly stretching them, you will be able to straighten the turns. When finished, the coils should be equal to or slightly larger than the magnets. The thickness of the stator should also correlate with the magnets.
If the latter is larger due to more turns, the space between the disks increases and the magnetic flux decreases.
But greater resistance of the coils will lead to a decrease in current. Plywood is suitable for the stator shape. To increase the strength of the product, fiberglass is placed on top of the coils (at the bottom of the mold). Before applying epoxy resin, the mold is treated with Vaseline or wax, or tape is used.
The generator is tested by turning it by hand. For a voltage of 40V, the current reaches 10 A.