Often a situation arises when it is necessary to sharpen a tool or sharpen knives. To perform these works, a sharpening machine is best suited - it is also called a sharpener or an emery machine. This is the simplest power tool, which consists of an electric motor and an abrasive wheel. There are many options sold in the retail chain, which differ from each other in price and manufacturer, but are designed to perform one function - sharpening a cutting tool. Do not rush to purchase a factory-made electric sharpener: any home craftsman can make it with his own hands if he has the necessary spare parts.
Where to start making?
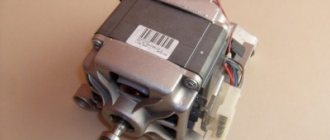
Homemade emery can be made at home, since there are quite a lot of recyclable washing machines.
At any scrap metal collection center there will always be a dozen used household appliances. Engines rarely fail; more often, leaks occur or electronics break down. The electronic boards used are comparable in cost to the machine itself. Therefore, after replacing the boards two or three times, users get rid of the device. They believe that it is better to buy a new one for regular use, and the old one is sent to a landfill.
For a nominal fee, it is not difficult to become the owner of several washing machine motors. If necessary, you can check them on site. You will need:
- a small piece of wire with a plug;
- some insulating tape;
- pliers;
- knife for stripping ends;
- switch.
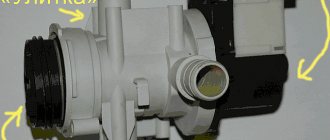
Attention! The design provides for the use of an asynchronous motor. It is turned on using capacitors. Therefore, when removing the electric motor, you also need to remove the capacitors. Their connection diagram is indicated on the engines.
Making a support and auxiliary table
The tool requires a support frame. To make it you will need a large pipe and an angle grinder. Manufacturing process:
- Following the drawing, a groove is cut out on the pipe for installing the capacitor. To do this, use an angle grinder. The groove is made on the rectangular section of the pipe from the wide edge.
- To fix the electric motor, small holes are cut out in the corners of the part.
Then the prepared corners and pipe blanks are welded using a welding machine. This creates a frame.- The required number of holes are drilled in the frame to install the engine. An electric drill is used for this.
- In order for the table to move to the desired position, two grooves are cut on the surface of one metal plate. The grooves are drilled with an electric drill. Their shape should be longitudinal. In this case, there is no need to make grooves in the second plate, which will be on top.
- A square pipe and 2 metal plates are welded using a welding machine. It turns out to be a table.
- The table and frame are connected by bolting.
- All irregularities and rough places on the structure are cleaned. A metal brush is attached to the grinder and grinding is carried out.
- All metal elements of the structure are coated with paint.
For stability, rubber shock absorbers are installed on the bottom side of the frame. They are fixed with self-tapping screws. The switch is attached to the structure according to the electrical diagram.
Rotary table for grinder
For accurate and uniform grinding, the part must be rigidly fixed in relation to the moving abrasive belt. Therefore, any grinder includes a rotating support table (or, as turners call it, a “handle”).
Usually this is a flat metal plate 15÷30 cm long, 5÷10 cm wide and 5÷10 mm thick. The table should have a recess at the end to fit the width of the belt, an adjustable tilt towards the grinding plane, and also move back and forth and up and down.
Some support tables have the ability to rotate 90 degrees to the right and left, but the master must decide how necessary this option is. Moreover, its implementation on home workshop equipment can be quite complicated.
In foreign videos, craftsmen widely use rectangular pipes and various shaped profiles to make homemade grinders. This simplifies both the design and manufacture of the machine. Our craftsmen use such materials much less often: they mainly use channel, strip and corner.
Of course, you can refer to the difference in price, but the grinder requires very little metal, so this explanation is questionable.
Adapter
This is the only detail that cannot be made by hand. You will need a lathe and, accordingly, a person who knows how to work on it. What is the adapter for? The fact is that the size of the motor shaft is about 14mm, while the mounting hole
The emery circle usually has a diameter of 32 mm. This means that their “direct” connection is absolutely excluded. The adapter seems to increase the washing machine motor shaft to the required size.
To make it, you will need a piece of round steel, approximately 65 mm long. and diameter 60 mm. The last figure is due to the need for the so-called flange - a fixed washer on the body of the part, into which a circle of emery rests on one side. Its thickness must be at least 4 mm. A seat with a diameter of 32 mm is machined in front of the flange. Next comes the “M20” thread, onto which the nut that secures the circle will be screwed.
For mounting on the engine, a hole is made in the adapter body with a diameter equal to the shaft. Then everything depends on how the pulley was fixed on the washing machine. There were two main options:
- Using a thread on the motor shaft and a large nut.
- Bolt 4, screwed into the adapter body, perpendicular to the longitudinal axis of the motor.
The part being manufactured must have one of the following mounting methods, depending on the type of engine.
Sometimes, home craftsmen try to minimize costs and make an adapter with a flange themselves. Most often, a pipe with suitable internal and external diameters is used as a base. You shouldn't do this without proper experience. The fact is that it is very difficult to select a suitable workpiece, so “beats” and distortions are inevitable. It will be unsafe to work with such emery. You should not save on your health, especially since the cost of a master’s work will not exceed 500 rubles, and if the part is made from its own material, it will cost even less.
Another adapter diagram for making emery from a washing machine engine
How to adapt a drill and grinder to an electric sharpener
You can make emery not only from a suitable electric motor available. You can use a power tool for this - it could be an electric drill or a screwdriver.
The latter is less suitable for these purposes: it has insufficient power and a short battery life.
Making a sharpener from a drill begins with purchasing an attachment.
The sharpening stone is secured in it and then clamped into the chuck. All that remains is to secure it to a stationary base using a special mount, which can be purchased at a store that sells power tools. With the help of such an electric sharpener you can straighten an ax, sharpen a kitchen knife or thread a drill.
In case of emergency, a sharpener can be made from a grinder. To do this, you do not need to purchase special devices and mandrels necessary for attaching the emery. You just need to secure it in a horizontal position on a massive base, install a standard cutting or sharpening disk, and the sharpener is ready for use.
Sharpening device from a washing machine: selecting a motor for emery
In terms of its power and configuration, the electric motor from old-style washing machines is ideal for portable homemade emery. As a rule, motors from units such as Siberia, Volga or Vyatka are used for this purpose. Approximate characteristics should be:
- mains voltage - 220 V;
- power - up to 370 W;
- rotation speed - no more than 3 thousand rpm.
Attention! If you construct an emery from a more powerful engine, a significant number of revolutions can simply break the whetstone during operation.
The parameters of the engine are necessarily indicated on its body. To make emery, a device with a power of 100-150 W and 1-1.5 thousand rpm is sufficient. It will cope well with household sharpening of repair equipment and kitchen utensils.
Old engine
A faster grinder (for example, an emery machine based on common engines with 2.8 thousand rpm) is appropriate to use for grinding or polishing parts. In this case, the emery stone should be stronger, and the main fastening element, the flange, should be of better quality and stronger.
Advice. To assemble emery from a motor with your own hands, you can use both a 1-phase and a 3-phase motor.
Schematic diagram of the grinder design and the principle of its operation
In order to correctly understand the structure and operating principle of the grinder, let us turn to its structure. The main task is to find a powerful motor that will need to be equipped with a drive.
Important! The torque is transmitted to the rollers, which drive the abrasive belt.
Appearance of the grinder
So, the main elements of the grinder, in addition to the engine, are:
- Straight roller with pulley.
- Tension rollers.
- Abrasive tape.
- Base.
- A device that fixes the tension of the belt and rollers.
- Table for fixing the part (in some models it can be rotary).
After connecting the device to the network, the rollers set the abrasive belt in motion. Moreover, the position of the rollers can be shifted to control the tension of the abrasive belt.
In some cases the table can be rotated 180°
When assembling the grinder yourself, it is important to position the rollers strictly perpendicular to each other to avoid distortions of the belt, which can lead to its breaks.
Advice! Before deciding on the size of the belt and the width of the rollers, figure out what surfaces you plan to process, their dimensions and volume of work.
Homemade sandpaper from a drill
You can also make a sharpening machine from a regular electric drill. In this case, it is better to use a drill that has a speed controller for the motor shaft, then you can set the rotation to a safe speed. It is advisable to order a flange for fastening the stone from a turner and have it made with a shank so that you can attach the flange directly to the chuck of an electric drill.
It is convenient to use such a machine if you have a vice - you just need to carefully clamp the drill in it. Another option is to mount the drill on a workbench so that the chuck protrudes over the edge of the table. This homemade emery is much safer than emery from an angle grinder, and it is very easy to make with your own hands.
Dear site visitors, share in the comments what you think about creating emery with your own hands and what good designs there are for such a homemade machine.
Mini sharpening machine
An electric sharpener is sometimes necessary if the master is engaged in modeling: during work it is often necessary to sharpen small parts. A large sharpener is not suitable for doing small work, so they often make mini-emery with their own hands. The assembly algorithm is as follows:
- take the motor from a computer hard drive or a children's toy;
- the tension sleeve of the spoke from the moped is soldered to the engine axis;
- a small grinding wheel is screwed to the shaft with a screw and washer;
- connect the power supply;
- fix the device on the bed, and the emery is ready.
Often, electric motors from a faulty sewing machine are used for these purposes. The advantage of this machine is that the motor has a speed controller, and this expands the capabilities of the device. It can also be successfully used as a polishing machine.
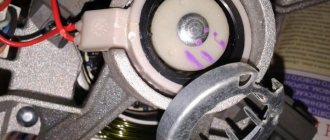
Bushing (flange)
The bushing for seating the whetstone is the most complex component of our device. This sleeve is also called a flange. What is a flange? This is a piece of metal pipe, the inner diameter of which ideally fits the electric motor shaft and is securely fixed to it. The outer diameter of the flange must coincide (with small errors) with the mounting diameter of the grinding disc. A thread is cut along the outer diameter to secure the disk; the thread must be opposite to the direction of rotation of the shaft. In other words, if the motor shaft rotates clockwise, then the threads must be left-handed. And vice versa, if the shaft rotates counterclockwise, then the thread on the sleeve should be right-handed, normal. That is why, just above, I advised connecting the motor with counterclockwise rotation.
If the electric motor has a fixed direction of rotation (old style) in the clockwise direction, then you will have to look for a lever for a left-hand thread. The fact is that if the directions of the thread and the rotation of the shaft coincide, then the probability of unwinding while moving is very high - the sharpening stone can easily fly off during work and injure others.
The best option would be to contact a turner you know and order the production of this bushing. Usually, a turner just needs to bring a pulley from the engine and tell him the mounting diameter of the grindstone. Most modern stones have an internal diameter of 32 mm. But it’s not for nothing that our web resource is replete with the motto “do it yourself” and it is quite possible to make a flange yourself. Of course, the quality will be worse than from a professional turner, but this does not require special skills or special tools.
You can also buy a suitable bushing from the Chinese.
So, the base will be a metal pipe “1/2” - a half-inch water pipe. According to GOST 3262-75, the internal diameter of this pipe is 15 mm, the external diameter is 21.3 mm. The outer one fits well with the mounting diameter of the grinder disc (22 mm), it may well come in handy. But the most important thing is that this diameter is well suited for a 32 mm nozzle, but more on that below... The internal diameter is 15 mm. does not fit any motor shaft and this discrepancy will have to be eliminated.
If the shaft rotates counterclockwise, you can use a plumbing pipe with a “1/2” thread as a pipe. If it is not possible to control the direction of the shaft and it rotates clockwise, then the thread will have to be cut independently using a left-hand thread tool. In any case, it is advisable to select a piece of pipe without a seam - the seam on the outside will not create any special problems, but the thickening from the inside of the pipe will contribute to beating during rotation.
A piece of threaded pipe must be cut to the required length so that the thread is on one side. The inner edges need to be processed with a round file. When choosing the length of the future flange, you need to try to make it as short as possible, but so that all the components fit on it. It is important to take into account the fixation bolt - there may be a recess or a cut edge on the shaft; the bolt on the sleeve in this place should not interfere with other parts.
As mentioned, the thread is only needed on one side of the sleeve, but the sharpening stone needs to hold something on the opposite side. A short piece of 32 mm polypropylene pipe is well suited for this purpose. must be marked SDR 6.0 (internal diameter 21.2 mm). A section of 1.5-2 cm must be cut as evenly as possible - this determines whether the stone will make figure eights during rotation.
A piece of PPR pipe needs to be placed on a metal bend so that there is a little less than a centimeter left before the thread - this is the place for the cleaning disk for the grinder. It will not be so easy to fit a plastic pipe onto a metal one. To do this, you need, firstly, to arm yourself with some kind of tube with a diameter larger than that of a metal pipe and smaller than that of a plastic piece - with this tube you can stuff a PPR pipe into a pipe. Secondly, the squeegee needs to be heated, for example on a stove, to a temperature that causes the water to hiss. A piece of PPR is hammered onto the hot pipe.
To securely fix the flange on the shaft, you need to drill a hole for the locking bolt. Naturally, the space for the bolt depends on the location of the recess on the shaft. It’s good when the location of the hole coincides with the mounted PPR pipe - there will be additional fixation. Perhaps there will be no space on the shaft at all for the fixation bolt, then this place is chosen arbitrarily and you need to try to drill the shaft a little directly through the bushing so that the bolt enters the hole a few millimeters. The flange itself is threaded for the bolt. To avoid cutting the thread, you can use a thick self-tapping screw with a fine thread pitch. Having cut the thread, the bolt or self-tapping screw is cut to the required length - so that it rests securely on the motor shaft, but also does not stick out too much from the sleeve.
Now it’s time to fit the bushing onto the motor shaft. The problem is that usually the shafts of electric motors from washing machines made in the USSR were produced in two diameters: 11 mm. and 14 mm. and these figures had quite large errors in the form of tenths of a millimeter. For example, in the photo in this publication the engine has an 11.9 mm shaft. Therefore, you need to look for a way to increase the shaft diameter to 15 mm.
In the case of a shaft with a diameter of ≈11 mm, a convenient solution would be a piece of 16 mm metal-plastic pipe. — the outer diameter can be sharpened directly on the motor shaft to 15 mm. And plastic generally fits well mechanically - the excess is simply crushed by a metal pipe. The internal diameter of the metal-plastic is about 12 mm. - if the shaft is thicker, then the pipe tends to stretch; if the shaft is too small (which is unlikely), then the additional thickness is achieved with one layer of electrical tape or heat-shrinkable tubing. A piece of metal-plastic pipe needs to be “pulled” onto the shaft with force, or rather even hammered in - this is the result that needs to be achieved. We must not forget about the recess on the shaft for the fixing bolt and find a way to mark this point on top of the metal-plastic.
When the MP piece sits securely on the shaft, you can turn on the engine and lightly grind the surface. This is an important point: you need not to remove excess - the metal squeegee must be forcefully driven over the MP. When installing a steel pipe, you must not lose the place where it is fixed with a bolt, and align the hole on the sleeve with the recess on the shaft. When the hole and recess are aligned, the MP pipe must be drilled to the motor shaft directly through the hole in the flange. When pushing the bushing onto the shaft, in order not to break the thread, you need to screw a nut onto it. When the flange is mounted, fix it with a bolt (or self-tapping screw). With the engine running, we evaluate the presence of beats and the quality of alignment. The beating of the bushing is not as bad as the “reconciliation” of the PPR section - you can straighten it with a file right on the go.
In the case of a shaft with a diameter of ≈14 mm, only about 1 mm needs to be filled. — this can be achieved with several layers of heat-shrinkable tubing, preferably adhesive.
Once the bushing is attached to the motor, the hardest part is over. All that remains is to make an attachment for the “32nd” stone, put on the washers and screw on the nut. The nozzle is made from the same 32 mm PPR pipe, with the difference that it will have to be “combed” a little from the inside to fit freely onto the sleeve. The M20 reinforced washer fits perfectly as washers. I couldn't find anything better for the nut than a plumber's locknut. A regular M20 nut is too wide and inappropriate.
When test-running the entire assembly, you should pay attention to the runouts and “eights” of the stone, and not the washers and nuts - the locknuts are rather crooked products, the washers have a slight play on the inner diameter. Small beatings of the stone are eliminated by simply sharpening it, and figure eights are corrected by aligning the PPR segment, which acts as a stop.
How to set up an emery machine and make a protection
How to secure the sanding machine and put protection on it? You can screw it to a workbench.
To do this, use the bracket that is in the washing machine. To reduce vibration during operation, rubber gaskets are placed on the corner, which can be made from a piece of hose.
If the device is installed on a wooden workbench, cover it with a sheet of metal on top to prevent fire.
For your own protection while using the machine, install a metal arc over the disk. You can also enhance the protection by attaching 5 mm thick plexiglass to the pendants. The glass can be raised and lowered using hangers.
Making a sharpening machine yourself is not difficult. The main thing is to secure it and connect it correctly. Also follow safety rules when working, use safety glasses and special clothing.
Safety precautions when working with a homemade device
When making power tools yourself, you should strictly follow safety precautions. If industrial units are equipped with protective equipment, then in home-made devices you will have to make them yourself. You should be aware that operating a sharpener from a washing machine engine without a protective casing is prohibited. It can be made from sheet metal 2.5 mm thick.
The working wheel experiences strong vibration during sharpening. To prevent the sandpaper from being destroyed during work, when installing the stone, cardboard spacers are placed under the metal washers. You should also make sure that the disc has no cracks.
While working, you should stand to the side of the circle so that if it breaks, the fragments do not fly towards the operator.
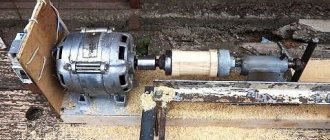
Algorithm for assembling emery from a Malyutka washing machine motor
First of all, we make the frame of the future mechanism. It can be made from a thick wooden board, wood slab, suitable plastic, but a thick metal slab is best. The electric motor is attached to it using brackets, corners or clamps. The connection between the electric motor and the stone occurs via a flange.
Homemade flange
Making a flange is one of the technically difficult operations when assembling homemade emery. It is usually done using a lathe. To do this, it is necessary to measure the diameter of the output shaft and the abrasive wheel that will be used in the sharpening machine. However, if you don’t have a lathe at hand, you can do without it. In the video below you can see how to make an emery flange from scrap material yourself:
The flange is secured to the shaft using a nut, bolt and washer. In this case, it is necessary to take into account the direction of rotation of the shaft: the thread on the nut should be in the opposite direction.
This is done for safety reasons so that during operation the nut does not unwind under the influence of vibration of the machine, which can cause the abrasive wheel to fly off and cause injury.
Finally, all that remains is to mount the electric sharpener in a permanent place and supply electricity. The emery from the Malyutka engine is ready.
In the case of using an engine removed from an automatic washing machine, you can make a sharpening machine in a similar way, the only difference is in connecting the electricity. The motor from an ordinary washing machine has four wires: two are connected to the working winding, and the other two are connected to the starting winding. To determine the working winding, it is enough to measure the resistance of both. The resistance of the starting winding is 30 Ohms, and the working winding has only 12 Ohms. The engines of modern cars have six terminals, two of which are the output of a tachometer with a resistance of 70 Ohms. Finding them won't be difficult. These wires must be insulated.
The connection diagram is as follows: both windings are connected in parallel and connected to the network, and a button is connected to the gap in the starting winding. To do this, you can take a starter or adapt a button from a doorbell.
Advantages and disadvantages
The advantages of grinding machines include:
- Quality and speed of processing.
- High performance.
- The ability to obtain the surface of the desired roughness.
- The ability to process not only the wood itself, but also pre-grind the finishing layer.
The disadvantages are:
- Release of a large amount of dust, requiring the organization of a dust removal system.
- Large quantities of consumables (abrasive) of several sizes.
- Difficult to manufacture and maintain (this especially applies to belt installations).
Considering the existing shortcomings, before starting assembly, you need to decide how necessary the machine is. If it will be used only occasionally, it is not practical to spend time on manufacturing - you can get by with hand tools.
Which engine is suitable for making emery?
Wondering what engine you can use? You can use any motor from a washing machine, even the brands “Vyatka”, “Riga” or “Volga”. The main thing is that it has sufficient power.
For normal operation of the sharpening machine, a power of 100-200 W, with 1000-1500 rpm, is enough. For particularly large parts, a 400 W motor is suitable. But if the engine speed reaches 3000 rpm, it needs to be adjusted or a very durable disc installed.
What you need to create emery from a washing machine motor
To make a simple sharpening machine you will need:
- washing machine motor;
- flange;
- sleeve;
- attachment to the electric motor (emery wheel);
- casing for protection;
- support;
- starting device.
When purchasing, it is better to choose a product with two circles: a finishing and a rough version.
You also need to make an adapter with a flange. Since the size of the shaft does not match the hole of the grindstone, an adapter must be made. It can be done on a lathe, having previously determined the dimensions and completed the drawing. On the diagram you need to mark the diameter of the shaft and the emery hole.
You can make a flange for the shaft yourself. A piece of pipe with a diameter of 32 mm, no more than 200 mm in length, will do. It should fit perfectly on the motor shaft. On one side of the flange there is a thread, the direction of which depends on the direction of movement of the shaft. When sent to the engine, the other end of the flange is heated and pressed.
After installation, be sure to secure the flange. This can be done by welding or bolting, drilling the flange with the shaft.
The shaft adapter is ready. It remains to install the element for sharpening the cutters.
Ready-made machines from the store
Grinder "Lefty"
Characteristics: motor – 1.5 kW, belt length – 1250 mm (up to 1600 mm); The model is interesting for its additional equipment (wheel, contour), which is included in the kit.
Appearance of the “Lefty” grinder
Grinder-sharpener “Kraton” BG 14-05
Characteristics: the device is used for sharpening metal tools and wooden parts; power consumption – 2 kW, movement of the sanding cloth – 14 m/s; disc diameter – 150 mm; tape width – 50 mm. Features: rigid cast base, adjustable stops and protective screen.
Model cost from 6,000 rubles Grinder-sharpener “Kraton” BG 14-05
Grinding machine BISON ZShS-330
Characteristics: machine type - disc-and-belt; circle – 125 mm; speed – 2950 rpm; tape size 762 mm × 25 mm; power - 330 W; belt speed – 810 m/min. Cost – 5490 rubles.
Grinding machine BISON ZShS-330Grinding machine BISON ZShS-330
Sharpener METABO DS 125
Characteristics: sharpener type - with sanding belt; circle - 125 mm × 20 mm × 20 mm; circle diameter - 125 mm; circle thickness - 20 mm; landing diameter – 20 mm; speed – 2980 rpm; power - 200 W. The cost of the model is 7679 rubles.
Sharpener METABO DS 125Sharpener METABO DS 125
Sources
- https://lesoteka.com/instrument-i-oborudovanie/shlifovalnyj-stanok-svoimi-rukami
- https://m-strana.ru/articles/chto-takoe-grinder-i-dlya-chego-on-nuzhen/
- https://homius.ru/grinder-svoimi-rukami-chertezhi.html
- https://tehno-gid.net/sad/shlifovalnyj-stanok-po-derevu-svoimi-rukami.html
- https://svoimirykami.guru/grinder-svoimi-rukami/
- https://HouseChief.ru/kak-sdelat-grinder-svoimi-rukami-chertezhi-s-razmerami.html
- https://vopros-remont.ru/elektrika/grinder/
- https://WikiMetall.ru/oborudovanie/grinder-svoimi-rukami.html
- https://SdelaySam-SvoimiRukami.ru/5627-samyj-prostoj-grinder-bez-svarki-i-tokarki-iz-dvigatelja-stiralki.html
How to make your own emery from a washing machine motor?
The home craftsman has a lot of different tools, and it wouldn’t hurt to make your own sandpaper from a washing machine motor. In the workshop, you often have to sharpen metal-cutting and carpentry tools. Craftsmen use a sharpening machine, which has only a couple of parts: a motor and a sharpening stone.
How much does the machine cost? In the retail chain, the cheapest product can be purchased for 1500-1700 rubles, but the engine power is small, it will be approximately 120 W. You can buy a suitable sharpener from China, the power of which will be 300-400 W, but it will cost more than 2000-2200 rubles. It is not difficult to make emery out of a washing machine motor; it will cost much less than store-bought. It will take a little effort, and the result will be a machine that will help in further work.
Grinder and sharpener: a brief comparison
A belt grinder and a sharpener are analog devices, as they perform almost the same functions. But there are also differences in the quality of processing and design. The grinder has several advantages that a regular sharpening machine cannot boast of. This:
- precise processing geometry;
- simple replacement of abrasive tape;
- versatility of use.
Please note that due to the presence of a shaft and rollers, the tape becomes perfectly level. This makes it possible to more accurately position the workpiece for processing. As a result of cleaning parts, defects, nicks and burrs do not appear (this often happens when processing metal parts with a grinding wheel).
The grinder belt is made from strong sandpaper. For belt grinders, many belt options are sold with different abrasiveness. Having a whole set of them on the farm, you can perform work of varying complexity.
Simple DIY machine
The step-by-step process for making a small sharpener that can be placed on the wall is shown below.
| The sides of the future sharpener are cut out of a sheet 3...4 mm thick. |
| The remaining elements that will be placed in front of the machine are cut out from the same sheet. The auxiliary stop is cut out. |
| Holes are drilled in the sidewalls according to the attached diagram of their location. Auxiliary grooves are made. |
| Holes are also drilled in the front wall. The entire structure is welded according to the attached installation diagram. |
| Approximately you should get a similar device. |
| To install the abrasive stone, you need to machine the adapter sleeve according to the proposed drawing. It will be put on the shaft of the electric motor from the washing machine. |
| After assembly and painting are completed, the small-sized machine is attached to the wall. |
| To make it more convenient to work on the machine, a light source is placed nearby. |
Instead of an abrasive stone, you can install:
- mechanical brush from an angle grinder. It is used to remove paint and rust from the surface of workpieces;
- felt circle. Using GOI paste, craftsmen polish small items.
Steps for creating emery from a washing machine engine with your own hands
For a homemade device, a belt-driven motor is useful.
All that remains is to assemble the device correctly. After installing the flange, put the nut and washer on the shaft, then a large emery wheel, and then the nut and washer again.
Motor connection
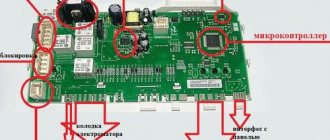
How to connect the motor from an automatic washing machine:
Immediately after connection, the motor for home emery will start working, and you will be able to evaluate the functionality of the device.
Connecting the electric motor of Soviet-made washing machines differs from the previous version.
The motor is now connected. But before starting work, you need to thoroughly secure the machine to avoid an emergency.
How to choose a ribbon
There are a lot of grinder models, but the most popular option is the band grinder. When choosing a sanding belt, you should focus on a number of criteria:
- The purpose of the grinding machine (processing wooden surfaces is very different from processing metal parts, artificial or natural stone).
- Required belt stiffness.
Carefully choose not only the type of sanding belt, but also its width. Videos, drawings, tips on choosing a belt and assembling a grinder with your own hands will help you optimally carry out your independent work.
Connecting (checking) the motor
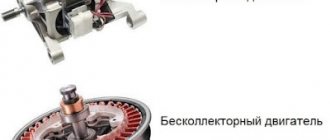
Naturally, before you start assembling something, the electric motor must first be connected and tested. In old washing machines, there are two versions of motors: an older and high-quality one, it has a closed housing with an impeller, with two supply terminals, and a newer one - four terminals, no impeller, cooling occurs through holes in the front and back, through which the windings are visible.
The old version does not require any capacitors for starting - the starting winding is cleverly connected and disconnected inside the engine using a special mechanism. Thanks to this, no connection difficulties should arise: both outputs are connected to a 220 volt network. The disadvantage of such a motor is that the direction of rotation of the shaft is preset by an internal connection and cannot be changed. Typically the direction is clockwise and therefore it will be necessary to use a left hand thread to attach the stone.
The newer version has four terminals of two windings: working and starting. You can distinguish them using a multimeter: the resistance of the working winding is about 10 Ohms, the starting winding is about 40 Ohms. Perhaps the resistances will differ from those indicated, but only slightly. The starting winding must be connected through a 4-5 µF capacitor for a voltage of at least 400 V. I have come across composite capacitors for similar motors: two connected in series, 10 µF each at 300 V. That is, in this way the maximum permissible operating voltage of the finished capacitor was raised. Using a composite capacitor of two with low voltages (at least 300 V) is possible, but not advisable. Capacitors should be non-polar!
You can check the engine without capacitors and starting winding at all: voltage 220 V. supplied directly to the working winding. With this connection, the motor will start without load in any direction. To set the direction of shaft rotation, you need to connect the starting winding and capacitor. For emery, you need to set the direction counterclockwise
. The connection diagram is shown below, if the shaft rotates clockwise, you need to change the connection of the starting winding.
In many publications on the network I have seen a statement that the starting windings do not need to be connected at all, and the direction of rotation must be set manually when starting. Allegedly, if the starting circuit is used, the engine will burn out. I can only explain these speculations in one way - one wrote something stupid, and the rest were copied from the first. I can say with confidence: the starting winding can and should be connected through a 4-5 uF capacitor, the starting circuit should always be connected, without any additional buttons. And if the motor is working properly, such a connection is safe and completely harmless for it.
Base
The frame on which the engine will be mounted does not require any special material costs, but this does not make it any less significant. The base must be well thought out, since making emery is not an end in itself; you still have to work on it. At the same time, all attention should be focused on sharpening the tool, and not on holding the motor jumping all over the workbench with your hand. Working like this is, at the very least, inconvenient, and in this case there is no talk of compliance with safety regulations at all.
Therefore, the base of the emery should be heavy enough, and most importantly, allow the motor to be fixed in the same way as it was fixed to the washing machine. It is best, of course, to make the frame metal. True, you will have to use welding for this. If this is not possible, then you should take a suitable piece of chipboard and bolt metal corners onto it to mount the engine. Even better, remove the motor from the washing machine along with the standard bracket and screw it to the base. The main thing is to use bolts and nuts for this; self-tapping screws can become loose and unscrew due to vibration.
There is one more key point. The height of the motor mounting should not only allow the emery wheel to rotate freely, but also provide a gap of 4 - 5 cm between it and the base. After the motor is securely mounted on the frame, you need to think about the support table. It must be metal; welding can be replaced with a bolted connection. If the starting capacitor on the washing machine was moved outside the motor housing, you need to provide a place for it on the base of the sandpaper.
Once the motor is securely fastened to the frame and all auxiliary elements are installed, you can proceed to the electrical connections. But first you need to make sure that the grinding wheel is securely fastened to the motor shaft, as well as that there are no various beats.
Some ideas from other elements
The scope of application of the engine from an old, but so dear to the heart washing machine is truly great. The options described above are just some of the possible ones. More information about the use of this type of engine, or, in general, all the parts from an old washing machine, including the drum, can be found on the Internet.
“ It’s better to see once than to hear a hundred times ” - this immutable truth applies to the search for interesting variations in the use of washing machine elements today. How? There are a lot of options on the Internet that can be made not only from the engine, but also from the drum, housing and even the belt separately. What is it about? Some parts of the washing machine can be used to make a mill, router, generator, pump, and from the drum you can even make a barbecue and part of the interior decor!
DIY emery assembly steps
Step-by-step assembly of electric emery with your own hands. Attaching the motor to the base of the machine:
- The base of the machine is a 50x50 cm chipboard board. The engine is placed in its middle part and the dimensions of the engine are outlined with a pencil in order to know approximately where it will be installed.
- The engine typically has four studs or long screws that hold the engine housing together. Two adjacent studs will be the points where the support brackets will be screwed.
- Emery support brackets in the shape of the letter “P” are made from two pieces of galvanized steel 5 cm wide and such a length that the distance between the legs is equal to the distance between the head and the screw nut, and the height of the legs is approximately 6 cm. Holes are drilled in the legs of each bracket for a screw, in the long part of the bracket there are two holes for self-tapping screws.
- Unscrew the two adjacent screws, put the brackets on the petals of the body covers and put the screws back in place.
- The staples are turned so that their long sides lie with each other in the same plane, and the screws are tightened.
- The engine is installed in the previously outlined location on the brackets and screwed with self-tapping screws to the emery plate.
Attaching the trigger circuit and toggle switch to the base:
- Take a liter plastic container with an acrylic paint lid (or similar) and screw the lid next to the engine so that the container can be inserted into it, turning the latter upside down.
- A cut is made on the side of the bucket for the wires, and a toggle switch is installed at the bottom of the bucket with the switch lever facing outward.
- All capacitors are glued to the lid with hot glue and connected by soldering to the toggle switch and power cord.
- The bucket is put on and snapped onto the lid, after inserting the wires into a pre-made slot.
Making a flange for attaching a sharpening stone:
- Two circles with a diameter of 60 mm and one circle with a diameter of 32 mm are cut out of plywood with a jigsaw.
- In the middle of each circle, a hole is drilled with a diameter equal to the diameter of the engine working shaft.
- Two circles of different diameters are combined with holes and connected to each other using glue and two self-tapping screws.
- In the resulting part, at the end of the larger circle, a through hole with a diameter of 3 mm is drilled to the center and a self-tapping screw (locking screw) is screwed into this hole so that it is visible in the central hole.
- 2 mm of steel is removed along the motor shaft on one side so that the locking screw resting in this place does not allow the flange to rotate.
- The flange is placed on the motor shaft and secured with a self-tapping screw.
- A stone is placed on the flange and tightened with self-tapping screws through a wooden circle.
Making a protective casing:
- The protective casing consists of two parts, both of which are truncated cones. The distance between them should be 2.5 cm wider than the thickness of the grinding wheel.
- The side parts and the end of the casing are made of galvanized steel and connected to each other by soldering with a powerful soldering iron.
- In one place of the end, a grinder is used to cut out a window for the working area; on the side, a vertical slot is made with a width equal to the diameter of the engine shaft so that the casing can be put on top.
- The casing is attached to the chipboard using emery using self-tapping screws.
Result of work
The sharpener is ready.
The result is a sharpener like this, there are a lot of uses; if desired, you can make polishing wheels, emery wheels, etc.
How to make a flange with your own hands?
The most difficult task of the entire project was attaching the sharpening attachment to the motor shaft of the washing machine. The shaft does not have the required threads, and its diameter does not fit the hole in the stone. To eliminate the discrepancy, it is necessary to make an attachment for the electric motor.
On one side the adapter has a hole for attaching to the shaft, on the other there is a threaded flange for installing a grinding wheel. It is made using a lathe. A drawing is prepared in advance indicating the dimensions of the shaft and the diameter of the inner part of the grinding stone.
Progress:
- Take a pipe with a diameter of 32 mm (depending on the shaft) and a length of no more than 200 mm.
- On one side, make a thread in the direction that will coincide with the side of rotation of the engine.
Important! If the motor moves clockwise, the thread is left-handed. And vice versa. Otherwise, when you turn on the sharpening unit, the stone will fly off.
- Warm up the other side and put it on the shaft.
- The pipe is fastened using welding or a bolt. The last option involves drilling the shaft and pipe.
The engine mount is ready. All that remains is to secure the device with a nut and washer. Now you can put on the emery disc, which is also secured with a washer and nut. You can create installations with two circles.
Connecting the motor from the washing machine
For successful operation of a homemade device, it is important to correctly connect the belt-driven motor. If you used an automatic machine, then 6 wires come from the motor. You only need 4 of them to connect. How to determine which ones? By calling:
- Take a multimeter and apply probes to the wires one by one.
- If two of them show values of 70 Ohms, these are the tachometer connections. They are not needed for work.
- Determine the compatibility of the others based on paired indicators. You should be left with two wires from the brushes and two from the stator.
Have you decided? Now do this:
- Fasten one wire of the brush and stator together, secure with electrical tape.
- Connect the remaining ones to a cable with a plug.
- After plugging the plug into the socket, the shaft will begin to rotate.
The motor from a Soviet machine has only 4 wires. To determine their purpose, a call is also made:
- Apply one probe to one wire. Apply the other probe alternately to the remaining wires. Your task is to find pairs.
- Now measure the values between pairs. The one where the resistance is lower (12 Ohms) is the working one, where the higher resistance (about 30 Ohms) is the starting one.
- Connect the working connection to the power cord and plug.
- For convenient use, install a starter. A doorbell button is suitable for this. You can do without a button, but then when you turn it on, you will have to rotate a large sandpaper by hand for the unit to start.
How to connect the button is shown in the picture below. SB means button, OB means working winding, PO means starting winding.
Direction of movement of the emery
First you need to determine which winding is intended for starting the engine, and which for the main work. To do this, you will need a tester that will help measure the resistance. In the first case, the value should reach 30 Ohms. The resistance in the working winding is much lower and is 12 ohms.
The winding responsible for the working process is connected to the electrical network. The starting winding is connected on one side to the coil. On the second side it is connected for a short period to the winding terminal. A relay is used for this. The engine starts.
In this simple way, by changing the ends of the winding necessary to start the motor, the direction of movement of the rotor changes. You can even do without a relay. In this case, you need to manually turn the sanding wheel in the desired direction.