Let's look at how to make a lathe for woodworking from the engine of an automatic washing machine. With its help you can cut workpieces, drill holes, and do grinding.
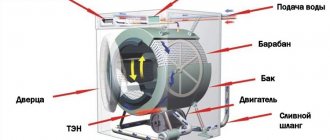
The machine has the main parts and components:
- headstock;
- tailstock;
- handyman;
- frame.
An asynchronous electric motor from a washing machine can be used for operation. Two speeds - 400 and 3000 rpm - will be enough.
Now let's look in detail at how to make each unit and assemble the whole structure with your own hands.
Headstock
The operating parameters of the device and the size of the workpieces will depend on the design of the headstock, as well as the power of the motor. The spindle must be reliable because it is subject to radial and axial loads when pressed by the tailstock.
- The body is made of 140 channel bars, which are cut into pieces and welded into a single structure at an angle of 90 degrees. The body should be 300x265 mm.
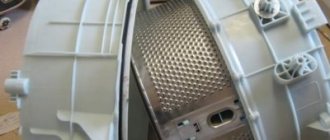
- On the smaller side a connector is made for the bearing assembly. The device itself can be taken from a washing machine, only adjusted to the required dimensions.
- The bearing assembly is installed in the hole through a paronite gasket and secured with bolts to the housing.
- The bearings from the washer remain in the assembly, but the seal is removed. Replace it with a thrust bearing.
- A belt pulley with a diameter of 70 mm and a shaft with designated locations for bearings are manufactured separately.
- A base for fixing the electric motor is installed inside the channel structure.
- The poly V-belt is tensioned - to do this, move the motor along the mount.
- The rear part of the motor is attached to the channel.
We have finished making the headstock.
Tailstock
One of the main elements that allows you to press a wooden piece against the headstock. The reliability of the tailstock fastening determines how high-quality and safe the work will be. The size of the parts to be turned will depend on the length of the retractable element of the headstock.
Get started:
- Take two channels 140 mm wide. Connect them using four strips of metal.
- Weld two partitions to the bottom of the body using a welding machine.
- Fix two bushings measuring 14x20 mm in the partitions. One bushing is welded and the other is secured with two screws.
- The shaft is made for bushings: diameter 20 mm, edges 14 mm, center offset by 2 mm. Once installed, the shaft should move down and up as it rotates. During movement, there should be a 4 mm gap at the top and bottom, which will allow the headstock to be clamped and released.
- Take two pieces of pipe 30-40 mm long and 21-23 mm in diameter. Weld them to the heads of the M12 bolts. Weld the tubes together using 3-4 mm thick wire.
- Attach a handle to the end of the shaft that comes out of the bushing.
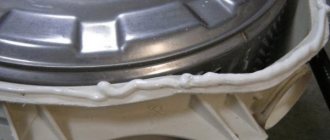
Assemble the device as shown in the photo and attach the bolts to the plate.
It needs to be tightened with nuts so that the structure is fixed on the support when you turn the handle away from you. When moving towards itself, it should lower and move along the support. This will allow you to quickly rebuild the machine to process different parts.
Now you need to make a quill with a rotating center:
- Take three straight bearings and one thrust bearing.
- Make the quill from a thick pipe with a square cross-section and dimensions of 30x30 mm. Mill the edges to 29x29 mm. Secure it at one end with an M12 nut, at the other with a 12 mm long rod. Press three bearings onto the rod.
- Make a body for the quill from a pipe with a square section of 29x29 mm. At one end the housing is completely closed, leaving only the center hole. On the other hand, there is a cut where a nut with an eye is welded. This way, by inserting the bolt into the eye nut, you can secure the quill.
- Take a stud with an M12 thread on one end and M8 on the other. The flywheel is screwed onto the end of the M8 and the M8 nut is secured.
- Weld two pieces of angle to the quill body and secure it to the tailstock.
- Adjust the tailstock accordingly so that its center axis rotates in line with the axis of the headstock spindle.
Podruchnik
How safe and convenient the device will be to use depends on the correct manufacturing of the tool rest. In order for the tool rest to be easily adjusted and securely fastened, you need to make an eccentric clamp.
- Take the rod from the shock absorber.
- Make two bushings with flanges. Their diameter should be 26 mm. Make holes in them measuring 14 and 10 mm. They should be offset by 2 mm from class=”aligncenter” width=”400″ height=”265″[/img]
- Drill threaded holes at the larger end to secure the bushings to the axle with screws.
- Take a piece of pipe so that its diameter is slightly larger than the rod. A rod with an M12 thread is welded to it.
- To make the body, take a channel measuring 80x40 mm. Weld two partitions inside and make holes in them. Weld bushings with a diameter of 26.5 mm and a length of 19 mm into the holes.
- The design must have play so that the rod can rotate.
- To secure the hand rest, weld a piece of pipe to the rod. Cut it at the end and weld a nut and bushing on both sides. When screwed in, the bolt should clamp the tool rest.
You need to make a starting device from the washing machine motor. Therefore, the connection is made according to the diagram.
Be sure to make a casing for the engine. It can be made from pieces of laminate. Install a speed controller on the body, which will allow you to perform work of varying complexity.
How to make a lathe and milling machine from a washing machine
Home » Machine » Lathe from a washing machine engine
Whether in a professional workshop or in an ordinary garage, it is often necessary for some household needs to accurately drill several holes in metal, wood and other materials.
An ordinary household drill may not be suitable for this, especially when increased accuracy is needed. A drilling machine from a washing machine, or rather from a washing machine motor, which you can make yourself, can come to the rescue. It will cost you very little.
The manufacture of such a machine will be discussed in the article.
Main details
Before assembling a drilling machine using a washing machine motor, it is necessary to clearly understand the safety rules, both during assembly and during subsequent operation of such equipment.
Remember! Working with a homemade drilling machine can be dangerous to life and health! Be extremely careful and do not forget that if you do not have the necessary skills, you should not undertake the manufacture of such units. We do not encourage everyone to make and use drilling machines and provide this information for informational purposes only.
So, what parts are needed to make a drill press? Conventionally, all the necessary parts of the machine can be divided into 3 groups: engine and drive mechanism, bed and mechanism for moving the drill in a vertical plane, electronic filling. The first group includes:
- commutator electric motor from an automatic washing machine;
- engine pulley;
- pulley on the drill shaft;
- V-belt.
Second group details:
- steel angle 50 mm;
- steel beam 30x60x30 cm;
- square sheet of metal 40x40 cm;
- steel staples;
- old steering rack from a VAZ eight;
- fasteners;
- drill shaft;
- bearings 6003 2RS;
- bearings 8103;
- drill chuck;
- a homemade turntable made from three hairpins welded together.
And finally, the parts of the third group are represented by electronic filling, which will control the engine speed so that the drilling machine works stably without failures. The easiest way is to use a ready-made TDA 1085 chip, although there may be other options.
Do-it-yourself wood lathe using a drill
If you have a workbench in your workshop, then the process of manufacturing a woodworking unit is greatly simplified. In this situation, there is no need to search for materials for the frame or to assemble it directly. A conventional drill fixed on a flat, horizontal surface of a workbench can replace a turning device.
Helpful information! The drill performs several functions at once, which in a conventional machine are performed by the front unit, as well as a rotation drive.
The drill is fixed using a clamp and a clamp, which must be secured to the neck of the electronic tool. However, the remaining components necessary for processing wooden blanks still have to be assembled.
A do-it-yourself lathe from a drill will allow you to save on the purchase of several specialized processing devices
First of all, this concerns the tailstock, which acts as a stop. This unit is fixed parallel to the drill and, as a rule, is made of wooden blocks. For reliability, it is also recommended to use an adjustment screw, the head of which is sharpened to a cone.
Further assembly of the lathe from a drill is quite simple. The support can be replaced with an ordinary wooden block, which is fixed on a horizontal plane using a clamp.
The main rule when assembling such a simple structure is to ensure alignment of the spindle rotation axis and the adjustment screw on the rear assembly. For example, you can temporarily assemble a lathe from an ordinary drill. Moreover, on such a machine you can both perform wood processing and produce workpieces from soft metals (aluminum, copper, etc.).
Grain crusher from a washing machine
With this useful homemade product, you can significantly save on the preparation of feed for domestic animals. If you choose an engine of sufficient power, it is quite possible to assemble a feed cutter, grain crusher and grass cutter, which will not be inferior in performance to factory models. In this case, it is recommended to use an engine from an automatic washing machine - they are distinguished by higher power.
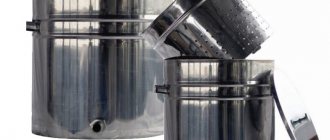
It doesn't take a lot of work to turn an old washing machine into a feed cutter. You need to take an engine from an automatic machine and a body from another old washing machine - with a top load. It’s quite easy to find such a case; it costs pennies at a scrap metal collection point.
Step-by-step description of creating a feed cutter with your own hands:
1
.
The blades with knives should have a diameter such that they do not reach quite a bit to the edges of the body. 2
.
We make a hole in the bottom to remove the finished food. 3
.
We install one blade with knives in the lower part of the body, the other - 40–50 cm from the upper edge; To ensure better grinding quality, you need to use 2 different shafts for the knives, they should rotate in different directions. 4
.
We screw the motor onto the lid of the washing machine and attach it to the shafts. 5
.
We cut a hole in the lid to fill in the raw materials. 6
. We install the cover in place and test the homemade product in action.
Such a homemade device will function no worse than a factory one, and will allow you to obtain high-quality ground feed.
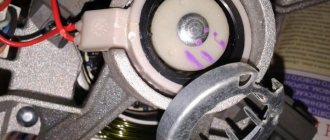
Connecting the washing machine motor
To connect the motor to alternating current, perform the following steps:
1
.
First you need to prepare a tester - this is a special device used to determine the winding wires. 2
.
To determine a pair of wires, connect the tester probe to any wire and check all the others one by one. If during connection the tester indicated a connection, then this will be a pair of wires. Accordingly, the other two wires will also form a pair. 3
.
We measure the resistance level of two windings. The winding with a higher value is the starting winding. 4
.
Wires from different windings are connected in pairs, then connected to a 220 V network 5
. It is recommended to install the switch on the starting winding wire.
In some cases, the direction in which the motor rotates must be changed. Here we swap the leads of the starting winding.
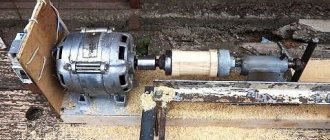
Motor from an old washing machine for a lathe
Assembling a lathe yourself is not a difficult task. All you need to do is fix the adapter on the base of the motor shaft from an old washing machine. The adapter should not be permanently secured. It is better if it is removable, since this way the lathe will become multifunctional, with the ability to turn parts, sharpen knives with a sharpening wheel, cut metal and plastic pipes with a cutting wheel, and use other attachments. The photo shows possible attachments.
You should not fix this homemade product on a solid base. To make work more convenient, it is recommended to make it portable. The basis will be a thick, durable board. To secure the resulting lathe, it is recommended to use brackets that are screwed onto the base using bolts from the washing machine. A regular switch can be used, or from a washing machine.
Grain crusher from a washing machine
With this useful homemade product, you can significantly save on the preparation of feed for domestic animals. If you choose an engine of sufficient power, it is quite possible to assemble a feed cutter, grain crusher and grass cutter, which will not be inferior in performance to factory models. In this case, it is recommended to use an engine from an automatic washing machine - they are distinguished by higher power.
It doesn't take a lot of work to turn an old washing machine into a feed cutter. You need to take an engine from an automatic machine and a body from another old washing machine - with a top load. It’s quite easy to find such a case; it costs pennies at a scrap metal collection point.
Step-by-step description of creating a feed cutter with your own hands:
1
.
The blades with knives should have a diameter such that they do not reach quite a bit to the edges of the body. 2
.
We make a hole in the bottom to remove the finished food. 3
.
We install one blade with knives in the lower part of the body, the other - 40–50 cm from the upper edge; To ensure better grinding quality, you need to use 2 different shafts for the knives, they should rotate in different directions. 4
.
We screw the motor onto the lid of the washing machine and attach it to the shafts. 5
.
We cut a hole in the lid to fill in the raw materials. 6
. We install the cover in place and test the homemade product in action.
Such a homemade device will function no worse than a factory one, and will allow you to obtain high-quality ground feed.
Emery from a washing machine motor
An emery machine is useful for almost any household.
It can be made in a simple way - for this it is enough to prepare the engine from an automatic washing machine in working condition. When you attach the sharpening stone to the motor, some difficulties may arise - the hole of the stone may not coincide with the diameter of the electric motor shaft.
In this case, you need to take an additional part that will need to be specially machined. This adapter can be easily made by any turner; you just need to tell him the diameter of the shaft.
In addition to the adapter, you need to have a special bolt, nut, and washer.
The thread on the nut should be cut depending on which direction the motor will rotate.
In order for the motor to rotate clockwise, the thread must be left-handed; for counterclockwise rotation, the thread must be right-handed.
If you do the opposite, the stone will constantly unwind and fly off during work.
It may be that you have a nut, but the thread direction is not correct. Then we change the direction of rotation. In this case, we swap the winding wires.
We connect the working winding to a 200 V network, connect the starting pair to the working coil.
We apply the second end to the winding terminal for a short time. The commutator electric motor will begin to move in one direction.
When the locations of the starting winding terminals change, the direction of movement of the motor will change to the opposite.
The direction of rotation of the motor can be changed without using a capacitor. Here, after connecting the working winding to 220 V, we sharply turn the stone in the right direction.
After this, the motor starts and the machine starts working.
DIY vibration table
Using the motor from a washing machine, we can make a vibrating table for paving slabs.
Equipment of this type is constructed in a fairly simple way. A homemade vibrating table is made in the form of a plate, which is the upper part of the device, attached to a metal base using a movable connection, with a motor with an eccentric from a washing machine. When the slab vibrates, air bubbles come out of the concrete that is poured into the molds on this slab and voids disappear. Thanks to this, the finished products are characterized by high strength and quality.
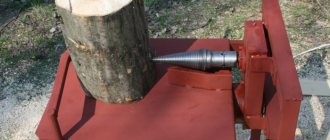
Electric motor for wood splitter
The basis of the design, as in a lathe, is the bed. It is made of a metal profile or square. The resulting site will consist of two zones - power and working. The power side is intended for installation of an electric motor. It must be securely fastened, since the main load falls on it.
The engine control unit is located in the same area. A dielectric plate is provided to accommodate the electrical components, and they themselves should, if possible, be placed in a plastic housing. The work area is made in the form of a table. The material used is steel sheet, 2-3 mm thick. At the boundary that conventionally separates both zones, a pedestal is mounted on which the shaft of the splitting cone is fixed. This part must not be mounted directly on the motor shaft.
The cone shaft is equipped with its own bearing support. In order to compensate for jerks and create torque, it is recommended to install a flywheel on the shaft.
What is needed to make a machine?
It is not difficult to assemble the structure with your own hands. You can make the simplest model of the machine, consisting of a motor, a tool rest and a tailstock (bed). To make a lathe for wood processing you need to prepare:
- working engine from an old washing machine;
- a board that will serve as a base for the device (alternatively, the machine can be attached directly to the desktop);
- a metal corner measuring 20*20, 195 mm long and a square pipe (will be used to prepare the tool rest);
- corner 62*62, 165 mm long (the tailstock will be made from it);
- a bolt with a length of 70 mm, useful for attaching the hand rest to the base;
- a piece of metal tube slightly larger than the diameter of the engine shaft;
- a bolt with a sharp tip (will be used as a rotating headstock assembly).
Don't forget to prepare the power supply wiring for the motor.
Tools and fasteners that will be needed during the work:
- drill;
- drills of various sizes;
- grinder and removable disks for it;
- nuts and bolts for fastening the main structural elements.
After all the tools and components necessary for the work have been prepared, you can begin the main work. Let's figure out how to assemble a homemade machine from an old washing machine motor.
How is it done?
If you decide to make a lathe yourself, you will have to be patient and have some free time. The assembly process will not be fast. First of all, it is necessary to prepare the foundation for the installation of all components of the structure. So, the algorithm of actions will be as follows.
- Clean the countertop.
- Attach the electric motor from the washing machine to the prepared base; for this you can use corners of suitable sizes.
- Assemble a tool rest from metal corners and square pipes.
- Using a drill and a drill of the appropriate size, drill a hole in the tabletop to attach the tool rest, and secure the part with a bolt.
- Assemble the frame using a 62-mm angle iron and a sharp-tipped bolt.
- Fasten the tool rest and the tailstock together.
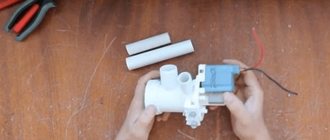
- Make an attachment for the electric motor shaft; it can be made from a piece of water pipe. The teeth of the nozzle are cut with a grinder.
- Weld the nozzle to the motor shaft.
- Connect the power supply to the motor.
By completing the following algorithm of actions, you will build a small wood lathe, which can be useful on the farm. The piece of wood to be processed is placed on the sharp tip of the engine shaft and the rotating tailstock assembly. Having started the device, you can begin turning work.
Manufacturing principle
It is recommended to make a wood lathe using ready-made components and parts, minimizing the manufacture of parts yourself.
At the initial stage, it is recommended to make a drawing indicating all dimensions. If possible, it is recommended to make a model out of cardboard; it will show all the subtle parts of the project. This is cheaper than correcting errors during assembly from expensive materials.
The second stage is cutting the material. When working with plywood, you will need a jigsaw or circular saw. First, the machine bed is cut out, glued and bolted together. The second stage is the design of the drive and headstock. Next is work on the tailstock and tool rest.
At the final stage, additional devices are manufactured - a copier, a milling device, and a grinding table. As practice shows, you can make a miniature lathe for modeling from plywood 18-24 mm thick in 3-4 days.
Installing the headstock and tailstock
The headstock of a lathe can be made in different design solutions. For its manufacture, you can use either ready-made units with bearings and an axle, or home-made ones.
In the first case, you can fit a hub with an axle from the front wheel of a bicycle under the turning shaft; in the second, you can simply buy two sealed bearings with an internal diameter of 10 mm, a bolt 10 mm thick, and several washers and nuts.
The supports for the headstock assembly are cut out of plywood. Holes for bearings are drilled in them. And then, bearings with a turning shaft are fixed in the holes and secured with clamping bolts. After this, the headstock of the lathe is firmly attached to the bed.
The tailstock assembly is made according to the template of the front headstock supports. A correctly made tailstock of a lathe with your own hands will be when the center of the lathe chuck and the cone center coincide. The easiest way to do this is by holding a regular pencil in the chuck and bringing the tailstock closer to it, marking the center point. After this, you can drill a hole and insert a bolt with a nut and locknut and a center sharpened to a cone.
Podruchnik
A tool rest for a wood lathe is needed as a stop on which the cutter will rest during operation. It is optimal to make the tool rest adjustable in height and so that it can move and be fixed anywhere on the frame between the headstocks. The material can be different - metal or even plywood, the main thing is that its edge on which the cutter will rest is rigid, so it is recommended to reinforce it with a metal plate. It is recommended to make the tool rest of a wood lathe adjustable - this will allow you to expand the number of operations on the machine and process parts not only along, but also across the axis of the machine.
Manufacturing of the bed
The bed is a frame that combines all parts of the machine into a single whole. The strength of the structure as a whole depends on its reliability, therefore the best material for the frame is a steel angle. You can also use a rectangular profile pipe.
First of all, the dimensions of the future unit are outlined. This indicator largely depends on what specific products the machine is needed for. The average bed size of a home lathe is 80 cm. Using a grinder with a metal circle, cut two identical workpieces.
Laying wooden blocks, the angles with the shelves up and inward, are laid on a flat surface, their upper edges should create an ideal plane. The same distance is maintained between them, approximately 5 cm. To orient them correctly, use a strip of appropriate thickness.
The longitudinal parts of the base are fixed with clamps. Cross members are made from the same square. There are three of them. Two are attached to the edges of the structure, the third, which is a support for the headstock, is approximately twenty centimeters from the left edge. The exact dimensions depend on the type of motor used and the parameters of the pulley that could be found.
All that remains is to weld the frame into a single whole. The seam must be reliable and of high quality; it can be welded manually or using an automatic machine.
It is important to immediately decide how the machine will be used. Desktop installation or production of a stand-alone unit is possible. In the second option, it is necessary to provide legs. They can be made from the same square, or they can be cut from timber of suitable thickness. The use of wooden legs will allow you to save on material, in addition, the machine can be made collapsible.
What can the machine be made from?
You can use anything that spins as a motor for a homemade wood lathe:
- Drill. A conventional drill can be used as an electric drive mechanism. It is important to understand that prolonged work without a pause contributes to increased wear on the power tool. But for short-term operations it is an excellent option, especially when there are no other options.
- Screwdriver. You can make a mini wood lathe with your own hands using a screwdriver. This option is completely universal, since the equipment can be transported and worked with anywhere. And if the power tool is powered by a voltage of 12V, then a car battery can be used as a source.
- Asynchronous motor. The best drive device for wood turning is an asynchronous electric motor. But it is more difficult to control than a DC motor. But by means of a belt drive and a primitive gearbox or the use of a gearbox, it is quite possible to make high-quality and productive wood lathes with your own hands.
- Motor from a washing machine. One of the most successful types of homemade wood lathe is a design using an engine from an Indesit washing machine. The motor is quite powerful and has a lot of torque, so the traction will be good. And to regulate the rotation speed, you can find a lot of electrical circuits using thyristors, triacs, or even transistors with feedback.
An example of a homemade lathe with drawings
Let's take a closer look at one of the working options for a lathe assembled on our own, the fairly high quality of which rightfully deserves the closest attention. The author of this homemade product did not even skimp on the drawings, according to which this device was successfully manufactured.
Of course, not everyone needs such a thorough approach to business; often simpler designs are built for home needs, but as a donor for good ideas, this machine is perfectly suited.
DIY lathe
Machine appearance
Main nodes
Caliper, tool holder and chuck
Side view
Tailstock
Bottom view of the tailstock
Guide shafts
Caliper design
Motor driven
Drawing No. 1
Drawing No. 2
Drawing No. 3
What types of motors do washing machines have?
In order to make a homemade lathe, you need a motor from an old washing machine, first you need to figure out what types of motors there are.
Asynchronous - there are two or three phase. Two-phase ones are often found in old cars made in the Soviet Union. More modern models are equipped with a three-phase motor.
A commutator motor is a small motor that runs on direct or alternating current. On the plus side, you can control the speed. The downside is the brushes, which wear out quickly, but can be easily replaced.
Modern direct drive motors are now found in most automatic washing machines. Mostly made in Korea.
The lathe consists of three parts: the motor itself, the tool rest, and the headstock and tailstock.
Direct drive or belt drive
There are several ways to transfer rotation to the workpiece. The simplest is direct drive. In this case, the workpiece is attached directly to the motor shaft. A distinctive feature of this design is its simplicity. With all this, direct drive has a number of significant disadvantages.
First of all, a direct drive machine does not allow you to adjust the rotation speed, which is critical when working with hard material. It is also worth considering the load on the electric motor, especially when working with large workpieces. No matter how well it is centered, it cannot do without vibration. Motor bearings are not designed to withstand longitudinal loads and will often fail.
To protect the engine from damage and provide the ability to adjust the speed of rotation of the workpiece, it is worth considering a belt drive. In this case, the engine is located away from the axis of rotation of the workpiece, and torque is transmitted through pulleys. Using pulley blocks of different diameters, it is easy to change the speed within a fairly wide range.
It is advisable to equip a machine for your home with pulleys with three or more grooves, which will allow you to process wood of any species with equal success, and, if necessary, work with soft alloys.
Areas of application of the machine
What is the scope of application of such an unusual homemade product? A small lathe for a home workshop, assembled with your own hands from an electric motor of a washing machine, can be used to make practically useful or decorative things from wood. Using a homemade device you can do:
- elements of interior or exterior decoration of the house;
- furniture parts;
- carved railings for stairs;
- tool handles;
- stools and much more.
In addition, a mini wood lathe can be used:
- for grinding the surface being processed;
- when applying threads with a certain pitch to the working surface;
- for drilling connectors in parts;
- for turning wooden elements.
As you can see, the scope of application of the machine is quite wide. Therefore, if the engine of an unnecessary washing machine is in working condition, you can give it a second life and use it to make a useful device for the household.
Main components of the device
The final quality of the processed part depends on the support. The effort, time and all other resources invested in the process can go down the drain without a well-established support. This part is located on special “sleds” moving along the frame along guide vectors.
The movement of the caliper can occur in the following directions:
- Longitudinal movement in which the working element of the device moves along the part being connected. This direction is performed when turning a circular thread or to remove the surface layer of paint or something else from the workpiece being processed.
- The transverse movement of the caliper is perpendicular to the axis of the part. With the help of this movement, holes and recesses are made.
- The inclined movement can be carried out at various angles of inclination, it is used to produce surface recesses of various configurations.
It should be remembered that the caliper, as the most active and moving part of the device, is the most worn.
Elements of a lathe.
Rapid wear is explained by the action of constant and serious vibration, which results in loosening of the fasteners and subsequent backlash, which always affects the quality of turning work in one form or another. Such a disaster can be avoided; this requires constant adjustment and adjustment of the caliper.
The caliper can be adjusted in different ways. If the backlash is adjusted, it is eliminated using a screw. Gaps can be eliminated using special inserts between the carriage and the guides.
Gaps appear when the screw, which controls longitudinal and transverse movements in planes, wears out. Oil seals can also wear out. In this case, they are washed and lubricated until completely saturated with machine oil. Sometimes they just need to be replaced with new ones.