When repairing a machine with your own hands, you need to think in advance about how to install the drum back, and at the same time choose a sealant.
In order for the machine to work as before after repair, you need to connect the dismountable parts and glue the halves of the tank, and they need to be sealed so that the assembly is waterproof.
To do this, you need to know how to seal the damage, and what products to use, which sealant or glue is suitable for sealing the damage, and which is not.
In addition, when repairing a tank, it is necessary not only to disassemble or saw the machine, determine where the damage is, replace worn bearings, gaskets and hoses, install all the parts back and reassemble the equipment. Repairing at home requires the owner of the unit to have knowledge and skills that not everyone has, and therefore often even people with experience prefer to take the equipment to repair shops.
How to choose the right sealant
To glue a tank consisting of two halves and seal a small crack, you can use sealants. They must additionally include adhesive functions to ensure the required level of adhesion of the elements. When choosing a suitable product, you must take into account the conditions of its use:
- constant strong vibration - the seam formed by the sealant must withstand mechanical loads without problems, therefore the product must be elastic;
- elevated temperatures and temperature changes - the tank heats up when hot water enters, cools down during rinsing, and the sealant should not lose adhesion to the surface during such changes;
- contact with water - all means for sealing parts of washing machines are necessarily water resistant and cannot be destroyed by water and its action under pressure.
There are a number of popular sealants that are well suited for gluing a tank; they are used to connect its halves for the purpose of sealing during assembly or to seal defects.
Permatex
This is an adhesive-sealant with good fluidity, which is usually used for gluing glass and car headlights; it has all the properties necessary for car repairs. The seams are moisture-resistant, transparent, do not react to temperatures, and can be used at -62...+232 degrees. Permatex sealant contains polyurethane, which lasts for many years and is safe for humans.
Kraftool
Kraftool silicone sealant is characterized by heat resistance. It does not deteriorate at temperatures up to +250 degrees, so it can easily withstand the heating of water in the machine. It was originally intended for sealing electric motors, but due to its excellent vibration tolerance it is also suitable for repairing tanks. Craftsmen prefer this product to others because of its high strength and reliability, because it can be used to glue drums even without additional fastening with bolts.
Dow Corning 7091
A universal sealant that forms elastic, flexible and durable joints. It is easy to work with, easy to apply, does not flow, but penetrates even small cracks. Curing occurs in half an hour at room temperature, after which the seam will not respond to vibration, temperature changes, or the action of water.
"Moment"
Aquarium sealant “Moment” is another composition that can be used to seal the washing machine tank, its drain and hoses. Distinctive features of the product are good tolerance to water, household chemicals, salts, vibration, and reliable sealing of joints.
"Glue F"
Adhesive-sealant F-6000 is a polyurethane composition with a high degree of adhesion to various materials, including stainless steel, plastic, glass, and ceramics. The seam is so strong that no additional mechanical fastening is required. After 2 hours, the joint hardens so that it is impossible to break it, you will have to saw it. The only drawback is the high price of the composition.
ABRO 11AB R
This is no less durable sealant than the previous one. The product easily withstands extremely low and high temperatures, constant contact with water, household chemicals and even aggressive substances and acids. They are recommended to glue tanks of cars without fastening them with bolts.
How to repair a breakdown?
The washing machine tub contains several moving parts, including a drum. It actively participates in washing clothes, although outwardly it seems that direct interaction occurs only with the surface of the drum.
Water flows into the tank. A misleading impression of the strength of the part may be created: it seems that its failure is almost impossible. But that's not true.
The list of DIY repair steps depends on the type of tank and the breakdown that occurred.:
- Bearings are moving components. They are inexpensive, but quite difficult to get to. Replacing it yourself requires care and patience, as there is a risk of damaging other important parts.
- Drain valve . It may break or become clogged with debris, then you will need to clean the hole (see step-by-step instructions for installing the drain here).
- Shaft failure . Such a nuisance is a consequence of problems with bearings that were not replaced on time.
- Wall deformation . Possible due to malfunctions of the shock absorbers of the washing machine and its bearings under the influence of centrifugal forces.
Plastic
In modern inexpensive models of automatic washing machines, plastic tanks are often found, as it is believed that they combine a combination of low price with average quality. They are easy to produce, the weight of the part is small, and the water heats up quickly. Service life is about 30 years.
A significant disadvantage of such containers is increased fragility. Repair involves the complete replacement of a part in the presence of serious defects or the elimination of minor defects and cracks by soldering or gluing.
- Gluing is an unreliable method of repair . The sealing compound may lose its properties due to constant vibration and exposure to hot water. Therefore, you need to choose the most high-tech components that can withstand high temperatures and mechanical factors.
- Can be repaired by soldering . All you need is an electric soldering iron. To give the seams greater strength, it is recommended that they be additionally reinforced with wire, which is embedded in plastic.
Non-separable
Most manufacturers make the structure monolithic . This makes it more durable, although it creates difficulties when repairs are necessary. It has to be sawed in half to get to bearings or other parts that have failed.
- To disassemble the structure, it must be carefully inspected to detect a seam sealed in production.
- 15–20 small diameter holes are drilled into it, which will serve as a place for installing fasteners during reassembly.
- The seam is then sawed with a hacksaw for working with metal. The work is painstaking.
ImportantAttention! When sawing a tank, you cannot go deeper than five centimeters into its thickness. Otherwise, you can irreversibly damage its walls.
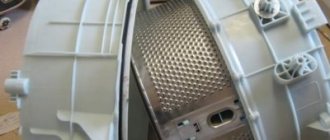
- The sawn tank consists of two halves. The front one looks like a ring of plastic with an irregularly shaped hatch. The rear one includes a drum with a drive, which you need to get out. It needs to be turned over to begin disassembling the shaft (you can see instructions for disassembling washing machines of different brands here).
- The screw in the middle must be unscrewed quite carefully. Then you can remove the shaft. To do this, you need to prepare three blocks of wood, one of which should be smaller than the others. The tank is installed on large bars, the small bar is placed on a rod, which is hit with a hammer. The blows should not be too strong, otherwise the rod may be damaged. Gradually you will be able to separate the drum.
- Inspect bearings, tank, seals.
- If damage is detected, the parts are replaced and then reassembled in the reverse order (read about how to repair or replace bearings here).
What and how to glue it after?
When repairing a washing machine yourself, you need to provide for the reverse installation of the drum and select a suitable sealing agent.
To restore the functionality of the machine, you will need to reconnect the disassembled elements, connect the halves, and make the seam waterproof. After cutting, sealing glue is used to fasten the halves together. For better sealing, metal or plastic is fastened with self-tapping screws. They will act as fasteners and connect the component parts more accurately and tightly. Sealant is an excellent moisture insulator , so it can be used everywhere when repairing washing machines. The product must be applied to both halves and over the seam to create a more reliable connection.
Advice
Attention! Before reassembling the washing machine, it is worth checking the repaired tank for leaks. To do this, hot water is poured inside and left for several hours. If there are no leaks, the part is ready to be reinstalled.
Procedure and features of work
Before starting work, you must drain the water from the machine. It's more convenient to work together.
To get to the tank and drum you need to remove from the unit:
- Back, top cover, powder receptacle, front panel with circuit board.
- We remove the rubber band: open the plastic or metal latches, take out the clamp, and remove the rubber band.
- We remove all attached parts (drive belt from the pulley power supply to the heating element, motor, lower pipe).
- Place the washer on its side and remove the shock absorbers.
- Return to its original position and remove the tank with the drum through the top cover, without tearing the existing rubber bands.
- Free the tank from gravity by removing the load.
- Remove the cuff.
We recommend watching a video on how to work with a tank:
How to glue halves
The tank is ready for further work:
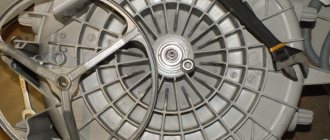
- Unscrew the pulley.
- Place with the drum hole facing up.
- To ensure secure fastening, drill holes for bolts along the contour of the upper part, so that later the two halves can be combined.
- We cut with a grinder or a saw with small teeth.
- Separate the top from the bottom and remove the drum.
- We remove burrs and polish both parts.
- We are making repairs.
- We put the drum in place and put on the pulley.
- Generously lubricate the halves with a fixing agent along the edges of the contour.
- We combine the upper part with the lower one, making sure that the holes of the top and bottom coincide.
- We tighten the bolts.
- We are assembling the car.
- Sealant, glue dries from 12 to 24 hours.
How to fill a hole in a tank
Mechanical damage may cause a crack or hole to appear on the tank.
The scale of the disaster must be assessed. If the hole or crack is small, then take a soldering iron or a heat gun, sealant, a piece of plastic for a patch the size of the hole and a structure similar to the tank, a piece of sandpaper. Next, follow the instructions:
- Sand the repair area.
- Use a soldering iron to solder a piece of plastic.
- Fill with sealant.
- Leave to dry.
The crack is also glued together using a soldering iron and filled with sealant.
What to do if the tank body is deformed?
First of all, you need to analyze the nature of the damage and the scale of the work.
If the tank is plastic
If the tank is plastic, it may have cracks and cause water leakage.
We immediately dismiss the option of soldering the crack, because this is a conditional repair of washing tanks that will not last long.
The best option is to replace it with a new tank. The price of a metal tank is more expensive than a plastic one.
If the tank is made of stainless steel
If we consider the possibility of repairing a stainless steel tank, then the option of using welding is quite justified. Of course, it is better to trust an experienced welder who will do everything carefully and quickly. After welding, you can paint over the seam with waterproof enamel to increase the service life of the part.
Keep in mind that sealant, no matter what quality, and cold welding will not solve the problem.
Deformation repair
If the tank is deformed, repair occurs as follows:
- You will need a hammer with a block of wood. If the damage is minor without holes, no other tools are needed.
- The dent needs to be heated using, for example, a gas burner. The outside of the tank heats up.
- The block is struck with a hammer not to create a dent, but to create a bulge until the metal has cooled.
Gluing the halves of the tank together
Having dealt with the bearings and oil seal, we proceed to assembling the tank and the machine. The first step is to hook the drum to the crosspiece so that the rod is fixed in the seat. Then we tighten the pulley ring with the provided screw and begin gluing the tank.
The edges of both halves of the tank must be cleaned again and degreased with a special compound. Then we apply a moisture-repellent and heat-resistant sealant along the edge
It is important to correctly measure the amount of adhesive: there should be no less and no more. Then we connect the two parts together and tighten the structure with fasteners
There is no need to skimp on holders - it is better not to limit yourself to self-tapping screws, but to use a screw with a nut, locknut and washers.
After gluing, the sealant must dry completely. The hardening time depends on the texture and type of lubricant and is always indicated on the packaging of the product. Professionals recommend playing it safe and waiting “above” the appointed time for another 1-3 hours. There is no need to cut off the glue that has come out of the seam - it will serve as additional protection.
It is not worth putting the tank into use right away; it is better to first test it for leaks. You need to plug all the holes with rags and fill them with water. If there are no drops or smudges on the sealant, then you can start the wash.
Share your opinion - leave a comment
How to glue the halves?
There is nothing complicated here. The main thing is to properly prepare the parts for gluing. Before sawing, you need to make 30–40 small diameter holes across the seam. They are then precisely aligned when gluing, and the halves fit together flawlessly.
The joint of the halves is smeared with the selected composition, and then the bolts are screwed on. Moreover, they tighten the bolted connections without waiting for the glue/sealant to dry. The seam will dry completely in about two hours.
Why do you have to glue it?
Sealing and gluing the washing machine tank is a forced process that owners of some SMA models have to deal with. Washing machines with a non-removable tank are offered, for example, by brands such as Ariston and Indesit. Manufacturers, making this element monolithic, do not intend to disassemble it. If the bearing breaks, the unit must be completely replaced. But such a replacement costs a lot of money and our people simply cannot agree with this order of things. As it turned out, you can halve the drum, remove the bearing, replace it with a new one, and then connect the halves
It is important to know how and with what to seal the tank
This is interesting: Why ice freezes on the back wall of the refrigerator: causes of malfunction
How to prevent foreign elements from getting into the washing machine drum?
To prevent foreign elements from penetrating into the drum of the device (for example, in the HANSA WDHS 1260 LW) and damaging its internal components, you must follow a few simple rules.
Bras with wires, as well as corsets, should be washed in a special bag that closes with a zipper. This also avoids deformation of bras during washing and spinning. An ordinary pillowcase made of cotton can also serve as a replacement for the cover.
It is advisable to wash clothes inside out or stick them with tape if they have large buttons or are decorated with other large items. This way they are less likely to fall off.
Article on the topic: How to wash a down jacket in a washing machine and dryer
Life hack: metal objects that decorate light-colored clothing sealed with regular tape will not leave traces of rust on the fabric.
The article discusses methods that will help you remove a stuck bone from a corset or bra from a washing machine. The user of the equipment can cope with this without outside help. A method that does not require disassembly is more painstaking; methods that require disassembling the machine will also provide access to parts that need to be cleaned.
Why does the cuff get damaged?
The cuff is a rubber product, damage to which can be caused by the following factors:
- physical wear of the material, which occurs due to the presence of vibration loads during drum operation;
- rotting of the cuff due to the appearance of mold in the folds;
- mechanical impact with a sharp object during rotation.
It often happens that some factors overlap with others. With poor maintenance, namely lack of proper care after washing, mold may appear between the folds and rust may appear on metal elements.
This leads to the fact that during operation the rubber product cannot withstand the impact and is rubbed or broken. Hard water can have a negative impact.
Cuff damage is not as harmless as it might seem at first glance. Leaking rubber can lead to water entering electrical wiring elements, which can result in a short circuit.
This means that it is better to replace the cuff before it breaks. If there are places on it with significant wear, then you need to think about replacing it.
Grinder and circular saw
Not the best tool to cut through a washing machine tub. The main problem with the grinder is that it does not saw, but melts plastic. As a result: torn melted edges, wide seams, high probability of damaging the surface. At the same time, the grinder is perfect for cutting stuck fasteners of a metal tank, for example, those that are installed in Bosch machines in the upper price segment. The circular saw also has disadvantages. It cuts well, but “walks”, you need to constantly keep it on the cutting line.
As is easy to see, there is no ideal tool, and there cannot be one. To quickly and efficiently cut the tank of any washing machine, you need to choose the best option for each area. For example, you can use a jigsaw on a smooth surface, and process areas with protruding elements with a saw (a backhoe or a hacksaw).
We make a replacement
Let's figure out how to get to the oil seal. Here are the step by step steps.
- After disconnecting the machine from the network and communications, drain the remaining water from the drain filter. It is located under the front panel, behind a small hatch.
- Remove two screws from the back to remove the top panel. Now unscrew the screws around the perimeter of the back panel and set it aside.
- Remove the drive belt from the drum. Using the hammer handle to lock the pulley, unscrew its central bolt and remove it from the tank.
- Disconnect any wiring that may be attached to the drum. It is usually secured with plastic clamps, so use wire cutters.
- After disconnecting the motor wiring, unscrew the fastening bolts and pull the electric motor out of the housing. Also unfasten the wires from the heating element.
- Remove the tank top counterweight bolts. Put it aside.
- Pull out the detergent dispenser by pressing the central latch. Remove all bolts that hold the control panel in place. Unlock the plastic latches, remove it and place it on top of the case.
- Loosen the filler valve clamp and disconnect it from the tank. Pull out the powder hopper along with the filling valve. To do this, unfasten the wires from the valve and unscrew the mounting bolts from the back.
- Remove the pressure switch hose, which is usually attached to the tank.
- Open the hatch door, bending the sealing rubber, remove the outer clamp. Tuck the cuff inside the tank. Unscrew the screws of the UBL lock, placing your hand behind the SMA body, pull out the lock and unfasten the wiring.
- Unscrew the screws around the perimeter of the front panel, pull it up and set it aside.
- Remove the counterweights from the tank by unscrewing the bolts.
- After unscrewing the shock absorbers, remove the tank from the hooks and pull it out.
You have completed the removal of the tank. Now let’s figure out how to properly remove and install the oil seal in the washing machine.
- Remove the screws around the perimeter of the tank. Using a screwdriver, release the latches and remove the top half.
- By hitting the bushing several times, knock the drum out of the tank.
- Remove the oil seal by prying it with a screwdriver.
Before installing the oil seal correctly, apply lubricant. Begin to lubricate the outer surface with a thin layer. After installing the seal in place, use a syringe to apply lubricant to the inner surface.
You understand how to change and lubricate the oil seal. All that remains is to assemble the machine and enjoy its smooth operation. A video on the topic will help you:
How to check the quality of fixation
If you have finished soldering, inspected and checked the area to be fixed with your hands, you can proceed to the final check. Boil a small container of water and pour it into the container. To be on the safe side, you can leave the water in the container overnight to make sure the tank is not leaking in the morning. Only after making sure that the tank is completely sealed can you begin assembling the washing machine and subsequent operation of the device.
Checking the tightness of the tank using boiling water
Attention! Repairs made in this way will last a long time, but if the tank is damaged in the same place, it is better not to make repeated repairs. With each soldering, the layer of plastic will become thinner and subsequent repairs will no longer provide such a guarantee of long and safe operation of the machine.
Prerequisites for getting started
The tank is the main part of the washing machine; this statement is true for all models of Indesit, Ardo, Samsung and other manufacturers. It is inside the tank that the drum rotates, and it is in it that the washing process takes place. Based on the type of design, a distinction is made between the tank being collapsible and non-dismountable. If in the first case it is easy to disassemble it - just unscrew a few bolts, then in the second case, in addition to the tool, you will also need ingenuity.
As already mentioned, you need to cut a non-separable tank to replace the drum bearings, but not only. This procedure is necessary in the following cases:
- drum shaft deformation;
- damage to the tank walls;
- blockage of the drain hole;
- failure of the drain valve.
Any of the problems listed above is a signal to action. You shouldn’t wait, because damage to the integrity of the tank can lead to a full-fledged flood in the apartment, and problems with the shaft or bearings can lead to a serious breakdown of the washing machine itself.
What you need for work
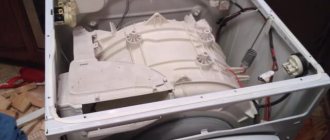
Removing the washing machine tank
We recommend that you read
- How to clean the washing machine tray?
- Indesit washing machine does not spin
- Washing machine pump repair and error codes
There are several methods for repairing a burst washing machine tub, but most of them are not effective. Attempts to use glue or other fastening elements are not crowned with success, since the tank is a part that comes into contact with moisture during operation and is subject to strong mechanical stress.
There is one working method - soldering, but not just fastening plastic, but sealing through additional reinforcement.
Hole on the right side of the tank
If the problem has already been diagnosed and the tank is the cause of the machine breakdown, there is no need to mention the tools needed to disassemble the machine. To repair a tank you will only need:
- electric soldering iron;
- a piece of metal stranded wire.
Using a simple tool, you can eliminate the leak and restore the tank’s former tightness.
Attention! If you cannot collect all the fragments of a cracked tank, you will also need an additional piece of plastic. It can be cut from the non-functional raised part of the lid.
This is interesting: Deciphering the Sud (5ud) or SD (5D) error on a Samsung washing machine: causes of the malfunction, solutions
Features of tank disassembly and assembly
Repairing a washing machine tank is carried out according to a specific algorithm. The procedure for disassembling such a part is similar in all car models, regardless of whether it is a non-collapsible version or a collapsible one. We will describe the entire disassembly process using the example of a non-dismountable tank, since it is much more complicated.
Tools
To disassemble the tank (drum), prepare the following tools:
- A set of screwdrivers - among the screwdrivers there must be a Phillips and slotted one.
- Set of hexagons.
- Screwdriver.
- Hammer, pliers.
Most automatic washing machines have a horizontal loading type, but some models also have a vertical loading type. Let's look at how to prepare the device for dismantling the drum.
Front loading washing machines
First of all, to repair the washing machine tank yourself, unplug the device and remove the drain hose. Shut off the water supply hose.
Then proceed directly to the disassembly process:
- Remove the back panel of the device by unscrewing the screws with a screwdriver.
- Remove the front panel using a similar principle.
- Remove the powder loading container.
- Remove the control panel using a slotted screwdriver. Do not remove the control panel completely, but place it on the side, since the main thing is that it does not interfere with the disassembly process.
- Remove the hatch cuff and bottom panel.
- Remove the screws on the bottom panel.
- Disconnect all elements from the tank: shock absorbers, electronics and other parts. (The wiring is usually attached to tie clamps or hooks).
- Disconnect the wires from the heating element and from the motor.
- Remove the motor by unscrewing the two bolts. Separate it from the tank.
- Remove the tank by the springs, lifting it up from the body, very carefully so as not to damage the wiring.
- After removing the tank, unscrew everything from it that may interfere with further disassembly: front balancing weight, pulley, heating element.
Top loading washing machines
Vertical loading models are more ergonomic and take up little space. The loading tank in such machines is secured with screws.
To make it more convenient to repair the washing machine tank with your own hands with this model, remove the drum in this way:
- Dismantle the back and front walls of the device by removing the screws with a screwdriver.
- Move the side panel to the side.
- Remove the side panel completely.
- Remove the wiring around the circumference of the casing.
- Unscrew the screws.
- Unscrew the screw securing the shaft.
- Pull out the drum.
Which washing machines have collapsible tanks?
Devices made in Italy and other high-quality and expensive foreign-made models have collapsible tanks, for example “Electrolux” or “Indesit” from an Italian manufacturer. To disassemble the drum of such units, you need to find the attachment point of its two halves, and then remove the screws that hold them together.
Repair of a non-separable tank
To repair the tank, which is a single whole, you will have to cut it. To do this, use a power tool to separate the front and rear halves. If done correctly, a ring with a rubber cuff should remain in your hands, which seals the tank. To replace the cuff, the elastic will have to be torn off.
During repairs, depending on the type of breakdown, the following actions are carried out:
- installation of new bearings coated with silicone grout;
- replacing oil seals and lubricating the front side with a special lubricant;
- cleaning of rust or complete replacement of the drum rotation axis.
Next, you need to carefully drill holes in the tank with a diameter of 3-5 mm every 5-9 cm, into which self-tapping screws are then inserted. After gluing the halves and securing them with bolts, the machine is assembled. Lubricating the parts is a prerequisite - this is the only way to achieve complete sealing of the tank. A day later, when the seam has dried, the tank is put back into the machine, it is collected and put into operation. It is better to fix serious damage in a specialized workshop, and small leaks in the tank can be repaired with sealant.
Basic faults
The tank is one of the main elements of washing equipment. Thanks to the movable mechanisms contained in it, laundry is washed. This device is inextricably linked with its internal components. And when a malfunction occurs in the operation of equipment, the reasons must be sought in unrepaired breakdowns of these elements.
When operating washing machines, the following malfunctions occur:
- failure or blockage of the drain valve, as well as the drain hole - in the latter case, these parts will need to be cleaned of dirt and accumulated debris;
- damage to the shaft and, as a result, its failure - the reason for this is wear or defects of the bearings;
- Due to incorrect operation of shock absorbers and bearings, deformation of the tank, or rather its walls, often occurs, and then the owner of the equipment is forced to replace the entire tank.
But the most common problem is bearing wear, which leads to other serious problems. Replacing these moving parts yourself without risking damage to parts like the pin and shaft can be difficult and time-consuming. In this case, you need to have a good idea of how to disassemble the tank, remove the bearing, and then seal and glue the tank container without damaging the equipment.
But if the tank is metal, the cracks will need to be professionally welded, and this is best done by a qualified technician. The technician will not only reliably seal the crack, but will also cover the seam with special enamel that is not exposed to water, which will increase the service life of the washing machine.
Causes of machine breakdowns
Most often, device malfunctions are associated with violation of operating rules. For example, the cause of a rupture of the sealing cuff is often a sharp object getting into the tank or careless removal of laundry. The pipes leak due to lime deposits or blockages, the bearings leak due to non-compliance with the standards for the weight of the loaded laundry or due to mechanical wear. The cause of tank failure may be:
- malfunction of seals;
- shaft deformation due to bearing failure;
- damage to the walls;
- leakage due to strong friction.
What parts break most often?
The most common parts that fail are bearings. Their price is low, and they are considered by craftsmen to be a “consumable material” in the washing machine. However, replacement requires complete disassembly of the device, which without the lack of skills can cause damage to the shaft, pin and other parts.
The second most common failure is the failure of the drain valve. This happens in the absence of measures for regular cleaning of the machine, ignoring preventive running of the device with special cleaning compounds. The walls of the tank may also deteriorate due to:
- defect of bearings, shock absorbers;
- strong impact of centrifugal force;
- mechanical influence from inside or outside.
Sealant DOWSIL 7091 gray
A versatile neutral curing adhesive/sealant that forms strong yet flexible bonds.
Old name: Dow Corning 7091 gray
- Description
Offers
Description
Properties and Application
- Universal bonding and sealing.
- Manufacturing of on-site formed gaskets.
- Applications that require strong but flexible connections, such as bonding materials with different coefficients of thermal expansion, such as glass and metal or glass and plastic.
- Strong adhesion without primer to common materials including enamelled and painted steel, aluminum, ceramics and glass, as well as many engineering plastics.
Basic properties
- Safety Data Sheet - Dow Corning 7091 gray
- Data Sheet - Dow Corning 7091
Available packaging
Causes of deformation and nuances of repair
One of the causes of damage to plastic water containers is improper installation. An uneven surface and the presence of sharp objects can lead to changes in the geometry of the tanks, the appearance of cracks and leaks. Deformation can also be caused by mechanical influences, including impacts during operation.
Before sealing a plastic water tank, you need to know the composition of the material that was used to make it. Depending on the feedstock, the following types of polymers are distinguished:
- Polyethylene (PE-HD)
. It is characterized by a combination of hardness and ductility, which simplifies the processing of plastic. Low-density polyethylene is resistant to various organic and inorganic environments and retains its parameters at temperatures from -50..+80 °C. - Polypropylene (PP-H)
. It is characterized by increased hardness, tensile strength and chemical resistance. - Polyvinyl chloride (PVC-U)
. Withstands temperatures ranging from 0...+60 °C, as well as exposure to oxidizing environments and chemically aggressive substances. In addition, it has high strength and hardness.
The type of polymer influences the choice of method by which damage and leakage of containers is repaired. Repair of plastic water tanks made of plastic with different compositions is carried out using certain technologies.
How to glue a plastic water tank?
Below are adhesives and sealants that are suitable for bonding the drum. These compositions easily withstand the difficulties characteristic of SMA - temperature extremes, vibration attacks, high pressure, contact with water.
Permatex 81730
This is a flowable adhesive-sealant designed for hermetically sealing headlights and glass in a car. The composition is characterized by transparency. Frozen seams do not allow water to pass through and are not afraid of extreme temperatures. The operating range of the composition is from minus 62 to plus 232 °C. Great for the task. Costs on average - 175 rubles.
Kraftool
The composition is highly elastic. Withstands strong vibrations and heating up to plus 250 °C. Its main purpose is to seal connections in electric motors. Reliably fastens the halves of the product even without bolted connections. One tube can glue 4 tanks together. The cost is about 200 rubles.
Glue F
This is polyurethane glue. If you use it, then you won't need bolts. But it is so strong that if you need to disassemble the machine again, you will have to saw it again. The second disadvantage is the price, it costs much more than sealants, a 310 ml can costs almost 700 rubles.
The main breakdowns that are associated with the failure of the pipe
If your LG washing machine is leaking, you must first check the condition of the pipes. Among the most common breakdowns that their malfunction can lead to are the following:
- loose fit of the hatch;
- if the pipe breaks or the seal is broken, water appears at the bottom of the machine under its central part;
In this case, you must also perform the following steps:
- remove the pipe
- clear
- dry its location
- install again in the old place
- secure with glue to ensure reliable sealing of the fastening
Sometimes leaks occur as a result of wear and tear on the drain pipe when it becomes clogged with various foreign objects, such as buttons or coins. This often leads to loosening of the pipe clamps.
To eliminate the breakdown, you need:
- clean the part well
- lubricate the fitting area using glue/sealant
- tighten the clamps.
In addition, it is important to have theoretical knowledge of the structure of a washing machine, so it will be better if this work is carried out by professional craftsmen.
Most washing machines now have non-removable tanks. If it breaks down, sometimes you have to completely replace this important part, because it is not always possible to repair it. However, in some cases, you can use a washing machine sealant to fix leaks, seal drum cracks, and get your appliance working again.