How to make a circular saw drive
What engine does it need?
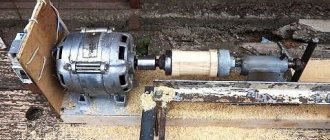
It depends on what kind of automatic washing machine you have gathering dust in your storage room. It is better to take an engine, of course, with more power. Although for a mini-circular, which is assembled in a similar way, a less strong one will do. Its difference is its light weight and the installation of the mechanism not on a stationary base, but on a wooden box. It serves as both a bed and a chip storage.
Preparing the motor
The collector motors of washing machines have several outputs. How to determine and connect the ones you need? We use an ohmmeter to test the second coil, selecting the one with the highest resistance.
We check other connections at the commutator and brush outputs.
We also find, measure and mark the speed sensor wires. They may be located inside the case, then disassemble it.
We connect the first output of the collector and one from the coil. The second one, with the remaining coil contact, is connected to the network. We are doing a test run.
To enable reverse rotation, the contacts are swapped.
Adjusting the speed
In order for a circular saw to process materials of different sizes, a device is needed to add or reduce the number of revolutions.
In the device from which we removed the motor, this function is performed by a tachometer operating through an electronic module. The latter will not work with our device.
The simplest thing is to use a dimmer or trigger from a hand-held electrical appliance to control the voltage supply and, accordingly, the shaft rotation speed. The connection goes like this:
- one coil terminal is terminated with the armature terminal;
- the second - for mains power;
- the remaining armature output through the dimmer is the same;
- Having checked the connection, we test it.
A more complicated option is using a tachometer. It will allow you not to lose electric drive power during operation. It must be connected through a microcircuit, which will equalize the power as the load on the shaft increases. If it is impossible to buy a ready-made one, using the TDA 1085 board diagram and the list of necessary parts, you can assemble it yourself.
Motion module
It consists of:
- Shaft for attaching the cutting disc.
- Motor shaft.
- Transmission belt.
- Motor pulley.
- Saw pulley.
To simplify things, you can assemble the device without bearings.
Through a drive belt placed on a pressed-in smaller pulley, the shaft transmits rotation to the saw blade. The pulley must have notches so that the serpentine belt does not slip on it.
A small protrusion is welded onto the edge of the larger pulley to prevent the drive loop from slipping.
The disk must be securely fastened to the shaft, otherwise it will come off and cause injury.
Bore the holes for fixing the engine to adjust the belt tension.
Starting device
You can choose a switch for a household electrical appliance for it. It’s better to install a push-button one from a Soviet washing machine.
Its connection diagram is as follows:
- At the input it is powered by two contacts, and inside one wire bifurcates.
- Of the three outputs, one will be phase, the second zero.
- The third, through a capacitor, will give a shifted phase.
This connection will provide better launch. But after it it is necessary to disconnect the capacitor.
bed
For a welded frame, a rectangular twenty-millimeter profile is suitable.
The drive and motion module are securely attached at the bottom. This design leaves the upper platform free.
According to the testimony of the craftsmen who made such machines, they spent about six months on it. But we are quite satisfied with the equipment. So go for it too!
Video:
Badly
Interesting 8
Super
Motor selection
The question arises whether any washing machine will do. Of course, the greater the engine power, the more powerful the saw will be and will cope with larger tasks. But a low-power tool is always useful on the farm. It does not require a stationary table; an ordinary box will do, which will serve as both a support and a place for shavings. The main aspect is to connect the motor correctly, otherwise the assembled circular saw will not work. But this is not the only difficulty.
In order for the tool to work properly and cope with various tasks without spoiling the material, you need to adjust the motor speed. In a washing machine, a tachometer, which is controlled by an electronic system, is responsible for regulating the speed. A homemade instrument without electronics requires a different solution. The commutator motor has several terminals. In order to determine which one to connect to, you need to “ring” all the terminals in pairs with an ohmmeter. We find where the greatest resistance is.
We also check other connections at the commutator and brush outputs. We also take measurements and mark the wires of the speed sensor. If in the model they are located inside the case, it needs to be disassembled. We connect one output from the coil to the first output of the collector. The remaining contact of the coil with the second output of the collector must be connected to the mains. We are conducting a test run. Since there is a high risk of injury from moving parts and electricity, extreme care must be taken.
Important! To turn on rotation in the other direction, you need to swap the contacts.
Speed regulation
During the operation of the tool, it becomes necessary to work with materials of different sizes, so you need to be able to adjust the speed up or down. To do this, you can use a dimmer or trigger from a hand-held electrical appliance, because they allow you to regulate the voltage supply and, accordingly, the speed of rotation of the disk.
A more complex way to regulate speed is to use a tachometer. With it you can adjust the rotation speed without losing engine power
Attention, you need to connect the tachometer using a microcircuit. It equalizes power when the load on the shaft increases
You can buy the required microcircuit or make it yourself.
Which motor to choose?
The first criterion for choosing a motor for a circular saw is power.
It is recommended to choose from engines equipped with a V-belt.
This will simplify the process of transferring speed to the saw blade.
To launch a 350 mm disk, 1 kW of energy is required. If you use a 170 mm disk, then approximately 500 W are needed. Therefore, to build a circular machine, they use the engine of an old washing machine.
In a circular saw, it is important to be able to control the number of engine revolutions, otherwise the saw will simply tear the material. In washing machines, the tachometer, which controls the control module, is responsible for controlling the number of revolutions. However, the device is not connected to the circular, so you will have to use a voltage regulator.
Circular saw device
Being a truly useful tool, the circular saw has a fairly simple design. Its main components:
- bed – frame on which the main units are mounted;
- tabletop with a slot for a disk;
- engine with rotation transmission system;
- cutting tool, disc with teeth.
Optionally, the device can be supplemented with a pusher, which ensures progressive movement of the workpiece towards the disk, and various lifting mechanisms that regulate the cutting depth.
The principle of operation of a circular saw (circular saw) is that the rotation of the electric motor shaft is transmitted to the cutting tool, a disk with sharply sharpened teeth. The center of the disk is located below the level of the tabletop, only a segment of it is removed from it. The workpiece is brought to the rotating disk, the teeth bite into the wood, creating an even cut.
How the device works
The engine starts, which drives the shaft and pulley. As a result, the drive belt rotates, transmitting speed to the circular saw pulley. The saw begins to rotate, allowing the material to be cut.
A homemade circular saw is always useful in the household. Due to the fact that it can be made from improvised materials, it will cost you almost free.
Source: cosmo-frost.ru
Machine with pendulum engine suspension
This is a more advanced type of circular saw. The pendulum suspension of the circular saw ensures smooth operation of the tool, there are no jerks during operation, and the belt is tensioned more tightly. Such a homemade circular saw vibrates less, which affects the quality of work and the durability of the components of the machine itself. The pendulum itself is a platform fixed on one side on which the engine is installed. The second end of the platform is spring-loaded. When the engine is turned on, the platform dampens vibrations, and under the influence of shaft rotation, the electric motor tensions the belt.
As you can see, assembling a simple table saw with your own hands is relatively simple. The motor from a washing machine and the shaft from an old grinder are the main and most expensive parts of this machine; everything else can be made from scrap materials. The result is an irreplaceable device, which, if necessary, can be modified to suit your needs by adding the necessary devices and accessories.
Moving parts
Having finished connecting the engine and making sure that it normally increases and decreases speed, you can proceed directly to the circular device.
Let's figure out which moving units that bear the main load we will need:
- saw shaft,
- SMA motor shaft,
- drive belt,
- two pulleys - from the washing machine and the circular shaft.
The drive must operate in this manner. The engine transmits rotation to a shaft on which a small pulley is pressed. The last one is wearing a belt that sends revolutions to the second pulley. At first glance, everything seems simple, but when the circular is being installed, many difficulties arise that must be resolved.
The small pulley must be sharpened. Three to four transverse grooves are placed on it so that the belt has the opportunity for a good hook.
You don’t have to use the belt from an old washing machine; just take an analogue from another unit. The main thing is that it is durable and has teeth.
A disc of a slightly larger diameter is welded to the edge of the large pulley to create a protrusion that prevents the belt from slipping during operation. It is not necessary to sharpen the serrations on this pulley; the clutch with the belt will be quite sufficient.
The shaft holding the circular saw, fastenings in the form of a washer and a nut must be reliable so that at maximum speed the saw does not become deformed and does not jump off, injuring workers. It is recommended to use the shaft and fasteners from a factory-made circular saw.
The procedure for constructing a circular saw is described for a saw with a three-hundredth blade. Many will say that the SMA engine will not pull such a saw and will stop. But here you should remember a few rules:
- you need to be able to work correctly on a circular saw,
- household saw, designed to work with small volumes of materials,
- the successful operation of such a saw is confirmed by numerous reviews.
Simply put, the saw should not be overloaded, and it is better not to work at idle speed .
The basis of a home wind generator
The topic of manufacturing and installing homemade wind generators is very widely represented on the Internet. However, most of the material is a banal description of the principles of obtaining electrical energy from natural sources.
The theoretical methodology for constructing (installing) wind generators has long been known and quite understandable. But how things stand practically in the household sector is a question that is far from fully disclosed.
Most often, it is recommended to choose car generators or asynchronous AC motors supplemented with neodymium magnets as a current source for homemade home wind generators.
The procedure for converting an asynchronous AC electric motor into a generator for a windmill. It involves making a rotor “coat” from neodymium magnets. An extremely complex and long-term process
However, both options require significant modifications, often complex, expensive, and time-consuming.
It is much simpler and easier in all respects to install electric motors, similar to those that were produced before and are now produced by Ametek (example) and others.
DC motors with a voltage of 30 - 100 volts are suitable for a home wind generator. In generator mode, you can get approximately 50% of the declared operating voltage from them.
It should be noted: when operating in generation mode, DC electric motors must be spun up to a speed higher than the rated speed.
Moreover, each individual motor from a dozen identical copies can show completely different characteristics.
Therefore, the optimal selection of an electric motor for a home wind generator is logical with the following indicators:
- High operating voltage parameter.
- Low RPM (angular rotation speed).
- High operating current.
Thus, a motor manufactured by Ametek with an operating voltage of 36 volts and an angular rotation speed of 325 rpm looks suitable for installation.
It is this kind of electric motor that is used in the design of a wind generator - an installation that is described below as an example of a home windmill.
DC motor for home wind generator. The best option among products manufactured by Ametek. Similar electric motors produced by other companies are also suitable
It is not difficult to check the efficiency of any similar motor. It is enough to connect a regular 12-volt car incandescent lamp to the electrical terminals and turn the motor shaft by hand. If the technical performance of the electric motor is good, the lamp will definitely light up.
How does the device work?
The circular saw works as follows:
- The motor starts and drives the shaft and pulley.
- As a result of rotation, the drive belt transmits speed to the circular saw pulley.
- After this, the saw rotates, due to which it cuts the material
A homemade circular saw is a useful tool to have around the house. And due to the fact that available materials are used, the cost is minimal.
Source: 2lzz.ru
How to choose a trimmer
An electric sawing tool is selected based on your needs. But the best, of course, would be one with a power of at least 1.5 kW.
Based on the power, you can select a cutting disc. The more powerful the machine, the larger the disk you can install on it. The most common disc is 250 mm in diameter.
Even under favorable operating conditions, discs lose teeth, become dull, and wear out. Therefore, the moment comes when you have to select the disk again. If you bought a saw with discs with a diameter of 250, 260, 300 mm, then there will be no problems buying a new one. Having a different standard may create a problem. Therefore, in the store you need to find out whether there are similar ones for sale.
Read also: Reverse 3-phase motor circuit
An important factor is the number of revolutions of the disk rotation. Even in production, machines from 4000 rpm are used
Also, when choosing for yourself, pay attention to the fact that the passport indicates 4500 rpm
The next point is the type of engine. Motors can be asynchronous and commutator. The first of them works silently and lasts longer. But the trouble is that it is not found on all models. The second type of motor will force you to change brushes often, but the price will be cheaper.
Next, look at the design as a whole and the turning system in particular. Each change in angle must be reliably recorded.
And the last, but no less important factor in the choice is safety. The casing must securely cover the disk. See how the sawdust ejection works. The machine must be equipped with a protection system against overheating and disk jamming.
Of course, you need to pay attention to all this at any retail outlet. But if Leroy Merlin is nearby, it will be much easier
Firstly, there is always a large selection of trims. And secondly, sales consultants will always provide the necessary assistance. Plus, all products have a warranty period.
Which engine to choose to make a circular machine
The choice of engine for creating a mini-circular depends on its power. It is advisable to use an engine with a V-belt, which will allow its speed to be transmitted to the saw blade of the machine.
A 350 mm disk will require 1 kW of energy to start. A disk with a diameter of 170 mm will require about 500 W. Therefore, you can install a motor from an old washing machine.
It is important to regulate the number of engine revolutions, otherwise instability in operation will lead to the disc tearing the material.
In the washing machine, the speed is controlled by a tachometer, which is controlled by a control module. But it is impossible to connect a module to the circular, so install a voltage regulator. Use the wiring diagram to correctly install the motor.
Motor selection and connection
It all depends on the power of the unit. Belt-driven motors are best so that the speed is transmitted directly to the saw. If you plan to install a 35 cm disk on a circular machine, then 1 kW of energy will be required to start it. The saw, whose diameter is 17 cm, operates from 500 W. This means that motors from old Sibir or Oka washing machines are quite suitable. All that remains is to adjust the engine speed, because unstable rotation will cause the saw to “tear” the wood.
The tachometer, which controls the control module, is responsible for the number of engine revolutions in the washing machine. But since the module will not connect to the circular circuit, it is recommended to install a voltage regulator.
Connecting the electric motor is considered an important working step, and if everything is not done correctly, then you can’t expect normal operation from the circular saw.
Engine types
There are three types of washing machine motors. Before using them to create a lathe, you should carefully study the features of each engine.
Asynchronous
This type of engine can be two or three phase. Two-phase motors are used in old Soviet-made cars. Modern models are equipped with a three-phase motor. Before use, it is enough to lubricate such a motor and you can start making homemade products.
Brushed motor
This is a compact size motor. Can operate on direct or alternating current. Characterized by controlled speed. The disadvantages include the presence of brushes that wear out quickly. But these elements can be easily replaced if necessary.
Assembly instructions
Using the washing machine engine, you can assemble a circular machine not just “for beauty”. Such a device will be useful for installation, sawing or construction work. For example, using a circular saw you can easily unravel a 10*10 block. Isn't this an indicator?
How to connect the motor?
Diagram of a circular saw
Connecting the motor is the main stage in building a circular saw.
If you fail to connect the motor from the washing machine correctly, the device simply will not work.
The difficulty is not in connecting the engine, but in ensuring stable speed control.
As already written above, without this the saw will simply tear the material. To ensure regulation, you can use a voltage regulator instead of a tachometer, which is equipped with washing machine motors.
When connecting, some masters get confused, since the commutator motors that are installed on automatic machines have several outputs at once. Therefore, it is not clear how to make the connection.
The connection occurs as follows:
- First, the motor must be cranked several times in order to find the excitation coil or shoes. There should be 2 or more wires coming from them.
- Using an ohmmeter set to minimum resistance, we ring each output in turn. Here you need to find two with the highest resistance out of all the available outputs. This is the case if there are more than two wires.
- After this, you need to find the motor commutator and brushes, from which there should also be two wires.
- After this, you need to find the tachometer outputs. Often these wires can be found directly on the housing. If they are not there, then they are hidden in the housing, then you will have to disassemble the engine a little.
- Now you need to take one wire from the collector and connect the wire from the coil to it.
- The other collector wire must be connected to a 220 V network.
If necessary, you can change the direction of rotation by simply swapping the wires. We do a test run, having previously marked the wires of the coil and tachometer.
If the engine starts without problems, then everything was done correctly. Separately, you can consider the process of connecting the engine using a speed controller:
- We connect one of the coil wires to one of the armature wires.
- We connect the other one to the network.
- We connect the second armature wire to the dimmer.
- We connect the other output of the dimmer to the network.
- Let's try to start the engine.
Moving parts
After the motor is connected, you can proceed to creating the circular. The next step is the assembly of the moving elements, since it is they that bear the load, namely:
- Motor shaft.
- Saw shaft.
- Drive belt.
- Motor pulley from the washing machine.
- Circular saw pulley.
The design itself is simple, but there are a lot of points that are important to consider, for example:
- It is recommended to sharpen the small pulley by making 4 transverse grooves, this is necessary so that the belt clings and does not slip.
- It is not necessary to use a drive belt from a washing machine; you can take any suitable one, as long as it has transverse serrations.
- The saw mounting shaft must be as reliable as possible, which also applies to the nut and washer. Otherwise, the saw may become deformed, or even jump out and injure the person working.
Bed and frame
After assembling the moving elements, all that remains is to make a reliable frame and bed. Considering that this is an ordinary homemade circular saw, you can use almost any available material as a bed. For example, a sheet of flat slate. All that is required is to cut it to the required size and cut a hole in it for the saw blade.
Slate will be enough, but if you want to make a high-quality and reliable saw, then take a metal sheet with a thickness of at least 3 mm. And for the frame you will need a metal corner of 30 mm.
To weld the circular frame, you need:
- Weld two metal squares (or rectangles depending on the expected dimensions of the saw) of the same size from the corners.
- Next, connect with four corners of the same length.
- In the upper part, two more corners are welded across the main square. This will be the support for the bed.
- Exactly the same two supports are welded from below, only transversely to the top ones. This will be the support on which the motor is located.
- Now all that remains is to weld the legs on the bottom, assemble and connect all the elements, and the saw is ready.
Homemade products from a washing machine engine
The electric motor from the washing machine can be adapted as the main power unit in a variety of designs. When starting work, you must first decide on the parts that will be mounted on the shaft of this motor and ensure their secure fastening. To do this, it is necessary to equip the electric motor shaft with an appropriate attachment.
Refinement of the electric motor
The main problem that has to be solved when modifying an electric motor is the discrepancy between the mounting holes of the parts that will be mounted on the shaft and the diameter of the latter. To interface these parts, it is necessary to make a special adapter (flange). On one side it should have a thread for installing the part, and on the other, an element that allows the flange to be securely fastened to the motor shaft.
Most often, to make such a flange, a piece of steel pipe with a length of no more than 20 mm and a diameter of 32 mm is used. A thread is cut at one end of this pipe, the length of which should be at least twice the thickness of the nozzle being installed.
The opposite end of the pipe is heated with a blowtorch and pressed onto the electric motor shaft. After cooling, the flange will be securely fastened. To strengthen it, it is advisable to drill a hole across the connection and additionally tighten the shaft and flange with a bolt and nut. This modification will allow any attachment to be securely attached to the engine shaft (pulley for a belt drive to a compressor, grinding or cutting wheels, cutting blades, etc.). You can use an electric motor modified in this way when creating various homemade products.
Emery
To sharpen scissors, knives, drills and other cutting tools, the motor must be mounted on a workbench or other suitable surface. To do this, it is best to make an intermediate frame (stand), on which, using standard mounting holes, install the engine. The design of the frame should ensure reliable fastening of the unit in the workplace.
The next operation is to install the whetstone. To do this, you need to prepare three nuts with appropriate threads and two suitable washers. One nut is screwed onto the flange until it stops, then a washer is put on, then an emery wheel and another washer. This entire “sandwich” is tightened with a second nut. The third nut is used to lock the threaded connection. At this point, the creation of the emery can be considered complete.
Advice! Such a device can be assembled using even a small electric motor from Malyutka-type washing machines.
Other simple devices are made in a similar way, for example, a circular saw, a grinder, etc.
But if starting the emery can be done simply by forcefully twisting it with your hand (being careful), then when using more complex mechanisms made using an electric motor from an old washing machine, a starting device is required. How to make such homemade products with your own hands will be discussed below.
Lathe
By securely attaching a frame with an electric motor to a workbench, you can make a multifunctional lathe designed for processing wooden workpieces. It includes:
- a headstock mounted directly on the electric motor shaft;
- tailstock, designed for reliable fastening of the workpiece;
- a tool rest that provides convenient use of a tool (cutter, chisel, etc.).
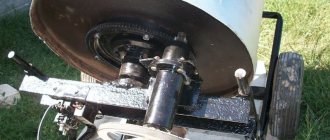
Sawmill
The construction of a stationary sawmill begins with the manufacture of a special frame with a technological slot for a saw blade. An electric motor from a washing machine is then installed on it, having previously secured a small pulley for the drive belt on it. A large disk is installed on the shaft of a circular saw. The pulleys are connected to each other by a V-shaped or rivulet belt.
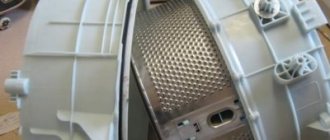
Feed cutter
To make a feed cutter, in addition to the motor from the washing machine, you will also need its drum, in the back wall of which you need to make a hole for the electric motor shaft. Then, having installed the motor on the drum, the cutting elements (2 knives) are attached to the shaft. The top of the drum must be closed with a lid, otherwise the cut raw materials will fly out of it.
Main components, materials, tools
The algorithm for creating a circular saw with your own hands is quite simple. First you need to determine for what purposes the circular will be used. If this is a small portable machine for working with laminate and plywood, then it is worth considering a device made from a hand-held circular saw, and if there are more ambitious tasks, then it is better to think about a more reliable engine and the impressive size of the machine.
In any case, you will have to make drawings of the device in order to calculate how and where the equipment will be installed, how the main parts will be attached, and at the same time think about what tools will be needed for the work.
For a small portable circular saw made from a handsaw, you can use the popular design of assembling a body from multi-layer plywood or pieces of chipboard. Well, if you plan to use a belt drive and a motor from a washing machine, then you will need a tool for working with metal. You can't do without welding work here.
Tips for work
It is worth taking into account the following tips from professionals:
- homemade circular saw is intended for household use; it is capable of processing small volumes of lumber with periodic interruptions;
- if the tool is often in demand and the volume of work is large, then it is worth considering the option of purchasing professional equipment;
- there is no need to cut by force if the material does not flow; For a more powerful tool, a more powerful motor is correspondingly needed.
How to make a circular saw from a washing machine engine, see the video below.
Source
The process of assembling a circular saw table
First, adjust the base to the optimal size. The wooden countertop is treated and left to soak in the antiseptic composition for a day. The metal base is sanded along the edges to avoid nicks.
Wood antiseptic is a modern building material that protects wood of any species in structures.
Electric saw
Electric saw table assembly process:
- First, prepare the beams, which are trimmed using a plane. A strong frame is assembled from them. Holes with a diameter of 5 mm should be drilled on each side of the base.
- Holes of the same diameter are also made in the drawers.
- Legs and drawers are installed on the tabletop. To ensure fixation, it is recommended to use clamps. They will help secure the legs while the glue dries. They are additionally fixed with metal corners and tightened with self-tapping screws.
- Fastening the saw with M4 bolts. The process is performed from the reverse side.
- To make a parallel stop, two strips are sawn off from plywood. Their width should be similar to the width of the tabletop. The average size is 10 cm. The corners must be rounded and polished.
The key property of the created table should be convenience.
Important! When installing an electric saw, you need to fix the start button. For this, a wire is suitable, which is threaded through the hole in the handle and twisted in the desired position.
For this purpose, a wire is suitable, which is threaded through the hole in the handle and twisted in the desired position.
Hand saw
For a hand saw you will need a 20mm sheet of plywood. The tabletop blank is made according to the selected size. The markings are made with a pencil, and the cutting is done with an electric jigsaw. Finally, the edge is milled. The workpiece must be sanded with sandpaper.
Care should be taken to ensure its stability. No loosening is allowed, otherwise it will negatively affect safety.
Subsequent assembly technology:
- The header is turned over, and markings are made on the bottom side for a hand saw. You need to attach a saw without a disc to the base and mark the dimensions of the sole.
- Using a hand router, a 10 mm recess is made.
- Next, the saw is tried on and the markings are adjusted.
- Markings are made on the bottom side, which are intended for stiffening ribs. For them, blanks are prepared from boards measuring 50x100 mm. The optimal location is up to 10 cm from the edge of the table.
- The longitudinal stiffening ribs are sawn and attached to the tabletop using wood glue. Clamps are used for fixation. Using a similar principle, side stiffening ribs are attached from beams.
- After the glue has dried, holes are drilled in the stiffeners and tightened with self-tapping screws.
- For table legs, boards measuring 50x100mm are used. The average optimal height is up to 110 cm. The legs are attached to the outside of the stiffeners with strong bolts. To improve stability, you can use ties made of beams measuring 50x50 mm.
The tabletop should have as smooth a surface as possible. This will reduce the likelihood of injury while working.
The hand-held circular saw is installed in the finished groove from the bottom side, the sole is fixed with bolts. A toothed disk is inserted into the slot. By following the technology and completing all the steps, you can make a homemade table at minimal cost to suit your height.
Regularly check the position of the table and its strength. The structure must be stable, without loosening.
Make other options
Figure 2. A piece of laminate must be attached to a wooden block, the angle of which should be 90° relative to the tabletop.
A do-it-yourself circular saw can be made manually. The easiest way to make it is from a grinder, making some improvements to its design. On the grinder you need to install an axial handle and a sliding stop.
To make a sliding stop, 2 pieces of corner will be needed. They are located on the sides of a disk with teeth, which replaces the abrasive wheel. The corners are attached with a gap of 3-4 mm. They are connected at the front and rear with bolts and nuts. To obtain clearance, washers must be used. The bottom edge of the corners should be rounded. Thanks to this, they will not cling to the objects being processed.
A do-it-yourself circular saw made from an angle grinder is equipped with a sliding stop. A clamp is attached to the body. It is made from metal tape. Its screed should be located at the bottom. A galvanized strip with a thickness of at least 1-1.5 mm is attached to the tape, on which a hole must first be made for the sliding stop bolt. Using washers, gaps are established between the working part and the side parts of the stop. The gaps must be the same size.
An axial handle is attached to the gearbox housing. To do this, the gearbox is disassembled so that you can determine at which points to make 4 holes for small bolts. The handle is made from a piece of pipe or rod and should have the shape of a staple. Its width is slightly wider than the master’s palm. At the ends with which it will be attached to the gearbox, it is necessary to drill holes for the bolts. It is not worth flaring the ends of the tube so that the handle does not bend during operation.
A piece of rod or tube protruding forward should be secured under the handle. Flare the end of the tube and make a hole for the axle 4-6 mm thick. The hole should be 4 mm larger. To make it convenient to work, a gap of at least 100-150 mm is left between the rod and the handle.
Figure 3. Diagram of a disk for a circular saw.
The next stage is the manufacture of the adjusting rod. To do this, you will need a piece of rod with a diameter of 4-6 mm. The end of the pipe is bent in the shape of a loop and slightly flared. Using washers at the front end of the stop, the same gap is established along the entire length.
The part of the rod that will fit into the hole on the handle must be threaded. Before inserting the rod, screw the nut onto it. The other nut is screwed on after assembly. The nuts will provide adjustment of the cutting depth. If necessary, they need to be released or tightened.
Which is popularly called a circular saw, is a productive and convenient tool. It can be used to perform a huge number of tasks. Perhaps you own it or are just planning to purchase it. However, when cutting large batches of material, working with such a device is quite difficult. You can make this process easier with the help of a table, which you can make yourself. This idea is easy to implement, and you need to prepare boards and plywood before starting work.
The hand saw is located below the working surface, but its working disk is in the slot. After turning on the equipment, the disk rotates, and when lumber is supplied, the cutting process begins. The maximum thickness of the workpieces processed will depend on the power of the saw and the size of the blade. When choosing a tool, you should take into account the thickness of the tabletop on which it will be mounted.
Homemade stationary machine
The proposed project for a stationary circular saw assembled with your own hands involves the use of ready-made parts and assemblies. The assembly includes only a few parts that require turning. The model is based on an electric motor from an old washing machine.
bed
Making the frame from a profile pipe was not chosen by chance. The design uses a profile of 20x20 mm and 25x25 mm.
This frame turned out to be strong and stable. The side posts are made identical. They are connected at the bottom with a 25x25 profile, and at the top there is a jumper made of a pipe with a cross-section of 20x20 mm. The resulting frame of the tabletop circular saw is raised above the surface on plastic legs, this increases the stability of the tool. Bolts for mounting the engine are installed on the lower jumpers.
The working shaft fastening unit is made of a nut. The internal thread of the nut is ground off, the diameter corresponds to the external diameter of the shaft bearings. To fix the bearings, a retaining ring will be used, under which a groove is made.
Tabletop
A sheet of metal 2 mm thick will be used as a desktop tabletop in the circular machine. This is quite enough for the workpiece to move freely on the work table.
Holes are made in the metal to accommodate countersunk screws. In addition to metal, you can also use chipboard as a table, or make it from plywood. It is recommended to make the working table of the circular saw so that a stop can be installed on it.
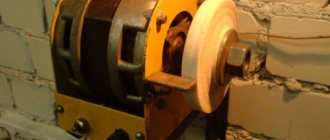
Motor
The engine already has a pulley. This is a standard pulley that is used in a washing machine.
Extended engine housing studs will be used as mounting points. The standard studs were replaced with longer ones with M8 threads. The brackets are made of angle 60x60 mm. Holes are drilled at the attachment point to the engine, and a slot is made at the attachment point to the frame to adjust the belt tension.
Rotation transmission
This table saw will use a belt drive. From the engine pulley, rotation will be transmitted to the working shaft using a V-belt. The pulleys on the machine are of the same diameter, so the rotation speed of the working shaft will be the same as that of the engine - 1450 rpm. These are standard pulleys used in a washing machine.
The circular shaft is taken from a grinder. This decision is completely justified. There is no need to be tricky with turning work; there is already a ready-made thread with washers of the required mounting diameter. And you can adjust the diameter of the shaft with your own hands, simply by clamping the shaft in a drill and processing it with a file.
The working shaft with a pulley installed on the frame will look like this.
Assembly
Assembling a circular saw begins with installing the motor on the frame.
After installing the engine, put on the belt.
After tensioning the belt and setting the engine position, it is secured with nuts.
To protect the motor from sawdust, protective screens are installed on the housing.
The circular saw is installed and clamped onto the working shaft.
For ease of switching on, a switch is installed. The last stage is the installation of the circular table.
As a test, various materials were cut: a slab of wood chips, a piece of chipboard, a board 30 mm thick.
As you can see, the result is impressive.
What is needed to make a machine
There is nothing complicated about assembling the equipment yourself. It is possible to make the simplest model of a lathe, the basis of which is a tool rest, a tailstock and an electric motor from an automatic washing machine.
To make a machine capable of processing wood material, you will have to prepare everything you need. The list of source materials includes:
- a motor from an old washing machine that has retained its functionality;
- the board from which the base of the device is prepared. As an option, the lathe can be mounted on a workbench;
- metal corners, the length of which is 19.5 cm, and the size is 2 by 2 cm. You will also need a pipe with a square cross-section. Steel blanks will be used to make tool rests;
- corner 6.2 by 6.2 cm, length 16.5 cm - you need to make a tailstock from it;
- the tool rest must be secured to the base with a bolt, the length of which must be at least 7 cm;
- a piece of steel pipe, the diameter of which is slightly larger than the size of the electric motor shaft;
- a bolt with a pointed tip that can be used to make a rotating headstock assembly.
The main operating parts of a lathe are the tool rest and the headstock, between which a piece of wood is inserted. Rotational motion from an electric motor is transmitted from the tool rest to the product. With the help of the tailstock, the product is held while maintaining its static position. The headstock is moved using a manual drive.
For ease of use, you will need certain tools and fasteners:
- electric drill with a set of drills;
- grinder with cutting discs;
- bolts and nuts with which the entire main structure will be assembled.
Once everything you need is prepared, you can move on to the main task. You just need to figure out how to properly make a lathe using an old motor from a washing machine.
Frame and Frame
Having assembled the parts for the moving parts of the circular, all we have to do is make a reliable frame and frame for our circle. In principle, for a home circular stand you can take the most common materials, for example, a piece of thick flat slate. Cut a rectangle out of it and cut a hole under the saw blade, it doesn't cost anything. But we are supporters of permanent structures, so we prefer to take a 3 mm thick sheet of metal for a round frame and a metal corner for a 30 mm frame.
The picture above clearly shows what elements make up the frame of a homemade circle. In this case, it is also welded by itself, but not a static metal corner is used as a support, but special home tables. The stand is made of two metal tubes of different diameters, which are inserted into each other, so that the round layer can be adjusted in height.
Experts insist on welded round frame construction because vibration is bad for static fasteners created with bolts. Although, if you don't have welding, as a last resort, you can make a frame from the corners, fastening them together with bolts and nuts. The frame is also better welded to the frame.
What does mandatory protection for an outlet include?
When there is a high load in the network, the contacts heat up and weaken, and the insulation strength is lost. As a result, a short circuit may occur that will “burn” not only the cord, but also the electric motor itself.
To prevent short circuits, a circuit breaker is required. And for it to work effectively, select the optimal characteristics.
What type of machine is needed for the socket?
The rating is calculated in the same way as a contactor, rounded up. Every electric motor has “jumps” in the load at the start, so you need a class “C” motor with an average response threshold. It can withstand inrush currents exceeding the rated current by 5-7 times.
Its value is indicated in the technical specifications on the case or data sheet (if it still exists). If Istart/In. > 5, then it is better to take class “D”, otherwise the machine may react to high starting currents as if it were a short circuit.
If the saw operates with a frequency switch or soft starter (without starting currents), then it is advisable to set the class “B”. It has the lowest shutdown threshold and delay before operation.
The installation location depends on the specific application. If this is a home sawmill, and you know for sure that the circular saw will be connected to only one outlet, then you can put the AB on this line in the electrical room. In another case, you can place it directly on the frame near the switch, only in a sealed shield not lower than IP44.
If the circuit breaker protects the network, then the RCD will protect you from dangerous phase leaks onto the frame or housing.
By what criteria to choose an RCD?
The rating must be no lower than that of the machine, so that in the event of an overload on the line, the RCD does not fail before the thermal release operates. The optimal shutdown current is 30 mA, this is the minimum discharge safe for humans.
An RCD is only necessary if the socket is not protected against differential leakage. Usually the electrical panel already has differential protection for the entire network. If it is missing, then you need to supply it, since it is for your safety.