Diagnostics of malfunctions of Electrolux, Zanussi and AEG washing machines
How to enter diagnostic mode on a Zanussi, Electrolux or AEG washing machine
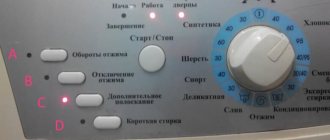
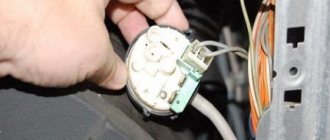
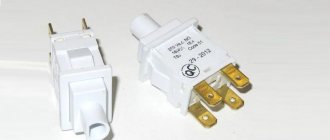
Sorry, but the article should be too long, since I will try to talk about all possible modifications of Zanussi, Electrolux or AEG washing machines. I'll start with the simplest ones, that is, under the control of EWM 1000 (+). Washing machines with a similar control panel have two main versions, in (photo 1) the horizontal arrangement of the buttons is shown, in (photo 2) you will see the vertical arrangement of the buttons. To enter such SM into diagnostic mode, you need to perform the following actions
- put the selector in position 0 (OFF)
- then connect the SMA to the power supply
- press the buttons as shown in the photo
- while holding the buttons, turn the knob to the right, to the first position
- after all this, you should see either the lights flashing or a beep
Test mode for AEG, Elktrolux and Zanussi washing machines controlled by EWM 1000 (+)
There are 7 fault checking modes for this line. In order, we will now list them. It is important that when switching from one mode to another, you take a 5-minute pause, otherwise the diagnosis may not be correct. Be sure to remove all laundry from the bin
- Having entered the test mode, we immediately enter the first diagnostic mode, that is, the program selector should be in position 1. In this mode, the buttons are checked; if you press the button, it will either blink or hear a sound signal (in models with vertical button arrangement)
- Turn the selector to position 2. Here you check the valve for filling the water into the main wash dispenser. The lock should also work, that is, the hatch should be blocked. The water level is controlled by a pressure switch, so water should not accumulate more than required
- We turn the knob further and set it to position 3. Here we check the water inlet valve for the pre-wash and, just like in point 2, the lock should work, and the level is controlled by the water intake sensor
- Mode 4 simultaneously turns on both valves. You need to turn the selector to position 4. Everything else is the same as in paragraphs “2 and 3”
- Mode 5 is not used in the line we are considering. It can only be seen in those washing machines that have three valves
- We put the selector in position 6 and go to the sixth mode. Here the heating element and water temperature sensor are checked. If the water level is less than the level, the SM will add water to the required level
- In the seventh mode we check the engine. We move the rotary knob to position 7. In this mode, the SMA draws water to the desired level, then the motor turns on, first in one direction, then in the other. After this, the engine revs up to 250 rpm
- In mode 8, the pump (drain pump) and spin are checked, that is, the engine speed will be maximum. The selector should be in position 8
Now about error codes. The last error can be seen as follows: you need to put the selector in position 10, after which the start and pause buttons will start blinking, we need to count these blinks. You can find out how to determine and decipher the error code for an AEG, Elktrolux and Zanusi washing machine without a display a little lower in this article. To exit the test mode, you need to turn the machine on and off twice. Now how to clear the error, in order to erase the error, you need to put the selector in position 10 and simultaneously press the buttons, as in Figure 1 or 2. If you see all the indicators blinking, then the error has been erased
Diagnostic mode for AEG, Eltrolux and Zanussi washing machines controlled by EWM 2000
There are SMAs with and without selector. We will analyze in detail the diagnostic mode for washing machines with a selector, since these are more difficult matters. Below you can watch a video about the test mode in SM without a selector. Let's return to washing machines that have a selector. To begin with, I suggest you look at a selection of photos that show a combination of buttons, thanks to which you can put the washing machine into test mode and diagnose the malfunction
Fig 1. Control panel with program selector. Press and hold buttons 2, then turn on the machine using button 1. The program selector should be in position 0 (OFF), hold the buttons until the indicators flash
Front panel photo
Another control panel with a selector. In Fig. 2 shows which buttons can be used to activate diagnostics
Photos of diagnostic buttons
Now let's look at a control panel without a selector . On this occasion, I have a very detailed video on my channel, in which I showed how to put a washing machine into the test without a program selector, I highly recommend watching it, then you will also learn about the diagnostic modes, that is, how and what details you can check
(Fig. 3) In addition to the video, I want to show another ruler. The input principle is practically no different. Press and hold the 2 buttons on the right and turn on the power. The indicators should flash
Diagnostic modes for Electrolux, Zanussi and AEG
For SMA without a program selector, test modes are described in great detail in the video above, so I don’t see the point in dwelling on such washing machines, but let’s talk about SM with a spinner in more detail. You learned above how to enter the test, now it’s time to talk about how to diagnose the details of your SMA
We put the selector in position ZERO, press the combination of buttons and wait for all the indicators to flash. In this position you can check the operation of the buttons, that is, when you press a button, the LED should light up
Once you have entered the test mode, you can proceed to a full check of all nodes. To do this, you need to turn the program selector to the right, that is, clockwise. Each step tests a certain part, for example, we turn the selector one position and see how the valve works. In short, almost the same as under control of EWM 1000 (+)
- Checking the water fill into the main wash dispenser
- Checking the water supply to the prewash dispenser
- Checking the water supply to the condenser dispenser
- Supplying water to the bleach dispenser. This mode is not available on all models
- Checking the heating element and if the circulation pump is installed, it should turn on
- Checking the engine at low speeds and at 250 revolutions. In this mode, you can see the water flowing, since the drum rotates very quickly when filled with water.
- Checking the pump (drain pump) and spin. Pay attention to the sparking of the brushes at maximum speed
- Checking for malfunction of the drying element and its fan
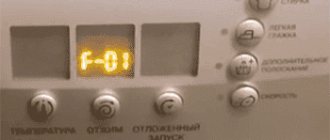
After you go through all the modes, you can find out the last error code. To do this, put the selector in position ZERO and turn it 2 steps to the right. If the CMA has a display, then the error code will appear on the display; if the washing machine does not have a display, then below you will see a table and explanations of how to read the error from the control panel. But first, pay attention to (Photo 4)
How to read the error code on an Electrolux, Zanussi and AEG washing machine, without a display
Now, I will try to clear up all the confusion about this. Having scoured the Internet, I have not found an explanation that is understandable to the common man. Everywhere there is a table and some unsuccessful examples
In (Photo 4), on the right side you see 8 indicators, which are divided into two blocks; it is from them that the error code is determined. By the blinking of the block indicators under the number 4, the first digit or letter of the code is determined. By the blinking of the indicators in the block under the number 1, we determine the second digit of the code. The indicators are numbered from bottom to top, this is clearly visible (Photo 4) in the example of the first block, I specially numbered the indicators, and the block numbered 4 is numbered in the same way. Now you can go to the table
Important
Page 6
- Image
- Text
13299 2210 TUS.qxd 0 3/04/03
16:42 Pagina 68
(Nero/Pr
^ss Black pellicola)
The other end of the inlet hose
connecting to the machine, can be turned in any direction. Loosen the nut, turn the hose and tighten the nut again, checking that there are no water leaks. The inlet hose must not be pulled out. If it is too short and you do not want to move the faucet, then you should buy a new, longer hose specifically designed for
these goals.
Connection to sewerage
The end of the drain hose can be installed
in three ways:
Hang it on the edge of the sink using
the plastic guide included with the machine.
In this case, make sure that the hose does not come off while draining the water.
This can be eliminated by tying the hose to the faucet with a piece of twine, or by securing it to the wall.
Connect to the sink drain pipe
branch.
This branch should be above the sink siphon so that the height from the floor
was at least 60 cm.
Directly to the drain pipe
not up to par
less than 60 cm and no more than 90 cm.
The end of the drain hose must always be ventilated
, that is, the inner diameter
pipe must be wider than the outer diameter of the drain hose.
Do not bend the drain hose.
Important!
For proper operation of the machine, the drain hose must be attached to a special
bracket provided for this purpose at the top of the rear panel.
Electrical connection
This machine is designed to operate from a single-phase power supply of 220-230 V, 50 Hz. Make sure your home electrical system can handle maximum
load (2.25 kW), taking into account the work and other
electrical appliances.
Connect the machine only to outlets with
grounding in accordance with
current electrical regulations.
A
The manufacturer is exempt from any
liability for damage to persons or property in case of failure to comply
the above precautions. If it is necessary to replace the device's power cable,
this operation should only be performed by a specialist from authorized by the manufacturer .
After installing the machine there should be
free access to the power cable is provided.
68
Fault codes related to water filling and draining
E11 – water is not being filled into the tank of the machine or it is flowing very slowly. The reasons for this error are as follows:
- the filling valve is inoperative or its electrics have broken down;
- the winding of the filling valve has burned out (normal resistance is 3.75 kOhm);
- clogging of the inlet system or lack of water pressure in the water supply system.
E13 – water seeps into the bottom of the machine.
E21 – waste water is not drained from the tank after washing. Worth checking:
- drain system for blockages;
- pump winding, normal resistance is 170 Ohms;
- electronic board.
For your information! In some models of Zanussi automatic cars, error E 21 is similar to error E20. Error E20 stands for drain system failure.
E22 – condensate is not removed during the drying process.
E23 - the semiconductor element (triac) that controls the operation of the pump has burned out; replace either the triac or the board.
E24 – the track from the triac controlling the pump is burnt out.
EC1 – the filling valve is blocked.
EF1 – the drain filter is clogged, the hose is clogged, the waiting time for draining the water has expired.
Engine related fault codes
E51 – poor contact of the electric motor triac.
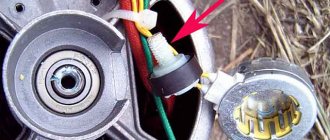
E52 – information is not received from the motor tachometer to the electronic board. Most often in such situations, the washer that holds the tachometer falls off.
E53 – the circuit controlling the electric motor triac is interrupted on the electronic board.
E54 – the relay contacts that provide motor reversal are stuck together.
E55 – engine electrical circuit is open.
E56 – the tachometer signal does not appear for a long time.
E57 - system current is more than 15A, the reason is a breakdown of the motor or electronic board.
E58 - the phase current of the electric motor is more than 4.5A, the reason is a breakdown of the motor or electronic board.
E59 – 3 seconds there is no signal from the tachometer, this may indicate a breakdown of the wiring between the motor and the inverter element, or a breakdown of the inverter board.
EA3 – the DSP system does not fix the electric motor pulley. Need to check:
- drive belt;
- DSP system;
- electrical wiring;
- fee.
Fault codes related to water heating
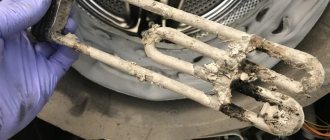
- E61 – the machine does not heat the water to the selected temperature in the set time. In case of such an error, check the resistance of the heating element, which is equal to 30 Ohms.
Important! This error in automatic washing machines is available for viewing only in diagnostic mode.
- E62 - water heats up very quickly and after 5 minutes has a temperature of almost 90 0 C. In this situation, check the heating element for breakdown, measure the resistance of the heating element, which under normal conditions varies from 5.7 to 6.3 Ohms.
- E66, E3A – heating element relay failure.
- E68 – grounding in the heating element circuit has tripped.
- E69 – heating element does not work.
Sensor related fault codes
E31 – the water pressure switch is broken. If such an error occurs, change the wiring or the relay itself.
E32 – frequency fluctuations of the sensor responsible for water pressure. This most often occurs due to:
- blocked water supply;
- filling valve malfunction;
- drainage filter clogged with debris;
- broken water level sensor tube;
- faulty pressure switch.
E33 – the sensor that determines the amount of water and the sensor that prevents the heating element from turning on “dry” are not synchronized. Check required:
- sensor performance;
- serviceability of tubes;
- voltage leakage to ground;
- whether the voltage in the network is exceeded.
E34 - this error is displayed for about a minute and indicates inconsistent operation of the anti-boil sensor and the pressure switch.
E35 – too much water has been filled into the tank, check the pressure switch.
E36 – ABS heating element protection sensor does not work.
E37 – L1S sensor does not work.
E38 – the tube leading from the tank to the pressure switch is clogged, so the pressure difference is not recorded.
E39 – the sensor protecting against water overflow HV1S does not work.
E44 – the hatch door closing sensor does not work.
E71 – the temperature sensor resistance does not meet normal limits.
E74 – the location of the temperature sensor is incorrect.
EC2 – the sensor that detects water turbidity does not work.
For your information! A sensor that detects the turbidity of the water in the tank is only available in the newest models of Zanussi machines.
EF4 – there is no signal from the flow sensor when the filling valve is turned on. It is possible that there is no pressure in the water supply.
Other errors
- E40 – the hatch door is not closed or the door lock is not working.
Let's celebrate! Code E40 is extremely rare; basically, a similar problem is encrypted with other codes.
- E41 – the drum door is not tightly closed.
- E42 – the hatch lock does not work, the part needs to be replaced.
- E43 – the semiconductor element (triac) responsible for locking the door lock does not work.
- E45 – parts of the triac circuit of the drum door lock do not work.
- E5C - the voltage in the bus has increased above 430 V, it is necessary to change the electronic module.
- E5D - no message transmission between the control module and the inverter. There is a problem with parts or wiring.
- E5E, E98 - no data transfer between the inverter and the system board.
- E5F – error in the inverter board, the engine does not start.
- E82 – a defect in the operation of the toggle switch when selecting a position.
- E83 - this error appears only in diagnostic mode and indicates a malfunction of the selector when reading data.
- E84 – recirculation pump recognition error.
- E85 – the recirculation pump or thyristor do not work.
- E91, E92 – error in the operation of the display board and main unit.
- E93 – incorrect software settings for washing machines. You can eliminate the cause if you enter the correct program code.
- E94 - incorrect setting of washing modes.
- E95 – problems in communication between the microprocessor and RAM.
- E96 – the machine control module does not fit the devices connected to it.
- E97 – the position of the program selector does not correspond to the programmed mode.
- E9A – programs responsible for sound do not work.
- EA1, EA2, EA4, EA5 - errors indicating a breakdown in the DSP system.
- EA6 – after half a minute there is no signal that the drum is spinning.
- EB1, EH1 – frequency in the power supply network has been exceeded.
- EB2, EH2 – the voltage value in the electrical network exceeds the norm.
- EB3, EH3 – the voltage value in the electrical network is underestimated.
- EBE, EBF, EHE, EHF – the relay in the protection circuit does not work.
- EF2 – increased foaming, the drain hose is clogged with debris or the filter is clogged.
- EF3 – Aqua Stop protection has activated, there is a leak inside the washing machine.
- EF5 – laundry does not spin, there is an imbalance of items in the drum.
How to decipher the blinking indicators?
In Zanussi washing machines that do not have a display, error recognition is carried out using indicators, for example the Zanussi aquacycle 1000 model. However, non-display panels can be different and have a different number of indicators. How to determine the error code from them and find out the cause of such an error. Let's look at the example of several control modules.
If the EWM 1000 module is installed in the washing machine, then fault codes are determined by the blinking of two lights (indicators): the start/pause indicator and the program end indicator. The lights flash quite quickly, 0.4 seconds, between a series of flashes there is a pause of 2.5 seconds, which is also not much. Therefore, it becomes difficult to correctly identify the error.
The number of flashes of the program completion indicator shows the first digit of the code, and the number of flashes of the start indicator shows the second digit of the code. For example, the program indicator blinked 4 times, and the start indicator 3, which means the error code will be E43, we described its decoding above. An example of a machine based on the EWM 1000 module is the Zanussi aquacycle 1006.
For your information! In all cases, the letter E is placed before the numbers and the full error code is received.
If the EWM2000 module is installed in the washing machine, then the codes are determined by the indication of eight LED lights on the control panel, for example, in the Zanussi aquacycle 1000, Zanussi aquacycle 900 washing machine. Eight indication lights are located on the machine panel on the right, the top 4 lights are the first digit of the code , bottom 4 – second. The number of light bulbs burning at the same time is a binary error code; to convert it into the decimal code familiar to us, you need to use the table.
Proceed as follows, for example, if two lamps No. 4 and No. 2 are lit in the upper group, and lamps No. 1 and No. 2 are lit in the lower group, as shown in the figure. In the table we look for this correspondence, the upper lights are code A, and the lower ones are code 3, we get error EA3. If light bulb No. 3 is lit in the upper group and No. 1 in the lower group, then this corresponds to code E41.
Important! Light bulbs are numbered from bottom to top.
So, deciphering the error codes of Zanussi brand washing machines may not be so easy. We hope the information we provide will help you cope with this problem and make it easier to troubleshoot and fix it.
Let's check and replace the fill valve
A fault code may be displayed on the digital screen due to the failure of the element responsible for drawing water from the centralized supply system. If the filling valve breaks down, the automatic machine will simply stop filling the tank with water and display error E10. The algorithm of actions for diagnosing the valve will be as follows:
If any of the filler valve coils do not operate when tested, therefore, the element must be replaced.
A multimeter will help you check the fill valve. The tester probes are applied to the coils to measure the resistance in them. If the device displays a value in the region of 2-4 kOhm, then the coil is fully operational.
In theory, the fill valve cannot be repaired. Experts, if they detect a breakdown, recommend not to repair, but to completely replace the part. Moreover, the spare part is relatively inexpensive. But if the desire to save money is stronger, and you have a similar valve from another washing machine in stock, you can try to replace the faulty coil by removing it from another element. Be prepared that your efforts may not pay off, you will not be able to fix the valve, and, ultimately, you will still have to go to the store.
So, after purchasing a new fill valve for a Zanussi washing machine, you need to install it in place of the faulty one and make all the connections. The algorithm of actions when replacing an element will be as follows:
Carefully remember the wiring and hose connection diagram, or better yet, take a picture.
Afterwards all that remains is to put the top cover of the machine body back in place. Now you can test your Zanussi washing machine for performance. Plug in the appliance and start the washing program. If the problem really is that the fill valve is broken, error E10 should reset.
Diagnostics of malfunctions of Electrolux, Zanussi and AEG washing machines
How to enter diagnostic mode on a Zanussi, Electrolux or AEG washing machine
Sorry, but the article should be too long, since I will try to talk about all possible modifications of Zanussi, Electrolux or AEG washing machines. I'll start with the simplest ones, that is, under the control of EWM 1000 (+). Washing machines with a similar control panel have two main versions, in (photo 1) the horizontal arrangement of the buttons is shown, in (photo 2) you will see the vertical arrangement of the buttons. To enter such SM into diagnostic mode, you need to perform the following actions
- put the selector in position 0 (OFF)
- then connect the SMA to the power supply
- press the buttons as shown in the photo
- while holding the buttons, turn the knob to the right, to the first position
- after all this, you should see either the lights flashing or a beep
Test mode for AEG, Elktrolux and Zanussi washing machines controlled by EWM 1000 (+)
There are 7 fault checking modes for this line. In order, we will now list them. It is important that when switching from one mode to another, you take a 5-minute pause, otherwise the diagnosis may not be correct. Be sure to remove all laundry from the bin
- Having entered the test mode, we immediately enter the first diagnostic mode, that is, the program selector should be in position 1. In this mode, the buttons are checked; if you press the button, it will either blink or hear a sound signal (in models with vertical button arrangement)
- Turn the selector to position 2. Here you check the valve for filling the water into the main wash dispenser. The lock should also work, that is, the hatch should be blocked. The water level is controlled by a pressure switch, so water should not accumulate more than required
- We turn the knob further and set it to position 3. Here we check the water inlet valve for the pre-wash and, just like in point 2, the lock should work, and the level is controlled by the water intake sensor
- Mode 4 simultaneously turns on both valves. You need to turn the selector to position 4. Everything else is the same as in paragraphs “2 and 3”
- Mode 5 is not used in the line we are considering. It can only be seen in those washing machines that have three valves
- We put the selector in position 6 and go to the sixth mode. Here the heating element and water temperature sensor are checked. If the water level is less than the level, the SM will add water to the required level
- In the seventh mode we check the engine. We move the rotary knob to position 7. In this mode, the SMA draws water to the desired level, then the motor turns on, first in one direction, then in the other. After this, the engine revs up to 250 rpm
- In mode 8, the pump (drain pump) and spin are checked, that is, the engine speed will be maximum. The selector should be in position 8
Now about error codes. The last error can be seen as follows: you need to put the selector in position 10, after which the start and pause buttons will start blinking, we need to count these blinks. You can find out how to determine and decipher the error code for an AEG, Elktrolux and Zanusi washing machine without a display a little lower in this article. To exit the test mode, you need to turn the machine on and off twice. Now how to clear the error, in order to erase the error, you need to put the selector in position 10 and simultaneously press the buttons, as in Figure 1 or 2. If you see all the indicators blinking, then the error has been erased
SMA "Zanussi" without display - with rotary control
Custom Zanussi CM control panels equipped with EWM2000 controllers can be without a display - only with LEDs.
To determine the malfunction, you need to enter the service mode. Proceed according to the scheme:
Flashing lamps will indicate that the equipment has entered service mode. Then, in the zero position of the program selector, check the operation of the interface. When you press the button, the corresponding lamp will light up.
In this mode, you can check the functionality of individual components of an electrical device. To check, turn the regulator in a clockwise direction, checking the modes step by step:
At each step, the door lock is also checked, and at the moment of water intake, the time allocated for filling the tank to the overflow level is checked, and the functionality of the level sensors is monitored.
It is in the service mode that you can view the latest equipment errors and reset them.
To reset errors, proceed as follows:
The 4 lowest lamps indicate units (4th group of indicators), and the four upper lamps indicate tens (3rd group). To reset the fault code, hold down the start button and button 6 while going through the diagnostics.
Now you know how to fix the situation if your Zanussi washing machine has generated a fault code. Often, resetting errors does not require much effort, and our recommendations will certainly help you.
Save the article to your bookmarks if you have chosen SM Zanussi - our table may still be useful to you.
Source