A washing machine is a piece of furniture in a kitchen or bathroom that is rarely moved and therefore disconnected from the water supply. However, there may be times when instructions on how to turn off the machine may be required. For example, the car has broken down and needs to be dismantled and transported to a service center, it has been decided to replace old equipment with new ones, renovations are planned in the room, or even the washing machine needs to be transported to a new place of residence. So, let's figure it out how to properly disconnect the water supply.
How to disconnect a washing machine from the water supply
Stationary placement of the washing machine in the bathroom or kitchen is quite justified. A heavy machine is connected to the network and communications, so you are unlikely to want to just move it.
However, in case of repair, moving, or purchasing a new SMA, you need to properly turn off the washing machine. After reading the article, you will understand how to do this correctly without compromising your equipment.
Child lock feature on washing machine
A washing machine in modern life is a mandatory and irreplaceable element. This unit greatly facilitates homework for any housewife.
This is especially noted by young mothers who have to wash a lot of diapers, onesies and other baby clothes every day. But the older the child gets, the more interested he becomes in household appliances.
Therefore, to prevent the baby from interfering with the operation of the washing machine, it is recommended to use the protection option.
Why is protection necessary?
Any parent is familiar with the situation in which a child, seeing the washing machine turned on, rushes towards it. The baby is attracted by the glowing lights, many buttons and the interesting, from the child’s point of view, process of circular circulation of things in the tank of the device. Of course, it cannot do without pressing buttons, and in a chaotic manner. As a result of such activity, the device begins to malfunction or shuts down completely.
Washing machine control panel
Knowing the prevalence of this situation and to prevent breakdowns of Candy, LG, Samsung washing machines, manufacturers have equipped the devices with a protection function. This option is launched by pressing two buttons simultaneously. It turns off in the same way. But since there are so many models of washing machines, each manufacturer sets its own combination of buttons that activate the protection.
Samsung combination
Any modern washing machine has a child lock option. Usually the manufacturer specifies a combination of buttons that turn this unit on and off. To find out how the child lock function on a Samsung washing machine is activated, it is recommended to study the instructions for the equipment
You can also pay attention to the control panel. Here the manufacturer puts an image of a lock, which is located between two buttons
Samsung WF-M602WCC
Pressing these buttons simultaneously will lock the entire panel and the child will not be able to change the progress of the wash cycle. In most Samsung washing units, a combination of the Rinse and Temperature buttons is used to start the child lock mode.
To protect, you need to simultaneously press these two buttons and hold them in this state for 5-10 seconds. The user will know that the protection mode is turned on by the indicator on the control panel that is turned on. Disabling the blocking is carried out using the same method.
Protection for Bosch washing machines
German Bosch household appliances are very popular. Housewives value it for its unsurpassed quality, long service life, and simple and intuitive interface. But not all Bosch models are equipped with a useful child lock feature. To find out which models are equipped with this option, it is recommended to study the list on the company’s official website.
Bosch Maxx 5
When purchasing in a store, it would also be a good idea to ask the seller whether the selected model is equipped with a child protection function. If your Bosch washing machine has a child lock, you need to study the process of launching this option. It turns out that the manufacturer was not clever with the control panel locking function. To start or remove the unit on Bosch Maxx 5 models, you need to press the start/pause button and hold it there for 5-7 seconds.
Bosch Maxx 5 control panel
After pressing the button, a key icon will appear on the display. Note that Bosch Maxx 5 models have the option of remembering modes selected by the user. That is why the lock will work the next time you turn on the device. To restore the functionality of the Bosch washing machine, you need to press the start button.
Protection on LG washing machines
One of the most popular brands producing home appliances, LG, also equips washing devices with an option to lock the control panel. To activate or remove the child lock on your LG washing machine, you must simultaneously press the “Spin” and “Option” keys. After pressing for three minutes, the required protection will turn on.
LG washing machine
However, users should be aware that the entire control panel is locked except for the power button. Unfortunately, this is a manufacturing flaw that has not yet been corrected in new LG models.
LG
Thus
If there is a baby growing in the house, young parents need to know how to protect household appliances from children's curiosity and interference with the operation of the devices. On Samsung, Bosch, LG, and Candy washing machines, there is a combination of buttons that locks the control panel. This option blocks the buttons and does not allow the child to correct the operation of the equipment.
Sequencing
To disconnect yourself you may need:
- wrench;
- a straight or Phillips screwdriver to loosen the clamps.
Use WD-40 to work on rusted parts. This “liquid wrench” will help you quickly deal with rusty, soured parts.
How to disconnect a washing machine from the water supply? Let's tell you in more detail:
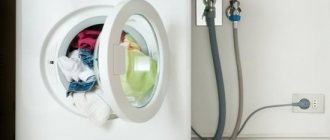
- Make sure the washing machine is not running, then unplug the machine. If the connection was via an extension cord, disconnect that too.
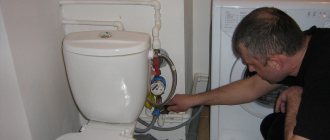
- Turn off the water supply. To do this, turn the shut-off valves all the way. They are usually located behind the MCA and attached to the wall.
- Open the rear of the washing machine. If you do this yourself, alternately pull one corner and then the other. It’s easier to complete the task with two people, because you can simultaneously apply force and move the car. Make sure that the hoses are not strained and that premature disconnection does not occur.
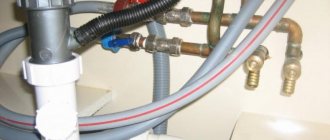
- Remove the inlet hose. Use a wrench if it is secured with nuts and screwdrivers to remove the clamp in a clockwise direction.
- Place a container below to collect water and disconnect the hose from the MCA. Drain the remaining water, then disconnect the other end of the hose from the valve by turning clockwise.
- Disconnect the wire and hose, attach it to the wall of the automatic washing machine.
- Disconnect the drain hose from the washing machine and the sewer, draining the remaining water into a bucket. Then attach it to the SM wall using a bracket.
- Clean the freed pipes from dirt with a brush. Carefully secure any loose parts with duct tape to prevent them from getting damaged or lost when you transport the washer.
- Take care to secure the drum. It may be damaged during transportation, so use special bolts or pieces of foam for fastening.
- Gather all the parts in one place and pack them.
- Make sure there is no water left in the system. Otherwise, during shaking, water may enter the control unit, which will lead to its malfunction.
It is advisable to allow the washing machine and all its parts to dry before transporting. To do this, open the door hatch and leave the washing machine to stand for a day.
Now you know how to properly disconnect the washing machine from the water supply. Therefore, avoid unnecessary problems when rearranging or transporting.
Unblocking
A common problem in the operation of Ariston, Indesit or LG washing machines is the door being blocked, which does not allow the laundry to be removed after the end of the wash cycle. There may be several reasons for this problem:
- Remaining water in the drum.
- Failure of the locking device.
- Natural wear and tear of equipment.
How to disable the lock on a washing machine? You can try to restart the spin or rinse mode. It is likely that a small glitch occurred in the program, which can be eliminated by restarting the unit. If this method does not lead to the desired result, you can try unplugging the machine and, after waiting 10-15 minutes, open the door. If the blockage was caused by a minor glitch in the program, the unit will be restored without problems.
If the door lock breaks, you need to open the plastic bottom panel and find the cable for forced opening of the hatch in the lower part near the filter. It comes in bright orange or deep red. You just need to pull the cable a little and the door will unlock.
Required Tools
You can disconnect the machine from the water supply without using tools at all. It all depends on the method of connecting the washing machine to the water supply, as well as on the type of inlet hose of the machine.
Installation and dismantling of the inlet hose is done by hand if there are plastic nuts and fittings at both ends. Plastic parts are fragile and need to be handled without tools.
This type of hose is more common than others. It is supplied complete with washing equipment. However, it is often changed to another.
Water drain options
If it is not possible to stop the work using the software buttons, and there is no point in starting the spin mode. For example, when a mobile phone or bank card is left in your jacket pocket, you need to act immediately, because further work can damage them. In this case, you need to use the emergency drain function.
Drain pipe
Emergency water drain
In the bottom right corner under the removable panel of the washing machine there is a drain tube. It is protected by a plug. Place a container at an angle into which the water will drain. The plug will need to be removed and the hose lowered into the reservoir.
If there is no tube, the water comes out directly. This must be provided for before you start draining, and stock up on a towel and a spare container. A basin or bucket wouldn't hurt.
Drain hose
The location of the drain hose depends on the design of the washing machine. Most often it is located at the bottom at the back, but in some brands, for example Bosch. This method cannot be used on such machines.
When located below, it must be disconnected from the sewer and the housing. Then place it in a container of sufficient size. When the bulk of the water has gone, you can throw the hose on the floor and collect the remainder with a rag.
I work in the household appliance repair industry. Extensive experience in restoring washing machines and dishwashers.
If there is no blockage, perhaps the easiest way.
Pipe branch
Draining water using a spigot is not the easiest option for the average user. Its blockage is the reason why the water does not drain.
Then the problem is solved by dismantling and cleaning the pipe. After this manipulation, drainage becomes possible. The process is quite complex and requires partial disassembly.
Therefore, it is better to use an alternative option.
Connection between tank and pump
Via pump filter
If the washing machine does not have the “Drain” function, and the “Spin” function cannot be used, you can urgently remove the water manually using the pump filter. It is located below the drum hatch. More details:
- It is necessary to stop the washing machine using the control functionality.
- Turn off the power supply by unplugging the plug from the outlet.
- Take a container with sides, for example a basin, and place it under the filter.
- Slowly unscrew the filter valve.
- Wait until the water drains into the container. If the tank is full, you will have to periodically stop the process to empty the container.
- Open the drum.
Important! After this, the program must be started again.
SMA drain pump filter concentrator
What to do if the door is jammed after an emergency shutdown
When you change the program, the door often jams, even if the water has been drained and the modes have been set to stop. In this case, a special emergency rope will come to your aid, of course, if there is one at all.
It is located in the same place as the emergency drain hose: under the decorative panel on the front of the machine. Usually it is bright and impossible not to notice. Just pull it and the door will open. You don’t even have to say “open sim-sim”, it should work without it.
If it is not there, then the situation is much worse. In this case, try opening the lock with a thin spatula, which is certainly flexible and thin. You need to insert it into the gap between the door in the place where the lock is located (usually where the hatch handle is attached) and try to press it.
If this does not help, try opening it with a cord. To do this, drape it around the perimeter of the hatch, take it by the two ends and squeeze. It will open if the lock is designed in such a way that the tongue is on the side of the body. But, if it’s the other way around, then you’ll have to remove the entire top panel of the machine.
How to turn off the machine yourself?
Disconnecting the machine from the water supply is carried out as follows:
- Disconnect the washing equipment from the power supply. This cannot be done during the washing process.
- Next, turn off the water supply valve to the machine. This tap is usually located either behind the appliance or under the sink.
- Move the washer away from the wall. At this moment, you need to make sure that the tension in the hoses (drain and fill) is not too strong.
- Next, you need to lay rags on the floor and prepare a bucket for water.
- The hose nut should be unscrewed. This is done counterclockwise. Then disconnect the hose itself from the washer. Do not exert great force when working with the tool. Otherwise, the thread may be stripped or the nut may be damaged.
- Next, you need to drain the water from the hose into a bucket.
- In the same way, you need to unscrew the inlet hose from the pipe or tee. At this point, the disconnection of the inlet hose is completed.
It should be noted that complete dismantling of the machine does not end with disconnecting the inlet hose. To transport the washing machine, you must also disconnect the drain hose from the sewer pipe.
Carefully disconnect the drain hose from the sewer pipe and drain the remaining water into a bucket.
Disassembly
Once you have familiarized yourself with the diagrams, you can begin to work.
The first disassembly step is to remove the top panel of the unit. On the back side of the machine in the upper corners there are two self-tapping screws on which the panel is attached. Unscrew them with a Phillips screwdriver, then lift the back of the cover, move it towards you and remove the panel.
Then you need to remove the control panel . To do this, unscrew the screws that secure it (on the sides of the machine body and under the powder receptacle). Remove the panel from the latches and attach it to the side on the service hook, if provided by the model. You can disconnect all the wires, but be sure to mark them before doing so so that there is no confusion during reassembly. Go to the back of the unit and remove the screw where the inlet valve attaches to the machine. Disconnect the wires leading from the valve to the powder receptacle niche, remove the niche and disconnect it from the pipe.
At this stage, you can check the operation of some parts, for example, replace or repair the inlet valve and water level sensor (pressostat). They are located immediately under the top cover, and if the cause of the breakdown lies in them, then complete disassembly of the machine is not required.
The photo shows the inlet valve and the pipes that connect it to the powder receptacle niche
Inspect the valve and its pipes (they are rubber and wear out quickly), make sure there are no blockages. The valve can be checked with a multimeter.
Inspect the pressure switch, its contacts and the tube leading to the sensor for damage. Clean the contacts and remove blockages in the tube. The sensor can be checked with a multimeter
To remove the pressure switch , unscrew the mounting bolts and disconnect the hose and contacts from the sensor. The hose is secured with a clamp.
When disassembling the washing machine, carefully inspect each part for wear. Check the reliability of the fastenings and the condition of the pipes.
Now you can remove the bottom panel . It is secured with two screws or latches (depending on the model).
Let's move on to the front part. Here the question may arise: how to remove the front cover? First you need to remove the hatch cuff . It is fixed with a clamp (ring), which can be picked up with a flat screwdriver and disconnected. After this, remove the cuff and put it in the drum. Be careful not to damage the rubber. Then you should unscrew a couple of bolts that secure the hatch lock.
Before putting the cuff into the drum, check it for mold and clean it if necessary.
The front panel is removed along with the hatch . To dismantle it, unscrew the screws that secure the wall to the unit body. They are located in the upper and lower corners. All that remains is to remove the panel from the latches/hooks by slightly lifting it. Before doing this, disconnect the wires of the locking lock.
Removing the back panel is much easier: you just need to unscrew four screws and remove the wall. At this stage, disconnect all hoses that are attached to the tank of the machine: filler, drain, as well as hoses from the pressure switch and the powder tray (if you have not done this already). Unscrew the clamps first.
Next, you should disconnect the wires of the heating element and temperature sensor. The heating element is located at the bottom of the tank, front or rear (depending on the model). To check, it is better to completely remove the heater. Unscrew the fastening element and remove the heating element from the socket. Also disconnect the motor wires and wiring . Record this moment so as not to get tangled with the wires during assembly.
When disassembling, it is recommended to remove the heating element and descale it.
All electrical wiring of the machine can be attached to the tank using ties. Unfasten it and put it aside. Label all terminals.
If during disassembly some fasteners do not give in easily, do not make any effort to unscrew them, use a special lubricant.
Now we have to remove the counterweights . They are located at the top and bottom of the unit. Unscrew the mounting bolts and remove the weights. This is where a wrench comes in handy. Then remove the drive belt . Next, disconnect the engine by unscrewing its fasteners. Remove the pulley by twisting the bolt in the middle. Disconnect the drain pipe by removing the clamp using pliers.
All that remains is to remove the washing machine tank . Unscrew the shock absorber mounts by tilting the car on its side, then return the unit to its original position, carefully remove the tank from the springs and remove it from the car. First bend all the wires so that they are not in the way.
Washing machine shock absorbers may fail due to grease production
And the most important question: how to disassemble the drum of a washing machine? The drum is located inside the tank; if the tank is collapsible, then this is an easy task. The tank halves are fastened with coupling bolts and latches. Having disconnected them, you can get to the drum, on the shaft of which there is a bearing assembly. Unscrew the bolts holding the drum together, unfasten the fasteners and remove the tank wall. To dismantle the bearing, you can use a special automotive puller or carefully knock the bearing down with a hammer. When replacing a bearing, inspect its seat for damage.
Disassembling the drum of a washing machine with a welded tank is a more complex process. You will have to cut the tank along the seam with a hacksaw, replace the bearing assembly, and then seal the joints and tighten the tank with bolts. You can watch this process in the video below.
After replacing the necessary parts, reassemble the unit in the reverse order of dismantling. It is now that photographs and notes made during the disassembly process will be useful to you.
In conclusion, a few words about how to disassemble a vertical washing machine . First you need to unscrew the control panel (side fastenings), then remove the inlet valve, control module and other parts that will be accessible. The top panel is not removable in all models of washing machines. Next you need to unscrew the side panels, after which you will have access to the front wall fastenings. Further actions consist of sequential removal of all parts. Bearings in top-loading units are located on both sides of the drum; removing them will take a little more time.
Now you know how to disassemble a washing machine. Follow the recommendations, use the diagrams, do not forget to record your actions, and you will definitely be able to repair the unit yourself. We hope that our article will be useful to you.
Shutdown algorithm
Now let's look at what order and what to do when you need to safely disconnect the washing machine from the water supply.
- We disconnect the washing machine from the network when the washing process is completed. This should not be done during washing.
- Turn off the water supply tap to the washing machine. As a rule, it is located behind the washing machine or under the sink if the machine is installed in the kitchen.
- We move the machine away from the wall or pull it out of the kitchen unit so that you can freely go behind the machine. In this case, the inlet and drain hoses should not be too tight.
- We take a bucket under the water and put rags on the floor in case water starts to flow.
- Disconnect the hose from the machine by unscrewing the nut counterclockwise.
When using the tool, do not apply excessive force, otherwise you may damage the nut and strip the threads.
- We tilt the hose into a bucket and drain the remaining water.
- Similarly, unscrew the hose from the tee or pipe. Removal of the inlet hose is complete.
- How to install a washing machine in the kitchen and bathroom
- How to place a washing machine in the bathroom
- Furniture for the washing machine in the bathroom
- How to connect a dishwasher to water supply and sewerage
- How to install a washing machine in the bathroom yourself
- Washing machine in the kitchen under the countertop
Dismantling the entire washing machine does not end with disconnecting the inlet hose. To be able to move the machine to another room or transport it, you must also disconnect the drain hose from the sewer. Of course, if the hose was simply thrown over the side of the bathtub, then practically nothing needs to be done here. But when connecting the drain hose to the sewer, it must be carefully disconnected . The drain hose is removed from the branch sewer pipe. The remaining water is poured into a bucket.
Transportation Tips
In order to transport the washing machine, it needs to be prepared. It is necessary to carefully wind up the power cord and secure it to the back wall with a clamp. If there is no such clamp, then you need to at least tie it. The inlet hose is dried and also secured to clamps on the rear wall of the machine . You can do the same with the drain hose, or you can clean it right away; a description of this work is in the article on Cleaning the hose of a washing machine.
If the hoses cannot be secured to the back cover, they must be wrapped in a rag and placed inside the machine. In addition, do not forget to check if there is any water left in the powder cuvette; wipe the cuvette hole with a dry cloth. You also need to drain the water and clean the drain filter at the same time.
Important! There should be no water left in the machine, because if it gets on the control module, it can burn when turned on.
After this, plugs are placed on the hose holes, and the tank is secured with shipping bolts. The machine itself can be packed in bubble cellophane, and it only needs to be transported vertically.
Thus, dismantling the inlet and drain hoses is quite easy. Even a woman can do this, but why would she do it if there is a strong man nearby? Take care of your equipment and be careful.
Interesting:
- Share your opinion - leave a comment
Proper transportation of equipment
Washing equipment must be prepared in advance for transportation. First you need to wind up the power cord and then secure it on the back side with a clamp.
Next, you need to dry the inlet hose, and then secure it on the back side with a clamp. The same must be done with the drain hose.
It is also important to check that there is no water in the powder tray. To do this, wipe it with a dry cloth. Next, you need to drain the water and clean the drain filter.
There must be no water in the device during transportation. Otherwise, it may get on the electronic control module and damage it.
At the last stage, you need to put plugs on all the holes from the hoses and secure the tank of the machine using shipping bolts. The device must be transported in an upright position.
So, in this article we found out how to disconnect the washing machine from the water supply yourself. This work is not at all difficult and almost anyone can cope with it.
Disconnection from water supply
Depending on how the machine is connected to the water supply, you may need certain tools, most often an adjustable wrench, pliers, and screwdrivers of various types. Sometimes you can do without using them. The algorithm of actions when disconnecting the machine from the water supply is as follows:
- Make sure that the washing machine is not currently functioning and is disconnected from the power supply.
- It is necessary to turn off the water supply tap. If there is a connection to both a hot and a cold system, then both taps are closed. Usually they are located behind the washing machine or near the sink if the washing machine is located in the kitchen.
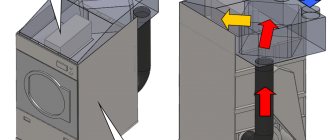
Why secure the drum during transportation?
The washing machine drum has some free play - during washing it can move inside the body of the device.
To prevent the machine from falling at high speeds, the manufacturer installs special counterweights on the drum for stabilization - a weighting weight made of concrete, less often cast iron or steel. Simply put, there is a hefty concrete stone on the drum, and it - along with the drum - can move around inside the body of the washing machine.
Provided that the washing machine is horizontal, during normal washing the drum will not be able to touch the inside of the device. But during transportation, any bump or sudden braking can damage the washing machine - break the cuvette (compartment for washing powder), break the fasteners or destroy the control module.
This is precisely why shipping bolts exist - they secure the washing machine drum during transportation so that it does not damage the inside of the appliance.
How to move the washing machine
So, you know how to turn off the washing machine, and you have completed this job quite successfully. The unit is disconnected from the power supply and connecting hoses. Now a few words about how to move a car from place to place:
- Empty the bucket and wipe up any spilled water around the machine.
- Double check that all hoses and cords are disconnected from the machine.
- Once you have access to the water drain pipes, clean them thoroughly with a brush. Now, when the machine is disconnected from the water drain, is the time for this. After this, the holes from the hoses must be closed with plugs.
- Unplug the power cord. If it cannot be removed, then you need to attach it to the car using tape.
- It is advisable to remove and pack separately all the handles of the unit so as not to accidentally lose them during the move.
- The next step is to secure the drum. This will avoid damage and distortion during transportation. The drum is secured using special bolts, a piece of foam rubber, or by fastening the screws located in the rear of the unit.
- Packaging of disconnected spare parts. It is advisable to use special wrapping paper, bubble wrap or a regular towel as packaging material. It is advisable to transport parts inside the car, which will protect them from damage.
Important! If you are not going to move immediately, let the machine dry a little after the hoses have been disconnected - leave it for a day or two with the door open. This can play a decisive role when transporting the device. If water accidentally gets on the control module, the machine may fail when turned on.
How to disassemble a washing machine: instructions
Below is the procedure for disassembling the washing machine down to its “internals” - drum, motor, belt, pump, bearings, etc. Strictly follow the instructions provided. If something went wrong, go through all the points again: perhaps you missed something.
Removing the top cover
To remove the top panel, move to the back of the unit and unscrew the two screws. When nothing will hold the lid, grab the panel and pull it towards you. Do everything carefully so as not to damage anything.
Removing the back panel
Pull the panel to the side. It is attached with latches, so there should not be any difficulties here. If it does not budge, slightly bend the latches with a screwdriver. The main thing is not to overdo it.
Removing the control unit
Take a screwdriver and carefully unscrew the front panel bolts at the top. Unscrew the control unit 90 degrees and carefully remove it from the fasteners. Using the service hook, securely secure the panel to the side of the washer.
Removing the front (service) panel
Before disassembling, do not forget to remove the powder tray - first remove the container, then unscrew the bolts that hold it in place. Then pry up the front panel using a flat-head screwdriver. On the side, below, from the front, you need to unscrew the bolts.
Remove the center panel
Simply unscrew the screws that hold this part of the machine in place and pull the part out completely.
Why disconnect the SMA from the water supply: preparatory work
An automatic washing machine (AWA) is a piece of equipment that is installed for a long time and is rarely moved to another place. But there are still situations when you need to disconnect the washing machine from the communications. For example:
- You have started renovations in the premises.
- You buy new equipment.
- Are you planning to move?
- You will be carrying out repairs or cleaning of the unit.
If you decide to do the work yourself, prepare the necessary tools. They may vary depending on the type of fasteners and the material of the components.
Important! Plastic nuts are unscrewed by hand because they are a fragile material and tools can damage the mount.
For metal connections, prepare:
- pliers;
- wrench;
- slotted and Phillips screwdrivers.
If the fastener is stuck to the base, spray it with WD-40.
So, the tools are prepared, let's move on to the next stage.
Expert advice
- When disassembling the washing machine, take into account that some parts are made of plastic, so work is carried out as carefully as possible so as not to damage the parts.
- When repairing a machine with your own hands for the first time, it is advisable to photograph each stage of the process so that after replacing parts there will be no doubt about the order in which the elements are installed.
- During disassembly of the unit, the parts are marked with multi-colored markers - this will help to perform assembly correctly and significantly reduce its time.
- When starting work, be sure to make sure that the device is disconnected from the network and that there is no residual current in the parts. To do this, use a multimeter.
When disassembling household appliances yourself, do not forget to follow safety precautions. Having studied the operating instructions, armed with the necessary tools, and following the steps described in the article, even a technician without experience can perform disassembly.
How to disconnect a washing machine from the water supply?
A washing machine is a piece of furniture in a kitchen or bathroom that is rarely moved and therefore disconnected from the water supply. However, there may be times when instructions on how to turn off the machine may be required. For example, the car has broken down and needs to be dismantled and transported to a service center, it has been decided to replace old equipment with new ones, renovations are planned in the room, or even the washing machine needs to be transported to a new place of residence. So, let's figure it out how to properly disconnect the water supply.
Disconnection from the sewer
The drain hose, unlike the inlet hose, can simply be hung on the edge of the sink or bathtub using a special hook or have a permanent connection to the sewer. In the first case, there is no need to disconnect anything; the hose is lowered into the prepared container and the water is drained from it by gravity. The second option involves first disconnecting the hose from the entrance to the sewer. This is where you will have to use rags when disconnecting. Because water can flow out of the hose onto the floor.
The design location of the drainage hose on the washing machine and its length may pose certain difficulties.
If there is a need or desire to completely remove water or rinse the drain hose, it can be disconnected from the washing machine. Fastening can be carried out on the body or directly on the volute of the drain pump. The hose will either need to be unscrewed or removed by loosening or removing the clamp. Access to the drainage system can be gained after removing the back wall of the washing machine or through its open bottom (for models in which it is actually open).