Let's look at replacing a bearing in a Zanussi Aquacycle 1000 washing machine, manufactured in 2002. All work was carried out at home, with our own hands. Since the repair was carried out in 2022, the age of the washing machine was approximately 15 years. Which, in principle, is not bad compared to machines that were manufactured at a later date. With proper operation, the service life of bearings is 15-20 years. Structurally, the Electrolux and Zanussi SMAs are similar, so this approach can be applied to both brands.
Do you wash your shoes in the machine?
Oh yes! No
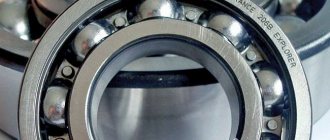
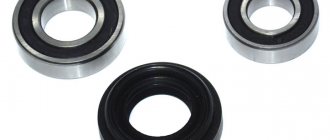
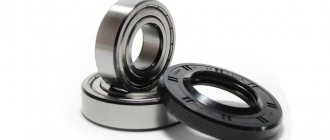
These machines use a powerful SKF double bearing model BA2D.
Characteristics:
- d=30;
- D=60;
- B=37.
Product code from spare parts suppliers: 026298, 12404633657, 255119, 633657, 663667.
For this tank, a special oil seal of the following dimensions is used: 40-60/10. Correspondence table for spare parts of popular models.
- Preparation
- Disassembling the Zanussi washing machine (“Zanussi”)
- Changing the bearing
- Assembling the washing machine
- Catalog SMA "Zanussi"
Analysis of the Zanussi front washing machine
Typically, the body of washing machines consists of a top cover, a front, a back and two side panels. Sometimes there is a bottom pan. Zanussi's technique is slightly different - instead of four panels, the body is divided into two halves, connecting at the sides of the washing machine.
To disassemble the equipment, you need to perform the following steps:
- Unscrew the screws, move it back a little and lift the top cover.
- Under the cover in the middle there is a metal plate, along its edges there is a fastener that holds the front and back panels. You need to unscrew it.
- There are plastic plugs on the sides of the machine at the panel joints. They need to be pryed and pulled out. There are screws underneath that will need to be removed.
- On some models, two more screws are located on the bottom of the back of the washing machine. They also need to be removed.
- Now both halves are fixed only with a plastic holder. To remove it, you need to carefully press the latches. Sometimes it may consist of two halves connected by a screw. Unscrew the fasteners, press the latches, after which the holder rises up and moves to the side.
- Now you can move and remove the back half of the case.
Partial disassembly of the washing machine has been completed. Now the owner of the device has access to the motor, pump, heating element, belt and many other components for repair or replacement.
In some cases, for example, to replace a bearing, it is necessary to completely disassemble the Zanussi washing machine.
- First you need to disconnect the wiring from the heating element and motor, pressure switches and pump, and water inlet valve. It is recommended that the wires be marked or photographed before disconnecting. If errors in its connection are made during assembly, this can lead to serious consequences.
- Remove and pull out the temperature sensor.
- Unscrew the upper counterweight.
- Rotate the pulley and remove the drive belt.
- Unclench the clamps and disconnect the pipes.
- Unscrew the fasteners holding the motor.
- Lightly tap the pulley to move and remove the engine.
- Unscrew the nut between the contacts of the heating element, carefully so as not to break the contacts, and pull out the heating element.
- Unscrew the tank struts.
- Disconnect and remove the pressure switch, loosen the clamps, release the fill pipes and pull them out along with the water fill valve.
- Unscrew the drain pump, disconnect the hose from it and move it aside.
- Disconnect the pipe at the top of the tank.
- Open the hatch, pull the cuff back and pull it towards you. Use a screwdriver to pry up the clamp, find and release the latch, and remove the clamp.
- Pull the upper part of the cuff, find the watering pipe, loosen the clamps, then disconnect the part.
- Unscrew the interference filter.
- Unscrew the two screws, stick your hand inside the tank and pull out the hatch locking device.
- Close the hatch, unscrew the fasteners, remove the hatch.
- Pull out the detergent cuvette, unscrew the fasteners under it and on top that hold the control panel. Release the latches, disconnect the wires, remove and put it away.
- Remove the tank from the springs and pull it out of the housing.
- Disconnect the counterweight.
- Place the water tank with the hatch down, block the pulley, and unscrew the bolt. If it does not budge, lubricate it with WD-40, wait a while, and then try again.
- Grasp the pulley with both hands and, swinging it to the sides, separate it.
- If the tank is collapsible, unscrew all the screws and remove the top part.
- If it is non-separable, select the screws with which it will be connected during assembly and drill holes for them along the seam of the tank. Next, saw the tank along the seam.
- In place of the screw that held the pulley, screw in a similar old screw and knock out the shaft with hammer blows at a right angle.
- You can then remove the drum from the bottom of the tank.
Now you can disassemble the drum, replace the bearings, inspect and clean the shaft and cross, and perform other work. Complete disassembly of the washing machine has been completed.
Changing the bearing
To change the bearings, you need to disassemble the tank. To make working with it easier, it is better to remove the counterweights. We unscrew the through fasteners and remove the front one located around the cuff.
Counterweight Mounts
We pull off the rubber. It is pressed against the body with a round clamp, in the form of a spring.
Tank without counterweight and cuff. A spring is visible on the floor.
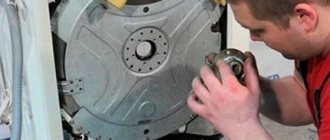
Remove the pulley using a 17 mm socket.
You will need to use a lot of force! Let's use leverage!
I use a metal tube for this to create the necessary pressure. The fact is that a special lock is applied to the thread to prevent unwinding during rotation. And tension must be applied in order to move the bolt from the retainer. After this it will unscrew easily.
Pulley removal lever
Remove the small counterweight under the pulley.
We unscrew the bolts in a circle that hold the two halves of the tank together. You will need an extension for the socket wrench.
Unscrewing the fastening bolts.
We separate the two halves of the tank and take out the drum. Sometimes it doesn't come out easily. Then you need to hit the shaft with a hammer - as many times as necessary.
Important! Do not hit the shaft directly. There is a possibility of damage. Let's tighten the fastening bolt and hit it through the board!
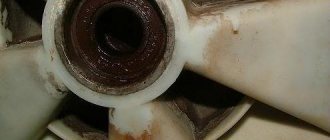
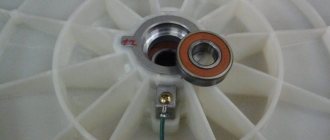
Bushing for bearings and oil seal.
We clean the landing site from the inside of the tank and remove the oil seal. To do this, use a strong screwdriver or chisel. Often you have to use a hammer.
Old oil seal, cleaned of dirt.
Then we pull out the metal retaining ring. It is located under the oil seal, in a special groove and fixes the position of the bearing. It is better to use round nose pliers with narrow tips and a slotted screwdriver for this. Requires some skill when removing.
Retaining ring.
We knock out the bearing. I use a chisel for this. Very comfortably. There is a wide platform on one side and a narrow one on the other. Let's dismantle the outer one first. We use a medium hammer.
Expert opinion
I work in the household appliance repair industry. Extensive experience in restoring washing machines and dishwashers.
Ask a Question
Note! It is more competent to use special pullers for removing and installing bearings. This is a professional tool. Costs - from 5000 rubles.
Since the bearing is double, this may take time, approximately 15-20 minutes. The chisel must be moved either in a circle or crosswise. This is necessary so that the bearing does not warp in the sleeve and it comes out evenly.
When knocking out, we strike any part of the bearing.
This is a rather noisy procedure, so it can be moved outside. I usually use counterweights as backing since I always have them on hand.
Repair kit.
Let's start the installation. The new bearing has a plastic sleeve inside. Do not remove until the product is seated. It will come out easily on its own after you put the drum in place.
Plastic bushing in the bearing.
Expert opinion
When landing, strike only on the outer diameter of the bearing!
First we use the wide part of the chisel. When the body settles, it will be narrow. Be sure to strike on different sides. It is better to use the criss-cross technique, gradually moving in a circle.
You can hammer the bearing in other ways. Some people use an old bearing for this. Another option is a fairly large bolt and a small hammer. The fourth method, which is also the most professional, is a special installation tool.
Planting with a chisel.
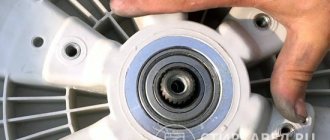
After the bearing is in place, be sure to put back the metal clamp. It should be located in the recess.
Mounted bearing with retaining ring
Then we install the oil seal. As a rule, it has to be driven in with a hammer through a plank. And also, you can use the old one for this. For reliability, it is recommended to use instant glue to connect to the body. This is especially important if the oil seal fits into place very loosely. For example, you placed it with your hands, pressing lightly.
We apply special lubricant to washing machine bearings. We place it on the inner skirt of the oil seal, completely filling the space.
It is highly advisable to apply lubricant to the part of the shaft that is in contact with the oil seal. Only here!
If you cannot find the right product, then you can use Ciatim 221. Some masters use Litol 24.
In principle, the product must satisfy the following requirements:
- Operating temperature not lower than 150°.
- Water resistance.
- Good ductility.
But it is still best to use special materials for washing machine seals.
Dismantling the Zanussi vertical washing machine
The disassembly process for vertical washing machines manufactured by Zanussi is a little simpler. So, to replace the bearings there is no need to disassemble the tank. Procedure:
- Pry up the sides of the control panel and release the latches.
- Pull up and then move back a little, tilt, disconnect the wiring, remove the panel.
- There is a guide at the top of the panel, and a special groove on the side, which can be used to fix the panel.
Now the user has access to the pressure switch, control board, water inlet valve and interference filter.
To get to the remaining nodes, you need to:
- Unscrew the fasteners from the back of the machine, slide the side panels back, remove and put away.
- Remove the fasteners holding the front wall and remove it.
- To remove the base panel, you need to pry it from above with a screwdriver and press the latches. This will give you access to the drain filter.
- Now the user has access to all important components of the vertical washing machine.
Preparation for repair
To successfully dismantle and then install a bearing, you need:
- Screwdrivers: slotted, Phillips, hex.
- Torx keys.
- Pliers.
- Set of wrenches.
- Hammer and bolt (15-20 cm).
- Glue or sealant.
- WD-40 for stuck parts.
Time to prepare the washing machine. Disconnect it from the network, turn off the water supply. Disconnect the intake hose and drain the water from it. Also drain any remaining water from the drain filter, which is located at the bottom of the front panel, behind the hatch.
Recommendations for replacing parts and assembling a Zanussi washing machine
After repair, reassemble the Zanussi washing machine in the reverse order. If photographs were taken during the work, it is recommended to check them, especially when connecting wiring, in order to avoid mistakes.
If the tank was disassembled, then during reassembly the joints of both halves should be carefully coated with silicone sealant that can withstand aggressive environments and high temperatures. After assembly, the machine should sit for the amount of time recommended by the sealant manufacturer to allow it to dry completely.
In addition to replacing the main part, you need to carry out preventive maintenance on other components of the washing machine: descale the heating element, tank, inspect and clean the shaft and cross, etc.
After the machine has stood for the time required for the sealant to harden, it should be connected to the communications and a test wash should be performed, adding a small amount of powder. If during the execution of the program there are no water leaks under the washing machine, the equipment behaves correctly, there are no signs of malfunction, this indicates that disassembling and repairing the device was successful.
Replacing the heating element
It is quite easy to determine the heating element by two characteristic connectors to which the wires are connected. However, if you have an ohmmeter at hand, before removing it, you should check the heating element - perhaps the malfunction is not caused by its failure. The resistance of the heating element in operating condition does not exceed 200 Ohms, otherwise it requires replacement.
Important:
Before starting work, we recommend photographing (sketching) the location of the wires and the order in which they are connected.
We install the protective housing covers in place - the operation is completed. We carry out control - we turn on the function in which the water heats up over 50 degrees. If the hatch cover heats up, then everything is done correctly.
Expert opinion
It-Technology, Electrical power and electronics specialist
Ask questions to the “Specialist for modernization of energy generation systems”
A heating element for a washing machine: how to check and replace it yourself. After all, you will have to remove the top cover, dismantle the tray for detergent powder, partially disassemble the laundry hatch, and only then remove the front panel itself. Ask, I'm in touch!
Washing machine prevention
To avoid breakdowns of the washing machine, you must follow simple operating rules.
The equipment must be leveled; for this you need to use adjustable feet.
You should only load the washing machine with the amount of laundry that is allowed by the technical characteristics of the device and the program being run. Overload has a negative impact on the condition of the equipment.
If you need to wash bulky items, you need to load them into the machine with care, distributing them evenly inside the drum. Imbalance also harms technique.
The washing machine should be connected to electricity through a stabilizer or at least a surge protector. Voltage surges are detrimental to the device.
When washing clothes, you can only use automatic powders; periodically it is recommended to use products to clean equipment from scale and other contaminants.
How to tell if a bearing is broken
The surest sign of a malfunction is error codes E13 and E55 on the washer display. If the self-diagnosis system detects problems and issues a code, you can proceed with disassembly and inspection.
But if there is no code, and every time you wash you hear a lot of noise, hum, vibration, grinding - all this also indicates wear of the bearings.
Additional check: open the hatch door and shake the drum by hand. If its rotation is uneven, it deviates strongly from the tank towards the rear wall - a malfunction is obvious.
Bottom line
To replace or repair a particular part in a Zanussi washing machine, the equipment will need to be partially or completely disassembled. You can do this yourself if you have the necessary tools. During the process, it is recommended to take photographs of each step in order to correctly assemble the washing machine, especially when connecting the wiring. Observing this rule and following the instructions, many will be able to disassemble the equipment and replace the necessary part. However, if you are not sure of a positive result, you should call professionals and trust them to disassemble and repair the washing machine.
Where is the heating element located?
Users often encounter difficulties in locating the heating element. In different models, access to the heating element is provided through the rear or front panel. To find out the location of the part in your device, read the instructions or inspect the washing machine.
Initially, inspect the back panel, and if the removable part is large enough, most likely the heating element is located there. If only a small cover is removed from the back, then try looking for the heating element under the front cover.
Replacement heating element Ariston.
First, remove the drive belt, as it will get in the way, and remove the ground and temperature sensor connector.
Now you need to loosen the tension nut, but under no circumstances unscrew it completely, just loosen it. If you unscrew it all the way, you will have difficulty removing the ten.
Now we take a pair of flat-head screwdrivers and, with deft movements, we pry the tench by the metal body, then we swing it and pull it towards ourselves, taking it out.
Here is a faulty Ariston heating element and a temperature sensor. The photo below shows that there is a layer of scale on the surface of the heater. Scale prevents normal heat exchange between the heater and water, resulting in overheating of the element. Scale is the main cause of heating element failure.
Before installing a new heater, we clean the seat in the tank with a rag from dirt and pieces of scale that fell off the heater when it was removed, and then install the new element.
Tighten the heater tightening (fixing) nut well so that when heating it does not get squeezed out of the tank, but there have been cases. Then we assemble everything in reverse order. We check the machine on the washing mode, if everything is in order, we are happy and use it.
Expert opinion
It-Technology, Electrical power and electronics specialist
Ask questions to the “Specialist for modernization of energy generation systems”
Heating element for washing machines: diagnostics, replacement, device 7 video Despite this, it will not work to install a long water heater instead of a short one, just like a curved heater instead of a straight one. Ask, I'm in touch!