A washing machine is a complex household appliance, the breakdown of which entails expensive repairs. But there are some breakdowns that you can fix yourself. One of these problems is replacing the seal in the washing machine. The article, using examples of models from several manufacturers, describes in detail the sequence of work when replacing a part, and describes what materials and tools are used. Recommendations are given for preventing damage to rubber parts.
Why did this problem occur?
There are quite a few reasons why an urgent replacement of the rubber seal or, in other words, the hatch cuff was required. Here are the most common versions.
- Natural wear and tear of a part that occurs due to the long service life of the machine. During operation of the drum, strong vibration occurs, therefore, over time, the rubber simply wears out, cracks and microdamages appear.
- Mold formation on the inside of the rubber band. Appears due to the use of low-quality household chemicals: powders, gels, rinses. Read about how to get rid of mold here.
- Damage (cracks, tears) to the cuff due to washing hard objects. It happens that before washing we forget to take various small things out of our pockets: coins, keys, key rings, pens, paper clips. A potential danger can be caused by washing clothes with large fittings and metal elements: buttons, locks, rivets.
- If washing occurs in hard water and softeners are not used, limescale is gradually deposited on the internal elements of the machine, which can also lead to future replacement of the rubber seal.
You can tell that it’s time to change the cuff of the washing machine hatch by the formation of water under the machine.
After all, it is the leak that mainly signals the emergence of a problem. As a result, all this can lead to a short circuit in the electrical network and complete failure of the unit. In order to remove the cuff and install a new one in its place, it will take you from 20 minutes to an hour, depending on the complexity of the problem of the washing machine model.
The appearance of the first signs of the need for repairs
The following circumstances and facts will tell you when the rubber band needs to be replaced:
- Hissing or rattling noise, even during normal wash cycles.
- Inability to close the hatch properly.
- Formation of puddles under the machine during operation.
The washing program stops immediately if at least one of the above defects appears. The device must be disconnected from the power supply. Next, measures are taken to determine the causes of the malfunction. And repairs are being carried out.
Where to begin
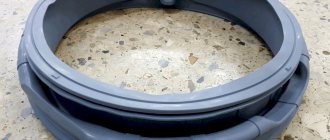
First of all, we go to the store of spare parts for automatic washing machines. You need to choose a seal that completely matches the make of the car. The cuff must be identical to the old one, otherwise it will not install tightly or not at all.
Before starting work, make sure that the machine is completely disconnected from the power supply.
Remember: any repair work, including replacing the washing machine hatch cuff, is carried out only with the appliance turned off!
Internal clamp: correct installation
In repair work, this is one of the most difficult moments. Only after checking the correct installation of the cuff, the master begins to restore the clamp:
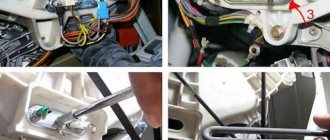
- Several bolts are used to keep the hatch locked. They get rid of them, it’s more convenient.
- A screwdriver is inserted through the blocking hole. After this, you need to hook the clamp so that it is fixed for further work.
- The next stage assumes that the part is stretched around the entire perimeter, the direction does not matter. The main thing is to control the fixation, along with the tension force. The clamp easily comes off with any careless movements. After this, the work has to be repeated again.
- The screwdriver is pulled out as soon as the clamp is in place.
- All that remains is to check how correct the installation was. The planting density should be high enough.
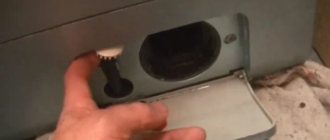
Removing the cuff
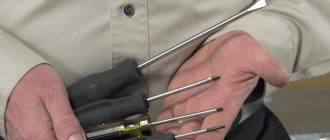
How to replace the hatch seal without damaging other parts? You don't need any special tools for this; round-nose pliers and a flat-head screwdriver will suffice. Just in case, prepare a cleaning agent and a cloth to remove limescale, mold and other dirt, if any.
- For ease of operation and free access to the rubber gasket, you need to remove the front panel of the machine body. Remove the powder tray and remove the screws holding the top and bottom panels in place. Then comes the turn of screws for the front of the car. When removing all the panels, remember which screws belong to which panel: they should not be confused.
- When the front panel of the washing machine is removed, you can also disconnect the hatch cuff itself. The rubber seal for a washing machine is usually attached to the tank body with two clamps. If the clamp is made of metal and is held in place by a spring, simply pry it with a screwdriver and pull it towards you. Remove additional screws. Sometimes the clamp is made of plastic and it is much easier to remove than a metal one.
- After removing the first clamp, unfasten the upper part of the elastic band. On it you will see a mounting mark that indicates the correct location in relation to the machine tank.
- Similarly to the fixing collar, remove the second one and release the cuff to be replaced completely. There is a second mark on its lower part. Please note that there are also similar marks on the rim of the hatch - by following them, you will then be able to correctly install the new cuff.
Preparation for gluing
If you still decide to glue a silicone part, prepare properly for the job:
- Inspect the seal, determine the cause of damage and the advisability of gluing. To get a good look at everything, you should press out the spring clamp that holds the front part of the cuff on the outside of the washer. For Bosch, Siemens, Samsung, Beko, LG, GE and Hansa machines, to access the seal, you must remove the entire front wall of the housing.
- Decide whether the cuff needs to be removed for repair. Sometimes the damage is “on top”, and you can seal it without removing the part. But it will be safer and neater if you apply the patch from the inside, and to do this the seal will have to be removed. True, there are cars in which the entire tank must be dismantled to disconnect the cuff. Immediately think about whether you have enough experience to put him in his place.
- Choose a patch that is durable and elastic. Experience shows that condoms and household rubber gloves, folded in two to four layers, work best in this capacity.
- Choose your glue. It must have maximum adhesion and elasticity (these properties are usually indicated on the packaging). Instant rubber and shoe adhesives work well.
Installing a new cuff
Before installing the new sunroof seal, make sure that it matches the exact make of your car, otherwise the seal will not be strong as a result. Thoroughly wash the so-called “rim” of the hatch to remove accumulated dirt, lime and mold. To do this, just take any soap solution.
It is not necessary to rinse off the soap: by sliding it will be easier for you to install a new rubber band, because the new part is most likely dense and inelastic.
We check whether the mounting marks on the edge of the tank and the cuff itself match, and pull the cuff onto the hatch. We hold the lower part with our fingers, pulling the upper part, then vice versa. The same soap solution will be useful as a lubricant.
Next, we proceed in the same way as when removing the rubber. We return the clamps to their place, tighten the screws and check whether the cuff is firmly seated. After all, if the installation turns out to be of poor quality, leaks are possible in the future.
To make sure that you have successfully replaced the sealing rubber, run the wash cycle on a short program without placing any items in the hatch. After the process is completed, look to see if any water appears in the area of the bottom of the cuff.
Tips for removing internal clamps
You need to find the location of the seal and all the parts, and then remember where and what is located. It is recommended to make special notes for this. Then the new cuff will be installed correctly, following the recommendations for maintaining tightness.
After this, dismantling of the internal holders is allowed. It is enough to pull the device in your direction. At the next stage, the elastic band is changed, the grooves are completely cleaned if necessary. You can use a soap solution, it makes the work easier in the future.
Why do you need to clean?
The rubber seal has a complex design with bends and folds. Dirt, hair, lint and debris accumulate in large quantities in the folds of the cuff - everything that was not removed through the filter and drain hose.
Due to the configuration, the rubber constantly maintains high humidity, which serves as an excellent environment for mold.
The musty smell not only creates an unfavorable atmosphere in the room, but also permeates washed clothes. Therefore, a responsible housewife should not have any questions about why the rubber band needs to be cleaned.
Prevention measures
In order to encounter cuff malfunctions as little as possible, it is necessary to follow simple preventive measures.
- After each wash, wipe the cuff with a dry cloth to remove any remaining water. Otherwise, pathogenic microflora will actively multiply, and with constant contact with water, rubber will lose its performance characteristics.
- Powder residues gradually collect in the grooves of the seal and turn into a thick coating. It must be removed periodically, since washing agents have a detrimental effect on the characteristics of rubber.
- When loading things, you should carefully check the contents of your pockets. Foreign objects in the drum during washing can damage the cuff and render it unusable.
- The manufacturer's recommendations regarding the weight of the laundry to be loaded must be strictly followed. Not only the maximum, but also the minimum weight is important.
- Clothes with iron elements and large decor should be washed in special bags, which are also necessarily used for shoes.
- Cleaning the washing machine using special products should be carried out regularly - at least 2 times a year. It is advisable to carry out complete mechanical cleaning every two years.
- The hatch should be slightly open if the machine is not in use, which will provide ventilation.
Watch a video about replacing the cuff below.
What you need to know before replacing the rubber band in your washing machine
You need to choose tires that match the model of your washing machine. If you have a front-loading appliance, you need to buy round shaped products. For vertical household appliances, you will need a rectangular piece. It will ensure a tight seal between the tank and the top cover.
Older cars had a rubber seal. Now a new material has appeared - silicone. It is more durable than rubber, as it does not lose its elasticity under the influence of humidity and high temperatures.
When choosing this product, you also need to pay attention to the dimensions of the product. They differ for different models. In addition, for equipment with additional functions, seals with additional holes are produced. These holes are used for aquaspray or drying process. In any case, you only need to buy the spare part that is intended for your model. You should not take analogues, even if they are the same size. Seals for other machines may not be suitable for you.