Samsung washing machines are distinguished by their quality and reliability, but they also break down from time to time. One of the most common malfunctions is bearing deformation and failure. To replace this unit (they cannot be repaired), the owner of the device should contact a service center. If the user wants to save a decent amount of money, he can change the bearing on a Samsung washing machine himself at home. To do this, you need to know how to do this work and purchase spare parts.
Signs and causes of malfunction
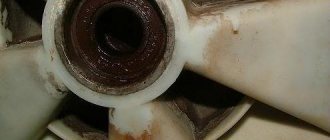
Bearings in a Samsung washing machine are designed for proper rotation of the drum during washing and spinning. During operation, the seal that protects them from moisture is gradually destroyed, as a result, water penetrates into the seat and washes out the lubricant. Increased friction occurs, as a result of which the bearing is deformed and destroyed.
There are a number of signs that indicate that a bearing has failed and needs to be replaced.
Firstly, there is increased noise during washing, which turns into a hum and loud knocking during the spin cycle.
Secondly, if you open the hatch of a Samsung washing machine and manually turn the drum, you will notice that it turns very hard or knocks and dangles. This is also a sure sign of bearing deformation.
Thirdly, after washing is completed, dark spots that look like grease may appear on the laundry. This is another clear symptom of bearing failure.
If at least one of these signs appears, it is necessary to urgently replace the bearings. If repairs are not carried out, this can lead to deformation of the shaft and cross, the replacement of which will cost much more.
Common replacement mistakes
When replacing these parts on their own, users often make a number of mistakes that can only complicate the problem:
- damage to the hatch cuff;
- a break in the wire coming from the sensor that blocks the hatch;
- damage to the shaft pulley when removing it from the axle;
- broken wires from the temperature sensor and heating element;
- damage to mounting bolts;
- failure of pipes due to forgetting to loosen the clamp;
- damage to the sleeve during the process of knocking the bearings out of the drum, as a result of which the latter will require replacement.
These errors will only add problems, so it’s better not to take on the job if repairing a washing machine is beyond your capabilities.
If you are far from technology, then seek help from a professional. For those who are familiar with household appliances, this video will help.
Preparation for repair
To replace faulty bearings, the owner of a Samsung washing machine will need to purchase new ones, as well as seals and special lubricant. Typically, manufacturer service centers and specialized stores offer repair kits that contain everything you need. You can also order them online. To correctly select the right parts, you should tell the seller the brand and model of the washing machine.
In addition to spare parts, to replace bearings, you need to prepare various tools. To perform the repair you will need:
- Regular or rubber hammer.
- Set of open end wrenches and sockets.
- Pliers.
- Chisel or metal pin.
- Slotted and Phillips screwdrivers.
- Indicator.
- Adjustable wrench.
- Silicone sealant.
- WD-40.
After everything you need has been collected and new bearings have been purchased, you need to unplug the washing machine, remove the water supply hose and disconnect the equipment from the sewer. Next, you need to move the Samsung washing machine to a spacious place and prepare one or two tables to place the removed components and panels.
Where to go
There are many specialized workshops in Moscow. It is worth choosing those that have proven themselves well.
Our company is one of the best in Moscow, and you will see it. We have been working since 2008, during which time our technicians have repaired more than fourteen thousand devices. Rich professional experience allows them to cope with any problem. Even the most economical client will like the prices.
Our advantages:
- Free diagnostics;
- Departure of the courier;
- Warranties from two months to a year;
- Affordable price, official price, available for review on the website.
To apply for a call from a specialist, call the number: +7, our operators will answer you immediately. Company address: st. Maroseyka, 6/8, office No. 6, if you want to visit the service center in person. Contact us, we will not disappoint you!
Analysis of a Samsung washing machine
Before disassembling a Samsung washing machine, you need to prepare your phone or camera and take pictures of the equipment before removing each part, especially before disconnecting the wiring. This is necessary to avoid errors when assembling the device and to prevent new malfunctions in case of incorrect actions.
Disassembling the washing machine occurs in the following order:
- Unscrew the two screws located on the back side in the corners, slide the top cover back, lift it and put it to the side.
- Pull out the detergent compartment, press the latch down, slightly lift the cuvette and pull it out of its seat.
- Disconnect and put aside the hose for supplying water to the powder compartment and the pipe leading from the cuvette to the tank. To do this, you need to use pliers to release the retaining clamps.
- Unscrew the retaining bolts and remove the upper counterweight.
- Open the hatch of the Samsung washing machine. To remove the cuff, remove the clamp. To do this, you need to pry off the spring holding its edges with a screwdriver, remove it and remove it along with the clamp. After this, the edges of the cuff can be tucked inward.
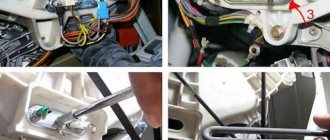
- Close the hatch, unscrew the fasteners holding the front panel. Self-tapping screws are located at the top and bottom. Carefully slide into the panel to gain access and disconnect the sunroof lock wire. Move the panel to the side.
- Turn the Samsung washing machine on its side, unscrew the screws, disconnect and remove the bottom. Take photos and disconnect the wires going to the motor and drain pump.
- Disconnect the pipe going from the pump to the tank.
- Unscrew the fasteners, pull out and put the motor aside.
- Remove the tank mounting posts by first unscrewing the retaining screws on the tank and at the bottom of the housing.
- Unscrew and pull out the lower counterweight.
- Without changing the position of the Samsung washing machine (on its side), return to the top part and disconnect the pipes and wires going to the water inlet valve. Unscrew the fasteners and pull out the valve.
- Disconnect the four counterweight springs that hold the tank and drum suspended.
- Unscrew the fasteners, carefully release the latches, disconnect the wires and remove the control panel.
Now you can remove the tank from the body of the Samsung washing machine.
- Place the tank in such a way that you have access to the pulley.
- Remove the belt.
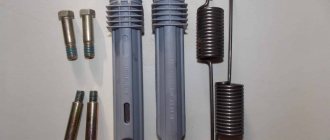
- Block the pulley and unscrew the bolt holding it. If it does not give in, lubricate it with WD-40 and wait a little.
- Remove the pulley.
- Find a bolt similar to that holding the pulley, screw it in and knock out the shaft with light blows of a hammer. The blows must be applied at right angles so as not to bend the knot.
Now you need to disassemble the tank to remove the drum and replace the seals and bearings.
The halves are connected with special clamps that can be easily separated and removed. After they are removed, you need to open the tank in two and pull out the drum.
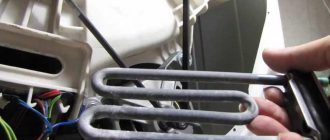
Before replacing the bearing, you may want to inspect and perform maintenance on other parts, such as inspecting and descaling the heating element. It is also important to inspect the shaft and crosspiece: if they are damaged, they should be replaced, otherwise simply clean them of dirt and grease. You can use fine sandpaper for the shaft, and a rag or sponge for the cross.
Disassembling the tank
Since the racks had already been unscrewed earlier, all that remained was to remove the clamps and brackets. Tools will help you with this. There are usually no special subtleties or difficulties with this work.
Remove the top of the tank housing so that the drum is visible. Then remove the bottom part. As a result, you should be left with:
- The upper half of the tank with a hatch hole in the center.
- The lower half of the tank with the heater.
- Drum and axle.
Since you have done such work, do not focus only on the bearings - along the way, check everything that you have access to.
For example, you can check the inside of the tank for damage or check the heating element for dirt and scale, short circuit and breakdown to the body (the last two checks are done with a tester). If you find problems with the heater, you can clean it of limescale or completely replace it with a similar one.
Bearing replacement
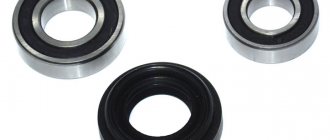
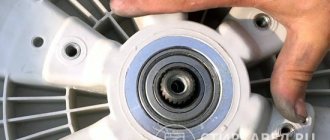
Bearings and seals are located on the rear cover of the tank. To replace these parts, they will first have to be knocked out of their seats.
- The outer bearing is removed first. To do this, you will need to take a chisel and a hammer and, with light blows in a circle, avoiding distortions, knock out the part. You only need to hit the outside of the bearing to prevent damage to the seat. It is forbidden to hit only one point; there must be several places to hit, otherwise the bearing will be distorted or stuck in the bushing, which will lead to additional difficulties.
- The second, smaller bearing is knocked out in the same way, turning half of the tank over with the inside facing up.
- It is also necessary to remove the old bearings.
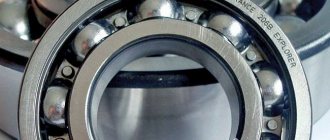
- After the worn parts have been removed, it is necessary to wipe the inside of the bushing dry with a clean rag, removing dirt and remaining lubricant. After this, you need to apply new grease that comes with the bearings and install new seals.
- Now you need to replace the bearings. You should start with the internal. It should be installed in the bushing, make sure it is level, and then drive it inside. To do this, you need to take a chisel and a hammer and hit it evenly in a circle, avoiding distortion. You only need to hit the outside of the bearing.
- After installing the inner bearing, you need to turn the half over and drive in the outer one.
The replacement of bearings is completed, you can begin assembling the equipment.