The high popularity of Bosch washing machines is due to the world-class quality of products, modern design, modern functionality and reliability.
During long-term operation of equipment, components wear out and require repair or replacement. One of the fairly common breakdowns of washing equipment is the failure of the heating element.
Read on to learn how to replace the heating element in a Bosch washing machine.
Purpose of the heating element
The heating element of a Bosch washing machine is an element that is responsible for heating the water coming from the water supply to a user-specified temperature . Structurally, the heating element is a tubular part in the cavity of which a conductor with a high level of resistance passes.
The heating coil is surrounded by a dielectric, which ensures the transfer of heat to the water located in the tank. The working spiral has output to contacts to which voltage is supplied by a signal from the control module.
The heating level is controlled by a sensor that transmits information to the control unit.
Important! High probability of leakage
After repairs are completed, it is necessary to monitor the serviceability of the machine for some time, since leaks are possible. Changes in water pressure, temperature changes, vibration when performing the spin function at high speeds can cause leaks at the joints. Only after checking the tightness of the system using different washing modes can you be confident in the quality of the repair performed. For your own peace of mind, you can install a leakage protection system on the floor.
Symptoms of a problem
A malfunction of the Bosch heating element is indicated by the lack of water heating. This can be determined by the display of code F19 on the display .
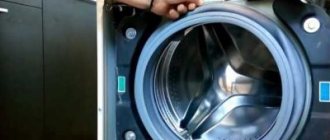
But in some cases, the work cycle may not even stop. At the same time, you can determine that heating has not started by the fact that the glass of the Bosch hatch remains cold at all stages of laundry processing, including during washing.
Also, at this time, the electricity meter does not work intensively, and the laundry after such a wash is washed worse than usual.
If a problem with the heating element occurs for the first time, you can try to reboot the washing machine. To do this, the device is turned off for 20-30 minutes, after which it is turned on again .
If the cause of the failure was an accidental coincidence, the heating problem will not recur. Otherwise, it will be necessary to conduct a thorough diagnosis of the node.
If the Samsung machine is under warranty
If a machine that is under warranty breaks down, you should not try to repair it yourself. Opening the device may result in denial of free service .
First you need to find a warranty card. It may indicate the number of the service center to contact.
If there are no contact details, you need to go to the store where the equipment was purchased. At the point of sale, the goods must be taken away for examination.
After determining the cause of the breakdown, there are 3 options for the development of events:
- The device will be repaired free of charge.
- The buyer gets his money back.
- The product is exchanged for a similar one.
As a rule, problems do not arise with equipment that has a manufacturing defect. If the store refuses to accept a broken machine, you need to write a complaint addressed to the director. When you cannot get an answer, you should contact the court or the Consumer Rights Protection Department. The maximum period for consideration of a claim is 10 days.
Delivery of the washing machine to the store is the responsibility of the buyer. The seller must transport the equipment to the examination site .
If he did not do this, and the cause of the breakdown is defective, the store is obliged to pay the costs incurred by the consumer. In this case, you need to collect all the receipts to prove your case in court.
How to replace it yourself?
If the heating element in a Bosch washing machine breaks down, it is replaced with a new part. Access to the heating element in front-loading washing machines is provided from the front panel.
Preparatory stage
At the preparation stage, it is necessary to prepare a set of tools for work (screwdriver, pliers, multimeter, screwdrivers). You should also disconnect the device from the electricity and turn off the water supply tap.
The device needs to be pulled out to have access to the washing machine from all sides. You should take care in advance of rags and good lighting of the work area. Before starting the repair, you should make sure that there is no laundry in the drum.
Gaining access to a part
In Bosch washing machines, access to the heating element is provided from the front panel. To get to the location of the heating element, you must perform the following steps:
- Unscrew the screws from the Bosch rear wall that hold the top cover.
- Pull the cover towards you and up to detach this panel from the body.
- Remove the powder receptacle cuvette.
- Remove the panel with control buttons, having first unscrewed the screws holding it.
- Place the removed part on top of the washing machine.
- Open the hatch door.
- Find the collar under the elastic band of the cuff. Using a screwdriver, pry up the clamp and pull it towards you, releasing it gradually in a circle.
- Thread the rubber band that is no longer held by the clamp into the drum.
- On the hatch you need to find the screws that hold the lock lock. Unscrew them and tuck the lock inside.
- Remove the decorative lower narrow panel.
- Find the screws that hold the front panel in place. Depending on the model of the washing machine, their number and location may vary.
- Remove the front panel.
How to remove?
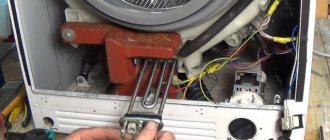
The heating element is located at the bottom of the Bosch, under the drum. It fits tightly into the socket and has many connections.
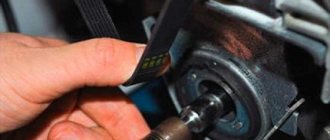
In order not to confuse anything in the future, it is advisable to photograph all contacts before proceeding with disassembly .
The connectors should be loosened and the wires should be moved aside. In the center of the base of the heating element there is a nut that holds and secures the part. It must not be completely unscrewed. The bolt should be pressed inward. After this, you need to carefully pull out the heating element, helping yourself with a flat-end screwdriver.
You need to remove the old heating element very carefully so as not to damage the mounting socket.
After the Bosch heating element is removed, you should inspect the place where it was located . The place where the heating element is installed should be cleaned of dirt and scale. The condition and performance of the removed heating element can be checked using a multimeter and assessed visually. If there are many layers on the element, it is advisable to replace it.
How to change to a new one?
The new Bosch heating element is installed exactly in the position in which the previous heating element was installed. The part should fit tightly.
After installation, secure it in the center with a screw and connect the contacts. Previously taken photographs will be a good help for this.
You can watch the video on how to replace the heating element in a Bosch washing machine:
Where to buy a shock absorber for an Indesit washing machine, at what price, how to choose?
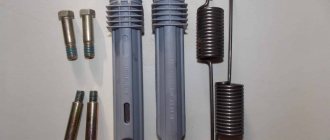
When choosing a new set of shock absorbers, you need to pay attention to the following points:
- length (in compressed and open form must correspond to the parameters of the dismantled element);
- bushing diameter (even a slight deviation from the original parameters of the dismantled element will not allow a high-quality installation of a new shock absorber);
- load indicator (indicated by the manufacturer on the case, varies from 100N to 150 N);
- shock absorber stiffness (the parameter is indicated by the manufacturer on the body, most often designated as 85N or 80N).
When going to the store, it’s a good idea to take an old part with you as a sample. This will help avoid selection mistakes.
The cost of a pair of shock absorbers varies from 450 rubles. up to 1500 rub.
Causes of breakdowns
A tubular electric heater can fail for various reasons. The most common include:
| Cause | Description |
| Poor quality water | The harder the water supplied to the washing machine, the more scale forms on the surface of the heating element. And this layer only thickens over time, leading to breakdowns. |
| Wear | Natural wear and tear resulting from long-term use is a very common cause. The more intensively the washing machine is used, the more wear the heating element undergoes |
| Power surges | Voltage changes in the electrical circuit provoke a short circuit. As a result, not only the heating element, but also other components can burn out. |
| Triac burnout in the control module | Burnout of the control unit element, which is responsible for controlling the operation of the heating element, leads to the fact that the control signal is not transmitted to the node |
| Wiring irregularities | If the wiring in the washing machine is faulty, signals may not pass between the nodes. As a result, the heating element may not turn on at all or work unstably |
| Manufacturing defects | The situation is rare, usually makes itself felt almost immediately |
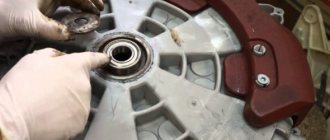
Problems removing shock absorbers
What prevents you from quickly and easily removing shock absorbers from an Indesit machine are special fasteners in the form of expanding plugs, called “nails” among repairmen. Each passes through a damper and two plastic plates that hold the stand on both sides. Its outer base is absolutely smooth, so it is almost impossible to pull it out.
Attention! It is not recommended to try to “get” to the plug on the other side with a screwdriver - there is a high risk of damaging the thin plastic and disrupting the pressure in the pressure switch system.
The problem can be eliminated if you upgrade the plug in this way:
- find a drill with a diameter of 2-2.5 mm and a length of at least 20 cm;
- use a drill or screwdriver to drill a hole in the middle by 3-4 cm, but you can also drill it right through;
- screw the self-tapping screw into the hole made, leaving 3-4 cm on the surface;
- Grab the screwed in screw with pliers and pull it towards you.
- carefully remove the self-tapping screw with the “nail”;
- pull the damper out of the grooves.
To remove the second shock absorber, we repeat the algorithm, turning the washing machine on the other side. The main thing is to choose the optimal drill length and reach the lock. If you can’t get close to the racks, it is recommended to take the tank out and try again.
Call the master
In cases where it is not possible to replace the Bosch heating element on your own, you need to call a washing machine repair specialist. You can find a suitable company on the Internet. There you can also read reviews about the work of the masters.
Companies providing washing equipment repair services that have been operating on the market for a long time value their reputation and take responsibility for fulfilling orders. This allows you to avoid falling for scammers.
The cost of work depends on the complexity of the problem and the company’s price list . If a failure requires not only replacing the heating element, but also performing other work, the cost of the call will be higher.
In the capital, the price for replacing a heating element is from 1,700 rubles. If repair of the control unit is necessary, for example, the cost of work will be from 2,500 rubles. A new heating element is not included in the price for the master’s work; it is paid separately.
Installing a new part
Now it's time to replace the old shock absorbers. It is logical that for this you will need new spare parts, which are purchased at service centers or online stores. There are two ways to select suitable parts: bring a previously used stand to the consultant or copy down the brand and serial number of the washing machine. Reassembly goes like this:
- we take out the shock absorber and, applying force, place it in special grooves;
- take the previously used plug and carefully drive it into the hole on the damper through both partitions;
- we install the drill in the drill and, including the “reverse” movement, remove the self-tapping screw;
- check the reliability of fixation;
- repeat the steps with the other stand, turning the machine over to the opposite side;
- if the tank was removed, then install it back into the body;
- we return the engine to its place, securely tighten the screws and hook up all the supply wiring;
- put on the drive belt, not forgetting to rotate the pulley;
- We raise the machine gun “to its feet” and screw the back wall.
The final stage will be running the washing machine at maximum spin. If the machine is stable throughout the entire cycle, the vibration is moderate, and there is no hum or knocking, then the DIY repair was done correctly. Otherwise, we return to the disassembly stage and tighten the retaining shock absorbers of the mount.
Source