Causes of malfunction
Bearings on washing machines not only from Kandy, but also from other companies fail for a number of reasons. Firstly, this happens if the equipment has been in operation for many years. Components have a certain service life, after which they break.
Secondly, the culprit of bearing failure may be a damaged oil seal. When holes and cracks appear on it, moisture begins to seep through it. It washes away the lubricant, resulting in much stronger friction, which leads to damage to the part.
Thirdly, the bearing breaks due to the design features of belt-driven equipment. In such devices, serious loads are placed on small elements, which is why they gradually collapse.
Also, bearing failure can be a consequence of improper operation of the washing machine. Overloading and improper loading of laundry lead to breakdowns and failure of equipment.
If you do not replace the damaged part and seal at the first sign of a malfunction, the situation may worsen. More serious components will fail, the cost of repairs will increase significantly, in some cases it will be easier to buy a new washing machine.
When do you need to change Kandy washing machine parts?
There are several main reasons for bearing failure :
- the service life of the components has expired;
- the oil seal is damaged;
- the equipment is operated in violation of the rules.
Washing machine parts usually work for 6 to 10 years without repair.
Often it is the bearing that “flies” first. The machine continues to work, but if it is not replaced, more serious parts will begin to break, and repairs will be unreasonably expensive. If the reason is a damaged oil seal, then the bearing breaks due to increased friction . This happens as follows: cracks appear in the oil seal, it begins to let water through, and the water washes away the lubricant (which softens friction). As a result, the bearing fails, and both parts have to be replaced.
Owners of belt-driven vehicles especially often encounter this type of breakdown. Their design features are such that small parts experience increased loads and therefore may break prematurely. In any case, at the first sign of problems with the bearing, it should be replaced as quickly as possible.
Signs of bearing failure are as follows:
- The first sign is the appearance of extraneous noise when the machine is operating. This may be a metallic clang, crunch or squeak. The sounds usually get louder when the spinning process begins.
- Damage to the edge of the rubber cuff. They arise as a result of the fact that when rotating, the drum, which has lost its balance, begins to vibrate, erasing the seal.
- Often, car owners notice the very fact that the car has begun to vibrate more strongly, and this is also a clear sign of bearing failure.
- Deterioration in spin quality. A damaged bearing assembly does not allow the equipment to work at full capacity, so the laundry remains wet after spinning.
Preparation for repair
Before repairing, it is necessary to assemble the tool and purchase spare parts. To disassemble the Kandy washing machine and replace the bearing, the owner of the device will need:
- hammer,
- pliers,
- metal rod for knocking out bearings,
- screwdrivers,
- set of open-end wrenches,
- sealant,
- WD-40,
- bearings and seals.
You can purchase spare materials in specialized stores, service centers or order online. Seals and bearings should be selected strictly in accordance with the model and brand of the washing machine. It is better to buy branded components or similar ones of good quality. Purchasing cheap, low-quality materials will soon lead to repeated repairs of equipment.
After everything necessary is prepared to disassemble the equipment and change the bearing, it is necessary to disconnect the Kandy washing machine from the network, water supply and sewerage system and move it to a spacious place so that there is no interference during repair work.
When disassembling a Kandy washing machine, it is recommended to photograph the equipment before removing each component, especially when disconnecting the wiring. This will allow you to assemble it correctly and avoid mistakes that could lead to costly repairs.
Other faults
There are several more common malfunctions of Kandy washing machines.
Water does not fill
This situation can arise when there is no (the pipe is blocked) or insufficient pressure in the system. One possible cause is a clogged mechanical filter in the inlet hose. In this case, you need to unscrew it and clean the mesh at the inlet with a brush.
Another probable cause is a broken inlet valve. If this part is faulty, the machine will not draw water. Valve replacement instructions:
- unscrew the inlet hose;
- remove the top cover;
- disconnect all wires and hoses leading to the valve:
- separate the part from the machine body by unfastening the latches or unscrewing the bolts;
- turn the valve and pull it out;
- Having replaced the part with a similar one, install it in its proper place.
Replacing the intake valve is a simple procedure, so the repair can be done by yourself.
Bearing broke
This malfunction is accompanied by a characteristic loud knocking sound when the machine is operating. The process of replacing a bearing is quite labor-intensive; it requires certain skills and dexterity.
The replacement procedure is as follows:
- turn off the power to the machine and unscrew the hoses;
- remove the top cover and unscrew the counterweight;
- remove the belt from the drum pulley;
- disconnect the wires leading to the heating element and the engine;
- take out the motor;
- disconnect the hatch by first unscrewing the screws under the cuff and prying the fixing clamp with a screwdriver;
- the tank is disassembled into two parts, the pulley is removed from the drum shaft;
- By lightly tapping, the old bearings are knocked out and new ones are installed.
If you can change the bearing on a machine with a detachable tank if you have the necessary components, a one-piece tank will make the task almost impossible at home. The only thing that can be done in such a situation is to contact a service center.
Replacing the cuff
Troubleshooting occurs according to the following scheme:
- open the hatch;
- Use a screwdriver to press out the clamp that goes around the entire circumference of the hatch;
- pull out the front part of the cuff;
- remove the internal spring clamp by removing the top cover;
- change the cuff to a new one;
- fasten the clamps in the reverse order.
The part may wear out over time, and it can also be damaged by sharp parts that get inside.
Disassembling the washing machine
To replace the bearing, you first need to disassemble the Kandy washing machine. The process looks like this:
- Unscrew the screws, slide the top cover back and remove it.
- Remove the top counterweight plate.
- Unscrew the fasteners and remove the back panel.
- Pull up to remove the left and right top side panels.
- Unscrew the two bolts on the sides, turn off the wiring, photograph it, and remove the control panel. It is held on by several plastic latches, which are very fragile. They need to be squeezed out with caution.
- Remove the hoses for filling water into the detergent dispenser.
- Turn off and remove the pressure switch.
- Unscrew the fasteners holding the control unit, remove the board, photographing the wiring.
- After removing the bolt, remove the rheostat.
- Disconnect the outer and inner clamps and remove the cuff on the hatch door.
- Remove the screw and remove the detergent tray.
- Disconnect the pipes holding the powder receiver and the tube from the rheostat.
- Remove the belt, heating element, motor, temperature sensor.
- Disconnect the remaining wiring.
- Disconnect the hose from the tank to the pump.
Now you need to make sure that all wires and hoses are disconnected and all parts that may interfere with the removal of the tank are removed. The washing machine door must be open. To remove the tank, you need to remove it from the side springs and pull it up.
How to replace?
You can replace the bearings yourself. To do this, you need to purchase the bearings and oil seal themselves, prepare the appropriate tools, and strictly follow the instructions.
Tools and accessories
Replacement is carried out using the following tools:
- set of wrenches;
- screwdrivers;
- metal rod (needed when knocking out the bearing);
- pliers;
- hammer.
In addition, you will need a sealant, as well as universal penetrating lubricant VD-40.
Disassembling a household appliance
Disassembly procedure:
- remove the top cover by sliding it back (after unscrewing the screws);
- remove the counterweight plate;
- remove the back panel (by unscrewing the fasteners);
- Pull the right and left top panels up and out;
- Unscrew the bolts on the sides;
- disconnect the wiring, take a photo of it;
- remove the control panel (squeezing out the plastic latches);
- remove the fill hoses
- turn off the pressure switch and remove it;
remove the control unit and board;- take a photo of the wiring;
- remove the rheostat;
- disconnect the clamps (internal and external);
- remove the cuff from the hatch door;
- remove the tray (by unscrewing the screw);
- disconnect the powder receiver pipes;
- remove the belt, heater, engine, temperature sensor;
- remove the remaining part of the wiring;
- disconnect the hose from the tank and pump;
- Remove the empty tank and remove it through the door (lifting it from the side springs);
- remove the counterweight and cuff from the tank;
- unscrew the top of the tank;
- remove the sealing gasket;
- remove the pulley by turning the tank upside down;
- fix the pulley with a screwdriver, unscrew the nut;
- open access to the shaft by removing the pulley;
- replace the original nut with a similar one (so as not to damage it);
- carefully knock out the shaft by hitting the nut with a hammer;
- remove the lower part of the tank, releasing the drum;
- check the integrity of the crosspiece (if damaged, replace it);
- Clean the shaft completely and inspect it (if there is the slightest damage, replace it).
Replacement
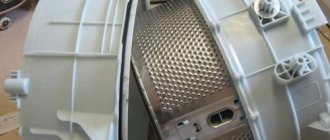
To get to the bearings located in the drum (its rear wall), you need to remove the oil seal. To do this, pry it off with a flat screwdriver. A new oil seal will need to be installed. After this, the outer and inner bearings are carefully knocked out with a hammer on a metal rod (in exactly that sequence).
After removing the bearings, their places must be thoroughly cleaned and wiped dry. Next, new bearings are installed - internal, then external. They are carefully and carefully driven in a circle, making sure that the parts sit evenly, without distortions.
The next stage is replacing the seals . Before installation, it is treated with a water-repellent lubricant.
Assembly and testing
First, the tank is assembled. Both parts of it must be thoroughly cleaned of dirt and scale, only then secured. The joints are treated with sealant. The gasket that fits between the halves of the tank should also be replaced with a new one. The bolts are tightened crosswise.
The entire process of assembling the machine is carried out in the reverse order of the disassembly process. First you need to clean the heater from scale , and then gradually return the parts to their places.
Check the wiring connections with the photos taken earlier. Inspect all elements being installed in place, clean off dirt, and replace if necessary.
After completing the assembly, you must wait until the sealant that was applied to the joints of the drum hardens . The curing time is indicated on the sealant packaging.
After this, the machine should be connected, some powder should be added, and started for testing. During the test wash process (in normal mode, but without laundry), residual grease and dirt will be removed from the machine, and unpleasant odors associated with the repair process will go away. At the same time, the machine should operate quietly, without excessive vibration.
After testing, check whether water appears under the car . If the machine washes quietly and does not leak, it means the replacement was successful.
Tank disassembly
To disassemble the tank, you must:
- Remove the second counterweight and the rubber cuff from it.
- Unscrew the bolts and remove the upper part of the tank, and also remove the gasket that ensures tightness.
- Turn the tank upside down and remove the pulley.
- Use a screwdriver to block the pulley so that it does not rotate and unscrew the nut.
- Remove the pulley. Access to the shaft will open.
- Find a similar nut so as not to spoil the original one, screw it back on and knock out the shaft with light blows of a hammer on the nut. The blows are applied strictly at right angles so as not to bend the shaft.
- After the shaft is knocked out, unscrew the nut and remove the lower part of the tank, freeing the drum.
- Inspect the crosspiece for damage. If there is play, it needs to be changed.
- Clean the shaft from dirt and grease. If defects are found, it is also better to replace it. Particular attention is paid to the shaft sleeve. If it is worn out and there are transverse grooves, it should be replaced. Otherwise, moisture ingress will cause the new bearing to fail.
Device disassembly sequence
If you are a beginner, we can advise you to use a camera to shoot a video or photograph the work process, so as not to confuse the sequence of actions and then assemble the machine correctly.
There are several important rules to remember that must be followed before starting repair work:
- it is necessary to drain all the water from the machine;
- Before disassembling the washing machine, it is necessary (!) to turn off the power to the device;
- choose a bright and spacious place for repairs.
If the unit cannot be moved to a convenient location, then maximum illumination of the workplace should be ensured.
The first step is to remove the top panel of the washing machine.
Removing the top panel is not difficult - just unscrew the two screws on the back of the case, move the cover back a little, then lift and remove it
The second step is to remove the container for powders; this is not difficult to do. Next you need to remove the cuff from the hatch
Caution is needed here. Use a screwdriver to pry up the retaining clamp, remove it, and then remove the O-ring
This must be done carefully, trying not to tear the soft rubber.
Carefully remove the O-ring - the main thing is not to damage it through carelessness. You can push the cuff inside the drum - it will be safe there. Now it's the turn of the control panel
In order to remove it, you need to unscrew two screws on the front of the panel and another one located on the right
Now it's the turn of the control panel. In order to remove it, you need to unscrew two screws on the front of the panel and another one located on the right.
Next, you can begin dismantling the lower front panel. By pulling the latch lever, we separate the base part of the facade - access to the drain filter and the hose for the emergency filter is open. Now you can remove the front panel by unscrewing the eight mounting screws. The heating element and drain pump open.
If the repair process requires removing the tank and drum, we advise you not to do it alone. Be sure to involve an assistant in this matter. Before removing the tank, you need to turn off the power to the heating element, disconnect all the pipes, as well as the electrical wiring from the motor.
To do this, you need to lay the machine on its side, then remove the 4 screws on the bottom cover. The engine is opened with a counterweight fixed with shock absorbers.
Disconnect the wiring from the connectors
Here it is important to remember what is connected to what, so before disassembling it is advisable to photograph everything, so that later you can repeat everything exactly as in the photo
Let's start dismantling the tank. First you need to remove the bolted counterweights, and then the springs, and unfasten the shock absorbers. Only after this can you, together with an assistant, remove the tank from the machine body
But all that remains is to disconnect the drive belt from the engine. To do this, simply remove the belt from the pulley. Remember that when putting on the belt, you should first put the drive belt on the small drive pulley, then put it on the large driven pulley and align it with the center of the pulley.
Bearing replacement
The bearings are located in the rear wall of the drum. Before you take them out and replace them, you need to pry up and remove the oil seal with a flat screwdriver. It will also need to be replaced with a new one.
Next, you need to knock out the inner and outer bearings in turn. These actions are performed using a hammer and a metal rod. First, the bearing installed outside is knocked out. The blows are applied evenly in a circle until the part comes out of the seat. Next, remove the second oil seal and knock out the inner bearing.
After the bearings are knocked out, you need to clean the drum and bearing seats. It is necessary to remove dirt and wipe these parts dry.
Now you need to change the bearings - first the internal, then the external. They are driven in evenly in a circle; this process must be monitored very carefully to prevent the part from skewing.
Next you need to change the seals. Before this, they should be thoroughly treated with a lubricant that has water-repellent characteristics.
Drain pump breakdown - from RUB 1,600*
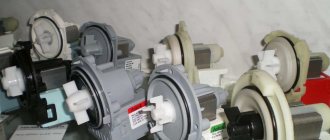
The pump is designed to pump out water during washing. It consists of a motor and an impeller. Basically, they break down: the pump motor burns out, the impeller is mechanically damaged. In the first case, the sound of the pump is not heard at all, in the second, the pump hums, but the machine does not drain water.
SIGNS
The washing machine does not drain the water: you can’t hear the pump working at all, or it is humming, but the water still does not drain from the washing machine. Zanussi cars with a display display error E20 or E21.
HOW TO FIX
Spare parts for the pump are not sold, so the pump needs to be replaced.
*Prices are only for the work of the master, the new pump is paid separately.
Assembling the tank and washing machine
Before assembling the tank, both halves must be thoroughly cleaned of scale and dirt. The joints should be carefully treated with silicone sealant. The gasket between the tank halves should be replaced with a new one. The bolts should be tightened crosswise.
Reassembling the Kandy washing machine is done in the reverse order. If the user took photographs at the disassembly stage, you should check them, especially when connecting the wiring. Installed parts must be inspected, cleaned if necessary, or replaced if damaged. Be sure to descale the heating element.
After the equipment is assembled, it is necessary to leave it for the time required for the sealant to completely harden. Next, you need to connect the washing machine to communications and electricity, add a small amount of detergent and run a test wash. This is necessary to remove dirt, grease and unpleasant odors remaining after the repair. If during the test wash the Kandy washing machine operates quietly, no extraneous noise is heard, and no moisture appears under the machine, this indicates that the bearing repairs were carried out successfully and the equipment was assembled correctly.
Review of purchased models
The manufacturer produces models with different dimensions, programs and spin speeds. All of them are front-loading, but given their small size, it will not be difficult to choose a machine for any room. Let's consider several popular product options and their technical characteristics and features.
Model 50у102
Compact white washing machine with a maximum laundry weight of 5 kg. It has a front loading type and many washing modes. Product dimensions 60*40*85 cm - this model is suitable for small spaces.
It belongs to the Maxi Function series and is equipped with a display that displays the necessary information about washing and the presence of problems or errors. This model, like the rest of the series, has a self-diagnosis function.
ATLANT 50у102
The advantages of the washing machine include:
- a large number of programs: 15 basic and several additional functions;
- quite good power consumption class A+;
- the ability to select the spin speed and cancel it;
- protection against leaks in the body and control over the level of foam;
- a timer that allows you to delay the “start” up to 24 hours;
- It is possible to select the washing temperature mode and a signal for the end of the program.
The disadvantages include the following parameters:
- lack of protection from children;
- plastic parts in the design.
"Atlant" 40m102
It belongs to small-sized products due to its depth, which is only 33 cm. But the drum capacity is quite large for this size - 4 kg. The washing machine is controlled using a regulator and buttons in an intuitive and simple manner. The necessary information about operation and problems is displayed on the digital display.
Panel model 40m102
Pros of the model:
- high washing class - A, as well as good efficiency in terms of energy consumption - A+;
- control over imbalance and foaming, which prevents possible product breakdowns;
- a good selection of basic washing programs - there are 15 of them, including a cycle for woolen items;
- possibility of changing temperature conditions;
- presence of a signal about the end of work.
Minuses:
- no child lock;
- lack of protection against possible leaks;
- small loading volume.
Model 50у107
Belongs to the Multi Function series, which features a “night mode”. Even before 2022, the cars in the series were spinning with a maximum speed of 1000 rpm, after which a value of 1200 was added.
The load of laundry is 5 kg and dimensions are 85x60x42 cm. The control is electronic, information about washing programs and errors is displayed on a digital display.
Atlant 50u107
The advantages of this SMA include:
- good efficiency - A+;
- availability of 15 main programs and a number of additional options;
- protection against leaks in the body;
- child lock;
- function of delicate spin and stop with water in the tank;
- possibility of delaying the start of washing up to 24 hours.
Do you turn off the water tap after washing?
Oh yes! No.
ATLANT 70с1010
The machine is a free-standing type and has front loading. The model is controlled using a digital display, the laundry load is 7 kg. The advantages of the washing machine include the following characteristics:
- efficiency: power consumption class A+++;
- functionality: contains 15 programs, including for wool;
- capacity;
- washing delay: built-in timer with program delay function for up to 24 hours;
- large and convenient loading hatch;
- safety: there is child protection and foam level control, and it is also protected from leaks in the body.
ATLANT 70с1010
ATLANT 60у1010
This model from the SMART Action series stands out for its design and control solutions: regular lines and discreet style. This series was developed by the company in 2013 and combines modern technological developments. Loading of laundry - 6 kg. Number of programs - 16.
Pros of the model:
- washing efficiency - class A++;
- a wide selection of both basic and additional programs;
- protection against children, leaks in the body;
- control of imbalance and foam level;
- increased drum volume by 5% and a large hatch into which large items can be loaded without any problems;
- antibacterial impregnation of the seal;
- the tank is made of high-strength composite material;
- function to control the complete use of washing powder.
Among the minuses, they note the presence of loud clicks when switching programs, and a weak mechanism for holding the hatch.
Manufacturer Atlant takes a responsible approach to product quality control at every stage of assembly. Therefore, washing machines are distinguished by their reliability and high quality washing. In addition, the products have simple and intuitive controls that do not cause problems during operation.
Recommendations for using technology
To ensure that bearings fail as rarely as possible, it is necessary to operate the Kandy washing machine correctly. The equipment should not be overloaded; there should be no more things in the drum than is allowed by its characteristics and the selected program. Bulk items should be placed inside the drum carefully and distributed evenly there. Imbalance and overload negatively affect the condition of the bearings.
If the owner of the equipment detects the first signs of bearing failure, there is no need to aggravate the situation. It is recommended to change them immediately, otherwise this will lead to failure of more important components and more expensive repairs.
Abrasion of motor brushes - from 1600 rubles*
The brushes generate an electromagnetic field, under the influence of which a torque is created and the motor shaft rotates. Over time, they wear out, make poor contact with the commutator, and the motor shaft, and as a result, the washing machine drum, stop spinning.
SIGNS
The drum of the Zanussi washing machine does not spin at all or does not gain speed during the spin cycle. Perhaps due to poor contact with the commutator, the brushes spark. Error E50 may appear on the display.
HOW TO FIX
Usually the master changes the brushes when their length becomes less than 1 cm.
*The prices indicated are for replacement of brushes; the parts themselves are paid separately.
Causes of breakdowns
- wear of parts;
- breakdowns and failures in electronics;
- careless handling (for example, washing shoes, slamming the door too hard);
- blockage in the intake and drainage system (hoses for intake and drainage of water);
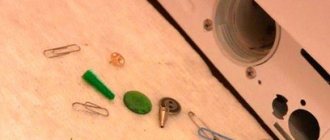
- foreign objects in the drum.
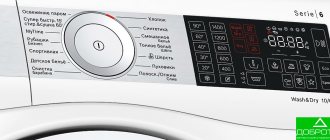
Depending on the type of machine, the code can either be displayed or transmitted using a special indicator (located on the panel on the left). The display simply shows an error code.
Using the indicator, the code is transmitted as follows: it flashes several times (for example, with error e06 - six times), then takes a break for five seconds, then flashes again.
By the code you can determine what exactly happened to the machine. Some problems can be dealt with on your own without calling a technician, while others require the attention of a specialist.