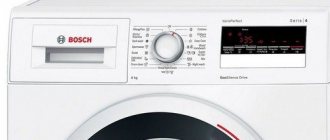
Household appliances often break down. An unpleasant surprise for any owner can be a breakdown of an Lg, Indezit, Electrolux washing machine. Typical signs of a malfunction are drum play and characteristic noise during spinning. To fix the problem, it is necessary to repair the washing machine shaft.
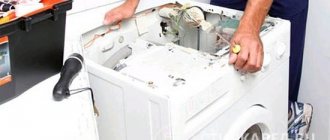
Disassembling the washing machine
DIY repair
To inspect and check the condition of the crosspiece, you need to remove and disassemble the washing machine tank. In some models it can be reached through the top of the car, in others through the front panel.
The most difficult disassembly process involves removing the front wall. What should be done:
- Shut off the water supply.
- Disconnect the machine from the network.
- Drain the remaining water by unscrewing the intake hose and drain filter. The latter is located behind the hatch, at the bottom of the front panel.
- Move the SMA away from the wall.
Breakage of crosspieces: reasons
Usually a part does not fail abruptly or unexpectedly. Wear of bearings suggests the presence of additional noise during operation, hum. The bearings first begin to wear out, and then further destruction occurs.
What other reasons could there be for such a malfunction?
- Negative result of repairs carried out earlier.
- Using too hard water.
- Presence of a manufacturing defect.
Most often, problems arise due to the fact that the bearings began to wear out, but they were not replaced in time. Because of this, the entire drum cross is destroyed.
If the bearing race and their balls are severely damaged, then during operation of the device they severely scratch the shaft. The result is the appearance of the so-called production. It will no longer be possible to fit a new bearing on the same shaft. Both parts of the structure will have to be replaced.
Cases of marriage are quite rare. The exception is models of some Italian brands. There are different reasons:
- Low quality alloy.
- Lack of production control.
- Components are produced with violations. What a particular model is made of can be easily found out from the accompanying documents.
Constant exposure to hard water can damage the crosspieces of even the highest quality products. In this situation, difficulties arise in the movement of the drum. Because of this, the bearings deteriorate. The result is a failed crosspiece.
In the case of unsuccessful repairs, everything is clear. Many people put too much effort into it, causing the parts to become unusable.
Typical problems and their solutions
When replacing, the user may encounter such a nuisance as the bearing sticking to the shaft of the washing machine drum cross. What should I do?
Don't even think about knocking the bearing out with a hammer. This way you risk damaging the shaft, which can lead to the purchase of new parts.
Here's what experts advise to do in such cases:
- Using a tool - an angle grinder or a drill - make cuts on the bearings. You need to work carefully so as not to damage the shaft.
- Insert a chisel into the cuts and knock it off the shaft in parts.
What other obstacles might there be? Some manufacturers use crosses with a shelf on washing machines. It happens that when the old bearing is knocked out, the inner part of the race goes away, but the outer part remains, held by the shelf - see the figure below.
There is no way to get it. To avoid replacing the entire crosspiece, it is recommended to reinstall the inner part and then remove the entire bearing.
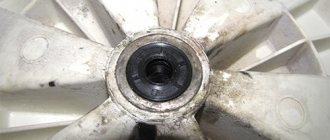
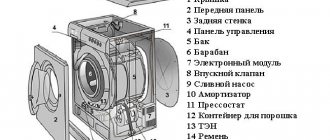
Disassembling the washing machine tank
To gain access to the washing machine crosspiece, you must disassemble the tank. It needs to be divided into two parts, and then the drum must be removed. Both parts of the tank are fastened around the entire perimeter using bolts or latches.
Disassembling the washing machine tank
The drum should be knocked out from the outside. You can use a hammer, but you need to act slowly and carefully. The drum must be pulled out so that the shaft of the LG washing machine (or a model from another manufacturer) is not damaged. The crosspiece and shaft must be cleaned to a shiny condition.
How do you understand that you need to change the washing element?
A signal that the washing machine requires repair may be knocking, rustling and other extraneous sounds that appear during the washing process. Most often, they indicate that the bearing assembly, one of the main elements of the cross, has failed.
An unpleasant creaking and grinding sound that accompanies the entire washing process is a signal for immediate repair of household appliances. Such sounds most likely indicate deformation and destruction of the crosspiece.
Ignoring the problem can lead to even more serious damage and even complete failure of the washing machine.
A decision to repair or replace the crosspiece can only be made after a visual inspection of the part. If the cause of the knocking noise is wear of the bearing assembly, a partial repair can be carried out (replace the bearings and oil seal). The wear of the shaft and threads, mechanical damage (cracks, dents) require a complete replacement of the cross.
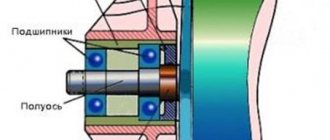
Regarding bearing replacement
The easiest way to work is with vertical loading machines. In this case, there is no need to remove the tank, which greatly simplifies the entire process. But replacement requires removing the plastic calipers where the bearings are fused.
Some people only change the bearing itself, ignoring the calipers. But this approach will not guarantee the maintenance of the minimum warranty period. Only a new support will increase the shelf life of the device as a whole.
In what sequence are the works carried out?
- First, the walls of the washing machine are dismantled along with the drive belt. The pulley is unscrewed separately. Inside the caliper, on both sides of the tank, there are bearings. Both parts are changed in turn, but in the shortest period of time.
- Calipers or hubs can be removed in different ways, depending on which model requires work. In some cases, the use of two lever screwdrivers is required. In other situations, you cannot do without a screwdriver.
- The oil seal must be removed if the structure remains in place after the previous steps.
- The planting site is thoroughly cleaned of any kind of contamination.
- New parts are treated with special compounds for maximum protection. Lubricant must be applied to the oil seal groove and bearings.
- The new hub is put in place along with the bearing, the second part involves performing the same actions.
- The machine is assembled in reverse order.
If loading is horizontal, with a collapsible tank
When replacing bearings, this is the option most often encountered. Most of the machines are equipped with horizontal unloading. The tank must be disassembled separately to perform the necessary work. There are two shock absorbers at the bottom as support, springs are used at the top, two or four pieces.
Before starting work, the machine must be completely disassembled. The procedure is individual, depending on the model, or the personal preferences of the owner or master.
For disassembly, you will need to dismantle the following components with parts:
- Front strap, if there is one.
- Front bar with hatch.
- The bottom panel where the drain filters are located. Under it there are often screws that hold the front wall with the door.
- Cuff.
- Interference filter.
- Shock absorber.
- Drain pipes.
- Counterweights.
- Motor part.
- Pulley.
- Drive belt.
- Back wall.
- Liquid supply valve.
- Filler pipes.
- Dispensers for detergents.
- Pressostats.
- The instrument panel is at the top, with the addition of a circuit board.
- Trays for detergents.
- Top covers.
Shaft dismantling
To remove worn-out elements, you will have to almost completely disassemble the washing machine body. To dismantle the bearings, you will need to gain access to the drum of the automatic machine. Let's figure out how to get to the shaft. To remove the MCA shaft you must:
- turn off the power to the machine, disconnect it from communications;
- remove the top panel of the case by unscrewing a pair of bolts holding it;
- remove the back wall of the case;
- remove the drive belt from the drum pulley and motor;
- pull out the powder receptacle;
- Unscrew the screws around the perimeter of the control panel, carefully hang the “tidy” on the side of the machine;
- remove the rubber cuff of the hatch, removing the two clamps securing it;
- remove the bolts holding the hatch locking device;
- remove the front panel of the case;
- disconnect the drain pipe from the tank. There may be water left in the tube; it must be drained into a previously prepared container;
- disconnect all wiring connected to the tank;
- remove the counterweight blocks;
- disconnect the electric motor from the tank by unscrewing several screws securing the motor;
- unscrew the shock-absorbing elements;
- Unhook the tank from the spring and pull it out.
Pulling out the tank alone can be difficult, so it is better to enlist an assistant.
It is much easier to remove the plastic tank from the case with four hands. To get to the crosspiece, the tank will have to be disassembled. We'll tell you how to do this.
Recommendations for repair and replacement
The bearings themselves are located in the sleeve of the tank cover. The behavior of some craftsmen deserves a separate discussion - they often install bearings that are not designed for the load actually present in a particular model. Because of this, the part is destroyed again, and you have to re-turn to the services of specialists. It is recommended to independently purchase bearings that are suitable for use in conjunction with a specific machine model.
Replacing bearings at the cross requires the following steps:
- Removing old bearings from the shaft.
- Removing old seals.
- Installation of new oil seals.
- Pressing in new bearings.
The main problem is that every action is performed as carefully as possible. Old parts are often difficult to remove from their place without damaging other structures. You have to put in extra effort.
It is not recommended to attempt to destroy the clip, for which the owner hits the surface with a hammer. This often leads to damage to the shaft.
It is also dangerous to use chisels to knock down a part. It is permissible to use the tool, but you must be very careful:
- First, take a grinder or drill.
- Cuts are made on old bearings on each side.
- A chisel is installed in the places where the cuts are made. The bearing finally comes off the shaft.
It is the cuts in this case that simplify the repair. The main thing is not to rush; rushing will prevent you from achieving the desired result when performing the work. A mandatory step is removing the seals. They are removed in any case, even if their condition still seems normal. Upon completion of the work, new parts of Samsung and other models are installed in place of the old ones.