In normal condition, the washing machine drains the liquid from the tank through a special hose into the sewer. If certain components of the device are damaged, water can seep out and flow under the body of the machine. If a phenomenon such as water under a washing machine is detected, it is necessary to try to solve this problem as soon as possible, since its further development can lead to serious consequences - from damage to important parts of the device to flooding of neighbors. Most often, such troubles happen with cheap Chinese-made machines - their design uses low-quality sealants and clamps.
If you find a puddle under the washing machine, first of all you need to stop the wash and drain the water using the appropriate program. Next, you need to turn off the tap that is responsible for supplying water from the water supply to the washing machine and begin diagnosing all its components. If you need a washing machine repairman in Saratov, contact our company. The company’s specialists will complete it as quickly and efficiently as possible.
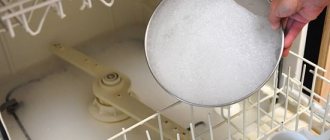
Sometimes water under the washing machine can form due to the use of hand washing powder - it can cause increased foaming and the foam comes out through the dispenser, causing moisture to appear under the body of the machine.
The design of the washing machine involves a large number of connections that can become damaged over time or lose their tightness, which can lead to water leakage. A leak can result from damage to one part of the washing machine, or to several parts at once. If the washing machine has been used for several years, the connections in it may simply become depressurized and to eliminate the leak it is necessary to tighten them.
Damage to loading hatch
First of all, you should pay attention to the location of the puddle. So, if water collects closer to the front side of the machine and its amount increases during the spin cycle, the hatch seal is most likely damaged. Punctures or cuts can be caused by sharp edges of accessories on clothing or items forgotten in pockets. Over time, under the influence of water and detergents, any seal can lose its properties and allow water to pass through. If it is damaged, the sealing rubber must be replaced - it is useless to seal the cuff, since it can shrink and stretch during washing.
Sometimes leaks are also caused by a washing machine hatch that does not close tightly.
The integrity of the cuff can be damaged by exposure to aggressive substances contained in detergents or by fungal infection. You can replace the cuff yourself. Its outer part is slightly recessed into the hole in the front wall and is fixed there using a wire or plastic clamp.
It is easier to put on a clamp with an adjusting screw - after putting it in place, the clamp is gradually tightened and the screw is tightened in a certain position. After installation, the cuff should be checked for fresh leaks.
The plastic clamp can be removed by pulling towards the area where the latches meet. To remove the wire clamp, you need to pry the spring or unscrew the fixing screw. The next step is to locate the installation mark on the cuff. It is necessary to determine the fixed position of the cuff according to the tank. If there is no such mark, use a marker to mark where the cuff is located to the tank. The mounting edges must be cleaned of dirt and deposits and thoroughly lubricated with soapy water. The more slippery the surface, the easier it will be to install the new cuff. Before installation, you need to align the cuff with the applied installation marks. The cuff is taken from the inside and placed in a circle on the edge of the tank. When the replacement is completed, you need to examine the perimeter of the ring with your fingers to check the tightness of the cuff with the edge. The next step is to put on the outer and inner clamps. To install the spring clamp, you need to use a screwdriver, with which it is fixed in the initial position.
How to fix it?
As soon as dripping drops are detected at the end of the Samsung washing machine while drawing water, the cycle must be forcibly stopped. If you were unable to immediately determine the location of the leak, do not be discouraged - during the disassembly of the machine, the cause will be found and eliminated. The main thing is to act extremely carefully and not deviate from the instructions.
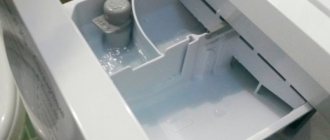
First, open the powder receptacle and, pressing on the central compartment, remove the hopper from its seat. Afterwards, we try to carefully inspect the body of the dispensary for cracks, chips and other suspicious holes and damage. We immediately pay attention to existing blockages. If the walls of the tray are covered with a thick layer of scale, then cleaning is necessary. Dried detergent is likely trapping water in the “box,” causing overflow and leakage throughout the body. When there are no visible reasons for the leak, we continue the diagnosis. Then we proceed like this.
- Using a “plus” screwdriver, loosen the screws holding the tray.
- We unscrew the screws securing the cover from the back wall and, pushing the “top” away from us, remove it to the side.
- We find four pipes connected to the dispensary. Two of them are immediately visible, as they are needed for filling water and are located at the rear wall of the bunker. The third is used for air conditioning and is attached to the right side panel. The fourth is a thick corrugation and is located on the left, which is why it often rubs against the counterweight.
- Using pliers, release the clamps on the pipes and disconnect the rubber bands from the pipes.
- We take out the powder receptacle.
- We inspect all the removed parts.
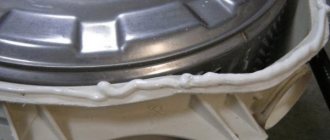
Now you can begin the actual repair. The first step is to clean the dispensary and all components from scale and dried detergents. Then we pay attention to the thick corrugation, which often wears off on the counterweight and requires replacement. There is no point in trying to patch it - it is better not to save money and order an analogue from a service center. Ideally, the concrete causing the hole should be sealed with a layer of polyethylene or soft plastic to minimize future damage. In addition, the problem area is filled with sealant.
It is recommended that all joints in the powder receptacle itself be treated with sealant. Use a minus screwdriver to open the clamps and spray the seams with adhesive.
To prevent the leakage situation from happening again, technicians advise adjusting the washing machine. We take a building level and, tightening the legs, install the machine as level as possible. It is important to remove the slight forward tilt, which accelerates the flow of water and puts the equipment in a dangerous position.
The machine is assembled according to the instructions described above in reverse order. The main thing is to be sure to run a test wash and check whether you managed to cope with the leakage. If the trickle appears again, call a specialist.
Interesting:
- LG washing machine is leaking from below
- Water is leaking from below the Samsung washing machine
- Water flows from below under the Atlant washing machine
- Samsung washing machines
- Why does my LG washing machine leak from the bottom during the spin cycle?
- Rating of Samsung washing machines
4readers
- 07/02/2020 at 14:24
Dimamendez:The hopper is intact, the pipes are normal, but during disassembly, an obstruction was discovered in the drum body itself, more precisely in the place where the waste corrugation is attached from the hopper to the drum. There is a blockage inside the drum compartment where the corrugation is attached. There is something soft inside, like a filter, but it is not clear what it is. How to change this “something” and what is it called?
Answer
- 12/20/2020 at 16:14
Kuzmich:I'm also looking for an answer, but I can't find it anywhere. Neither the diagrams nor the video mention a certain part that locks the output pipe of the receiver.
Answer
04/02/2021 at 13:08
Andrey:
Apparently it’s the same story, I’ll look into it now. I assume that this is not a part, but the blockage itself. I'll write about it after opening it.
Answer
- 05/18/2021 at 14:12
Nikolay:...Andrey, in order to get to the junction of the corrugation and the drum, you need to remove the entire drum, break it into halves and...?
Answer
Damage to pipes
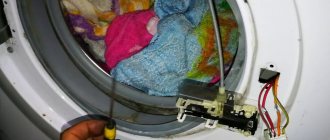
If inspection of the hatch cuff and dispenser did not lead to the detection of a leak, it is necessary to remove the top cover of the machine and carefully inspect the pipes that lead to the dispenser hopper from the inlet valve.
Worn and damaged pipes usually let water through. To eliminate the leak, they must be replaced. The filler pipe may leak where it connects to the tank. This will be indicated by characteristic streaks on the tank. In this case, the pipe must be removed, thoroughly cleaned, dried and installed in its original place, fixing it with epoxy resin or glue. If the pipe is chafed, the part in the damaged area is sealed with a piece of thin rubber.
The pipes, including the drain pipe, may leak due to loosening of the tightening clamps. Damage to the drain pipe can also be caused by solid foreign objects entering it from the tank. To eliminate the malfunction, replace the clamp or lubricate the pipe connection with sealant.
Reasons for leakage from the powder compartment
A leak from the powder receptacle compartment can have various causes . To determine the nature of the malfunction, you should carry out sequential diagnostics of the washing machine. The defect may be a manufacturing defect or appear as a result of use.
Manufacturing defect
The problem may be an uneven surface of the powder receiver tray, poor fit of the tray to the hopper into which it is inserted, etc.
In this case, you should not correct the defect yourself , since the machine is still under warranty.
High water pressure
If the water supply system has very high pressure, then water enters the washing machine at a pressure that the dispenser is often not designed for. It is necessary to check that the washing machine is installed correctly and ensure that it is not tilted forward.
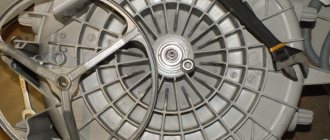
Damage to the oil seal and bearings
The appearance of water during the spin cycle may indicate damage to the tank seal. The presence of a leak of this kind is indicated by drips on the tank leading down from the bearings. In this case, the bearings and oil seal need to be replaced.
Similar problems can also be indicated by the appearance of water from the rear wall of the washing machine. To check the bearings for serviceability, you need to spin the empty drum of the washing machine by hand. If you hear extraneous noises or a slight grinding noise when it moves, most likely the seal or bearings have failed. In this case, the car must be repaired immediately, otherwise water may get on the engine.
Violation of the integrity of the hoses
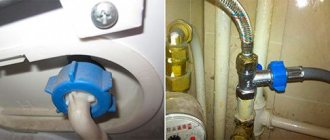
Water under the machine may also appear due to leaks in the drain or water supply hoses. Due to poor quality of the material, mechanical damage or aging, the hoses may be damaged. If a puddle appears when the washing machine draws water, it means the water supply hose is damaged; if it is drained, the drain hose is damaged.
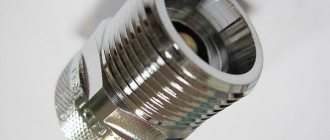
Most often, hoses leak at the joints. To eliminate a leak, depending on the cause, it is necessary to replace the rubber gasket and tighten the connection more tightly, eliminate the leak by sealing it, or replace the hose. As a replacement, it is better to use the original hose from the manufacturer of this washing machine - homemade copies are not of high quality.
Water set
Most often, leakage occurs during the filling stage of the drum. This stage is characterized by the following malfunctions:
- Excessively high pressure. Dispensers may not be able to cope with the powerful pressure. Make sure the device is level and not leaning forward. The increased pressure in the pipes causes the contents to leak out.
- The pipe through which the tray and tank of the machine communicate can become clogged with dry detergent.
- Use of low-quality household chemicals. Detergents always dissolve well in water. However, if after washing you pull out the tray and see a piece of undissolved reagent there, next time it is better to use another, softer product that dissolves more easily.
- Sometimes the water loading timer gets lost, causing the drum and tray to overflow with water, causing it to come out.
As practice shows, machines from AEG, Hansa and Miele cope worst with the water collection stage. Devices from these particular companies are more likely to break one of the internal hoses during water pressure surges.
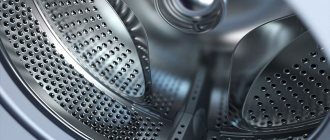
Crack in the washing machine tank
Water under the machine may also appear due to a violation of the integrity of the tank. So, to inspect it, it is necessary to tilt the washing machine so that the condition of its bottom becomes visible. If drips were found on it, most likely the cause was a crack in the tank. Over time, enamel tanks can rot from old age; the integrity of the plastic tank can be disrupted by damage to the heating element or by the entry of a foreign object into it. If there is any damage, the tank body needs to be replaced. You can also see here what types of tank materials are available in a washing machine.
For what reasons do leaks occur?
When the garbage filter leaks, water pours out from under the washing machine. However, before solving the problem, you need to make sure that the drain filter is leaking. After all, any part can leak: a pipe, a tank, a drain pump. Wipe the suspected leak with a dry towel or napkin and see if the filter gets wet over time. If yes, let's move on.
What is the SM cleaning element? It resembles a cork and is inserted into the snail of the washing machine. The snail, in turn, is connected to a channel for discharging water used during washing and a channel for pumping out water. Thus, if the filter is not sealed, water after washing will come out of the tank and spill from below. There are usually two reasons why the filter leaks.
- Incorrectly screwed in plug. If the filter is not put in place correctly, there is a high chance that there will be a gap through which water will leak. The same thing can happen if the plug is screwed in loosely.
- The rubber seals are worn out. They are located at the edges of the snail and on the filter itself. They just prevent water from seeping through the cracks. Over time, rubber tends to dry out and wear out, which leads to seal failure and leaks.
Now, knowing the reasons, you can deal with the consequences. Keep in mind that a leak may occur as a result of something completely unpredictable, in which case you will have to contact a specialist. We will consider the algorithm of actions in a standard situation.
What is needed for repair?
Before we begin the repair itself, we will prepare everything that may be needed. Nothing special is needed. Usually everything you need is available in every home. You will need these tools:
- flat and Phillips screwdriver;
- pliers;
- file;
- hacksaw for metal.
In addition, you will need silicone sealant or car sealant. You may also need a new tray, because not everything can always be repaired; sometimes you have to replace it. But you shouldn’t stock up on them; it’s better to understand whether there is a need for it or whether you can repair the old one.
Urgent actions
When repairing household appliances, first of all you need to create a safe environment in which you can work without fear of electric shock, etc. To do this, do the following:
- With dry hands, unplug the machine from the power supply. At the same time, under no circumstances step into a puddle under the machine. If you cannot pull out the plug, it is better to turn off the electricity in the panel.
- Now that the electric shock is not dangerous, turn off the water supply to the washing machine.
- Pump out the water and wipe up the puddle near the unit.
- If there is laundry in the drum, remove it.
The snail with the filter is located at the bottom of your washer in its front part. As a rule, the part is hidden by a decorative plinth, which can be easily removed without additional tools. On the right side you will see a round hole with a plug. This is the filter.
Do-it-yourself troubleshooting
If the problem is an incorrectly screwed filter, fixing it will be as easy as shelling pears. For more comfortable work, place a towel under the bottom of the machine and place a container to collect water that may flow from the filter. Further:
- remove the decorative panel;
- Unscrew the filter carefully, without sudden movements;
- insert it back correctly.
The above problem occurs very often. Why? People unscrew the part to clean it or drain water. And after cleaning the filter or other operations, they insert it incorrectly. However, as you can see, fixing the problem is quite simple without the involvement of specialists.
Attention! The filter must also be screwed in carefully and with medium pressure to avoid loose screwing or breakage of the thread.
If the problem lies in the rubber bands, they need to be replaced. For this:
- In special spare parts stores, ask a consultant for the necessary parts.
- According to the algorithm of actions already given, remove the filter.
- Replace old worn out rubber bands with new ones.
- After replacing the filter, you must also carefully put it back in place.
That's all! You have independently eliminated the cause of the leak in your washing machine's garbage filter. As you can see, the main thing here is to follow the instructions and observe safety precautions!
Interesting:
- Share your opinion - leave a comment
It is very difficult to imagine our life without a washing machine, however, it can not only help with housework, but also cause big troubles. Surely, many have encountered such a problem as a leaking washing machine. There are a large number of reasons why a machine can fail like this, however, most often the washing machine filter is leaking. We will tell you how to solve this kind of problem in this article.
What is the filter for?
Few users ask this question, but the answer is quite simple: a filter in a washing machine is necessary to ensure that the water passing inside the equipment is sufficiently purified. The filter removes scale from water, softens it, and prevents the ingress of foreign objects.
Modern cars (LG and others) have several filters installed at once:
- drain Responsible for the water that drains into the sewer and, along with this water, small buttons, threads, wool from clothes and other debris come out;
- aspic. This filter is located in the valve that supplies water and it is to this filter that the inlet hose is connected;
- network. Responsible for the electricity that flows to the washing machine, saving it from overheating and current surges.
Safety precautions in case of breakdown
Before you start repairing the device or calling a repairman, you need to think about your safety and the safety of your neighbors below. A breakdown of the washing machine can result in a flood or electric shock.
To prevent this from happening, you must remember that:
- Do not step on the wet floor near the washing machine or touch the plug with wet hands. You need to wipe your hands dry and unplug the device. If it is impossible to get to the outlet, you should turn off the electric meter;
- in order not to flood the neighbors, it is necessary to turn off the water supply in the apartment, if necessary, then in the entire house and wipe the floor dry as quickly as possible;
- then you should drain the water from the washing machine (in Candy brand machines this can be done using a drain hose, through the drain pipe or directly through the hatch) and clean the drum of things.
Washing machine leaks during spin cycle
If over the course of several washes it is discovered that water is flowing and this happens during the spin cycle, then there may be several reasons for this:
- the drain filter is clogged;
- the drain hose is damaged;
- seals not corrected;
- the drain pump is broken;
- bearings have failed;
- the tightness of the connection of the pipes is broken.
To figure out where the fault occurred, you must first turn off the power to the washing machine. Next, you need to check the condition of the water drain filter and whether it is clogged. Perhaps it is simply not completely closed, which is why water is leaking. You can find the filter at the bottom of the machine body, under the front bar.
Next, you should inspect the drain hose and the place where it is connected to the drain pump. For most well-known manufacturers, this place can be found through the bottom of the washing machine. It is enough to turn the machine on its side and make sure how tightly the hose is screwed to the pump.
If everything is normal here, it is necessary to inspect the seals and bearings. If the seals are worn, you can see water leaks in the rear of the drum. To verify this, you need to remove the back cover of the case. If the reason is in the bearings, then a grinding noise is heard when the drum rotates.
If the above reasons for water leakage are excluded, the last option remains - the drain pump is broken.
Causes of failure and how to fix them
It is very important to detect operational problems in a timely manner and correct them. Otherwise, a filter failure in machines like Samsung can lead to the remaining chips burning out and unwanted objects entering the device.
So what should you do if a puddle forms on the floor during washing? It is not recommended to repair and inspect the washing machine yourself, but if circumstances do not allow you to call a technician, you can try the following:
- you need to open the hatch located at the bottom of the machine and unscrew the drain filter;
- blow it out and screw it back, it is important that the filter fits tightly enough. It is very important not to apply pressure, because this can break the thread!
A loose filter connection is the most common cause of leakage, however, if the above method does not fix the problem, you need to call a technician.
Other reasons for filter failure include:
- manufacturing defects. If the washing machine has been leaking from the very first day of use, most likely the problem is due to incorrect assembly of the device. This problem is extremely rare, especially if we talk about famous brands such as, for example, In the case of a manufacturing defect, you should contact the store and replace the purchased equipment with a working one;
- Like any other thing, the filter can wear out over time. Such a breakdown can be corrected by simply replacing the component;
- Not only the filter itself can wear out, but also special rubber bands that ensure a tight fit of the spare part to the machine. If this is the cause of the breakdown, then you just need to replace the rubber bands with new ones;
- Since the filter is designed to purify water, it can become clogged over time. In this case, you can purchase a new spare part or wash the old one.
Do-it-yourself repairs or call a professional?
The simplest inspection of the powder receiver tray can be carried out independently, without calling a specialist. But if you need to disassemble the washing machine, but there is no time or opportunity to carry out repairs, you can turn to a specialist for help .
You can find a specialist in companies that repair washing household appliances. Such companies are widely represented on the Internet. Contacting a company that has been providing repair services for years allows you to receive quality service.
The cost of work depends on the complexity. If repairs are also required to adjacent units, the service fee will be higher.
The average prices in the capital are as follows:
- replacement of the inlet hose – from 1,200 rubles;
- pipe replacement/repair – from 2,000 rubles;
- replacement of detergent dispenser – from 1,200 rubles, etc.
The final cost is determined after diagnosis. The cost of parts that require replacement will be additionally paid. After the repair, the technician issues a warranty and tests the operation of the washing machine.
Where can I purchase the necessary parts?
When purchasing a new component, you must remember that there are a huge number of washing machines on the market and they are all different from each other. Even different Bosch models can have completely different parts. Therefore, in order to buy spare parts of the required shape and size, you should take this part with you or write down the name and number of the machine. Otherwise, the store consultant will not be able to help you with your choice.
That is why it is much more convenient to call a specialist, because a specialist will not only tell you what the problem is, but will also independently purchase and replace the faulty component, which will save a lot of time.
To summarize, it is worth noting that in order to ensure that a washing machine malfunction does not come as a surprise, and that neighbors do not suffer from a sudden flood, it is necessary to monitor the quality of water and detergents and replace faulty parts.
Prevention measures
To avoid the problem of leakage from the powder tray, it is advisable to remember the following preventive measures:
- The washing machine must be installed according to the rules, using a building level tool.
- The powder tray must be washed periodically to avoid clogging.
- The powder receptacle should be protected from children's pranks.
- For washing, only special products intended for automatic washing machines should be used. You cannot pour, for example, soap shavings into the cuvette. This can not only lead to clogging and leakage of water from the tray, but will also lead to other, more serious damage.