Everyone who breeds birds at home has more than once encountered such a process as processing carcasses. In this case, the carcass is doused with boiling water and the feathers are removed manually. It is acceptable for small quantity.
But if you are selling a large volume of products, then manual labor is long, tedious and ineffective. It is not necessary to buy special equipment; you can make your own feather removal machine from a washing machine.
How a homemade feather removal machine works
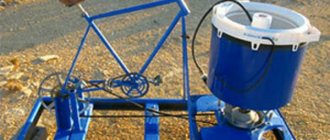
Before getting acquainted with the types of plucking machines, let's consider the principle of operation of the equipment. The machine consists of a container, on the sides of which there are rubber beaters. They have a ribbed surface, which allows you to grab and pull out feathers, while the bottom of the container rotates. As you can see, a feather removal machine is a simple device.
How to use the pinching technique:
- A scalded bird carcass is lowered into the machine.
- The equipment is connected to the network. The bottom rotates - the carcass begins to jump and hits the “rubber fingers”. Feathers fly off.
At the end you will get an almost completely plucked bird, only small feathers on the legs will remain.
Which bird is used to pluck a feather plucker?
Types of bird pickers
Based on the mechanism used, the designs are divided into:
- Centrifuge . The container is generally round in shape and has a vertical opening into which the bird is loaded. Beaters on the bottom and sides of the container help pluck feathers as the bottom rotates. During operation, water is supplied to the tank for greater plucking productivity. Suitable for small birds: quails, chickens, ducks.
- Drum type . The “tentacles” are located on the surface of the drum, which is rotated by a motor. You need to bring the carcass to the drum and press it. This way you can pluck a large bird, but for small ones it is not very convenient.
- Power tool with attachment . Making such a plucking machine would be very cheap. An attachment with “tentacles” is put on the instrument and brought into the carcass. It is not very convenient to use - your hands will get tired. Therefore, to process large quantities of poultry, use the previous options.
In one hour of working with a poultry picker, you can process up to 30 carcasses.
We suggest making a homemade feather plucker from a washing machine.
Features of choosing kick fingers
It’s not difficult to make hammer fingers with your own hands, you just need to choose the right material , which is very difficult. You will have to buy them, so they will be the most expensive part of the design. The range of fingers on the market is huge. As a result, when purchasing, you must keep in mind that the design options are quite varied and there are differences in the material used for manufacturing. Having decided to make a machine for a specific type of bird, you need to select the appropriate fingers.
When creating a feather removal machine for quails with your own hands, you need to use fingers of small diameter and very elastic, so as not to damage the quail carcass itself. For larger types of geese or turkeys, a larger diameter and more rigid material will be required. When making a universal unit for different types, we look for a compromise version.
The proposed design options are the basic basis for the manufacture of a feather removal machine. Using these examples, you can build a lot of modifications of similar devices. The main thing is that the farm has the availability of suitable materials, components and assemblies. There is a field of activity to choose from. But the second option is more preferable, since it completely eliminates the contact of human hands with the hammer fingers during operation. The carcass is placed in a container and there it is processed to condition.
Read also: Homemade pressure switch for a compressor
If you plan to make a completely original design , it is advisable to first create drawings that take into account all the features of the parts used, their location and interaction.
When setting up a quail farming business, owners are faced with the problem of plucking a large number of carcasses. It is impossible to do this manually, and there is a need to mechanize this process. We suggest you learn how to make a feather removal machine with your own hands using video and photos. Properly selected equipment will greatly facilitate the process of farming.
Instructions: how to make a feather removal machine from an automatic and semi-automatic machine
Before you make a chicken plucker yourself, prepare a drawing. It will help you take into account and calculate all structural elements, as well as correctly assemble the mechanism.
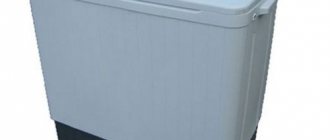
For production, you can take an automatic or semi-automatic washing machine. The main thing is that the washing machine is working and top-loading. It could be “Baby”, “Fairy” or “Oka”.
You will need to purchase rubber beaters. These are inexpensive parts, and you can buy them on the market or order them from an online store. It is worth considering that the size of the beaters depends on the dimensions of the carcass: the largest are for geese and turkeys, the smallest are for quail.
If you are worried that the carcass may be damaged during plucking, this is not the case. Rubber tentacles ensure maximum safety of the bird.
What tools will you need:
- set of wrenches;
- socket wrenches 8-30 mm;
- small adjustable wrench;
- drill with step drill;
- Bulgarian;
- pliers;
- hammer;
- tester or multimeter;
- marker.
Now prepare the washing machine. It needs minimal alteration, so no special costs are expected.
Converting a washing machine into a feather removal machine
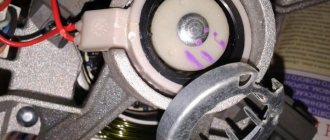
All you need to do is remove the motor from the housing. Since holes for the beaters will be made in the bottom of the housing, the flowing water will fall on the engine during operation. This cannot be allowed.
Disconnect the bottom and remove the electric motor. Then do this:
- Remove the activator with the drive mechanism.
- Remove all electrical parts.
- After preparing the washer, take the shower head and attach the rubber hose to it.
You won't need a shower or hose now, but you should prepare them in advance.
Assembling the perso-removable structure with your own hands
Now you need to assemble all the elements into a single device. Do this:
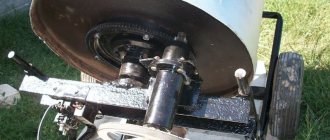
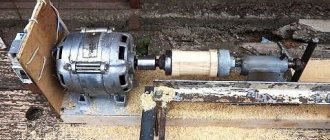
- Weld a motor support from a steel corner.
- Connect the electric motor to the network. We talked about how to do this correctly in previous articles.
- Build a frame for the finished device from a metal corner. The body must be at some height from the ground.
- To make the structure work, install pulleys. You can take them from the same washing machine.
- Place the small pulley on the motor shaft, and the large pulley on the activator shaft.
- Connect the pulleys with a belt. This will allow the motor to transmit speed to the activator, which will rotate the bottom of the device.
- Now make sure that the housing and motor are securely installed, as strong vibration may cause them to fly off.
Read also: Surface area of the corner 50x50x5
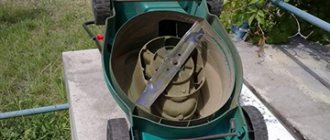
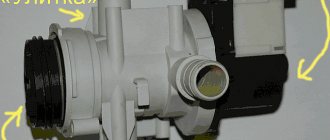
All that remains is to install the rubber beaters. Proceed sequentially:
- Make holes in the tank using a drill with a step bit. Depending on the size of the beaters, the size of the holes should be three or four millimeters smaller.
- To allow waste water and feathers to escape, make larger holes between the main holes. Then install a tray or wide container under the tank to collect waste.
- To facilitate installation of the beaters, the holes are lubricated. You can use machine oil. After lubrication, insert the rubber beaters into the prepared holes.
To protect the motor from water, make a plastic casing for it from a can or box.
Assembly of the feather removal machine is complete. To ensure that water flows during operation, install the previously prepared hose and shower head on the edge of the container.
Test work
Time to check out your homemade device.
Why is it recommended to use watering when plucking? Because within 2 minutes of the bird beating against the beaters with the flow of water, all the feathers fly off. While with the dry version, large feathers remain on the bird and more time is spent.
Since a lot of water leaks out during operation and feathers fly, carry out the procedure in a specially designated area.
The feather removal machine is an example of elementary automation of farm labor. Those who breed poultry know how labor-intensive the process of plucking—removing feathers from bird carcasses—is. Even with a small population, plucking takes a lot of time and effort, let alone a farm raising chickens, ducks, turkeys and other poultry for sale. Owners of small poultry farms replace manual labor with special devices. You can buy a feather plucker or make it yourself - for example, from a washing machine.
Are you here
It is known: industrially produced chicken meat is stuffed with “chemicals”. It’s clear: chickens raised in their own backyard do not have this drawback. You can pluck chickens by hand, or you can mechanize the process. Designed and manufactured a feather removal installation for a regular customer. It is designed to automate the process of de-feathering broilers, laying hens, roosters, turkeys, geese and other farm birds. It works on the principle of a centrifuge. The lower disk rotates while the drum is stationary. The installation consists of a frame, a working drum, an electric motor, a bearing unit, and a belt drive. Frame: welded, made of metal angle. Working drum: diameter 600 mm, made of food-grade polypropylene. Purchased from a store. Disc: made of food grade stainless steel. The installation uses commercially available pen removal pins designed for household pen removal machines. The advantages of this installation: low cost, ease of maintenance and repair. Technical characteristics of the installation. Dimensions: length - 1000, width - 700, height - 1200 mm. Number of punching fingers: 110 pcs. Motor: single-phase 220V, 1.5 kW, 1500 rpm. Attaching photo.
- Vikos's blog
How does a plucking machine work?
A homemade feather plucking machine is assembled from a reservoir and rubber parts placed on its inner surface. These parts are called hammer fingers - they are the main part of the device. It is impossible to make these ribbed elements yourself - you have to buy them.
One chicken picker can contain up to 120 beating fingers. Their cost is rather high - on average 20–40 rubles per piece. However, this is the only major expense that will be incurred when creating a homemade product from an old washing machine. Everything else can be found on the farm - a feather plucker assembled with your own hands will cost you little. But the result is excellent: the fuss with plucking will be replaced by an electromechanical installation.
When purchasing pickers, consider the size of the carcasses being plucked. Quail beaters are not suitable for geese, broilers and other larger animals.
What materials and tools will be needed for the work?
A thrifty owner can find all the spare parts in his own garage or shed. But if something is missing, it’s easy to buy additional parts at building materials or agricultural equipment stores. The main elements that you need to take care of purchasing first are the electric motor and the striking pins - they have already been mentioned above.
As for the motor, a regular rotor with a drive belt with a power of 2-3 kW will do. You can take a used one or buy a new one. If you use parts from an old but working washing machine, you can adapt the motor from it.
- steel pipes for the frame;
- a large plastic barrel with good thick walls;
- steel plates;
- nuts and bolts for fastening;
- switch for drive;
- a little paint.
Gathering the necessary tools
- pliers;
- hammer;
- Bulgarian;
- drill;
- screwdrivers and wrenches.
- welding machine;
How does the plucking machine work?
- A chicken carcass, previously scalded with boiling water, is placed in the container.
- The bird picker is plugged into the mains.
- After switching on, the bottom begins to rotate. The carcass, jumping, hits the ribbed rubber fingers. Feathers fly off her.
- The result is an almost perfectly plucked chicken, duck, goose, and so on. All that remains is to remove the small feathers on the paws.
The poultry plucker can handle almost any poultry - you can use it to pluck chickens, ducks, geese, quails, and turkeys.
What is the design?
- Centrifuge. A round container with a hole for loading carcasses is used. Beaters located on the bottom and sides of the barrel remove feathers as the bottom rotates. As work progresses, water enters the container to enhance the productivity of the process. This design is suitable for small animals - no larger than a duck.
- Drum. A drum with “tentacles” is used - it is rotated by a motor. The carcass is simply brought to the rotating drum and pressed. This option is convenient for large birds.
- Electric tool. This machine with an attachment requires virtually no investment. An attachment with “tentacles” is put on the rotating instrument. He is brought to the scalded carcass. The disadvantage of this option is that your hands get tired quickly.
When using the first option - a centrifuge, you can pluck 30 chickens.
Making a screwdriver attachment
The method is simple. It is not recommended to create fingers for the machine yourself.
Step-by-step creation of a nozzle:
- Design of a part (appearance of a tin can). It is the used container that is not used (due to the thin and easily wrinkled sheet metal). For the workpiece it is necessary to use a pipe made of low-melting metal.
- Fastening the bottom part (screws are used).
- Drilling a hole in the central part.
- Securing the pin. This is done using nuts in the central part. The size of the pin is similar to the size of the drill attachment.
- Drilling a hole for the fingers (in the cylinder of the future machine).
- Inserting rubber bands into the hole made.
- Using a carcass plucking machine.
What to make a feather plucker from?
Before assembling the device, draw up its drawings - they will help you take into account and calculate all the nuances of the design. What washing machines might be useful? Any automatic or semi-automatic washing machine that meets the following conditions:
- it must be working;
- with vertical loading.
Read also: How to make something out of big Lego
Washing machines such as “Oka”, “Fairy”, “Malyutka” are suitable as “raw materials” for bird pluckers. Don’t worry - the carcass in the plucker will not be damaged and will not lose its presentation: the rubber fingers are soft enough and will not cause harm.
How to make a feather plucker from an automatic washing machine?
Assembling the feather removal machine consists of several stages. First, remove the motor from the washing machine body. It is important to take into account this point: when the device is operating, water will be supplied to the tank. Since you will have to make holes in the bottom for the beaters, the water flowing down will fall on the engine. This must be prevented. Perform the following actions:
- Remove the bottom and remove the engine.
- Remove the activator with the drive.
- They take out all the electrical “stuffing”.
- Place a rubber hose on the shower head - you will need it later.
Let us next consider the assembly procedure step by step.
Setting the operating mode
The drum in the bird picker should rotate in one direction. If in the washing machine it rotates alternately in different directions, you should reconfigure its operation to the correct mode. How to do it? Disconnect the body and bottom and connect the wires in the correct order. The ends of the wires are connected to the power cord. The washing machine has a hose. It is not needed in the bird picker, so it is cut off. The hole is sealed with sealant.
Creating holes
When the hose is removed and the wires are rearranged, they begin to connect the bottom of the structure to the body. Remove the screw and plug from the drum. Then, having dismantled it, they begin to create a device equipped with “fingers” - you need to attach ribbed elements. Procedure:
- The holes are drilled with a drill. You will need a special drill - a stepped type. The dimensions of the holes depend on the beaters - they are made 3–4 mm smaller to strengthen the fastening.
- When the plucker rotates, feathers and water should come out of it. To do this, additional holes are made between the holes for the beats - larger ones. Some kind of vessel is placed below to receive waste.
- To facilitate the installation of rubber “tentacles”, the holes under them are smeared with machine oil.
- To protect the engine from liquid ingress, a special protective housing is made. It is made from a plastic container.
Assembly
- A steel corner is used to create a support for the motor.
- Connect the engine to 220 V.
- A metal frame is welded from the corner - the body of the device should be at a distance from the ground.
- The pulleys are installed - they are also taken from the washing machine. The small one will be placed on the motor shaft, the large one on the activator shaft.
- The pulleys are connected by means of a belt so that the engine transmits movement to the activator and the bottom of the chicken picker rotates.
- Check the strength of the fastening of the housing and the motor - they will experience strong vibrations and, if the fastening is unreliable, they may simply fly off.
This completes the assembly. All that remains is to install a hose with a shower nozzle, prepared in advance, on the edge of the tank to water the carcasses with water.
Tests
All that remains is to check the homemade device. Turn on the machine and throw the chicken or duck into the drum. Don't forget to provide water supply. When plucking dry, much more time is spent than with water. When the carcasses are sprinkled with “rain,” the feather flies off them in two minutes. The dry version also leaves a large feather. Please note that during plucking, a lot of water flows out, and feathers can fly to the sides, so you should also choose a special place for the feather plucker.
The described device allows not only to simplify the process of plucking poultry, but also to save on the purchase of an expensive industrially produced plucker. An old washing machine, a set of tools and minimal technical skills will help you become the owner of another useful household device.
Simple manual labor can be easily replaced with automated one. Thus, plucking geese can be entrusted to a special device - a plucking machine. You can either purchase it or make it yourself.
It is difficult to deny the value of goose meat and feathers. Many people can handle cutting meat, but not everyone knows how to properly pluck a bird so as not to spoil the feathers themselves and not leave stumps on the carcass, which will reduce its value.
On a large farm there is no time for such a long procedure as plucking. However, it is quite difficult, so it is better to use a plucking device. The process of its creation lasted a relatively long time.
Read also: Angle attachment for screwdriver
In the middle, friction is provoked, which causes the fingers to cut into the carcass and tear out feathers. The drum is mounted on a moving axis.
The goose feather removal machine not only saves time, but also improves labor productivity. If you have a small number of poultry, then there is no point in buying an expensive machine; it is better to make it yourself. The devices differ:
- Dimensions;
- Power;
- Number of fingers.
A homemade geese machine consists of:
Working with a goose tweezer consists of the following steps:
- After slaughtering poultry, leave the carcass for a couple of hours;
- After this, dip it in warm water for 2-3 minutes;
- Comb all feathers thoroughly. Immerse in boiling water for 2 minutes. The main thing is not to keep it for too long;
- Place the carcass in a preheated machine;
- During the automated plucking process, pour boiling water over the goose. Take it out and rinse with cool water;
- Clean areas where feather cover has not been completely removed.
If the fluff is small and soft, burn it, and then use a sharp blade to remove the spoiled areas and rinse the goose under running warm water.
It is used together with a sharpening machine or a screwdriver. The main component of the nozzle is the drum, which must have sufficient rigidity to work effectively.
Instructions for making a plucking attachment:
- Attach the bottom to a pipe with dense metal walls using screws;
- Make a hole in the center of the bottom. Insert a pin into it and secure it with two screws. Choose a diameter so that the pin is securely held in the tool used for work;
- Drill several holes around the circumference of the drum; Make them in several tiers, placing them at equal distances;
- Insert strong pen removal pins into the holes.
A machine of this type, despite its apparent primitiveness, will allow you to pluck not only geese, but also chickens, quails, ducks and turkeys. It will be useful not only for the farmer, but also for the hunter interested in processing carcasses.
The device can be constructed from a part of a pipe with a diameter of 100 mm. For this option you will need two bottoms, which can be made of wood or plastic. In the center of the bottoms you need to drill a hole through which to insert a pin to tie the mechanism and use it on the tool. As with the previous nozzle, you need to make holes in a circle and tuck your fingers into them.
- Frame on which the drum is mounted;
- Electric motor;
- Belt drive system;
- Feather container;
- Drum of any length with 2 axes.
The creation technology is similar to those presented above.
You can make a strong device from an activator-type washing unit, which is a container for plucking. The convenience of this design is that the lower section is initially equipped with a drive that can be used to transmit rotations. It is also convenient that the tanks are made of durable steel.
To transform an outdated washing machine into a powerful pinching unit, you need to build a rotating type bottom and connect it to the shaft. The bottom can be made from durable sheet metal.
Large intervals between structural elements should not be made, as parts of the carcasses will fall into them. Before fixing the bottom, you need to drill holes to fix the hammer fingers. They are drilled on the side surfaces.
Plucking geese in this design is carried out with water, so it is important to make holes for water to drain. Their diameter (mm) should be sufficient to allow clumps of feathers to escape. It is permissible to use a colander as a filter.
For a constant supply of water, you can connect a plastic hose to the inner surface of the drum.
The big advantage is that such a mechanism will be able to pluck not only geese, but also all poultry. A similar option can be done with a plastic barrel, but then you will need to make the frame yourself and build the drive mechanism.
Creating such a product with your own hands is a simple process that anyone can easily master. The main thing in this matter is to understand the importance of each component element and not neglect it. The correct sequence of actions and the use of durable materials are the key to ensuring that the structure will last a very long time.