In large machines, bearings often remain forever and are disposed of along with the unit. It happens that bearings are destroyed over time due to old age, corrosion, stress and other troubles in life. They are not easy to get or remove. They are usually located in hard-to-reach, blind holes, pressed in or secured in some other way. In this article we will look at 4 ways to remove or remove a bearing from a part.
How to remove bearings from a car crankshaft
Without a puller, in the absence of standard devices, you will need an overpass or a garage pit. One of the most effective methods is dismantling using a regular chisel, which does not require special knowledge. The old element is simply split with a hammer and a new one is installed. The main task when performing work is to avoid damage and avoid injury. It is advisable to use gentle techniques and protective devices.
The problem of how to remove a wheel bearing is solved in a similar way.
An equally effective way is to remove the part using an inertial hook, which you can make yourself from a piece of reinforcement or a piece of wire. The diameter must be at least 8 mm, and the length must be at least 400 mm; one end must be bent at an angle of 90 degrees so that the inner ring can be fixed. You will also need some kind of hollow cylinder or old heavy gear, into which a prepared metal rod will freely fit, to the reverse end of which another small piece should be welded perpendicularly so that it can be held by hand.
When the device is ready, the hook clings to the inner race, and the gear should be used to hit the stopper with a reciprocating motion until the part is completely dismantled.
Recommendations
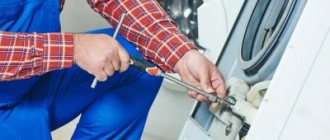
Replacing wheel bearings may vary from vehicle to vehicle. Modern cars may be equipped with various easily damaged electronic devices that must be removed when replacing a bearing. Therefore, if you are not a highly qualified car mechanic, it is better to entrust this work to car service specialists.
It is also worth doing a wheel alignment after replacing the wheel bearing. An adjusted wheel alignment will improve the car's road holding on turns and straights, eliminate vibration, and also reduce tire wear and fuel consumption. Vibration may also occur due to a crookedly inserted bearing. To eliminate it, you need to knock out the bearing again and check the tightness of the wheel nuts.
How to remove the suspension bearing from the cardan on a Gazelle
Before removing the shaft from the engine, it is necessary to make marks with a marker relative to the drive gear flange near the continuation of the gearbox housing to maintain balance after installation. Then the following actions are performed sequentially:
- unscrew the bolts securing the cardan to the rear axle flange;
- remove the shaft, remove the lock washer, unscrew the bolt and remove the U-shaped plate;
- by hitting the fork with a hammer, separate the splines and dismantle the element;
- Before installing a new part, check for corrosion and apply lubricant.
Having a puller makes the procedure easier.
How to remove a bearing from a rear wheel hub
Before replacing in the field, it is necessary to block the vehicle using reliable supports. Then remove the wheel, unscrew the bolts by first tapping them with a copper hammer. The brake drum is dismantled, the central nut is unscrewed, then the hub is pulled out. When the inner race “hardens” on the shaft, it can be removed with a puller or knocked down with a chisel. This procedure should be carried out very carefully so as not to damage the surface of the axle. If the upper race remains, it is pressed out with a special device or knocked out. If the element falls apart during heavy use, the entire assembly may need to be replaced.
Advantages
The advantages include:
- • Products delivered from the factory are immediately ready for use.
- • Long service life.
- • Can be used in conditions of heavy dust and precipitation.
- • The sliding zone is permanently sealed and therefore no leakage of safety material occurs.
- • Short-term use with complete immersion in water is acceptable. In this case, the fluid is removed without consequences for the node.
- The temperature regime of its use will depend on what kind of lubricant to fill a closed bearing with. For example, if you use “Ciatim”, then heating more than 100 degrees will not lead to leakage and increased wear.
How to remove the inner bearing without a puller from the front wheel hub of a VAZ 2110
Dismantling and replacement of the p/w is required if you hear a characteristic crunch or hum that comes from the front wheels when moving. It is better to carry out replacement with a special device and auxiliary tools to avoid damage. To understand how to remove the bearing from the front hub axle shaft yourself, you should familiarize yourself with the step-by-step procedure:
- place the car on an overpass or a flat surface, jack up the wheel, and apply the handbrake;
- remove the caliper, brake disc, unscrew the lock nut;
- using two pins inserted into the brake disc and screwed into the hub until it stops, pull the part off the shaft;
- Unscrew the ball joint bolts and pull the CV joint out of the joint;
- remove the retaining ring using pliers;
- use a puller to press out the upper race;
- remove the dirt protection ring with a screwdriver;
Before installing a new element, thoroughly clean and lubricate the seat and check for damage. Assembly is carried out in reverse order.
Application area
Initially, the design of the rolling apparatus implied the presence of a lubricating device, special safety shields with stuffing box packing, felt or rubber fillers.
The appearance of a ready-to-use mechanism that does not require additional service throughout its entire lifespan has significantly simplified production and reduced maintenance costs. Now all rotation points, if there is no need for constant forced introduction of a sliding solution, are assembled with enclosing bearings.
The operation of such types is provided for by technological features and is used in aggressive conditions, where the equipment is most exposed to non-standard and specific factors:
- • Where evaporation occurs at elevated temperatures, which is caused by humidity.
- • Where fine dust content prevails.
- • Where work is carried out using organic substances (fat, oil).
- • Where the main focus of the industry is directly related to various chemicals.
Most agricultural machinery, motor vehicles, and light industry machines have components that do not require service. Rollers for sports equipment, warehouse equipment (roller or hydraulic trolley), conveyor lines use parts that are prepared for work at the manufacturer. Household and office equipment cannot do without such small-diameter products.
In modern construction tools, such as drills, grinders, screwdrivers, electric and chainsaws, concrete mixers, lawn mowers, vibrating plates, the vast majority of rotating samples are equipped with hidden rolling elements. In a passenger car, this type is used in hubs, a generator, a fan, an air conditioner, a pump, a tension roller, wiper motors, and window regulators.
How to remove bearings from a VAZ 2110 generator
Replacement of old or worn elements is carried out in a given sequence. First you need to familiarize yourself with the mounting diagram. Then they are disconnected and dismantled:
- device terminals and negative terminals from the battery;
- crankcase protection;
- generator from the car frame;
- plastic back protective cover;
- voltage regulator and brush holders;
- pulley from the axle, holding the unit in a vice;
- having access to the armature, plastic casing and front bearing;
- use a puller to pull out the rear element; if it is missing, you can carefully knock it out with a chisel;
Before installing new sh/p, it is necessary to check the seats, remove contamination and apply lubricant.
Self-disassembly
Having completed the preparation, you can begin disassembling the SMA. Whatever brand your car is, the repair principle remains the same.
Top and front panel
In some washing machines, it is not necessary to remove the front panel to remove the tank. But we will describe the most difficult disassembly:
- Using a Phillips or hex screwdriver, remove the two bolts on the back of the top cover. Push it forward and remove it from the body.
- Move to the front. You need to pull out the dispenser tray, which is used to pour in the powder. Press the latch in the center and at the same time pull the tray towards you.
- Remove the screws securing the control panel.
- Using a flathead screwdriver, pry open the plastic latches.
- Without unfastening the wiring from the control unit, place the panel on top of the housing. If you decide to put it aside, first take a photo of the location of the connectors and then disconnect it.
- Open the hatch door. Bend the edge of the sealing rubber - behind it there is a clamp. Pry it with a screwdriver and pull it out of place.
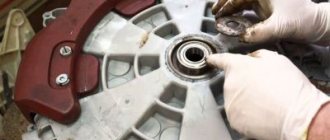
How to remove a bearing from a rotor
If you do not carry out preventive replacement of the sh/p in a timely manner, they begin to overheat, the electric motor makes noise and works inefficiently. Backlash occurs and the rotating rotor touches the stator, which can lead to motor failure and the need to completely replace the assembly.
You can check the functionality of the elements yourself by placing the engine on a flat surface and turning the shaft, first placing your hand on top.
There should be no extraneous or mechanical sounds. If the rotation is jerky or there is extraneous noise, then the elements need to be replaced.
To dismantle parts, it is advisable to use special removable devices, which differ in parameters and functionality, depending on the size of the unit. For massive rotors, large pullers with several jaws can be used; small ones are equipped with bars or replaceable plates.
For dismantling, emphasis is placed on the inner ring; to make it easier, use a piece of pipe as a lever. You must first lubricate the shaft with lithol or machine oil.
My secret
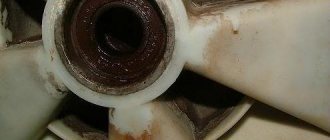
The bearing looks like this:
Remove the boot (the next three photos show three different types of boots)
The boot protects the bearing from dirt, water, dust and sand getting inside. Usually there are boots on both sides of the bearing, but it also happens that there is no boot on one side of the bearing. When it comes to roller bearings, there is nothing wrong with this - the bearing is inserted with the open side into the wheel, where there is no dirt or water. Anthers are made of metal, plastic or rubber. They can be removable or conditionally non-removable. Bearings with conditionally non-removable anthers are called non-removable. But in reality, removing a “non-removable” boot can be as easy as removing a removable one. Problems arise when trying to put it in place. Metal removable boots are a round washer of a special profile, secured with a C-ring (C-ring) in an annular groove in the outer race. Such anthers can be easily removed and replaced. To do this, just pick it up (for example, with a sewing needle) and pull out the C-ring. After which you can simply shake out the boot. Metal conditionally non-removable anthers are a round washer of a special profile with a flared outer edge, which is pressed into an annular groove in the outer race. Such anthers can be removed, but putting them back is not easy. However, it is quite possible if they were not greatly deformed during the removal process. Metal boots protect the bearing only from dry dust. Together with moisture (water), dust easily penetrates inside the bearing. Rubber boots are a rubberized metal washer with flexible inner and outer edges. The inner edge fits tightly into the inner race, and the outer edge fits tightly into the groove of the outer race. Such anthers are removed with a slight movement of a needle, and then just as easily put back in place. Rubber boots can protect the bearing not only from dry dust, but also from water and dirt. Rubber boots are usually used in so-called “PVZ” bearings. But rubber boots also have disadvantages - due to the constant friction of the boot on the inner race, the ease of free movement deteriorates. Although, under load (while riding) the resistance is almost unnoticeable. Plastic boots on roller bearings are almost never found. They are similar in design and properties to rubber ones.
Bearings usually contain lubricant. It serves to reduce friction and prevent dust from entering work surfaces. The principle of operation of any lubricant is based on filling microscopic irregularities on working surfaces with lubricant particles. Thus, “dry” metal-to-metal friction is replaced by “liquid” lubricant-lubricant friction, which is orders of magnitude less than “dry” friction. And excess lubricant collects dust that gets into the bearing, thereby preventing its penetration into the working area.
Between the two cages (outer and inner) there are balls. When the bearing rotates, the balls roll along ring tracks in cages. In order to reduce sliding friction, the tracks are made with a slightly larger radius than the balls, so that when moving, the balls do not rub their sides against the walls of the tracks, but roll exactly in the middle of the track. Because of this, a slight lateral play is observed in any bearings. Some have more, others less, but it occurs in all bearings, even new ones. But there should be no “vertical” play in new bearings.
The better the surfaces of the tracks and balls are polished, the less friction. The number after the abbreviation “ABEC-X” indicates the quality of polishing of these surfaces, as well as the accuracy of their ideal geometric shapes. The larger the number after “ABEC”, the better the surfaces of the tracks and balls correspond to ideal geometric shapes, which means less friction and a “faster” bearing (in theory - editor's note).
To prevent the balls from running into one heap, they are separated by a separator. Separators are usually made of plastic, steel or bronze.
Plastic cages have less free-wheeling friction, they make less noise, they don't rust, but they don't last long. In addition, some plastics can become deformed and even dissolve when washed in gasoline; after washing in water, they cannot be dried at high temperatures. Typically, plastic separators are made of one piece and simply snap into place on one side.
Steel cages are strong, but because they are made from mild steel, they have more free-running friction than plastic cages, they make more noise, and they rust. Steel cages are usually made of two almost identical parts, which are put on the balls from the sides and fastened together using spot welding or special “antennae”.
Bronze spacers are considered the best, but due to the high cost of the material and complex technology, they are expensive to produce and are extremely rare. I have only seen them in old domestic and some modern imported bearings. But they do not rust, are durable, have less free-wheeling friction, and make less noise than steel ones. The design and installation method of bronze separators are similar to steel ones.
But in practice, the difference in freewheel friction has almost no effect on driving, since friction under load exceeds it tens of times and does not depend on the separator.
If you remove the separator, the balls can be moved into one pile and then the bearing easily breaks up into two cages and a pile of balls:
It is almost impossible to reassemble such a disassembled bearing, so never disassemble your still “living” bearings into balls. There is no need to disassemble the bearing down to the balls to wash it; you just need to remove the boots!
When driving along dusty city streets, sand inevitably gets into the bearings, which literally eats “holes” (pits) on the balls and race tracks. The depth of these pits is only a few thousandths of a millimeter, but this is enough for the bearing to begin to hum, and if there is sand inside, also crunch. At the same time, the friction force increases significantly. Jumps and other shock overloads of bearings can lead to the appearance of microcracks on the surfaces and disruption of the geometry of balls and tracks, which also leads to buzzing and crunching, as well as an increase in frictional force. Thus, after some time, your “ABEC-7” will turn into “firsts”, or even worse. Then the tracks will begin to wear out, and the balls will shrink, and so on until the bearing falls apart. Timely cleaning and lubrication can significantly slow down this process, improve ease of movement and reduce the volume of sounds produced by the bearing.
It would seem that the balls and paths shine like a mirror, which means they are perfectly smooth... But this is not so. In fact, if you arm yourself with a microscope, you can see a completely different picture. The photo on the left shows the track of an almost new bearing. It has not yet been eaten away by sand; only traces of the cutter with which this path was carved are visible on it, and traces of the first “passes” of balls along it. This type of bearing has very little friction and operates smoothly and silently. The right photo shows the same path, but after the bearing was in operation with sand trapped inside. This photo shows what a few grains of sand can do to a bearing in just a few kilometers. As they say, no comments. Such a bearing hums loudly and rotates unevenly and jerkily.
If in the first photo it was the track of an almost new 5th ABES, then what is visible in the second photo does not fit into any standards at all. This is what bearings become after sand gets into them. These consequences can be smoothed out a little with the help of special lubricants, but they do not go away without a trace. If the bearing is used for a long time in a clean state, without dust, then these irregularities can be smoothed out a little by grinding the track in depth and filing the irregularities against each other, as a result of which play appears. Over time, the sand “eats away” not only individual holes, but begins to quickly “eat away” the paths in depth, as a result of which the backlash quickly increases.
If large grains of sand get into heavily worn bearings, they can become jammed between the balls and the cage, which can lead to deformation or even “rupture” of the cage under the force applied to the bearing. If the cage is destroyed, the balls can bunch up and then the bearing falls apart. To prevent this from happening, you need to periodically check the condition of the bearings, clean and lubricate them if necessary, or, if there is too much play or visible damage to the cage, replace them with new ones.
* For those attentive:
If you notice a discrepancy, keep in mind that the disassembled and assembled photographs show different bearings. A slightly larger bearing was disassembled. The bearing from the rollers inside is designed in exactly the same way, only there are usually fewer balls (7 pieces, not 8).
_____________
Divas 2005
and about disassembling the bearings and you feel that this is not enough, then you can disassemble the bearing completely by removing the balls and the separator from it. For those who are doing this for the first time, or simply rightly believe that there is no need to disassemble the entire part, we will write how to partially disassemble this element.
Where should I start disassembling bearings?
Naturally, you need to remove the wheel from the axle and remove the bearing from the wheel. Although you don’t have to do the latter if you feel that it is more convenient for you to hold the entire wheel rather than a bare bearing. Next, you need to arm yourself with some strong and sharp object so that you have something to pry off the bearing elements. A small sharp knife, drill or screwdriver may work.
Two types of bearing designs
. Bearings are divided into 2 types: collapsible and non-separable. It would seem, why produce non-separable bearings when dismountable ones are much easier to maintain? Non-separable bearings are generally smaller and lighter, have greater accuracy, have fewer gaps for dirt to enter, and are less expensive. With collapsible ones, all this is sacrificed for the convenience of cleaning and replacing bearing elements. But also collapsible bearings are slightly behind non-separable ones.
Disassembling a non-separable bearing
Is it possible to take apart something that cannot be taken apart?
If the bearing is non-separable, then the boots are rolled or pressed. But this does not mean that one of them (you can have two, but we don’t need any more) cannot be removed. Because such prefabricated units, such as bearings, were once disassembled at the manufacturing plant, which means it is possible to gut them again. True, this requires a little effort and breaking them a little. In addition, a bearing broken in this way cannot be completely reassembled: it will work, but the protective parts cannot be put back, because this is not provided for by design. If you try to somehow solder the broken sidewalls or glue them, this may lead to a deterioration in the properties of the bearing, but will not save it from further contamination. Therefore, the protective sides (boots), which, moreover, are usually damaged when opening a non-separable bearing, are usually thrown away.
Disassembly and assembly process
As already mentioned, for washing it is enough to disassemble the bearing on only one side. This will be enough to be able to wash all the dirt out of it. In order to open the bearing, you need to pick up the boot from the inner (smaller) diameter. To do this, you need to insert a thin flat sharp object, for example a knife, into the gap between the inner diameter of the boot and the inner support ring of the bearing. You need to insert the knife approximately perpendicular to the boot. We must remember that immediately behind the outer boot there are the following parts of the mechanism: balls and a separator. Therefore, in order to pick up only the boot and nothing else, you need to deepen the tip of the knife no more than 2 mm. When you successfully pick up the edge of the boot and see that it is lifted, you can proceed further: either continue to walk along the perimeter of the boot, separating it from the bearing, or turn the knife along the axis so that the boot rises more. It is recommended to place the disassembled bearing without one side wall with the hole inside the board, i.e. so that the broken hole is covered by the suspension it is put on, and does not have a hole sticking out of the wheel.
Disassembling a separable bearing
Unlike a non-separable bearing, where everything is sealed, a separable bearing has a boot that is simply inserted into the outer ring of the bearing. And the boot and all its contents are prevented from falling out of the body by a special gasket between the boot and the outer ring. This gasket is a retaining ring. The retaining ring looks like a flattened horseshoe with microscopic thickness, but unlike a regular horseshoe, this horseshoe is rounder and more like the letter "C". Due to the fact that the material has a minuscule thickness, the letter “C” can compress and straighten, springing back when compressed. The retaining ring sits in the groove of the outer bearing ring and reliably blocks the boot from falling out. In order to remove the retaining ring and remove the contents of the bearing outward, you need to compress the retaining ring, reducing its diameter, and remove it outward. The main thing is that the compressed retaining ring does not spring out of your hands somewhere onto the floor, otherwise this thin piece of metal will be difficult to find.
Removing the retaining ring is usually easy. A cut in the locking ring is sought and one of the ends of this horseshoe-shaped element is pryed off with a sharp, thin object. Next, the retaining ring is removed from its groove and ceases to block access to the boot, after removing which we can get to the contents of the bearing.
Bearings tend to get clogged. The main enemies of bearings are water, dust, sand. You can determine that a bearing is clogged by characteristic noise and deterioration in driving performance. Kettles continue to run on dirty bearings. Rich individuals buy new bearings. Proper roller bearings are washed and lubricated regularly, without running them to a critical state.
How it's done. Inside each wheel there are two bearings and a bushing. First, the bearings must be removed from the wheel. It is convenient to use a special key for this. If there is no key, you can use available tools that are suitable in size.
Depending on the design of the hub, the bearing can either be pressed out of the wheel or pulled out with a wrench.
There are two types of bearings: collapsible and non-separable. In collapsible bearings, the anthers are secured with retaining rings, while in non-separable bearings they are rolled or pressed. To disassemble the collapsible bearings, you need to remove the retaining rings and remove the anthers. The retaining rings are removed using a regular needle.
After this, the anthers are easily removed.
Gasoline is used to wash bearings.
1st stage of washing: Disassembled bearings, metal boots and retaining rings should be thrown into a container with gasoline and chatted. After this, the boots and rings are sent for drying, and the bearings are sent for a second wash.
2nd stage of washing: you need a container for gasoline with relatively wide edges and a small stick of a material insoluble in gasoline of a suitable diameter. Each bearing in turn must be put on a stick, dipped in gasoline and rotated with your finger until the remaining dirt is removed from it and it begins to rotate freely.
After washing, the bearings should be dried.
Lubrication.
There are two types of lubricant: liquid and plastic.
Liquid lubricant can be used for bearings with accuracy class ABEC-5 and higher. It immediately ensures maximum ease of rotation. However, it is consumed just as quickly. Therefore, if you want to use liquid lubrication, you will have to service the bearings very often.
We recommend that you use grease lubricants. To achieve maximum ease of rotation after lubrication, the bearings will have to be “rolled out” a little (about a week), but it is enough to lubricate the bearings once a season and it is cheaper. Grease is suitable for all bearings. A small amount of lubricant should be placed in the bearing: approximately 30% of the free volume inside the bearing.
Types of lubricants.
Liquid lubricant is sometimes sold in specialized stores in special tubes or syringes (for example, TWINCAM RACING GEL, KRYPTONICS F1 GEL).
Grease can be purchased at auto stores. Litol-24 or its imported analogues are suitable:
- "Shell": Alvania 3, R3, Cyprina 3, RA
- "Mobil": Mobilux 2, 3, EP2, EP3; Mobilgrease MP
- British Petroleum: Energrease L2, LS3
- Exxon: Beacon 3
- "Castrol": Castrol LM, LMX
- "Agip": Agip F1 CR MU3; Agip F1 CP FC3
- "Teboil": Multi-Purpose Grease
- "Texaco": Hytex EP-2
- "Unocal 76": Multiplex Red Grease 2
- Valvoline: General Multi Purpose Grease
Non-separable bearings can also be serviced. To do this, you need to pick out and throw away one anther.
It's done like this... From the inside of the bearing, carefully pick up the boot with a knife (insert the knife shallowly! Otherwise, you can damage the cap with the balls) and remove the boot. It will bend and become unusable. But don't be upset, because... you won't need it anymore. After washing and lubrication, the bearing is inserted with the open side into the wheel and continues to function. Don’t let the fact that there won’t be one boot bother you: the bearing fits tightly to the walls of the wheel, and dirt doesn’t fly there. Wash and lubricate as per instructions above.
5.01.2003
Structure, types, sizes, ABEC standards, ceramic or swiss - this article will answer most of your questions about bearings. And also a little practice, specifically removing the boot.
Each roller skate has bearings, their number depends on the number of wheels: two for each wheel, between which there is a bushing. The role of the bushing is to sit tightly between the bearings and transfer lateral pressure from one inner ring to the other, and from the latter to the frame. Thus, when the skater tilts the frame on the outer or inner side during skating, almost all the pressure goes to the frame, and not to the bearings. This allows them to rotate under such a load and not break. All bearings for roller skates are standardized, i.e. They are produced in specified sizes and specifications. This makes it possible to install almost any bearings on wheels.
Structure
1. Inner ring 2. Outer ring 3. Balls 4. Cage 5. Boot 6. C-ring
Types of bearings
Roller bearings are most often used in three types: 608, 688 and 698. The first digit
– bearing type – 6, means that the bearing is of the “single-row deep groove” type (one row with a deep groove).
These are the most commonly found bearings. The second number
indicates the bearing series.
There are the following series (from lightest to heaviest): 8 - ultra-thin 9 - very thin 0 - ultra-light 1 - ultra-light pressure 2 - light 3 - medium 4 - heavy The third and last number
indicates the diameter of the inner ring.
608 bearing
.
Used in most videos. Inner diameter 8mm, outer diameter – 22mm, thickness – 7mm. 688 or micro bearing
.
Mainly used in roller skates. Inner diameter – 8mm, outer – 16mm, thickness – 5mm. 698 bearing
. They are also called dwarf size. Used quite rarely. Inner diameter – 8mm, outer – 19mm, thickness – 6mm.
608 vs 688
688 micro bearings are distinguished by the fact that the outer diameter is 6 mm smaller than 608 bearings, and the thickness is 2 mm, due to this they have less weight (a steel 608 bearing weighs about 12 grams, a 688 micro bearing weighs about 4 g), and are better protected from dust and moisture. The number of balls is usually 9-11 (in 608 bearings there are 7 balls, less often 6 or 8). However, such a microbearing cannot simply be installed in ordinary wheels. A special adapter is required for the 688 bearing and 688 bushings (they are, as a rule, slightly longer than regular bushings). Since adapters are made, as a rule, from light plastic, and 608 and 688 bushings are approximately the same in weight, you can get a gain in the mass of the roller. For example, on 4-wheel 608 rollers, the bearings weigh a total of about 96 g, which is approximately equal to the weight of one more wheel. When replacing with micro-bearings, the weight is reduced to approximately 50g, which is almost half as much. This may be completely unnoticeable for ordinary skates, but for running skates it is not so little, when the weight of the frame is up to 200g, and the boot is about 300g. Here, every couple of grams of weight loss reduces energy expenditure when running, which is especially important over long distances. However, 688 micro bearings do not handle uneven roads or rough asphalt as well. In addition, they are much more expensive due to the increased complexity of production.
Types of cells
Cages (or “separators,” as you prefer) are used to hold and separate the balls. Usually metal, the so-called “ribbon cage” type. They consist of two halves into which balls are pressed.
On higher quality bearings, as well as on running bearings, Crown type cages made from various synthetic polymers or metal are more often used. They consist of one single piece and are easy to put on and take off from the balls.
ABEC Standards
Also, almost all bearings indicate the ABEC (Annular Bearing Engineering Council) classification. The higher the ABEC number, the higher the manufacturing accuracy. In this case, there is no need to adhere to certain materials during manufacture; the bearings must be made with a certain accuracy (for example, the list shows the largest error of the inner ring). A higher accuracy class allows the bearing to rotate at a higher frequency with less vibration and friction. There are 5 accuracy classes: ABEC 1
– Inexpensive bearings.
Most cheap roller skates and skateboards are equipped with them, often without indicating the class. As a rule, they are not designed for maintenance. Error – 0.0075 mm. ABEC 3
– Conventional medium roller bearings.
Not bad for hockey and roller skaters, who often have to rearrange bearings depending on skating conditions. Error – 0.005 mm. ABEC 5
– Improved bearings for most good rollers.
Good for normal frequent riding. They are most common due to their good quality and relatively low price compared to ABEC 3 bearings. Error – 0.0035 mm. ABEC 7
– Racing bearings.
Mainly used by experienced skaters who want the best quality. More expensive than other bearings due to the increased complexity of manufacturing. Error – 0.0025 mm. ABEC 9
– The most precise and high-quality bearings, and therefore the most expensive. Error – 0.0012 mm. The ABEC classification is mainly used for roller and skateboard bearings only. Everywhere the generally accepted system of ISO standards (International Standards Organization) is used.
ISO classification table for ABEC bearings:
ABEC 1 is equivalent to ISO P0 ABEC 3 is equivalent to ISO P6 ABEC 5 is equivalent to ISO P5 ABEC 7 is equivalent to ISO P4 ABEC 9 is equivalent to ISO P2
However, it is not always possible to feel the difference between, for example, ABEC 7 and ABEC 3 bearings. The higher accuracy is almost unnoticeable at 20 km/h. The reduction in vibration and improved rolling are clearly noticeable at a speed of approximately 10,000 rpm (on an 80mm wheel this is approximately 150 km/h). The highest rotation speed for ABEC 1 standard bearings is approximately 32,000 rpm. A regular roller skate roller skates at approximately 2,000 rpm; on downhill you can reach up to 4,000 rpm. In addition, it must be taken into account that the ingress of dust, dirt, and wear lead to a deterioration in the class of the bearing. Because of this, when replacing bearings with new ones of a higher class, it may seem that they run faster. This is only due to the fact that there is no dirt in them, the lubricant is clean, they are not damaged by dust particles, etc. So changing the lubricant, reducing air friction, changing your riding position, and improving your riding technique will most likely increase speed much more effectively than replacing bearings.
— ceramic balls are lighter than steel
. The mass of a ceramic bearing is approximately 9-10 grams. Also, due to this, the centrifugal force acting on each ball is less. And this in turn leads to a decrease in the energy spent on friction.
— stronger than steel
.
Thanks to this, a high-quality ceramic bearing will last an order of magnitude longer than a steel one. — have a smoother surface
, which reduces friction in the bearing.
- have better temperature properties
.
They do not heat up so much, which reduces the evaporation of lubricant. — not susceptible to oxidation and chemical reactions
, and also require virtually no lubrication. Thanks to this, such bearings are more resistant to water and do not require frequent maintenance. Oil is always used as a lubricant. However, the inner and outer rings remain, as in conventional bearings, steel and vulnerable to moisture. This is done to reduce friction when the ball rolls in the groove. Metal, unlike ceramics, is flexible and over time, under the pressure of the balls, the grooves are slightly formed. This polishes the grooves and reduces friction. Another negative point at this point is that when the bearings are constantly swapped, these grooves expand and play appears due to the constant change in the direction of pressure.
But not all ceramic bearings are good!
There are also cheap options in which the balls are made of steel and coated with a layer of silicon nitride. It is better not to use these for two reasons. First, they do not have all the benefits of quality ceramic bearings. Secondly, due to differences in the properties of these two materials, the ceramic layer peels off from the steel. There are not only 608 ceramic bearings, but also 688 bearings. If they are also Swiss – the best option for racing. The price corresponds to the best quality.
Suffixes
Typically, manufacturers add Latin letters - suffixes - after the type of bearing - for example, “RS” or “ZZ”. They characterize the type of anther on it. The most commonly used designations are: Z – metal boot on one side of the bearing ZZ – metal boots on both sides of the bearing (most often “Z” is used, although boots are on both sides) RS – metal boot with rubber coating 2RS – on both sides of the bearing However Some manufacturers use their own designations, and the same bearing may be designated differently.
Removing the boot
The bearing is almost always covered with a boot on one or both sides. If the boot is held in place by the so-called C-ring, then the bearings are called collapsible. If necessary, the boot can be easily removed. All you need is a pin or needle. You need to pick up the ring on one side and pull it out. After this, the boot is quietly pulled out or shaken out. You can also insert it back without any problems and don’t forget to put on the C-ring. This procedure is performed if you need to clean the bearing and change the lubricant. Some manufacturers produce bearings with a boot on one side. This side must be outer when installed on the wheel. Dust doesn’t get inside the wheel anyway, so this technique allows you not to constantly waste time removing the boots.
However, there are also very similar bearings in which there is no C-ring, but instead the boot is pressed into a solid ring. Such bearings are called non-separable. But this does not mean that the anthers cannot be removed from them, it’s just that this is not provided for by the design and they cannot be put back on later. And they are removed a little differently, using a small screwdriver or knife and pliers. You need to insert the end of a screwdriver or knife into the gap between the inner ring and the boot, pry it out and bend it, and then grab it with pliers and pull it out. After washing, the side without the boot should be placed on the inside of the wheel.
A regular metal boot does not touch the inner ring, as this will lead to a negative effect when rotating. So all the dirt gets inside through a small gap. Some bearings use “Inner Race Step” technology to increase dust and water resistance. The bottom line is that there is a small “step” on the inner ring of the bearing, and because of this the inner radius of the boot is slightly larger than usual. This technology creates an additional obstacle to dust and moisture.
Also, a rubberized boot is often used to reduce the entry of foreign particles into the bearing. It is a metal boot covered with a layer of rubber on the outside. In this case, the rubber comes into contact with the inner ring. This has virtually no effect on rotation, but significantly increases the endurance of the bearing, reducing the ingress of dust and water.
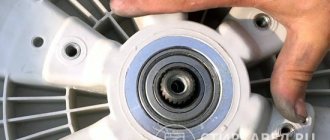
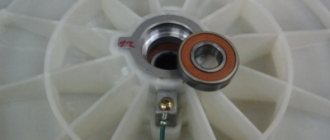
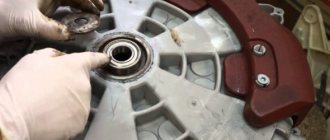
How to remove a bearing from a Samsung washing machine drum
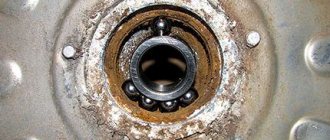
In washing machines, ball bearings ensure uniform and dynamic rotation of the drum. Considering that spinning is performed at high speeds and the elements are subject to increased load, they often fail and must be replaced in order to prevent breakdowns of the main components of the equipment, the repair of which is quite expensive.
If it is not possible to invite a service technician, you can make the replacement yourself, having first read the step-by-step instructions. First you have to disassemble the machine. Two elements, large and small, are replaced in the tank housing bushing. A part with a larger diameter is knocked out using a metal rod, and a part with a smaller diameter is knocked out. The upper cage is removed by striking with a hammer, placing the end of a pin or rod against the edge. To avoid jamming, you should hit the entire circumference of the element evenly, until the body comes out completely. After dismantling the p/sh, the seals are removed and the seat is thoroughly cleaned. Then new parts are installed and assembly is carried out in the reverse order.
Types of construction
Elements of this type are necessary for the operation of critical components. They are classified in the same way as open ones, but with the addition of markings. For example: 62012 - this refers to a product without a gasket. 62012-Z or 62012-2Z are already adjacent models with 1 and, respectively, 2 faces.
When choosing a particular modification, the main factors should be taken into account:
- • At what temperature conditions are the maximum loads permissible.
- • In what environment will it be used, where water and dust prevail. Are there strong effects of chemical compounds.
- • Set rotation speed according to technical specifications.
- • Whether or not it is possible to supply additional lubricant.
With one side
The designation of single-row ones occurs according to GOST 8882-75. The letter Z indicates that the mechanism uses a metal-rubber seal. The additional abbreviation RS can be found on imported models and carries the same information.
With two sides
The designation of sealed bearings is the same as that of the first type, only the number 2 is placed in front of the letters. They are more universal and are in demand when there is a possibility of contamination on both edges.
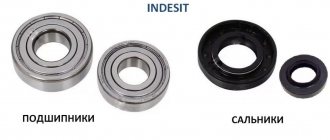
How to remove a bearing on an Indesit washing machine
Typically, household washing machines have two elements installed that connect the drum with the pulley. The parts ensure uniform rotation during high-speed spinning and washing modes.
With careful operation, replacement of the p/w may be required no earlier than 5-6 years, when natural wear and tear occurs. Breakage can occur when laundry is loaded incorrectly or excessively, causing imbalance, or the seal is damaged due to water ingress, causing corrosion and breakage.
Dismantling and installing new elements is quite simple; the main difficulty lies in completely disassembling the washing machine to get to the washing machine.
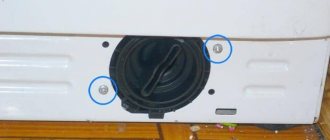
Before starting work, you should select new products in accordance with the modification of equipment, prepare tools, consumables, and be sure to turn off the power supply. All water must be drained, the filters must be unscrewed, and the supply hoses must be disconnected.
Having disassembled and taken out the drum, you need to cut it along the seam with a hacksaw or a metal blade, having previously made holes along the contour of the skirt for subsequent additional fastening.
Then you need to pull out the bushing, remove the oil seal and use a puller to remove the bushing. In the absence of a special device, you can use a rod and a hammer, tapping evenly along the contour of the holder.
After dismantling, you must thoroughly wipe the seats, removing dirt and old grease, check for damage, install new parts and reassemble in reverse order.
Third batch of diameters
| 60302 | 80302 | 15 | 42 | 13 | 1,5 | 0,08 | 11400 | 5400 | 17 |
| 60314 | 80314 | 70 | 150 | 35 | 3,5 | 2,50 | 104000 | 63000 | 4,5 |
| 60303 | 80303 | 17 | 47 | 14 | 1,5 | 0,11 | 13500 | 6650 | 16 |
| 60311 | 80311 | 55 | 120 | 29 | 3,0 | 1,37 | 71500 | 41500 | 5,6 |
| 60305 | 80305 | 25 | 62 | 17 | 2,0 | 0,23 | 22500 | 11400 | 11 |
| 60310 | 80310 | 50 | 110 | 27 | 3,0 | 1,08 | 61800 | 36000 | 6,3 |
| 60306 | 80306 | 30 | 72 | 10 | 2,0 | 0,34 | 28100 | 14600 | 9 |
| 60309 | 80309 | 45 | 100 | 25 | 2,5 | 0,64 | 41000 | 22400 | 7,5 |
| 60307 | 80307 | 35 | 80 | 21 | 2,5 | 0,44 | 33200 | 18000 | 8,5 |
| 60308 | 80308 | 40 | 90 | 23 | 2,5 | 0,64 | 52700 | 30000 | 6,7 |
How to remove a bearing from an LG washing machine drum
Household appliances from a well-known Korean manufacturer are highly reliable, but some parts and consumables require periodic replacement or maintenance. To remove the washing machine yourself, you must first disconnect all communications, drain the remaining water, and disassemble the washing machine to remove the drum.
Then the fixing bolts are unscrewed and the assembly is divided into two parts. Using improvised means or special devices, the bearings are knocked out, the seats are completely cleaned, and all parts are checked for damage and deformation.
Installation of new elements and reassembly is carried out in the reverse order.
Manufacturers
The popularity of units is growing, so all manufacturers in the world are trying to master the production of such products. Models from Japanese brands NTN and NSK, German LFD, FBJ from China, and many other countries come to our market.
Russian EPK and GPP are represented by:
- • Moscow numbered 1 and 2.
- • Saratov Plant for No. 3.
- • Samara instrument making plants.
- • Tomsk OJSC “Roltom” – 5.
- • Yekaterinburg Gas Processing Plant 6.
In total, there are 28 large enterprises in Russia that produce such products. Active construction began in the thirties of the last century. During the Second World War they were evacuated with all their equipment beyond the Urals. After the Victory, they began to develop the industry in these northern regions, where to this day they successfully work for the benefit of the national economy.
The biography is very extensive, gas processing plants are located not only in Siberia, but also located in Rostov-on-Don, Kursk, Penza, Vologda, Samara, in the Kurgan and Volgograd regions. In addition, enterprises in post-Soviet countries such as Kazakhstan, the Republic of Belarus, and Ukraine do not stop operating. Trade and production sells a wide range of rolling units designed for manual hydraulic trolleys and stackers. We have given detailed recommendations on how to open, disassemble and replace the grease in a closed bearing and why this should be done.
How to remove a bearing from a washing machine drum
Replacing the p/w is necessary on a scheduled basis in accordance with the manufacturer’s recommendations or if extraneous noise occurs during rotation and leakage. To carry out work at home, you will have to disassemble almost the entire household appliance and remove the tank from which you will have to remove the drum in order to gain access to the bearings.
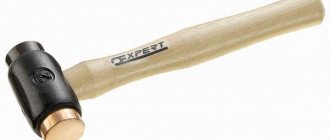
Considering that the p/w on washing machines are usually disposed of and replaced with new ones, you can simply knock them out with due care. To do this, use a copper hammer, chisel or powerful screwdriver. The emphasis should be placed on the clip and the blows should be made along the entire contour, avoiding distortion. Before installing new elements, you must carefully check all parts for wear, clean possible oxidation, corrosion and dirt, and apply lubricant.
see also
Comments 30
I sawed out two pieces like this, clamped them in a vice and pressed them together
Beautiful. You simply, without strain, pressed it out with a vice. Respect and respect. This is the most practical advice, I will definitely draw a bold cross over the workbench so as not to forget this advice. One problem, how to make such a wedge? You can't cut it off with a grinder, you need to polish it, otherwise it will bite. I have three sandpapers in the garage, but I doubt that I can keep such a part on the plane of the stone. You need a familiar milling machine. Previously, I would have had one like this, made me a vice with a magnet for a drilling machine. But overall the idea is cool. Good luck with your inventions.
I made a wedge from a 5mm strip, first flattened it on a rail, then finished it off with a grinder and an emery wheel, it’s simple and you don’t need much.
Probably of all the tips, the most correct one would be to use a chisel first between the cage and the nut, move it a little, and then use a chisel to split the cage, but that’s just my opinion. It's up to you to choose and make sure you don't damage the shank.
I support it 100%. Or warm up the clip.
As a last resort, a reverse hammer can help. If there is welding, then weld a piece of tube along the diameter of the bearing and use a reverse hammer.
On the sharpener, you cut on both sides, without overheating, not all the way, you can turn it with a suitable open-end wrench. It will fall apart on its own
and be sure to warm up the clip.
drive a wedge between the cage and the second nut. Wedge - chisel.
put the anchor in the assistant's hands, he places the clip on the anvil on top, put a hammer or something like that and hit it
Use a grinder to saw down the clip, and then knock it off with a chisel
I’ll just assume: hold the rotor in a vice with some pieces of wood, turn the nut (counterclockwise, as much as possible, apply tension on the bearing race), remove it, tap it with a bronze hammer on the race in a circle (from the sides), and maybe it will come loose. Maybe I could weld something and press it out, I don’t know, I wouldn’t cut it, maybe I could carefully grind out a groove with a milling cutter and hit it to create a crack. Well, that’s it—thoughts from what I saw.
Could be so:
the plastic impeller will fly apart from this.
and what does the impeller have to do with it? Do you need to take both off? It sits on a steel shaft and rests against a steel washer. This puller should be inserted between them.
Sorry, it's morning, my brain is working a bit dull. I agree that it will work as an option.
make cuts for a two-legged puller in the holder, or weld a piece of pipe with ears onto the holder and pull it off with the same puller
here's a noona puller
I've been thinking about such a puller for a long time, but the price is stopping me