When it comes to diagnosing the control module of a washing machine, the term “triac” is often heard. For users who are far from electrical engineering, this word is akin to a curse and means nothing. At the same time, this semiconductor is among the first to suffer in the event of failures and breakdowns: it burns out and requires replacement. A triac in a washing machine is a key connecting radio element that allows the control board to transmit signals to sensors and system components. Let's take a closer look at what it looks like and on what principle it functions.
Varistors and triacs in washing machines
Varistor
As a rule, a protective varistor . Such a metal-oxide varistor is a semiconductor device with a special current-voltage characteristic. Its function is to protect the electronic circuits of the device from overvoltage . To do this, it short-circuits the potential that crosses a certain safety threshold. A varistor easily absorbs high-voltage power surges, thereby saving our machine from burning out.
But nothing lasts forever, and after several voltage shocks, this element can fail: burn out and even explode. In such cases, a large area of the washing machine circuit board becomes covered with soot. Such deposits can be easily washed off with gasoline. In parallel with the varistor, other parts of the module may also fail - for example, transistors with a small power reserve. An image of the most common types of protective varistors is shown in the figure.
The maximum voltage value for each varistor is usually printed on its case, on average it is 275 V. In addition, protective variators are installed in electronic modules and in load circuits: for example, in the power circuit of the drive motor, pump, heating element, various valves, drying fans. It happens that these protective varistors are triggered (burn out) after water gets on the contacts that connect the load elements. Therefore, when making repairs yourself, you need to carefully examine all the connectors to see if there are any traces of water or cleaning solution left on them.
Triac
They are used to supply power voltage to external devices. There are also models of different capacities. For example, conventional triacs are used to connect the lead motor.
The figures below show triacs of different powers, including those in SMD version.
The most powerful triacs (used in connecting the lead motor circuits) may be marked BTB15, BTB16, BTB24, BT139, MRC419, MAC15, etc. They are practically from the same cloth.
The performance of triacs is determined by dialing or using an ohmmeter. Between the extreme contacts, the resistance ranges from 100 to approximately 600 ohms. And the resistance between the middle (case) and the extreme terminals is infinity.
In the figure we show an example of the standard size
.
Medium power triacs in washing machines are used to connect pumps, water supply valves, thermostop electromagnets and can be marked MAL600, PH600, BT134, and lower power elements - MAC97A8, MA7R423, etc.
How to test a thyristor with a multimeter?
Let’s make a reservation right away - you can check the serviceability of a thyristor without a tester. For example, using a flashlight bulb and a AA battery.
To do this, we turn on in series the power source corresponding to the voltage of the light bulb, the operating terminals of the thyristor, and the light bulb.
When a control current is supplied (an AA battery is sufficient), the light will light. This means the control circuit is working properly. Then disconnect the battery without turning off the operating current source. If the pn junction is working properly and is set to a certain holding current value, the light bulb continues to light.
Read also: Copper-phosphorus solder for copper soldering
If you don’t have a suitable lamp and battery at hand, you should know how to test a thyristor with a multimeter.
- We set the tester switch to the “dialing” mode. In this case, sufficient voltage will appear on the wire probes to test the thyristor. The operating current does not open the pn junction, so the resistance at the terminals will be high and no current will flow. “1” is displayed on the multimeter display. We have made sure that the working pn junction is not broken;
- We check the opening of the transition. To do this, we connect the control terminal to the anode. The tester supplies enough current to open the junction, and the resistance drops sharply. Numbers other than one appear on the display. The thyristor is “open”. Thus, we checked the functionality of the control element;
- Open the control contact. In this case, the resistance should again tend to infinity, that is, we see “1” on the display.
Operating principle and signs of control module failure
The more abundant the functionality of the washing machine, the more complex the electronic board is. This part is responsible for the operation of all components located in the machine body. Individual triacs, using wiring, send signals to start working to the following nodes:
- heater (heating element);
- thermistor;
- pump;
- UBL (hatch blocking device);
- solenoid valve;
- Hall sensor;
- electric motor;
- level relay.
As you can see, the entire operation of the equipment depends on the serviceability of the board. Any breakdown that occurs during operation can be associated either with a specific part or with the electrical circuit. Only diagnostics can accurately determine whether it is necessary to repair the “brains” of washing machines. A malfunction can be assumed based on indirect signs:
- The SMA screen displays an error code or the indicators blink. The decoding indicates the washing machine control unit.
- Installed programs are not activated in the machine.
- The equipment does not turn on.
- Water is constantly filling and draining.
- Unregulated engine speed.
- The water overheats or remains cold.
All these signs are ambiguous. Therefore, it is necessary to test both the node itself and the electronics. Most often, the module breaks down for the following reasons:
- Factory defect (rare case). It appears quite quickly, so the problem is solved by warranty repair or replacement.
- Power surges in the network. Lead to burnout of tracks and individual parts.
- Moisture. Contacts with moisture result in oxidation of the board surface.
- Abrupt power cut to the SM during operation. Also leads to voltage drop.
DIY repair guide
Calling a specialist is the only correct solution when:
- The warranty period has not expired - if the operating rules are followed, repairs will be free;
- Ominous smoke came out of the car.
In other cases, they say there are options.
But the first stage of repair always begins with disconnecting the faulty equipment from the power supply. Electricity will definitely and severely punish you for negligence. An indispensable rule for a home master: do not act at random, use the instructions.
No. 1: basic malfunctions in the operation of the machine
If the display does not indicate a malfunction, there are no leaks, smoke, or a burning smell, then usually fixing the problem is simple:
- If your home laundry won't turn on , you first need to check whether the plug is inserted tightly enough into the socket. Sometimes the washing machine may shut down due to power surges. You must also make sure that the operating mode is set correctly on the control panel;
- When water does not enter the tank , it is recommended to press the button responsible for turning the unit on and off again and make sure that the door is closed tightly. Sometimes the fault turns out to be insufficient pressure in the water supply; perhaps the tap was simply turned off or the hose was damaged. The reason may lie in a failure of both the program and the control system. Elimination occurs by repeatedly accessing the “Start / Pause” button;
- If the drain is not working, you first need to check the filter - sometimes it is enough just to clean it.
And the source of the frightening roar can be any object (for example, a coin) that accidentally ends up in the drum.
No. 2: the heating element has failed
This is a fairly common breakdown, although the declared service life of the heating element is 10-15 years. However, numerous washes in very hot and hard water, constant overloading of the tank, and low-grade detergents do an evil job.
Over time, a kind of “coat” of various salts is formed on the heating device - the heating element. It fails due to overheating and cannot be restored. A malfunction of the heater is indicated by a cold hatch when the washing mode is turned on and, naturally, clothes that have not been washed in cold water.
Replacing a damaged part is quite simple: manufacturers have placed the heating element so that it is easy to get to by opening the back cover of the case. The only inconvenience is that the car needs to be disconnected from all communications in order to turn it the right way for repairs.
The heating element is placed under the drum pulley. When disconnecting and replacing the wire board again, you should not forget to be careful.
You will need a minimum of tools: just a flat and figured screwdriver, a wrench with a head. To check the heating element, you will also need a multimeter or tester. The smartest way to buy a new heater is an original Italian one.
- Disconnect the unit from all communications.
- Turn the bolts around the perimeter of the cover.
- Next, under the tank you need to find the contacts of the heating element and attach the multimeter probes to them. Normal resistance is 25-35 Ohms, other indicators indicate a malfunction.
- Next operation: connecting all wires with terminals, recording their positions in memory.
- Then the nut on the bolt is unscrewed, the end of which is located in the center of the heater base.
- In order for the bolt to go into the hole, it should be carefully tapped.
- Push the base of the heating element towards you, picking it up with a flat screwdriver.
- Replace the temperature sensor from the damaged part to a new heating element.
- Clean the seat for the electric heater from any debris that has formed.
- Place the new heating element in its designated place and secure it with a bolt.
Then all that remains is to return the wires to their previous position, close the back cover of the machine and restore the connection to the communications.
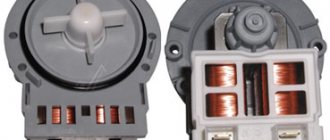
No. 3: there was a problem with the drain
Also a fairly common problem. The pump is the weak point of automatic washing machines. In addition to clogging, when it is enough to clean the hose and filter, the impeller may jam. The washing machine pump is located behind the drain filter, which should be unscrewed and removed.
The impeller blades should be tested for rotation. It should not be too light: in normal condition, the impeller rotates with certain delays due to the magnet in the coil. Sometimes threads, hair, laces and other similar debris wrap around the impeller so much that they even block it. All these interferences must be removed.
It happens that the plastic body turns out to be deformed and begins to pinch the blades. When there is no possibility of replacement, the blades need to be trimmed with a knife by no more than 2 mm, and the washer can still be used.
If after this the operation is not restored, then the breakdown is more significant and requires a detailed inspection - the pump will have to be disassembled. The machine is laid on its side, you twist the screws securing the pump to the body, disconnect the electrical wires and 2 hoses.
The hoses are cleaned if necessary. A tester checks the motor windings to eliminate the possibility of a break. The usual resistance value here is 150-300 Ohms.
Without relying on memory, it is worth noting the orientation of the pump relative to the engine. Then the pump motor is disconnected from the housing, and the rotor is removed from the stator. Often everything inside becomes clogged with dirt, preventing the rotor from rotating. In such cases, thorough rinsing is necessary.
The rotor axis bearing is lubricated with lithol, and the oil seal is adjusted. Subsequent assembly is carried out using sealant to prevent leaks.
If you follow the instructions for caring for your washing machine and clean the drain hose every 6 months, the likelihood of the drain system breaking down will be greatly reduced.
No. 4: the washer’s “heart” failed
Indesit's motor is well designed, reliable and wear-resistant. However, nothing lasts forever, and at one not very wonderful moment, the “heart of the machine” may fail. The reason may be not only wear of the mechanism, but also excessive overload.
- First, the outer panels of the car are removed, usually the top and rear.
- Disconnect the power wires.
- Remove the belt from the pulley.
- Unscrew the fasteners and remove the motor.
After diagnostics, a final decision is made to repair or replace the engine. Usually they lean towards the latter option - it is difficult to restore the engine; it is easier to completely replace it. Installation of the new engine is carried out in the reverse order.
The washing machine immediately starts spinning
A situation may arise that at the very beginning or in the middle of the wash, the machine reaches high speeds and begins to spin .
Such a malfunction can occur either constantly or periodically - not every time the washing machine is used. In a working washing machine, the washing process occurs as follows: after loading the laundry, water is drawn into the tank, which, depending on the washing mode, can be heated. The laundry is cleaned of dirt due to the measured rotation of the drum during washing. To remove excess water at the end of the washing program, the drum turns to high speed - the laundry is pressed tightly against its walls, and the water leaves through the holes in the drum. If you need washing machine repair in Saratov, contact our company. There may be several reasons for such a malfunction.
Faulty tachogenerator
Before carrying out diagnostics, the washing machine must be de-energized. A common reason that a car suddenly picks up speed may be a malfunction of the tachogenerator. This part is designed to regulate the speed of the engine. To determine the cause of the breakdown, it is necessary to disconnect the engine from the tank (the tachogenerator is installed on it) and carefully ring the power circuit, starting from the tachogenerator to the engine connector. The tachogenerator is located near the rear wall of the engine, in a small recess. It is also necessary to visually inspect the part for the presence of burnt or melted parts.
The machine may suddenly reach high speeds due to damage to the magnet , which is one of the constituent elements of the tachogenerator.
The magnet is fixed on one side to the motor shaft, and if it falls out of its seat during operation, this leads to malfunctions of the washing machine. To fix the problem, you need to install it in place. In some cases, during operation, the entire tachogenerator may move away from the motor shaft, resulting in loss of contact. In this case, to eliminate the malfunction, it will be enough to put it in place.
The cause of a malfunction of the tachogenerator may also be a break in one of the wires in the circuit or a weak contact in the engine connector. To eliminate the breakdown, you should carefully check and seal all possible contacts present on the connector and test the wiring.
It is not difficult to replace a failed part; replacement is carried out with the engine removed.
Why didn't the thyristor stay open?
The fact is that the multimeter does not produce a current sufficient to trigger the thyristor at the “holding current”.
We will not be able to check this element. However, the remaining check points indicate that the semiconductor device is working properly. If the polarity is reversed, the test will fail. Thus, we will make sure that there is no reverse breakdown.
Using a multimeter, you can also check the sensitivity of the thyristor. In this case, we switch the tester switch to ohmmeter mode. Measurements are made according to the previously described method. Only we change the sensitivity of the device every time. We start with the limit of measurement of wills.
Sensitive thyristors, when the control current is turned off, remain open, which we record on the device. We increase the measurement limit to “x10”. In this case, the current on the tester probes decreases.
If the transition does not close when the control current is turned off, we continue to increase the measurement limit until the thyristor operates based on the holding current.
When testing parts from the same batch (or with the same characteristics), choose more sensitive elements. Such thyristors have more flexible control options and a correspondingly wider range of applications.
Having mastered the principle of testing a thyristor, it is easy to guess how to test a triac with a multimeter.
Control module failure
If the tachogenerator is working properly, the reason that the machine immediately starts spinning and reaches high speeds may be a breakdown in the control module. Very often, the reason that the machine suddenly starts rotating the drum is not the failure of the entire board, but a specific part of it - the triac. It is designed to receive and process pulses emanating from the tachogenerator and control the motor supply voltage.
Different models of washing machines have different locations of the electronic module. Exact information about its location can be obtained from the user manual for your specific washing machine. Many models provide for the installation of plastic protective covers on the module, which can be divided into two identical halves. To diagnose the triac, the module must be removed. It is worth considering that without proper experience in working with electronics, it is not advisable to interfere with the operation of the control board of the washing machine.
After the module is removed, you need to check the triac for serviceability. So, during diagnostics, the outer contacts and the central one should not close (ring). If the multimeter readings indicate a breakdown, you will need to replace the faulty part to fix the problem. To replace it, you need to unsolder the contacts and solder a working part in its place. It is necessary to take into account when working that the board in washing machines is usually double-sided. After the installation of the part is completed, you should check the operation of the washing machine.
Testing
Each radio amateur has his own ways of testing a triac. To do this, you can use special devices or improvised materials. The main thing is to know how to check the device correctly based on the principle of its operation.
Method No. 1
The easiest way is to test the triac with an ohmmeter. To do this, it is necessary to connect the cathode of the part to the negative contact of the ohmmeter, and the anode to the positive contact. And then short-circuit the anode with the control electrode. On the ohmmeter itself you need to set the unit (x1). If the arrow shows the resistance of the device within 15-50 Ohms, we can assume that the triac is intact and suitable for installation in any radio device.
But there is one important point here. If in this position all contacts are removed from the anode, and the resistance readings do not change, then this confirms the integrity of the part. If the arrow begins to deviate towards zero, then throw the triac in the trash.
Method No. 2
Of course, you can come up with a large number of different devices with which it will not be difficult to test the triac. But for this you will have to put in effort and spend your time on assembly, although for many it will be a pleasure. As an example, we present one of the circuits of such a test device, here it is in the figure below.
The connection diagram for this device to the triac is exactly the same as in the case of testing with an ohmmeter. But this device has an LED (HL1). So, when voltage is applied to the triac through the button (key), the light source should light up. And this indicates the serviceability of the part.
Pay attention to resistors. Their resistance is calculated at the rated voltage. Practice has shown that resistance in the range of 9-12 Ohms is sufficient.