The washing machine must be connected to three networks at once: water supply, sewerage and electricity. Therefore, it is necessary to choose a place for installation so that all three systems are located nearby or there is an opportunity to bring them there. The optimal places to install a washing machine are the bathtub, toilet and kitchen - they have all the necessary communications. Most often they require a little modification, but connecting the washing machine is not very difficult. The connection process itself is simple, you don’t need to do anything super complicated, if you have “direct” ones, you can do everything yourself.
Accommodation options
There are several places where you can put a washing machine:
- toilet;
- bathroom or combined bathroom;
- kitchen;
- corridor.
The most problematic option is the corridor. Usually there are no required communications in the corridor - no sewerage, no water. You will have to “pull” them to the installation site, which is not at all easy. But sometimes this is the only option. In the photo below there are several interesting solutions for how you can place the typewriter in the hallway.
The photo shows an option for installing a washing machine in a narrow corridor
Making something similar to a portal is also a way out
Hide in the nightstand
Integrate into hallway furniture
The toilet has all communications, but in typical high-rise buildings the size of this room is such that it is sometimes difficult to turn around there - there is no space at all. In this case, washing machines are placed above the toilet. To do this, make a shelf so that when sitting on the toilet you do not touch it with your head. It is clear that it must be very durable and reliable, and the machine must have very good shock absorbers. In addition, they must be set perfectly, otherwise they may “jump away” during the spin cycle. In general, with this method of installing a washing machine, it doesn’t hurt to make several strips that will prevent it from falling off the shelf.
The shelf is solid and reliable, but slippery - you need a rubber mat under the legs for shock absorption
Powerful corners are built into the wall; a washing machine is installed on them. The plastic stops were removed from the legs, and holes were drilled in the corners for the remaining screws. The installation is reliable, it is only important that the vibration does not tear the corners out of the wall
Can be closed with vertical blinds
This is already a whole cabinet. The only thing missing is the doors
In the bathroom and combined toilet there is usually not very much space either, but still more than in the toilet. There is a choice here. If you have space, you can place the washing machine next to the sink. You can install a table top on top, which will be a logical conclusion and will also solve the problem of water getting on the body. To make everything look organic, you need to choose a machine of such a height that it fits into the size, and the sink itself is better square - then they will be wall to wall. If there is not enough space, you can slide at least part of the body under the sink.
Place the washing machine next to the sink
Now fashionable countertops in the bathroom can be finished with mosaics
If space allows, just place the machine next to the sink.
There is a more compact way - to place the washing machine under the sink. Only the sink needs a special shape so that the siphon is installed at the back.
To place the washing machine under the sink you need a special sink
One of the sinks under which you can put a washing machine
The next option for installing a washing machine in the bathroom is on the side of the bath - between its side and the wall. Today, case sizes can be narrow, so this option is a reality.
Narrow cases are no longer uncommon
Between the bathtub and toilet The sink should not be smaller than the body
Nobody bothers you to install a sink on top
Just keep in mind that installing such equipment in bathrooms or a combined bathroom is not the best idea. Due to increased humidity, the case begins to rust quickly (tested from my own experience). However, there is usually not a lot of space, although in principle, you can put the car under the washbasin or hang shelves above it. In general, it's up to you.
Another popular place to install a washing machine is in the kitchen. It is built into the kitchen set. Sometimes they close doors, sometimes they don’t. This is at the discretion of the owners. Several interesting photos are in the gallery.
Doors with a cutout for a “porthole”
Place in the kitchen cabinet
The washing machine looks quite organic in the kitchen set
Let's start with preparation
First you need to choose a place that will be ideal to install the structure.
The following factors should be considered when the buyer undertakes installation:
- So that installation and further operation do not cause any problems.
- The floor covering where the device is installed should be as smooth as possible.
- Compliance with the surrounding interior.
- Close proximity to water supply, sewerage and electricity. Then household appliances are connected with less hassle.
Users often argue about where such devices should be located. Some say that the best place to connect will be the kitchen. Others prefer the option with bathrooms.
The bathroom is considered by experts to be the optimal solution, allowing you to spend a minimum of time and effort.
But some city apartments don't have bathtubs large enough. Then the device can be placed under the sink. The main thing is to take care of taking measurements in advance, so as not to miss the dimensions later.
Experts also have their own points of view regarding suitable installation options:
- Bathrooms with tiles and easy access to all communications are standard.
- The kitchen is also an acceptable solution to save available space. But this is the only plus in this case.
- The structure is installed in the hallway only when absolutely necessary. True, here it is no longer possible to do without additional laying of appropriate communications. Connecting to the water supply system will be somewhat problematic.
Dismantling the parts of the old washing machine is the next step after the installation location has been completely thought out. Any master will confirm that this process also plays an important role.
First you need to start removing the following parts of the structure:
- Safety brackets.
- Wooden bars for spreading.
- Transport bolts.
The instructions usually write about how to unlock household appliances.
Removing the shipping bolts
Before connecting the washing machine, you need to unpack it and remove the mounting bolts and replace them with plugs.
The shipping bolts look something like this
This procedure is required immediately after unpacking. If you leave the bolts and turn on the machine, it will break. And this is not a warranty case. The number of bolts varies from manufacturer to manufacturer, but their installation diagram is in the instruction manual, and they are visible on the back wall. Just take a screwdriver and unscrew it, and close the opened hole with a plug.
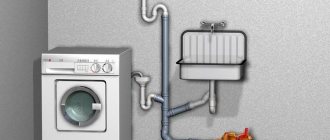
Connection to water supply
First, let’s talk about what kind of water the washing machine is connected to. In general - to the cold. The water is then heated by heating elements as needed. Some owners, in order to save money, connect to hot water. This way, less energy is consumed when washing. But the savings are questionable - more hot water is wasted. If a meter is installed on the hot water supply, then it is cheaper to pay for electricity than for hot water. It is also worth considering that connecting a washing machine to hot water is not very good for laundry: the temperature causes the whites to curl and then not be washed well.
We were talking about ordinary washing machines, but there are models that connect to both hot and cold water. They have not one water inlet on the back wall, but two. In our country they are very rare - there is too little demand, and the prices for such equipment are much higher.
There are washing machines that connect to both hot and cold water
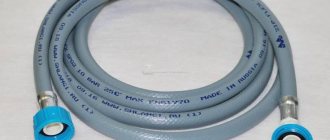
Now about the connection itself. The washing machine comes with a rubber hose, which is used to connect the washing machine to the water. Its length is 70-80 cm, which is not always enough. If necessary, you can buy a longer one in stores that sell plumbing fixtures (3 meters is not the limit, it seems).
This hose is screwed onto the corresponding outlet on the rear wall. There should be a sealing rubber gasket there, so there is no need to wind it up. Tighten the hose union nut (plastic) by hand; if you use wrenches, tighten it only half a turn. Not more.
Screw the inlet hose to a special outlet on the rear wall of the housing
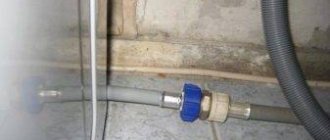
The second end of the hose must be connected to the water supply system. If you have a free outlet somewhere that ends with a tap, great; if not, you need to make a tie-in.
If there is a free drainage of water, connecting the washing machine to the water supply is very simple - install a filter and a hose to it. All
The easiest way with plastic, polypropylene or metal-plastic pipes is to buy a tee (with one transition to metal), solder/install it. If the water supply is connected by a metal pipe, you will have to install the tee by welding.
In any case, a tap is installed after the tee. A simpler and cheaper one is a ball one. When installing it, you can wrap flax tow on the threads and lubricate it with paste.
After the tee, install a ball valve and connect the hose to it
There are also tees with taps for connecting washing machines and other household appliances. The same ball valve is installed in one of the outlets, but everything is done in one housing. It looks more compact, but if the tap malfunctions, you will have to change the entire tee, but it costs a decent amount.
Taps and tees for connecting household appliances
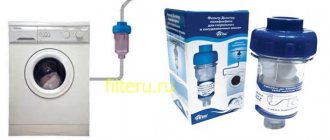
Sometimes it is recommended to install a filter before the tap. Of course, it won’t be superfluous, but if there is a filter at the entrance to the apartment or house, then there is no urgent need for it.
Washing machine device
To understand the technology of connecting a washing machine to a water supply system, you need to imagine its structure. Visible elements of the machines are shown in the photo.
Inside the machine there are modules that carry out the process of washing contaminated clothes.
How does the washing unit work?
The detergent compartment contains washing powder, conditioner, and, if necessary, rinse aid. The drum contains dirty items. The door closes tightly. The required textile processing mode is selected.
The washing cycle begins with the supply of water to the drum loaded with clothes, which enters through an inlet hose connected to the water supply. Its level is monitored by a special sensor - a pressure switch. The electronics of many models allows you to fill in a volume of water corresponding to the number of items placed for washing. The hatch cover is locked before starting work.
Washing clothes is carried out in heated water, using special chemical compounds and mechanical action, which ensures rotation of the drum (in different directions and at different speeds). Its inner surface has ribs, with the help of which the clothes are mixed. The movement of the drum is controlled by a power unit located below and a drive belt. Some models do not use a belt drive; the motor is connected directly to the drum. This allows you to optimize the internal space and reduce noise during operation of the washing machine.
The heating element is responsible for heating the liquid. Its operation is controlled by a thermostat that monitors the water temperature (it is different for different washing modes).
At accelerated drum speeds, the laundry is spun.
When necessary, the water is drained into the sewer. To remove it, a drain pump is installed. To prevent foreign objects that often appear during washing (threads, garbage and small items from clothing pockets) from getting into the pump, there is a filter in front of it.
The brain of the washing machine is the control module. It is he who controls all processes depending on the selected program and controls the operation of the modules (water supply and drainage, heating, drum rotation speed, etc.). The data necessary to determine the cycle mode is transmitted from the control panel. The wash type is specified by the user.
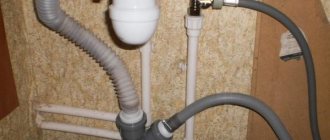
Where to route the drain hose
If there is a sink or sink siphon nearby, there is no problem. You don't even have to redo the sewer system. You will need to buy a special siphon with an outlet for connecting washing machines and other household appliances and install it in place of the old one.
One of the siphons for connecting the washing machine drain to the sewer system
Another option is to connect the washing machine to the sewer directly. To do this you can:
- change the sewer tee that goes to the sink;
- make a separate outlet.
Tee with outlet for connecting the drain of a washing machine
All these methods require alteration of the pipeline, but the connection will be major. There is one point: the diameter of the drain hose is much smaller than the size of the sewer pipes. To ensure tightness and ensure the absence of odors, special rubber cuffs are inserted into the outlets. The hose is simply stuck into them. The elastic edge of the cuff squeezes it, the connection is ready.
There are also temporary connection options. The drain hose is simply lowered into the bathtub, toilet or sink. This method, of course, is very simple, but not the best - the hose may fall, you may forget to put it back in place after turning on the machine, etc. Then the water drains directly onto the floor, and cleaning up the flood is not very pleasant, and even the neighbors below (if any) will definitely not be happy.
Lowering the hose into the toilet is simple, but unreliable
With any method of connecting the drain hose from the machine to the sewer, you must ensure that it does not bend or become looped. The corrugated drain hose is prone to blockages, so you need to ensure the minimum bend radius.
Rules for connecting a washing machine to the sewer
All this data is usually specified in the instructions, but usually the minimum bending radius is 50 cm, the maximum is 85 cm. In order to control the position of the hose, there are special plastic clamps that fit on top of the corrugation and hold it in the desired position.
Collar for fixing corrugations
Sewer connection
This connection scheme is the most reliable and safe. It can be implemented not only in the bathroom, but also in the kitchen, where many today prefer to install washing machines.
The easiest way to organize drainage is if, during the installation of the sewer system, a pipe with an additional branch for the automatic machine was installed. In this case, the following actions will be required:
- purchase a rubber o-ring;
- remove the plug from the sewer pipe branch;
- lubricate the O-ring with silicone and install it in the pipe branch;
- insert the hose of the machine into the hole of the ring (to a depth of no more than 5 cm).
If the pipe below does not have an additional outlet, you will have to build it yourself. For this:
- we purchase a plastic tee;
- dismantle the siphon pipe and the old drain pipe;
- remove the old gasket from the hole formed in the sewer pipe and install a new one;
- insert a tee into the hole;
- we connect the sink and machine drain to the tee (the same as in the previous version - through the seal).
Tee with connected washing machine outlet
Electrical connection
Since the power of the washing machine when the heating elements are turned on is decent, it is advisable to connect a separate power supply line to it from the panel. The circuit is simple - the phase from the input is supplied to the circuit breaker, from it goes to the RCD, then through a wire to the location where the socket is installed.
Connection diagram of the washing machine to the electrical network
All manufacturers emphasize that the outlet must be grounded. Only in this case the factory warranty remains valid.
Now about the denominations. The circuit breaker is selected according to the current required by the device. This figure can be found in your passport, or you can calculate it. It is necessary to divide the power of the washing machine by 220 V, we get the current consumption. For example, your unit has a power of 3.5 kW. We get 3500 W / 220 V = 15.9 A. We take the nearest larger rated circuit breaker. They come in 6 A, 10 A, 16 A, 20 A, 25 A. For our case, a 16 A machine is suitable.
Let's move on to choosing an RCD. In terms of current, it is taken one step higher than the rating of the machine, that is, for the example given it is 32 A. But the RCD has one more characteristic - leakage current. For devices that connect to a dedicated line, the recommended value is 10 mA. So, for a washing machine with a power of 3.5 kW, a 16 A automatic machine, a 32 A RCD, with a leakage current of 10 mA are required.
It would also be nice to calculate the cross-section of the wire. Today, cables with copper conductors are mainly used for wiring. They are more flexible and less heavy. The calculation is made based on power or current consumption, but since the power spread of washing machines is limited, we can immediately say that for devices up to 4.1 kW, a core cross-section of 1.5 square meters is sufficient. mm (copper conductors), up to 5.5 kW - cross-section 2.5 sq. mm.
And the last thing about electrics: about sockets. When choosing an outlet, keep track of more than just the presence of a grounding contact. You also need to look at what voltage the outlet is designed for. Normal products have markings on the back. The maximum operating voltage is indicated there. Sometimes the rated current is set. You know it too (or you can calculate it as described above). If there are no inscriptions, it is better not to risk it. Most likely this is cheap Chinese consumer goods and how it will work is a mystery.
The last stage is setting the level
Connecting the washing machine to the water supply and sewerage system is not all. We need to provide her with normal working conditions. To prevent the washing machine from jumping during the spin cycle, it must be positioned strictly vertically. The position of the body is adjusted using adjustable legs. Take a building level, place it on the lid, change the height of the legs, ensuring that the bubble in the level is strictly in the center.
Check by placing the level parallel to the front part, then move it to the rear wall. Then the procedure is repeated, but the level is applied to the side walls of the case - on one side, then on the other. Once the bubble is strictly in the center in all positions, we can assume that the washing machine is level.
Checking the correct alignment of the washing machine
If there is no level, you can try to level the machine by placing a glass with a rim filled with water on it. The water level is up to the rim. Change the position until the water is exactly along the rim. This method is less accurate, but better than nothing.
There is one more point. Most often, washing machines are placed on a tiled floor, which is slippery and hard. That’s why even a perfectly aligned machine sometimes “jumps”—it’s impossible to dampen the vibration when spinning on a hard floor. To cope with the situation, you can place a rubber mat under the machine. It serves as an excellent shock absorber.
Principle of operation
Siphons for washing machines, sinks and bathtubs operate on the same principle. Due to the special shape, part of the dirty water that drains from the machine is retained in the siphon. It forms a water seal, that is, a hydraulic one. It helps prevent gases from the sewer from penetrating inside the machine.
Moreover, manufacturers even give siphons a spiral shape. This makes it possible to increase the strength of the water barrier with a small device size. You can also find universal models that can be installed on both the sink and the washing device at the same time.
The design of such units is simple and differs only in that the inlet pipe has another outlet. The end can be threaded so that the fastening is carried out with a nut or under a hose. It turns out that it is necessary to change only this area for connecting the washing device. As a result, there is no need to greatly alter anything or change the position of objects in the room.