Household appliances of this type have long become an indispensable attribute for most households. Purchasing and connecting washing machines to sewerage and water supply has long become commonplace and most of us know how it’s done.
However, in this article we will dwell on the issue in detail and analyze all the nuances of connecting to water supply and sewerage, what methods exist, what tools and materials we will need, and how to avoid common mistakes.
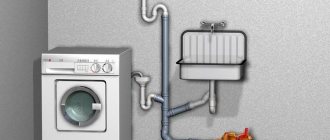
But first, let's briefly learn how to connect a washing machine: the hose for connecting cold water is screwed at one end to the water pipe, and the other to the filler fitting of the machine. The end of the drain hose at a certain height is connected to the sewer system. Below, we will look at all the processes in more detail.
Materials and tools for connecting to water supply and sewerage
The need for certain materials when installing and connecting washing machines to sewerage and water supply is determined, first of all, by the location of the unit and the accessibility of the designated objects. In some cases, it is necessary to incur significantly higher costs in order to subsequently use household appliances conveniently for many years.
If you plan to lay additional branches from the water supply in the groove, you will need a fairly powerful angle grinder with a saw blade for concrete. You can use a hammer and a chisel to break out the concrete.
A pipe without joints is laid in the groove to ensure its long-term operation without leakage. Otherwise, if a leak occurs, restoring the functionality of the pipe will involve a large amount of troubleshooting work.
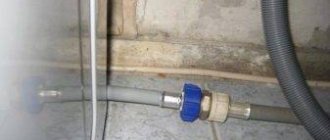
To connect to the water supply network, a tee with a shut-off valve is usually used, and to install it in place, a set of wrenches or a universal adjustable wrench is used. All threaded connections are sealed with tow or FUM tape.
Installing an external pipe involves attaching the pipe to the wall; for this you will need an electric drill and concrete drills. Plastic dowels are installed in the drilled holes, fastening is carried out with screws of the appropriate size.
When installing washing machines, the main requirement is that the top cover is horizontal in relation to the floor. For precise installation of the washing machine, a building level is used; adjustment is made using screw support legs.
To arrange a drain for washing machines into the sewer, you will need a drain adapter with an outlet at an angle of 45 degrees.
To connect washing machines to electricity, you will need a three-core cable with a cross-section of 2.5 square meters in double insulation and a 16-amp diffusion machine with a leakage current of no more than 30 milliamps.
In addition, it is possible to use control equipment - a voltmeter. Let’s take a closer look at how to properly connect the washing machine to the mains below.
What is needed to install a drain hose
To independently connect the SMA Hotpoint Ariston or Samsung drain corrugation to the sewer system, you need to prepare the necessary consumables and tools. So, you will need:
- splitter or “tee” for sewerage;
- “double” or water seal;
- corrugated hose for extension, however, its total length should not exceed 3 m;
- pipes;
- various connectors;
- sealing coupling;
- clamps;
- siphon;
- silicone sealant;
- adapters;
- pliers;
- screwdriver;
- socket and adjustable wrenches;
- perforator and hammer (if the hose is led into the next room).
To better understand the process of connecting a Samsung washing machine, it is recommended to watch a video that shows all the steps in detail.
Attention! All necessary tools, fastenings and consumables are selected based on the complexity of the connection.
Preparing washing household appliances for installation
First of all, when the unit is delivered to the installation site, it needs to be unpacked. Usually the machine is packed in a cardboard box and secured with plastic tape. It needs to be cut and removed.
After this, the cardboard box is carefully removed and the foam pads are removed from the top and sides. Next, you need to lift the car and pull out the lower foam platform.
In this case, it is worth paying attention to its design - if there is no special boss in the middle on which the device drum rests in the transport position, then in this design it is manufactured and installed separately. You need to tilt it and remove this insert.
Please note that the cardboard packaging and foam pads must be retained for the duration of the warranty. If a situation arises in which you need to replace the machine due to its defect, this operation will not take place without packaging. These are the terms of the guarantee.
Inside the cardboard package there is an envelope or folder with technical documentation. It contains:
- A passport for the purchased washing machine indicating the personal unit number and other credentials. All entries in it must be certified by the store’s seal.
- A warranty card, which is certified by the store’s seal indicating the date of sale, since the countdown of the warranty period begins with it.
- Operating instructions, starting from the moment of unpacking, and instructions on the installation procedure.
You should strictly follow all the manufacturer's requirements, since failure to comply with any of them will result in a waiver of warranty obligations.
Connecting a washing machine
The packaging also contains the components of the purchased washing machine. Typically they include:
- Flexible filling hose equipped with plastic union nuts for connection to the machine and water supply;
- drain hose for removing used water after washing and spinning clothes;
- reduction – an intermediate part for connecting the drain hose to the sewer pipe;
- bracket for fixing the drain hose on the wall;
- wrench for removing transportation screws and adjusting the position of household appliances in space before turning them on;
- plugs installed on the holes for transportation screws after they are removed.
These are the main items of the sales kit, which may differ from model to model.
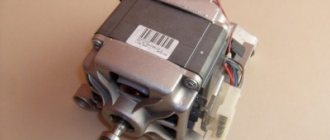
If your washing machine breaks down, you can connect the motor from it to a 220 V network with your own hands.
Removing shipping screws
This is a mandatory operation before connecting washing machines to water supply and sewerage.
Their purpose is to secure the drum during transportation to prevent damage. As noted above, a tool for removing bolts is included in the sales package.
Under no circumstances should the removed screws be thrown away; they will be useful if you need to transport the washing machine to a warranty workshop. The holes where the transport screws were must be closed with the covers included in the sales kit.
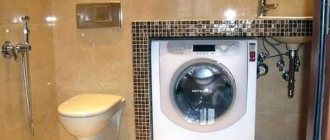
Placement options for washing household appliances
Household appliances of this kind are not purchased spontaneously; the purchase is preceded by careful analysis and preparation. First of all, this applies to the installation location.
The need to drain used water determines the location of washing machines as close as possible to the distribution of the sewer system.
Such points are located either in the bathroom or in the kitchen. There is also a water supply network there.
As for connecting to electricity, washing machines may require a separate power supply line from the input panel to the location where the outlet is installed.
Stage #7 - test activation
Having completed all the work described above, you need to check the correct installation by starting the washing machine one by one to operate in all modes.
The final stage of work is to check all systems of the washing machine. It must be carried out strictly according to the instructions and affect all sides of the connection.
To do this, you need to inspect all the assembled components, and then conduct a test run of the machine without laundry, during which you need to pay attention to the following options:
- the period of time (it should be short) during which the tank is filled;
- no leaks;
- correct functioning of the drain;
- uniform rotation of the drum;
- good spin;
- full heating of water, which occurs 5-7 minutes after the completion of water collection.
At all stages of operation of the unit there should be no extraneous sounds.
You can install and connect to communications yourself not only a washing machine. We suggest that you read the installation instructions for the dishwasher. The step-by-step guide we offer will provide effective assistance in carrying out the work yourself.
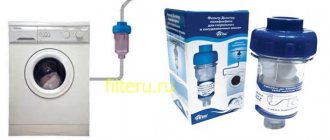
Connecting washing machines to the water supply - several connection methods
Watch the video - the first method of establishing a connection to the water supply
How to install a washing machine, connecting the washing machine to the water supply. Video tutorial Plumber
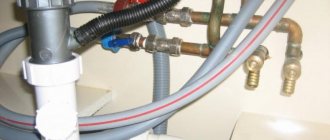
The sales package for such a unit always includes a hose for connecting cold water. Its length is 1.2-1.5 meters and at the ends the hose is equipped with two union nuts made of plastic.
One of the ends is installed on the hose at a right angle. It must be installed on the inlet of the unit. The installation angle prevents the hose from kinking or pinching. Connection is made in the following order:
- Turn off the water supply to the water supply by turning off the tap on the riser.
- Unscrew the flexible cold water line at the sink or sink.
- Install the tee onto the supply pipe in the water supply system so that the side outlet is located conveniently for connecting the washing machine hose.
- Screw the filling hose to the tee. When tightening the plastic nut, do not use a tool, and only tighten the nut until it stops by hand. Tool installation often results in breakage of the flimsy plastic nut.
- Install the flexible mixer hose.
A test supply of water to the system with the washing machine should be carried out with the tap on the crosspiece closed, and only after making sure that there are no leaks can it be opened to check the reliability of the hose connection.
This connection option is used when the installation location of the unit coincides with the location of the sink or sink.
Otherwise, you need to bring the water closer to it. To do this, a tee is inserted into the nearest water pipe.
An additional pipe of the water supply system is extended to the installation site of the washing machine, where it is connected in the manner described above.
Often, filling the household with household appliances occurs gradually; eventually, under the sink or sink, the entire space is filled with tees and a tangle of various hoses.
How to connect a washing machine (review video)
Providing for this possibility, a manifold with several outlets is installed on the embedded pipe. An output that is not currently in use can be closed with a plug and used at the right time.
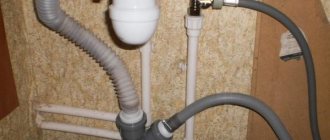
Connection using plumbing equipment
This method differs from others in that the drain is carried out directly into the bathtub or sink. This option is not practical, since the plumbing needs to be washed constantly.
- When the machine drains dirty water, the surface of the sink becomes coated and an unpleasant odor occurs.
- After several washes, the plumbing needs to be treated with special detergents.
- The drain corrugation must be fixed to the tap or wall, and a special semicircular element is used.
- However, when getting rid of water, the machine is running, and at this moment it can break the fastening due to high speeds.
- Therefore, it is necessary to constantly monitor the work so that the drain pipe does not jump off.
This method cannot be used if the dimensions of the washbasin are small, as this will lead to water flowing beyond its limits.
In addition, this causes inconvenience; while the unit is operating, you cannot use the shower or bathtub.
Connecting washing machines to the sewer - consider 2 methods
Watch the video - the first method of installing a drain into the sewer
Washing machine. Drain through non-return valve. Eliminating the siphon effect
Draining used water into the sewer system is a mandatory process in the operation of units of this kind, because the purification of contaminated wastewater is becoming increasingly important.
If we simply talk about organizing the drainage of water from washing machines into the sewer system, we can do without directly connecting these two systems.
It is enough to use a U-shaped bracket from the unit sales kit, which fixes the drain pipe on the edge of the bathtub. At the same time, the issue of the height of the drain into the sewer is resolved, due to which a water plug is formed, preventing the reverse flow of water.
Many modern units include the installation of a check valve that prevents this process.
Considering the specific location of the sewer system in a house or apartment, there are no problems with connection, but it has its own specifics.
Connecting to the sewer directly is used quite often, being the simplest to implement. But this method has its drawbacks.
To implement this, it is necessary to install a spacer to the sewer pipe in the form of a tee, and the outlet should be at an angle of 45 degrees.
The drainage hose is connected to a sewer pipe with a diameter of 50 millimeters, while its size is 22 mm. Therefore, the connection is made using a special spacer called a “reduction”.
The drainage hose of washing machines is standardized on all models and has a diameter of 22 millimeters. There are no special adapters for draining this size; this simple rubber part is used on the transition.
When the machine is located in close proximity to the outlet of a sewer pipe, it is naturally connected to it using a tee.
Do-it-yourself connections of the washing machine to water and sewerage
But if the unit is located at the opposite end of the room, the most reasonable solution would be to lay an additional PVC pipe with a diameter of 32 millimeters and then switch to size 50.
In this case, it is necessary to fulfill the requirements for a slope of this pipe of 2-3 millimeters per meter of length. A reduction with these dimensions is produced and can be purchased on the market.
In some cases, if the machine is automatic, there is no need to use an intermediate pipe, since the used water is pumped out by a pump.
In this case, the connection is made using a rubber reduction. It is a rubber bushing. The outer surface has ribs like a cuff to seal the connection. The inner hole is arranged in the same way with a diameter of the appropriate size.
In the technical documentation, if there is no check valve in the machine model being installed, the height of the drain from the floor at which a water seal is formed must be indicated.
If this parameter is not maintained, very unpleasant odors will penetrate into the room through the drain hole.
The second way to connect washing machines to the drain is to connect through a siphon. Many of these products are available with a special outlet at the top.
When sold, it is equipped with a special plug that covers the pipe. Before connecting the drain hose of the machine, this part must be removed and removed - it has purely protective functions.
The drain hose of the washing machine is simply put on this pipe and, if necessary, additionally secured with a clamp.
This product can be equipped with several taps, which allows the connection of several units at the same time.
If there is such a possibility, connecting washing machines should be done in such a way that is quite reliable and solves all problems of tightness and safety.
How should the drain flexible pipe be positioned correctly?
The height at which it is decided to lay the drain hose is very important, and it, in turn, is determined by the power of the pump that pumps out dirty water. The minimum distance from the floor at which the corrugation can be placed is 550 mm, taking into account that it is connected to a siphon or “tee”. If water will be drained directly into plumbing fixtures, the discharge height should not exceed 1,000 mm. The length of the corrugated pipe recommended by the manufacturer from the machine to the entry into the sewer is about 1,500 mm.
Attention! Incorrect connection of the washing machine will void the right to warranty repair of household appliances.
Connecting washing machines to the electrical network
When making repairs in a bathroom or kitchen, you must provide wiring for connecting a washing machine or other similar equipment. It should be understood that combining water and electricity in one unit makes it a means of increased danger. Therefore, separate wires are pulled to connect them.
Connecting the washing machine drain to the sewer system, what problems and errors occur
Based on the maximum total power possible in such household appliances, you should usually focus on 2.3-3.0 kW.
What you need to connect
The list of materials for creating an autonomous network for connecting household appliances is not extensive and includes:
- Conductor products are selected from copper samples. At the same time, taking into account the place of application, they must be double insulated.
- An emergency shutdown control device that will save household appliances from failure due to voltage surges, and the building from a possible fire. The equipment will not be damaged if moisture gets into the electrical network.
How to connect a washing machine to a Miele three-phase network
To connect washing machines, a 16-amp device with a leakage current of no more than 30 milliamps is used.
- An automatic switch with the same parameters is installed in case of a short circuit and protects the network from damage.
- High security socket with moisture protection.
- Additional materials include common parts for electrical installation - clamps, terminals, junction boxes, cable ducts, etc.
Electrical installation
We draw your attention to the need to follow all the rules in order to ensure your own safety and the safety of your property and home:
- During installation, you must use only professionally designed connection diagrams.
- Do not twist aluminum and copper wires together.
- To carry out wiring, you need to use wires only of the appropriate cross-sectional power.
- Grounding cannot be done by connecting a wire to a water pipe or hot water supply.
- The sockets used must be made on a ceramic base in a waterproof casing.
- It is strictly not recommended to use an extension cord or adapter from a regular outlet to a Euro plug to connect washing machines.
- It is prohibited to connect the ground wire to the neutral wire.
- The connection wire must be laid as a separate line.
After completing the electrical installation, it is recommended to carefully check the entire circuit with a tester to eliminate the possibility of a short circuit.
Connecting the washing machine to water supply, sewerage and electricity.
TYPICAL MISTAKES WHEN CONDUCTING INSTALLATION WORK
Often during repairs, beginners make a number of serious mistakes:
- Poor fixation of connections. Under high loads, unreliable fasteners may become detached, and the entire contents will spill out under pressure. All joints should be tightly secured to avoid such problems.
- Small siphon diameter. If the size of the part is incorrectly calculated, the line may burst under high pressure.
- Excessively long drain hose. The standard pump of the machine will not cope with the pumping function if the length of the hose exceeds 4 meters. It is better to limit yourself to a short tube or think about a different location for the “washer”.
- Small sink size when organizing a drain. With large drain volumes, the small sink will fill up in a short time, and then dirty water will rush over the edge. It is advisable to think over this point and choose a different option for connecting to the sewer.
How to level a washing machine
This operation is final and is performed after it is connected to all communications. If this is not done, the machine will be overloaded during operation, and strong drum vibrations will occur, which will not extend its service life.
The top cover of the unit must be positioned horizontally. To do this you need to perform the following operations:
- Install the washing machine in its permanent location. The distance from the back panel to the wall should be no more than 5 centimeters, otherwise the hoses may be deformed or broken.
- Loosen the locknuts on the machine legs.
- Use a spirit level to determine the direction of rise or fall.
- Adjust the position of the unit by unscrewing or tightening the screws. The tolerance for non-parallelism of the cover in relation to the floor is no more than 2 degrees.
- Having achieved the correct position of the machine body, you need to tighten the locknuts to the body.
- It is important to prevent vibration of the unit, which can occur if there is a gap between the leg and the floor. To do this, you need to try to swing the body in different directions. If necessary, tighten the legs until the same tightening force is achieved.
ALIGNMENT
After introducing the “washer” into the water supply system, it is necessary to ensure maximum stability for the unit. A special mat with an anti-vibration effect is placed under the base of the machine, which dampens vibrations from the operation of the device.
Next, the machine needs to be placed in a perfectly level position. The building level will help with this. A level is placed on top of the unit and by changing the length of the threaded legs, the desired condition is achieved. The deflection angle should not exceed 2 degrees.
First start
To check the functionality of the installed washing machine, it is necessary to carry out a test wash. This is done in the following order:
- Connect the machine to the network.
- Select the desired washing mode and set it on the display.
- Enable work mode. When pouring water into the tank, monitor its filling time in comparison with the passport data. If the machine fills slowly, it is necessary to check the pressure in the water supply and, if necessary, take measures to increase it in accordance with the passport recommendations.
- Check the water heating time for the selected mode.
- When filling the tank with water, check for leaks; if there are any, eliminate the cause and repeat the tests.
The program and rules for conducting a trial run are described in detail in the relevant technical documentation. Recommendations for different models may differ, but these should be used as a guide.
Recommendations from professionals
In a private house, the drain is done directly into the septic tank. In houses where there are many apartments and a common sewer drain, such a supply is simply not feasible, but in rural areas, it is quite practical and convenient.
If you use soap and not powder when washing, then draining is possible anywhere. But Nelya allows water to seep under the foundation.
However, if people live in the house all year round, then the washing machine must be drained in accordance with all rules and regulations.
When working, you must carefully follow the instructions. The fastening points must be securely connected to avoid leaks.
- If a malfunction is identified during the test wash, it must be corrected immediately.
- The gasket is installed in this place and the joint must be securely fastened.
- If everything is done correctly, the equipment will serve its owner for many years.
Since a lot depends on the quality of the connection of the unit to the drain system.