When installing a new washing machine, you need to take care of how to drain the water from it. The best way is to connect the washing machine drain to the sewer. If this is not possible, there are other methods of draining. Each of them has disadvantages and advantages. Regardless of the connection method, the system must be equipped so that it can be used without incident.
Difficulty connecting the washing machine
If the master has experience, he can easily cope with such work. In the absence of experience, care and caution will be required. Before purchasing materials, you need to understand how the drainage system works where you want to install the washing machine. The choice of tools and materials largely depends on the location of the equipment and pipe. You also need to pay attention to what pipes are installed in the house.
Advice! Prepare a diagram in advance with possible connection methods. This will help with calculations and selection of materials.
Types of drain system
There are several ways to install a drain:
- simple: when working, the hose is lowered into the plumbing fixtures (they use not only the sink or bathtub, but also toilets);
- connecting the washing machine to the siphon (it is located under the sink);
- the drain outlet for the washing machine directly into the sewer (through a tee).
The option with a tee is the most practical, but making it yourself is not easy. It’s easier to connect the “washing machine” to the siphon, and even easier - just lower the hose into the bathroom. This is not the best way, but it is used everywhere.
Draining waste into a sink or bathtub
A common method, despite its lack of aesthetics. Moreover, activator washing machines (without automatic mode) initially provide this method of draining used water.
In fact, there is no connection to the sewer system. You just need to purchase a special “U” shaped adapter for the correct orientation of the drain hose.
With this nozzle, you can simply throw the hose over the bathroom wall, or hang it over the sink.
In addition to the aesthetic component (you need to rinse the bathtub after washing), there are a couple of disadvantages:
- During washing, there is a smell of detergent in the room.
- Constant monitoring is necessary: if the hose falls to the floor, you will cause a flood.
Hose outlet to plumbing
Proper connection is a troublesome matter and requires serious plumbing work. Most often, owners of washing machines use a primitive drainage system, without connection to a sewer pipe. Each machine comes with a plastic attachment in the shape of a hook. It is put on the hose from the edge and thrown over the sink or bathtub. This type of water drainage has the following advantages:
- quick installation, no installation skills required;
- no need to mess with the pipeline;
- no special tools or knowledge required.
Sewer connection
This connection scheme is the most reliable and safe. It can be implemented not only in the bathroom, but also in the kitchen, where many today prefer to install washing machines.
The easiest way to organize drainage is if, during the installation of the sewer system, a pipe with an additional branch for the automatic machine was installed. In this case, the following actions will be required:
- purchase a rubber o-ring;
- remove the plug from the sewer pipe branch;
- lubricate the O-ring with silicone and install it in the pipe branch;
- insert the hose of the machine into the hole of the ring (to a depth of no more than 5 cm).
Tools and materials for working with drains
If you decide to do the drain yourself, such work will require careful preparation. It is necessary to take into account the diameter of the sewer pipe and the sizes of the hoses that are included in the kit. If they are too short, they are replaced with others. When connecting the drain from the washing machine to the sewer directly, you will need adapters. The type of adapter is selected in accordance with the pipe material. You also need to consider the type of drain connection in the room.
Tools and materials you will need:
- rubber gaskets;
- clamps;
- several fittings;
- valve - “return”;
- new siphon;
- drain adapter for washing machine;
- adjustable wrench and other wrenches;
- pipe cutter or grinder;
- tee for draining the washing machine.
Using a grinder or pipe cutter requires special skills and compliance with safety precautions. You cannot take on such an instrument without preparation.
Simple designs
Simple products have a primitive and understandable design. These are plastic or brass elements that have one inlet and outlet, but the thread diameter may differ from different sides. They are used for an inlet hose or under a drain, especially in cases where it is necessary to increase the length of the hose.
What types of water adapters are there:
- Plastic with external thread 3/4 or 1/2. To be more precise, the part is made of polyethylene. It is inexpensive and perfectly holds together drain and fill elements.
- Brass fittings or fittings for water supply. Brass parts have rightfully earned the role of durable and reliable pipe connectors. They are easy to process and have both internal and external threads. Everything you need to do to attach the hose and screw the structure into the pipe section.
Connecting the siphon to the drain hose
You will need to buy a special siphon and install it under the sink. The height of its location should be such that there is no reverse flow of water. You need to know the length of the drain hose in advance: often its deficiency is discovered during the work process. The instructions for each washing machine always indicate how long the hose should be.
The work is carried out in several stages:
- the drain hose is connected to the siphon using a pipe located on it;
- a coupling is used to hermetically seal the junction of the tube and the pipe so that bad odors from the drain do not penetrate into the room.
Using this scheme helps to avoid leaks. The rubber cuff that comes with each siphon reliably connects the hose to the drain. Dirty water goes into the sewer through a siphon, and you can use the plumbing at any time.
The siphon must be installed strictly vertically so as not to cause leaks. The minimum height of the hose during installation should be 60 cm. First, it is raised to this height and then lowered to the drainage point. Since the tube is flexible, it is not difficult to move it into the desired position. Only in this way can you properly connect the drain for the washing machine so that problems do not arise later. On the top of the washing machine body there is a fastening point to which the tube is attached.
Installing a new siphon is impossible without completely replacing the old one. The old siphon does not have a pipe for connecting hoses. After connecting, you need to check the locations of all connections, open the tap and check the tightness of the assembly. If there are no leaks, all that remains is to connect the tube. For this, a flexible cuff is used. If it is not there, an adapter secured with a metal clamp will do.
The tightness of connections is the main factor that allows you to avoid leaks and floods. However, among professional installers there are specialists who do not recommend tightening the connections to capacity. If there is no air in the pipe, a vacuum space appears, which sucks part of the dirty waste back. This can cause a water blockage followed by a breakthrough outside. Experts recommend leaving a small gap that will allow air to penetrate and prevent dirty water from flowing in the opposite direction.
Information! The disadvantage of a siphon is that gurgling sounds will constantly be heard in the drain. This irritates many people.
There is a special type of siphon that is designed for installation inside a wall. On one side, the system is installed outside (a drain hose is connected to it). Its other side is connected to the sewer drain. This is convenient and tempting from an aesthetic point of view, but if the connection elements are damaged, you will have to disassemble the wall. It is better if access to the siphon is quick and easy.
Two methods
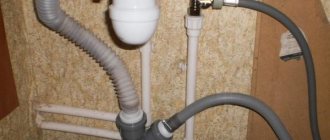
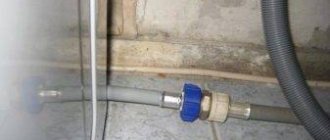
The sewer hose for the washing machine can be fixed to the bathroom
There is another, third way, which you see in the photo above. But this is no longer a connection, but simply fixing the hose with a U-shaped adapter over the side of the bathroom. This U-shaped fitting is included in the kit for every automatic washing machine.
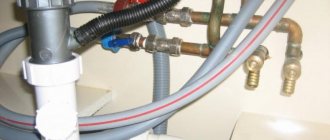
Method one
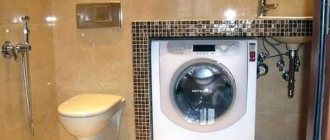
The blue arrow indicates the location of the connection of the drain hose from the washing machine.
It is not for nothing that I focus your attention on the automatic machine, since there the water is drained forcibly. Therefore, all the instructions below apply specifically to this type of washing machine:
- on the plumbing market there are currently on sale siphons for sinks, sinks and bathtubs with an additional outlet for connecting a hose 22 mm in diameter;
- we can say that there are much more such siphons (with an additional outlet) offered than conventional ones;
- If you install such a siphon, but for some reason you will not connect the washing machine, then the output can be closed with the plug included in the kit.
How to connect a machine without a siphon
There is a simple way to connect a washing machine to the sewer without a siphon. The hose is connected directly to the pipe by installing a tee on it. A tube is connected to the tee. If necessary, an additional plastic pipe is connected to the “washing machine”, which connects it to the drainage system.
The diagram looks like this:
- the hose is lowered into the sewer pipe;
- fix it to the pipe;
- carry out sealing.
In this case, sealing is mandatory to prevent odors from penetrating into the room. The correct connection of the drain hose looks like this. It is bent in the shape of the letter S - to isolate the machine from the sewer when the drain pump is turned off. If you leave the tube in a straight position, odors from the sewer will permeate your clean laundry. To avoid dirty water from washing being sucked in the opposite direction, you need to install a check valve. The “return” is called an anti-siphon and is always used when professionally installing drains for washing machines.
Adapters, which are used when connecting the drain hose of a washing machine to sewer drains, not only seal the space. They block unpleasant odors from entering the bathroom or kitchen.
Connecting the washing machine drain directly to the sewer is the right solution. As already noted, it requires effort, time and skill. If the pipe has a special branch for draining the washing machine, this makes the task easier. You will need a rubber o-ring. The drain branch is closed with a plug. They pull it out, lubricate the rubber seal with silicone sealant and insert it into the hole in the pipe. After installing the ring, you need to connect the washing machine drain hose to it. Insert it carefully, no more than 50 mm deep.
Complex adapter ¾
This name refers to transition elements for three or more outlet holes with the same number of threads. At the same time, complex devices are often equipped with valves, filters, flaps and other devices that allow additional tasks to be performed during connection:
- Tee through passage with valve for washing device. The most popular option, used quite often by specialists. With its help, the water intake hose is connected to the water through the existing mixer;
- corner type adapter with water tap. They are used to connect washing equipment in places where the hose should only be positioned at an angle. This adapter is not used for sewer drainage, but it is used to make a reliable and aesthetic connection of the filling hose to the water supply;
- triple adapter made of plastic material for the drain hose of the washing unit. The element is quite unusual; it is used to ensure the drainage of liquid into the sewer system. A drain hose is connected through one of its outputs, the second is connected to a siphon, and another (thin) one is designed to drain condensate that accumulates when drying things (if the washing machine has such a function);
- The branching adapter is designed to simultaneously connect a pair of water intake hoses. The peculiarity is that two water consumers are connected to one pipe at once. This adapter option is not used for draining water from the washing machine.
Connection to sewerage without branch
If there is no “branch” in the pipe, do not despair and think that you are doomed to constantly drain dirty water into snow-white plumbing. The store has special plastic tees. The tee always has the necessary “branch” for the washing machine. The tee is inserted like this:
- unscrew the siphon pipe;
- take out the old pipe"
- change the old rubber gasket;
- install a new tee in place of the old pipe;
- the siphon drain is put in its original place;
- The drain for the “washing machine” is cut into the sewer system (through a rubber ring).
When working with a direct connection, there are several nuances to consider. Much depends on the condition of the pipeline and the place where you plan to install the washing machine. The standard diameter of the drain hose for all automatic machines is 22 mm. If you need to make a branch into a system with a pipe diameter of 32 or 50 mm, you cannot buy standard sockets for them in any store. For this purpose, a rubber reduction is used. The rubber reduction has a transition to 22 mm, it is sealed and easy to install.
Tapping through a tee is the best solution if the pipeline is located next to the washing machine. If it is located far from the sewer drain, you will need a plastic pipe with a diameter of 32 mm, with a connection to the drainage system. There is no need to slope the pipe, because the water will drain forcibly under the pressure of the pump. To connect two pipes (32 and 55mm), you will also need a rubber reduction.
The pressure switch is broken - water level sensor
The pressure switch is a very important element of an automatic washing machine. It detects the amount of water in the washing tub and commands the inlet valve to supply water. If an incorrect command is received from the sensor, the electronics considers that there is not enough water in the machine and gives the command to fill the washing tank.
The pressure switch may fail due to the following:
- the rubber membrane has lost its tightness. It should be taken into account that all rubber parts gradually lose their performance properties during operation and require replacement;
- The sensor contacts have oxidized. They should be cleaned or replaced;
- sensor fill tube is clogged. This tube becomes clogged due to scale, small debris present in the water. As a result, the sensor provides deliberately false information about the amount of water in the drum. In this case, it must be replaced. It should be noted that the pressure switch is not a very expensive part, so if problems arise with it, it is easier to put a new one in the car than to repair the old one.
Drainage equipment for a summer house or private home
At dachas or in private houses there may be no sewerage. The only way out is to drain the dirty water outside - through a window, into a large barrel or water tank. If the hose is long, it should not be placed on the floor, otherwise water will stagnate in it. The tube will have to be placed at an angle, otherwise the liquid will constantly return to the drum, slowing down the operation of the “washer” and wearing out its internal elements.
The amount of water in the tank must be constantly monitored. It’s good if the barrel is installed outside. The water will go into the ground without flooding the floor. If the barrel is installed indoors, you will have to constantly monitor its filling. You also need to pay attention to water pressure. At low pressure, a small pumping station will be needed.
Important! Low fluid pressure leads to premature failure of the machine.
Washing tub leaking
The tank may begin to leak due to a crack that has formed in it. This happens when users forget to check their pockets before washing. Various small metal parts from them - tokens, coins - can get into the small space between the tank and the drum, which leads to cracks in the walls of the tank, loss of tight connections, and damage to the pump body.
The second reason for the leak may be that the gasket between the two halves of the washing tub has dried out. If the car has a solid tank, then this will not happen. A tank leak will be immediately noticeable by puddles on the floor. The control unit will send a constant signal to supply water, since it will continuously flow out of the leaky tank and this will not allow the machine to operate normally. A leaky tank must be replaced. It cannot be welded or soldered due to the material it is made from.
Useful little things and tricks
Diverting a hose into a sewer drain is not an easy task for a home handyman. Do not leave the hose on the floor. You need at least a minimal inclination so that the water does not stagnate inside the tube. In addition, the pipe can be chewed by pets. Remember about the hook on the back of the washing machine, on which you can always hook the hose so that it is in a comfortable and safe position.
The edge of the drain pipe must be located above the floor at a minimum height of 50 cm. If you have a check valve, the height may be lower, but if you do not have one, this requirement must be observed. Some modern machines include a return line. When it is not there, it is better to buy it separately and connect the washing machine to the sewer so that the water drainage system works properly. You should not save on the “little things” on which the proper operation of the drainage system depends. The average return cost is from 60 to 100 rubles. Nowadays there are different types of valves. Experienced craftsmen advise buying a “return” with a ball-shaped lock.
There are times when a technician inserts a drain hose into the place where the old unit used to be. The drain of the old washer works properly, but problems arise with the new one. It is in such cases that check valves are installed so that problems do not arise later.
Any person who has the knowledge, skills and tools to do this can do this work. The efficiency of water drainage and the correct operation of the “washer” depend on the correct approach to installing the system.
How do you like the article?
Connection height
If the product is too short, there is an option to lengthen it. However, experts are against such a measure, because a drain assembled from two parts cannot withstand high loads for a long time
It is also necessary to pay attention to the material used to make the pipe and other elements of the drainage system.
It is important to fix the end of the drain device with an overlap, and you need to keep track of where it is located. It is important that it does not come into contact with water
A cuff is used for this.
When installing a washing machine without a water conduit, the location of the pipe should not be lower than 50 cm, otherwise the room will inevitably be filled with unpleasant odors and gurgling sounds will appear, similar to the sounds when the outlet is through the water conduit. It is desirable to have a check valve; you will also need a special coupling for sealing.