How to remove the lid on modern washing machines
To remove the lid from the washing machine, you first need to move it away from the wall so that you can access the back wall of the washer. This is due to the fact that the cover mounting bolts are located at the back; we will need to unscrew them. If you have a washing machine installed under the sink, then the matter becomes a little more complicated, because it will have to be pulled out from there.
On different models of washing machines, the number of screws may vary, 2-3, but most often there are two. Use a Phillips screwdriver to unscrew them.
, rotate them counterclockwise until they are completely unscrewed.
There may be plastic washers under the screws, so be careful that they do not fall out or get lost.
After the lid is unscrewed, it must be removed; to do this, you need to move the lid back relative to the washing machine.
, then lift it up and put it to the side.
The cover is installed in the reverse order, i.e. first you get it into the grooves, push it into place, and only after that tighten the bolts.
If you have removed the side cover from a regular personal computer, you probably already realized that it is attached there in a similar way.
C. button to lower the drying temperature, Door
Page 10
- Image
- Text
R. Spin off button
G
Press this button if you do not need to spin the laundry, e.g.
when you just want to hang the laundry so that the water can easily drain from it.
Attention!
When the spin stop button is pressed, the drying time selection knob
should be in the "O" position.
C. Button for decreasing the drying temperature
Pressing this button lowers the drying temperature. It should be pressed
if delicate fabrics are being dried (on the label (2)
).
Door
The car door has a locking device that prevents access
into the drum while the machine is running and does not allow you to turn on the machine with
open door.
The car door can be opened approximately one to two minutes after
the end of the washing program or turning off the machine.
Don't try this before.
This limitation does not apply to the drying cycle, during which the machine
can be opened at any time.
Comments
Why not dry
Danis 01/26/2021 19:34 GMT
Select → I found the instructions for my washing machine here! #manualza
- Click →
- You will be engaged in fraud. - But i can not. “It’s all written there in the instructions for the ointment for hemorrhoids, patient.”
Manualza!manualza.ru
Still not with us?
Other options for attaching the top cover to washing machines
On some washing machines, for example, the Ardo brand, the top cover is removed differently.
In order to remove it on such a washing machine, you will need, as in the method above, to first unscrew the rear mounting bolts. But then you need to act differently.
After the screws are removed, you need to lift the back of the cover up. Lifting it, move the cover forward, relative to the washing machine. The lid will only move forward at a certain angle, so you will need to "catch" it.
Another option for attaching the lid to old Bosh and Siemens washing machines
past generations. Nowadays you won’t see such fastenings anymore, but if suddenly you have just such an old washing machine, then the instructions will be useful to you. The fastening bolts, in this case, are located on the sides of the top cover from its front side. In order to get to them, you must first remove the plugs. After this, unscrew the bolts.
To remove the cover, lift it up and pull it forward relative to the washing machine. The cover will detach only if a certain angle is observed, which you will need to “catch”.
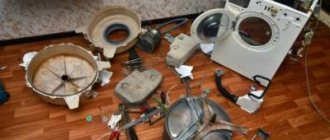
A washing machine is an important appliance that must be in good condition. Washing linen and clothes occupies one of the important places in the normal life of every person. Therefore, when this device fails, many difficulties arise. But you shouldn’t immediately take the device to a repair shop; sometimes repairing modern models of lg, Samsung, Zanussi, Indesit washing machines can cost a decent amount. Therefore, in order to avoid troubles, you can learn how to disassemble a washing machine, and the instructions for this process will help you do this without much difficulty.
How to save the situation
If you need to remove something from the drum or you have set the wrong mode by mistake, you need to know how to cancel a program on your washing machine. Follow the general recommendations.
First option. In many SM models, the “Start” key also performs the “Pause” function. Press the button once to stop operation. After waiting a bit for the door lock to unlock, you can add laundry or pull out a forgotten item.
Second option. A complete reset of the washing machine program is also performed by pressing the “Start” or “Pause” key. In this case, you need to hold the button for 5 seconds. This way you can reset the error on your Bosch washing machine. Depending on the settings of the washer, you will get the following result:
- The water drained and the door unlocked.
- The water did not drain, but the lock still unlocked.
Sudden power outage
It happens that the power goes out while the washing machine is running. Or the users themselves solved the problem of how to clear the errors and stop the machine by disconnecting from the network. This approach is unacceptable, as is turning off the voltage supply in principle. Modern models are equipped with a memory that allows you to resume settings after power is supplied. But earlier washing machines do not have such a function - if you do not want to get problems with the electronic module, use other ways to stop SMA.
Individual approach
There are certain car models in which the manufacturer has provided special methods for emergency stopping. Let's look at how to reset the program on an Indesit washing machine. Depending on the selected model, the pause or program stop button may be indicated by a diamond. Hence, hold the key for a few seconds.
Another option is to turn the mode selection switch to its original position. If there is still water in the drum, turn on the spin or drain mode.
How to reset program settings on a LG, Samsung, Ariston washing machine? Earlier models were equipped with a mode selection toggle switch, and they did not have the “Start” and “Stop” buttons. To start resetting the washing machine program, return the toggle switch to its original position.
Then follow these steps:
- Hold the On/Off key for five seconds.
- After 30 seconds, start the washing machine again using the desired program.
The recommendations mainly apply to washing machines of earlier years of production. In modern SM models, when you press the “Program Reset” button, the water drains automatically.
SMA is frozen
How to reset the program when the system is frozen and the keys do not respond to pressing? A reboot will help. To do this, unplug the machine for 15-20 minutes. Now connect and try running the program again.
Now you know how to restart the machine. If you need to return the washing machine to factory settings, you may need the help of a technician because there will be work to be done on electronics. But such situations arise infrequently, so first try restarting the washing machine to cope with the critical situation yourself.
Source
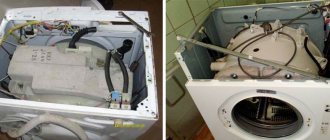
Washing machine device
Before disassembling washing equipment, regardless of its type, be it a Samsung machine, LG or an ordinary baby, it is worth considering the standard structure of this device. After all, correct disassembly often depends on knowledge of the structure of this device. Standard device for all Samsung, Indesit, baby and other washing machines:
- There are panels in the washing appliance. They can be rear, front, base type, top;
- the presence of a tray for pouring or pouring detergent (gel, powder);
- It is mandatory, especially in automatic or semi-automatic models, to have a programmer panel;
- all models have a drum with couplings and a tank;
- the presence of weights for the tank;
- engine;
- springs;
- water pump;
- pressure switch
Basically, all models of washing machines - lg, Samsung, Indesit, Zanussi - consist of precisely these devices.
Disassembly diagram
Malfunctions of the refrigerator Indesit C132G
Freestanding refrigerator with electromechanical control. Manual defrosting is used for the freezer and drip defrosting for the refrigerator. The compact device is 167 cm high and has a volume of 241 liters.
The main malfunction of the Indesit refrigerator is that when the refrigerator compartment does not maintain the temperature, the lower cabinet does not freeze. There are several reasons, the main ones include:
- malfunction of the thermostat in the upper chamber and the thermostat in the lower chamber;
- absence or lack of freon due to a leak in the circuit or damage to the evaporators;
- plugs in the capillary system;
- failure of the motor-compressor or start relay.
But first of all, when you detect melted food, you need to check whether there is voltage in the power line and whether the power-on indicator on the refrigerator is on.
Preparatory work
The procedure for carrying out the work process for disassembling washing machines of any Lg, Samsung models directly depends on the type of laundry loading - frontal or vertical type. Sometimes it is enough to simply remove the rear panel of the car, as a result, this will provide access to components that in most cases fail. For example, heating elements or various drum elements with a high risk of wear. Many experts recommend that before you start disassembling Samsung or Indesit washing machines, you should still familiarize yourself with the electrical circuit and the design of these devices. And regardless of the type of this device - automatic, semi-automatic, small and models (Samsung, Zanussi. Indesit), the device has similarities. After this, you can begin to disassemble and repair this device yourself.
Before you start disassembling the washing machine, you need to do the following:
- first of all, you need to carefully read the instructions and study its rules;
- Next, you should select and prepare the necessary equipment for the work;
- it is necessary to disconnect the machine from the power supply and water supply system, and you also need to disconnect the drain hose from the outlet to the sewer.
Then we prepare the necessary tools and equipment to disassemble the washing machine:
- service type hook;
- wrenches 8, 9 and 19;
- flat screwdriver;
- a screwdriver with a cross-shaped end;
- pliers, wire cutters that will be used for self-clamping clamps;
- ordinary wire cutters;
- insulated pliers;
- long bent pliers.
Tools
When disassembling the washing machine, keep in mind that most of the parts and elements of the washing device are made of plastic material, so disassemble these parts with extreme caution and very carefully so as not to cause harm or break these elements.
List of required tools
- First, prepare the necessary tools. Everyone has most of them in their home; if one of them is missing, they turn to neighbors for help or go to the store.
- Then a well-lit, spacious place is prepared, the floor is covered with rags or paper so as not to lose small parts and bolts.
For disassembly you will need:
- a screwdriver with a set of bits or a set of Phillips screwdrivers;
- wrench;
- flat screwdriver;
- hexagonal wrench 8 mm;
- multimeter;
- pliers, pliers;
- hammer;
- colored markers;
- transparent sealant;
- CV joint lubricants, VD-40;
- clean rags.
When cutting a tank, a fine-toothed hacksaw, a drill with a long drill bit, bolts or self-tapping screws, and a sealant gun will be useful. It is advisable to stock up on tools in advance.
Disassembling the washing machine
Before you start disassembling the washing machine, you should find out what loading method the equipment has. Modern equipment for washing clothes is available with two types of loading - frontal and vertical. Basically, all automatic and semi-automatic washing machines have front loading, and other devices have vertical loading. To ensure that the parsing process does not cause problems, it is worth considering the parsing scheme for each type separately.
Front loading
The front loading type is typical for automatic and semi-automatic machine models from Zanussi, Samsung, Lg. The disassembly procedure of different manufacturers of these devices has its own characteristics. But there are still general principles that are the same for almost all manufacturers of washing appliances:
- The first step is to remove the top panel. To do this, use a Phillips screwdriver to unscrew the fasteners, and after that you should carefully pull the cover towards you and carefully remove it. Everything must be done with extreme caution so as not to break them;
- release of the dispenser recess intended for powder or bleach. To release the distributor recess, you need to press your finger on a special area, which is located in the central part of the tray. Then the container is quickly and easily removed;
- dismantling the control unit. First you need to unscrew the screws of the upper compartment of the front panel; with extreme care, turn the unit 90 degrees, then carefully remove it from the fastening mechanisms. Using a service type hook, the panel is secured to the side of the washing appliance. Sometimes you can disconnect connectors that have wires. To do this, you just need to remove them from special slots in the control unit;
- you need to remove the service panel, which is located at the bottom of the front of the washing appliance. To do this, unscrew the screws that come out on the sides, then remove the panel; to do this, carefully pry it off with a flat-end screwdriver;
- Next, the cuff made of rubber base is separated from the panel located in the central part. To do this, use a screwdriver to pry up the clamp, then it is released from the grooves;
- After separating the cuff from the central panel, it is necessary to remove the counterweights. In all models of Lg and Samsung machines, these elements can be located either in the front or in the back. In appearance they look like blocks made of concrete base. These elements are designed to ensure that the washing device does not produce strong vibrations during washing, spinning, or other modes. These parts are usually attached using long bolts. The bolts should be unscrewed and the counterweights removed;
- then the element for heating the heating element is removed. In many Lg, Indesit, Samsung washing machines, this element is located on the back side at the bottom of the tank. First of all, you need to unscrew the fixing nut. This nut is in the middle. After this, you need to press on the pin, with the help of which the nut itself was twisted. This pin needs to be pressed inward. If it is difficult to do by hand, you can lightly tap it with a hammer. The heating element must be pryed off with a flat-tipped screwdriver and this element must be carefully removed;
- After this you need to remove the drive belt. This element is stretched from the washing appliance motor to a pulley that is attached to the tank. In addition, you should remove all wires located in the tank and motor. The fixing elements of the tank must be removed and the tank itself must be removed;
- Next, the central panel is removed. First you need to unscrew the 4 screws that hold and attach this element to the body. Then the panel is dismantled;
- after this the hatch locking connector is disconnected;
The wires need to be disconnected from the engine
- If necessary, the rear panel can be removed. To do this, unscrew special fastening screws, a coupling bolt.
And here is the assembly of a washing machine of Lg, Samsung models. Indesit. Zanussi and other models are done in reverse order.
But assembly should be done with special responsibility; all elements and wires must be in their places. Any inaccurate movement or incorrect installation can lead to breakdown and complete failure of the washing device. Therefore, when disassembling the washing machine, you need to remember the exact location of each element. Fortunately, all models of washing machines (Samsung, Indesit and others) have the same arrangement of elements.
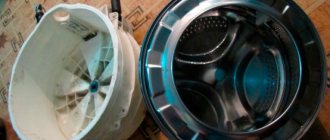
Top loading
Usually, a baby washing machine, model from Zanussi, has a vertical loading. Disassembling devices with this type of loading has certain difficulties. The fact is that devices of this type have many malfunctions, problems, which include the most common:
- corrosion damage to the metal base block;
- spontaneous opening of the drum;
- rapid imbalance of the drum during the washing period.
But there is a main problem with these washing appliances, which occurs most often - bearing failure. And in order to make repairs when this malfunction occurs, you need to disassemble the washing machine.
First of all, disassembling a washing appliance with a vertical type of loading of laundry begins with dismantling the control panels:
- from the side, the screws intended for fixation are unscrewed;
- then the block is moved towards you;
- then the wires are disconnected;
- After this, the panel itself is removed.
Removing the control panel
After this, the disassembly scheme for the washing appliance follows the same principle as disassembling a washing machine with a front-loading type of laundry:
- the dispenser or tray intended for filling or pouring detergents is removed;
- then the top and side panels are dismantled;
Removing the front panel
- After this, the drum is released. To do this, remove the clamp using a flat-end screwdriver;
- Next you need to remove the plastic casing that covers the tank. This element must be removed with extreme caution, because the material from which it is made is quite fragile and any incorrect or sudden movement can lead to breakage of the coating;
- It is imperative to remember the location of each wire and internal element, so that during subsequent assembly it can be assembled in the same form as it was. Otherwise, after assembly, the washing machine may simply not work. But this is the least that can happen. Sometimes incorrect assembly can cause a short circuit, which subsequently leads to a complete malfunction of the equipment.
Removing the board with wires
The places where the cables are connected should be remembered.
Removing the water fill valve
Disassembling a washing machine is a rather labor-intensive process that should be approached with special responsibility. Since the washing machine models Lg, Samsung, Indesit, Zanussi have almost the same device, the disassembly principle is no different. The only thing that needs to be taken into account is that devices with a vertical loading method, such as the baby, have some differences from devices with a front-loading type. The main thing is to remember during the dismantling process the exact location of all the parts so that during the subsequent assembly process everything can be installed in the right order in the washing machine.
In Western Europe, no one would even think of fixing a broken washing machine. Equipment that has become faulty will simply be thrown away and a new one will be bought in its place. But we have a completely different mentality and attitude towards things. Therefore, the owner will not throw away a broken washing machine, but will repair it in a special service center or independently.
Hatch locking device
When starting to check, it is important to understand what type of lock is installed in your model of automatic washing machine (WMA). In older SM releases, manufacturers installed blockers with an electromagnet. However, they were ineffective without electricity
If the electricity was turned off during washing, the hatch automatically unlocked
However, they were ineffective without electricity. If the electricity was turned off during washing, the hatch automatically unlocked.
Another thing is the hatch door lock based on bimetallic plates. They are used everywhere due to their efficient operation.
The structure consists of three main elements:
- thermoelement;
- bimetallic plate;
- fixing device.
How does UBL work? Everything is tied to electronics. The electronic board supplies current to the thermocouple, which heats up quickly. This, in turn, is applied to the plate, which, increasing in size, pushes out the latch. Typically, when you start a cycle, you will hear a click, which means the door is locked and ready to draw water.
The principle of operation of the lock has been disassembled. Now let's talk about its problems: for what reasons does a breakdown occur?
Reasons for the malfunction of the lock in the washing machine
There are two main causes of breakdowns: physical wear and tear and electronic problems.
- Constant deformation of the plates when heated leads to damage and destruction of the element. In such cases, fixation does not work at all.
- Power surges in the network can lead to breakdown of the thermoelement. Then it does not heat up, therefore, the plate remains in place. The short circuit of the control triac results in the door not opening. Current is continuously supplied to the parts, so the latch does not turn off.
What should I do if there is a problem? Check the lock of the washing machine and replace it if it is faulty.
How to check the UBL of a washing machine with a tester?
The first thing that catches your eye when a breakdown occurs is the abnormal operation of the equipment. Here are the signs that indicate problems with UBL:
- The hatch does not open even several hours after the wash is finished.
- A code was displayed on the display of the washing machine, which indicates a problem with the blocker.
- The door will not unlock even after disconnecting the appliance from the power supply.
- During startup, the lock does not work and the hatch does not close.
Most often, either the element itself or its wiring and control module fail. A multimeter will help you accurately determine the cause of the breakdown.
To perform diagnostics, you will need the electrical diagram of the device. It may be different for each model, because manufacturers arrange the contacts differently.
What you need to find out:
- Where is the “neutral” contact located?
- Where is "general" located?
- Where is the “phase” located?
Prepare a multimeter and adjust it to measure resistance. You can get to the lock the same way in all front models:
- Open the door.
- Unscrew the two mounting bolts.
- Bend down the sealing collar.
- Place your hand behind your body.
- Get the UBL.
- Disconnect the wiring.
Now place one tester probe on the neutral contact and the other on the phase contact. Three-digit values are considered normal.
Next, place one probe against the neutral contact, and the other against the common one. The device is considered broken if the values are 1 or 0.
The tester did not find a fault, but the lock does not work? Inspect the lock itself; perhaps the reason is the wear of the bimetallic element. The lock cannot be repaired; it must be replaced immediately. Buy an identical part from the store, connect the wires and install it in its original place. Watch the video for details:
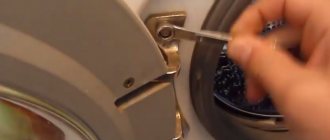
How to perform diagnostics if the sunroof is blocked? There is an easy way to open it:
- Take a thin ribbon.
- Pass it between the door and the SMA body.
- Pull firmly on both ends.
- The latch should give way.
Lastly, the control board is inspected. Its triacs often suffer from oxidation and burns. The reason for this is unstable voltage in the network and high humidity in the room. It is better to entrust module repair to a specialist.
To maintain the functionality of the washing machine electronics, connect the equipment through a voltage stabilizer. Before starting repairs, unplug the plug from the outlet.
Bad7
Interesting18
Super
The operating principle of automatic washing machines and the main types of breakdowns
There is nothing difficult about DIY repairs. The main thing is to first familiarize yourself with the structure of the product in order to understand how to disassemble a washing machine of a certain brand.
All automatic washing machines have the same principle of operation, only the number of possible washing modes differs. Its classic (basic) process for all automatic washing machines is as follows:
- Opening the valve, supplying the required amount of water to the machine drum, closing the valve.
- Turn on the element for heating water and start rotating the drum in different directions at low speed.
- Pumping dirty water from the drum and filling it with new water.
- Rinse at low speeds and pump out water from the drum.
- Turn on high speed and spin clothes.
For a complete repair, you need to know not only how to disassemble a washing machine, but also navigate the possible causes of its breakdown. Their main types include the following:
- increased vibration;
- loud noise during spinning;
- breakdown of the heating element;
- the drum does not spin;
- Water does not fill into the drum of the washing machine;
- washing programs switch independently;
- The machine does not drain the water after washing;
- The door remains locked after the wash is completed.
Most of the breakdowns described above can be dealt with on your own, although it will take much longer than repairs at a service center. But at the same time, independent repairs will save the family budget.
So, in order not to break something that is not yet broken, let’s look at how to disassemble Samsung, Bosch and Zanussi.
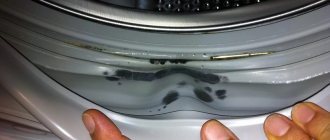
We list possible malfunctions
You can’t wash things dry in a machine, so you can’t put off solving the problem with filling - it’s better to immediately start looking for a possible cause. Fortunately, an empty drum does not always indicate a breakdown; sometimes it is due to a missing central water supply or a blocked water supply.
There is a third “non-repairable” reason - a door that is not tightly locked. Before washing, the control board must ensure that the drum is sealed. If the hatch is not slammed shut, the electronic lock does not work, which means the system rejects the start of the cycle.
Quite often, quite noticeable breakdowns and malfunctions lead to problems with water supply. The difficulty of diagnostics is that their list is long: from the inlet valve to hoses and the control module. So, users often encounter eight problems.
- Damaged intake valve. This device controls the water supply to the machine. If it fails, the membrane stops responding to the signal supplied by the board - the “entrance” to the machine will remain locked. Confirming a valve sensor malfunction is simple: just connect to the power supply and apply voltage to it. A working system will close and make a characteristic click, while a broken one will remain silent.
- Clogged filter mesh. The Zanussi inlet hose has a special filter attachment, on which a noticeable part of the dirt and impurities found in tap water settles. Naturally, over time, the part becomes too clogged and does not allow the water flow to pass into the machine under the necessary pressure. In this case, the machine hums when trying to fill the drum, but to no avail.
- Overfilled inlet filter. Like the mesh, the coarse filter, which was installed even earlier - right in the water pipe - also suffers from dirty water. This is where the main “dirty” impact comes in, and without regular cleaning, a blockage is possible, followed by stopping the intake into the machine.
- Broken pressure switch. This is a water level sensor, which controls the degree of filling of the drum. If the device fails, the electronic unit, not receiving information about the fill, shuts down the system for safety reasons and to prevent leakage. To test the pressure switch, you need to remove the top cover of the case, find the device, unscrew the bolts holding it, remove it and blow into the tube. There should be a few clicks in response to the air flow. Their absence will prove the fact of breakdown or blockage.
- Problems with the pressure switch hose. Sometimes it is not the sensor itself that fails, but the pipe connected to it. It becomes damaged, leaks and prevents the device from monitoring the water level in the drum.
- Problems with the inlet hose. If the sleeve is crushed by the body or broken, then the water will not be able to reach the machine.
- Non-functional pump. Before collecting a portion of clean water, the machine always drains some of the old water remaining in the tank after the previous wash. If the pump cannot pump out liquid, then the board does not give the command to fill.
- "Hung" control board. It is the electronic module that is responsible for issuing commands and collecting information from the main components of the washing machine. If there is a problem in a block with triacs, microcircuits or tracks, the system cannot cope with the task and stops Zanussi.
Modern Zanussi machines make it easier for the user to find the cause by displaying an error code on the display after automatic self-diagnosis of the system. In this case, you just need to remember the combination that is displayed and decipher it according to the instructions. The rest will have to look for the breakdown manually, checking all the problems leading to an empty drum.
Let's start disassembling the washing machine: general rules for all models
Before considering how to disassemble a washing machine of a particular brand, you need to remember general key points, which will be the same in all cases.
The first and main rule: before starting repairs, it must be disconnected from the power supply (pull out the cord from the outlet) and disconnected from the water supply.
Second rule: prepare in advance all the tools that may be needed during the work process (screwdrivers, pliers, wrenches, etc.).
Third rule: identify the breakdown. After all, it is quite logical that there is no point in disassembling the drum of a washing machine if the hose is leaking, etc.
Once these simple requirements are met, disassembly can begin.
How to disassemble a Samsung washing machine
For greater convenience, each of the brands of washing machines will be considered in a separate paragraph listing the full procedure.
It’s not difficult to remember how to disassemble a Samsung washing machine:
- Follow the general rules (disconnect the device from the power supply and water supply).
- Remove the plate on the back of the washing machine using a screwdriver.
- Check the drum fastenings, inspect the inside of the washing machine, remove dust and foreign objects (if any).
- Check the serviceability of all components of the machine. To do this, you need to turn on the washing process and observe all processes.
If you need to disassemble the front panel, the steps are as follows:
- Remove the top cover.
- Pull out the powder tray.
- Unscrew all the screws on the front control panel (there are 2 of them).
- Remove the front panel.
- In order to get the engine of the Samsung washing machine, you need to disconnect the connector with wires from it and unscrew the bolts.
How to dismantle the front one?
After the washer cover has been removed, you can begin disassembling the front panel.
The work is carried out in several stages. First, remove the lower part of the front cover. To do this, open the hatch hiding the garbage filter and unscrew the screws located in the corners of the niche. Then, using a flat screwdriver, carefully pick up the latches on the right and left sides of the decorative strip and pull it towards you.
To remove the upper part of the front panel of the LG washing machine, you need to carry out a number of sequential actions:
- Remove the detergent dispenser (press the special lock inside the tray and pull the powder receptacle towards you).
- Remove the control panel. To do this, unscrew two self-tapping screws (one is located in the opened niche of the powder receptacle, the second is in the right corner of the control panel). Once all the fasteners are unscrewed, the control panel is carefully set aside (in some washing machine models, the manufacturer provides a special hook). Do not touch the wiring on the control panel!
- Remove the rubber cuff clamp (the element securing the rubber cuff of the hatch on the front cover). In order to quickly remove the clamp without damaging the rubber seal, you need to feel for the small spring on the steel ring of the clamp and pry it off with a flat screwdriver.
- Unscrew the UBL fastener, disconnect the wiring and remove the lock from the washing machine body.
The final step is to unscrew two screws on top and four at the bottom of the front panel, and then remove the cover from the washing machine body.
How to disassemble an Indesit washing machine (Indesit)
Next in line is an equally popular assistant in home laundry. Let's see how to disassemble the Indesit washing machine, not forgetting to follow the mandatory rules.
- Remove the back cover, which is secured with six screws. Remove the heating element, which is attached to the wiring on the clamps.
- To remove the top cover, you need to unscrew the screws that hold it in place and pull it slightly towards you.
- The top weight is removed by unscrewing three screws. They are screwed in tightly, so some effort will be required.
To remove the front panel, you need to unscrew the screws (they are on top), take out the powder tray and disconnect the wire, after remembering the order in which the colors are connected (so that you can put it back together without any problems).
To disassemble the Indesit washing machine from below, you need to turn it over. After this, the shock absorber bolts are unscrewed on both sides and the plastic reservoir and electric motor are removed.
To remove the motor, you need to unscrew two screws, then pry it up with a flat-head screwdriver, disconnect it from the pipe that goes to the powder container and remove it from the two pins cast on the tank body.
Step-by-step instructions for troubleshooting yourself
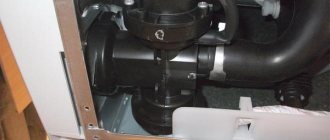
To remove and repair a faulty part, first determine the location of the pump, which depends on the manufacturer and model of the equipment (you can view instructions for disassembling washing machines of different brands here).
Location of the pump inside the device
In washing machines from LG, Samsung, Ardo, Indesit, it is easiest to get to the pump, since the part is located at the bottom. To get to it, just lay the car on its side, covering the floor so as not to scratch the body, or simply tilt it.
Disassembly and cleaning
The instructions for repairing the pump of a washing machine with your own hands look like this:
- before removing the pump, the washing machine is disconnected from the electrical network;
- the water supply is shut off before disassembly;
- the machine is placed on its side so that the pump is at the top;
- remove the protective panel on the bottom (if any);
- Having unscrewed the screws on the bottom, remove the lower pan (if any) or unscrew the lower part of the front panel, gaining access to the pump with a filter attached with screws;
- remove the pump protective cover;
- then they feel the pipes, determining the presence of blockages, loosen the clamps, and pull them off the pump;
- unscrew the fasteners holding the pump;
- Disconnect the wiring and take the pump out.
If the pump is attached to the volute, it is disconnected from the pump by unscrewing the fasteners or turning it counterclockwise (depending on the model). At the same time, they determine how easily the impeller turns - it most often fails. A working impeller rotates irregularly due to the rotating magnet in the coil.
If the part rotates easily, without delays, or, conversely, movement is difficult and there is no debris inside, you will have to disassemble the pump. To do this, perform the following steps:
- disconnect the impeller by prying the housing latches;
- The crosspiece, which cannot be disassembled, is heated with a hairdryer at low temperature and pryed off with a screwdriver;
- remove the magnet with the impeller, the part, and clean the joint;
- the shaft is disconnected from the magnet, the bearing that appears is cleaned and lubricated;
- the bearing located at the bottom of the housing is also lubricated;
- worn gaskets, rubber seals are replaced with new ones;
- assemble the pump, make sure that the o-ring fits tightly into place;
- Don’t forget to inspect the oil seal and replace it if necessary.
Attention: Test the pump with a multimeter by placing probes on the pump contacts. The indicators “0” and “1” displayed on the screen indicate a malfunction of the unit and the need to replace it. We offer you to watch a video on how to check the pump of a washing machine:
We offer you to watch a video on how to check the pump of a washing machine:
Bearing replacement
The reason for the incorrect operation of the pump is not only the accumulation of debris and small objects. Bearings often fail, causing friction between the volute and the impeller, which causes noise and knocking to be heard during shaft operation. In advanced cases, the pump may stop completely.
The problem is eliminated by installing new elements, which are purchased at specialized points of sale and service centers that service household appliances (read about how to repair or replace bearings here).
If it is impossible to postpone the wash and a new part is not at hand, emergency measures are taken: the impeller blades are shortened by 2 mm. Do this with a sharp knife, carefully so as not to cut off too much and reduce the performance of the pump. Then the body with the blades is returned to its place in the coil and secured with latches. All that remains is to check the functionality of the repaired part.
After installing the pump and connecting the machine to the network, it will launch diagnostics and display the results on an electronic display. If the repair is performed incorrectly, an error code will appear on the display. If the car model does not have an information display, the test is carried out with a multimeter by connecting the probes to the contacts. A three-digit number indicates a malfunction of the electronic control module, a two-digit number indicates a malfunction of the pump.
We offer you to watch a video on how to replace a bearing in an LG washing machine:
Disassembling the Bosch washing machine
The manufacturer of the third washing machine, which we will now consider, is .
Disassembly rules:
- Before disassembling, you need to remove the housing cover by unscrewing the two screws that secure it. Next, remove the control panel: take out the powder tray, unscrew the screws that are located under it, and carefully remove the front panel.
- To remove the back panel, you need to unscrew the screws that hold it in place. This is done using a screwdriver.
- To remove the drum, you must first remove the following parts from the washing machine: heating element, counterweights, drive belt, wiring elements, motor and shock-absorbing springs.
Front panel and control unit
Removing the cover reveals two screws holding the front panel in place. They are unscrewed in the same way using a figured screwdriver; the screw in the upper plan above the opening for the tray is removed.
Next, you need to be careful, because wires are connected to the board and connected with a connector. They go to the control unit, which is located at the back of the car in the lower left corner. To be honest, this is a completely inconvenient place, because if there is a water leak, then it splashes from the pulley in different directions and ends up right on this block.
To remove the control unit, you can stick your hand through the hatch in the rear wall. The engine is unscrewed using an open-end wrench and a 10-mm socket. The connector with the wires is easily removed by pressing on the stopper, and the belt is also easily removed from the pulley, since it does not have rivets.
A heating element is located right above the engine. It is inserted into the tank and pressed with a nut 8, the hole is sealed with a special cuff. First, you should carefully remove the chips supplying power to the coil and the wires going to the temperature sensor.
Additional devices
The design of the washing machine has a funnel for collecting water into the tank and a pressure switch that controls the water level. To dismantle the drum, these components must first be removed.
The pressure switch is secured with a plastic clip and held in a slot on the side wall. A hose with a diameter of 8 mm is attached to it using a self-clamping clamp coming from the tank.
To remove the fill funnel from the washer, you must first unscrew the back cover, which centers the water fill inlet. Thin wires from the control unit that control the water supply valves are also suitable. A corrugated hose comes from the funnel, attached to it with a rubber loop.
Disassembling a vertical washing machine
Vertical models of washing machines will also not cause any particular difficulties during disassembly. We suggest considering how to disassemble a vertical washing machine:
- Unscrew the screws on the side panel and remove the side panel. Depending on the model, either one or both can be removable
- Unscrew the screws on the back wall, move it back, lower it down a little and remove it.
- To remove the front bar of the machine, you need to pry it out a little using a flat-head screwdriver. In some models, it is not held on by latches, but by two screws, which simultaneously hold the side panel.
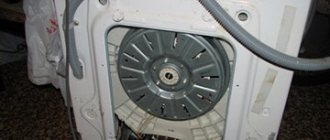
How to remove the back panel?
LG front-loading washing machines have a service hatch on the rear wall. It is behind it that provides access to such elements of the internal structure of the washing machine as: engine, tank, pulley and drive belt, heating element. In terms of size, the service hatch occupies almost the entire rear panel.
Removing the back cover is easy. It is enough to unscrew all the screws located around the perimeter of the service hatch.
To prevent numerous bolts and screws from getting lost during disassembly of the washing machine, they must be cut off and put into small boxes after unscrewing. Along with the bolts and screws, a piece of paper indicating the panel for which the fastener is intended is placed in the box.
Disassembling the washing machine tank
If repairing a washing machine involves replacing bearings, you must be prepared for the fact that you will have to remove and disassemble its tank. Therefore, below is a procedure that will tell you how to disassemble the washing machine tank.
- Depending on the model, release the latches or screws, remove the pulley and pull out the drum.
- Tap the shaft with a hammer to knock it out.
- Unscrew the bolt and pull out the tank, which is located behind the drum.
To change the bearings, you need to remove the seal on the back of the tank, knock out the bearings, put new ones in their place and reassemble the washing machine in the reverse order.
So you have learned how to disassemble a washing machine from different companies. But it is still important to remember that if you have doubts in your own abilities or you do not know what the breakdown may be, it is better to entrust the repair to specialists so as not to aggravate the situation.
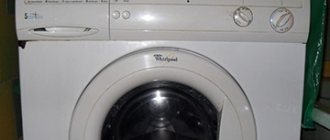
It doesn’t matter whether your home has a Whirpool, LG, Ariston, Indesit or another brand of washing machine, any equipment can break down. And since in many cases, to diagnose the cause of a breakdown, it may be necessary to remove the cover of the device, each owner should know how to cope with this task.
Most often, disconnecting the top cover of an Indesit, LG, Ariston, Samsung, Whirlpool washing machine is the first stage of product repair. For example, you will certainly have to remove the cover if the door breaks.
Here's what every machine owner should know when planning to remove its top cover:
- Before starting any work, the equipment must be de-energized.
- To ensure full access to the machine, it should be moved away from the wall.
- To work you will need a Phillips screwdriver.
- The steps will differ depending on the type of machine loaded.
Removing the cover
Often the need for dismantling work arises when there is a breakdown inside the housing. If you are faced with a breakdown of your washing machine, you need to figure out the cause of the malfunction - this is where disassembly will be necessary. In many cases, it starts with removing the cover.
If you are interested in which washing machines have the top cover removed, then the first answer to the question will be: SM with front loading. In the article we will consider whether it is possible to do this yourself.
As for brands and models, it happens that under the same brand there are different model lines, in which the covers are removed in different ways, or maybe not removed at all.
Removing the top cover of the washing machine does not require careful preparation, and all you need is a screwdriver - give preference to the Phillips type.
Remember to be safe: Before removing the cover, unplug the power cord by removing the plug from the outlet. Then proceed like this:
- Pull out the machine for convenience and unscrew the mounting bolts (located at the back).
- Move the panel back slightly by pushing it slightly.
- When it comes out of its grooves, you can easily remove it.
- Now nothing prevents you from getting inside the SM housing to carry out the necessary checks and repairs.
Knowing how to open the top lid of a washing machine automatically gives you the idea of how to close it. To replace the panel, you need to place the front part in the grooves and push it forward. At the very end, the fasteners are screwed in.
How to remove the lid on most side loading machines
After moving the machine away to be able to unscrew the bolts on the back of the device, look for the locations of the screws on the back wall. Most models have two such screws, but there are devices with three screws. Using a screwdriver, rotate the screws until they are completely removed. Please note that there may be plastic washers underneath, so be careful not to lose any of these.
As soon as you unscrew the lid, to disconnect it from the machine you should apply force, as a result of which the lid will come out of the grooves and move slightly, first back and then up. After this, the cover can be removed to the side. To replace the cover, perform all the steps in reverse order, that is, first push the cover into the grooves, then screw in the screws.
Attention
Page 2
- Image
- Text
Attention
This machine is equipped with an electronic control device
automatic balancing (ABK), which allows you
to spin at high speed only
the laundry that is well distributed in the drum.
The automatic balancing device rotates the drum
for some time before spinning in different directions at
low speed, thereby distributing the laundry
evenly in it.
In some cases this may not help well.
distribute the laundry (for example, if in the drum together
loaded with a terry bathrobe and a small amount
other linen or when duvet covers or pillowcases have collected
all the other linen inside them, as well as in some other cases).
In situations like this, one of two things happens:
•
ABC allows for some imbalance
drum, however, it reduces the
spin speed.
As a result, the laundry will be damper than usual.
•
ABC detects imbalance above
permissible threshold and does not allow spinning.
In this case, remove the laundry from the drum, and then
put it back, distributing it evenly, and
only then start the spin program.
Both of these cases should not be considered as
machine malfunction.
This is only a technical possibility that allows you to protect your car from breakdowns, vibration, sliding on the floor and other serious troubles.
Other options
Some machines, such as Ardo models, require the cover to be removed a little differently.
After unscrewing the screws at the back of the device, the cover should move not to the back, but forward (towards you if you are facing the hatch). In this case, the lid will shift only at a certain angle, which you will have to determine.
You may also come across the option of mounting the top cover not on the back, but on the front wall. For example, such a mount can be found in older devices from Siemens and Bosch.
After removing the plugs, unscrew the screws, then slightly lift the cover up and move it to the front in relation to the machine. As with the Ardo machines, you will need to find an angle at which the lid can be easily removed.
Malfunctions of the refrigerator Indesit C138NFG
Two-chamber combined refrigerator with one compressor and electromechanical control. The No Frost defrosting system is used in the freezer and a “crying” wall in the cold chamber.
The temperature control in the chambers is independent, thanks to the presence of a magnetic valve on the refrigerant line between the freezer and the refrigerator. Faulty components of the Indesit refrigerator of this model, when the temperature in the chambers is not maintained, can be:
- freezer thermostat, if the required minus is not reached in the freezer;
- upper chamber thermostat, if the temperature in the refrigerator is incorrect;
- sticking of the switching magnetic valve;
- Freon leak or compressor failure.
Elimination of the causes is possible after a complete diagnosis by service center specialists.
The condensate drainage system in the refrigerator may become clogged. Failure of heaters in the No-growth freezer system will result in icing. The fan will stop, clogged with ice. A non-working defrost timer will also lead to such consequences.
A specialist can find and fix the problem, but before doing this, you should defrost the lower chamber for 24 hours. During this time, the refrigerator blades will be freed, and it will be possible to check whether the No Frost electrical network is working properly.