Bosch is a recognized leader in the home appliance market in the washing machine industry. This is explained by the low price of the products and, at the same time, the quality of their assembly and simplicity of design. This guarantees long service life and durability of the devices.
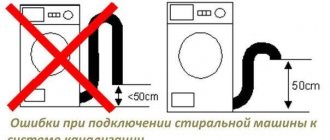
If the machine does break down, you can fix it at any service center of the company or try to figure it out yourself. Repair of Bosch Maxx 5 washing machines, its complexity and cost depend on the type of breakdown (for example, if the machine is installed incorrectly, it may “stand up” and not drain water). Let's take a closer look at each malfunction, analyze their causes and solutions.
Why Bosch?
The Bosch washing machine represents true German quality and, if used correctly, will last for many years. This company is chosen because of many useful properties, such as the highest class A - excellent washing quality for all models of machines of this brand.
They also do not consume a lot of electricity, and have an energy consumption class of A or higher, A+ or A++. The peculiarity is that the machines also dose water for the volume of washing, which allows you to save on water bills, and control foaming if the housewife accidentally poured too much powder into a special container.
In this case, the “helper” uses as much as is needed for this particular wash. Bosch is confident in its products, so the minimum warranty period is 2 years, which is undoubtedly a pleasant bonus and a guarantee of reliability.
Common Causes
Despite careful operation, someday the washing machine may not turn on, and there can be a variety of reasons for this:
- The reason is electrical. All Bosch washing machines are equipped with a rather weak surge protector, which should smooth out power surges; on Bosch Max 4 machines, in 25% of repair cases a blown fuse is observed. In the new Bosch Max 5 model, this problem is less common. Whether the mains filter is the reason why the Bosch washing machine does not turn on during repair is checked with a multimeter, which shows the voltage level before and after the filter. If the device shows a difference between the input and output, then the problem is different, but if it’s the other way around, then the machine needs to be repaired. If the machine is many years old, then problems may arise with the plug or power cord; these can also be detected using a multimeter. Failures in the electrical system can also be detected through routine inspection. It may also be that the wires have jumped out of the nodes, and because of this the machine may not turn on. Debugging a wiring system is a painstaking job, often requiring the participation of a professional.
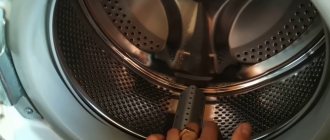
- The reason is that the door is blocked. Each front-loading washing machine is equipped with a door locking system that ensures the drum is sealed and protects against leaks. In Bosch washing machines it works as follows: the locking device, after locking the door well, sends a signal to the control board, after which it starts the engine and the washing begins. If no signal is received from the blocker, the engine will not start. If there really is a problem with the door lock, then this device can be easily changed at home.
- The reason is the control board. In Bosch Max 4, the voltage from the start button is transmitted to the control board, and in Bosch Max 5 - to the command device. The “Start” button is checked with a multimeter, and the wires that lead to the power button are inspected. If the problem is in the board, then there is no point in trying to fix it yourself; it is best to contact a specialist, because even if you change this part completely, problems may arise. For example, such boards are often sold unprogrammed, and only a professional can write the necessary commands onto them. In fact, all faults that concern the “brain center” of the machine are best repaired by a repair service.
The command device is more reliable; it usually fails after several years of operation, so repairing it is often pointless. It’s easier to replace it completely, but it’s also better to do this at a service center.
Brief instructions for replacing faulty parts of the Bosch Maxx 5 washing machine
Replacing shock absorbers
Washing machine shock absorbers are responsible for reducing the level of noise and vibration emanating from the machine's tank during spinning. Their design is simple: a main cylinder (in which the return piston is located), as well as a rod and a set of gaskets. It is the simplicity of their design that allows machine owners to replace these parts with their own hands.
Before replacing a part, you need to remove the nearby components of the machine. For this:
- Remove the top cover, remove the dispenser with hopper;
- Remove several holding screws that are located behind the control panel and hopper;
- Place the machine on the back wall, remove the hatch and bottom, after unscrewing the screws. After removing the twisted wire guide, tuck the sealing collar inside the tank; it is not necessary to pull it out;
- Pull out the front wall of the washing machine, use a wrench to unscrew the bottom bolt that connects the tank to the bottom.
Note: you don’t have to unfasten the hatch separately, but rather detach the entire front panel.
You can dismantle the shock absorbers without removing the tank, so the next step is preparatory work. They consist of drilling a hole 3 cm deep in a plastic mount (the drill should have a diameter of 13.2 mm). It is recommended to put the drill on a screwdriver; it will give the optimal number of revolutions and the required force. Once drilled, you can remove the bolt by simply pushing it out.
Figure 7 – Procedure for removing the shock absorber using a drill
Installation of the shock absorber is carried out in several steps, which are illustrated in Figure 8 (hereinafter - sequential comments to it):
- The shock absorber bolt must be reinforced on both sides with plastic spacers, which are connected to each other exactly in the center of the bolt;
- Then the shock absorber is installed opposite the corresponding holes provided by the design of the machine, and special bushings are installed on the sides of these holes;
- The entire structure is additionally secured with a side retaining bolt.
Figure 8 – Installing the shock absorber
Tank repair
Repairing the tank of a Bosch Max 5 washing machine usually means either treating cracks and cracks that have appeared, or removing stuck foreign objects. The tank must be dismantled when replacing the bearings and stuffing box. As in the previous case, you first need to carry out preparatory measures: remove the top cover and front panel, remove the dispenser with the hopper, disconnect all electrical and mechanical communications. Also, before finally removing the tank from the box, you need to detach the motor and counterweights from it.
Note: you should not pull out the tank, since many parts are attached almost tightly by the manufacturer, and such actions can only help to rip the wires out of their sockets. Therefore, it is recommended to remove the tank from the box with light and swaying movements, and if nothing offers resistance, continue.
You definitely need to pay attention to whether there are holes for screws or nuts along the seam connecting the two halves of the washing machine tank body, so that you can then fasten them together. If not, you will have to drill it by hand.
The process of disassembling the tank after its dismantling occurs in several steps:
- First, use pliers to cut the retaining plastic clips (they can also be knocked out with a chisel). You can also insert metal plates between these clips and the surface of the tank body, and then use a chisel to separate its two halves;
- The rear part of the housing is removed, after which the retaining bolt is unscrewed, and then the front part of the housing is removed;
Figure 9 – The process of dismantling the tank body (the tank itself is shown in the middle of the figure)
- The pulley is easy to remove; just pull it towards you, slightly rocking it from side to side, and it will give way. If it is stuck tightly (for example, due to accumulated plaque), you can warm it up with a gas burner, or use a hammer and a wooden block.
Figure 10 – Half-disassembled body of the washing machine tank (in the foreground, slightly to the left – heating element)
If the metal clips were not carefully opened, but pulled off, then it is better to finally remove their remains after the repair, and connect the halves of the tank body mechanically (using bolts and nuts, using the provided holes). The gap between the halves should be filled with waterproof glue.
Among the most commonly used sealants, noteworthy are Permatex 81730 and ABRO 11AB-R - professional products that, firstly, withstand both high and low temperatures equally well, are not sensitive to water, and are also resistant to chemicals.
Removing the motor
The washing machine motor is removed only in case of emergency, for example, to replace its brushes or lamellas, as well as for repair or complete replacement at low drum speeds or in emergency situations (if there is a burning smell or even smoke).
Removing the motor occurs in stages:
- First, using a hex screwdriver, unscrew the bolts holding the back wall of the machine body;
- Then the drive belt located on the pulley, as well as all mechanical and electrical communications, are removed. It is not necessary to dismantle the pulley;
- Having tilted the washing machine forward, you should unscrew the bolts that hold the bottom of the machine, and then carefully remove it;
- Finally, you need to unscrew the two fastening screws, which are conventionally shown in Figure 11 with the letter “A”, after which the motor is pulled out by slightly moving it backwards.
Figure 11 – Location of the motor mounting screws on the Bosch Maxx 5 washing machine
Removing the drain pump
The procedure for removing the drain pump differs from the engine removal described above. This is explained by the fact that several communications are connected to the pump, which differ from each other in their connection principle.
Note: before disassembling, make sure that there is no water in the system (check the drain hose and filter at the bottom of the machine).
First you need to remove the top panel and back wall, after unscrewing the screws. After this, the washing machine with a pre-fixed drum (you can use a pillow or at least a sheet of cardboard folded in three) is placed on its side, and on the side where the dispenser hopper is located. Then you can start disconnecting incoming communications:
- Before removing the power wires, it is better to photograph them with a smartphone so that you can connect them correctly;
- The drain hose is removed in two stages: first, the clamp is loosened with pliers, and then it is carefully pulled out of the pump with loosening movements.
Before unscrewing the pump, it should be freed from the retainer (plastic tongue) and the retaining screw located on the side of the housing. The pump is unscrewed counterclockwise (if it is stuck to its location, you should not pull it out - this can damage the pipe; you just need to gradually loosen it from side to side).
If, after removing the pump, deposits are visible inside the nozzle and drain hose, it must be removed, then treat all attachment points with alcohol and wipe dry. If the pipe is damaged during dismantling of the pump, the crack or hole should be healed with the above-mentioned sealants. The new pump must be installed exactly in the old place, and secured with three latches and a clamp. All of these fasteners are circled in the picture below.
Figure 12 – Places for attaching the drain pump
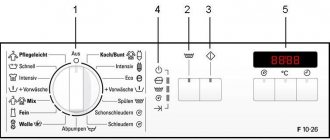
Error codes
Also, the Bosch washing machine can indicate what problems are in the system. Each error is numbered and has its own meaning:
- F01 - problem with the door, not closed.
- F02 - water does not fill.
- F03 - difficulties with draining water.
- F04 - a leak has formed in the system.
- F16 - leaky hatch closure.
- F17 - no water flows into the drum itself.
- F18 - cannot drain water.
- F19 - water heating malfunction.
- F20 - arbitrary water heating.
- F21 - the drum does not spin.
- F22 - water heating has stopped.
- F23 - aqua-stop is working, there is a leak.
- F25 - turbidity sensor malfunction.
- F26 - no water supply/drainage.
- F27 - problems with the pressure sensor.
- F28 - problem with the flow sensor.
- F29 - the flow sensor did not respond to water intake.
- F31 - water in the tank is higher than normal - one of the main reasons why the machine may not turn on.
- F34 - the door is not closed, there is no locking signal.
- F36 - blocker is broken.
- F37 - problems with the heating sensor, no heating.
- F38 - short circuit of the heating sensor.
- F40 - Bosch washing machine did not start.
- F42 - RPM limit exceeded.
- F43 - the drum is blocked and does not spin, problems with the engine.
- F44 - the motor rotates in the opposite direction.
- F59 - 3D sensor failure.
- F60 - flow sensor malfunction.
- F61 - the door is not locked, the washing has not started.
- F63 - functional protection has tripped.
- F67 - controller failure.
- E02 - critical error, the washing machine may catch fire.
- E67 - the central unit is broken.
Any washing machine, no matter how high-quality and modern it is, cannot work forever; any mechanism is subject to wear. If you want to use the machine for many years, then in addition to careful operation, you should always pay attention to problems and fix them in a timely manner, extending the life of the washing machine.
The main thing is that you always have the opportunity to diagnose the machine and correct the problems yourself, or contact a service center, where such Bosch washing machines will always receive high-quality repairs, thanks to the prevalence and popularity of this brand. Some DIY repairs are a completely solvable task for every person.
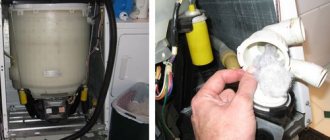
Simply, it is necessary to clean the filters and maintain the washing machine on time. In this case, situations where the machine will not turn on will be minimized.
Replacing bearings yourself
To carry out this complex operation, almost complete disassembly of the SM is required. If you decide to do this, do not completely remove all the wires from the electronic module - it is not a fact that you will be able to connect everything in place. After dismantling the module, place it on the frame or hang it on a special hook.
Making a technological hook
To make a technological hook with your own hands, take a 30-centimeter piece of unheated steel wire with a diameter of 3 mm or more. You need to thread a cambric (heat shrink) onto the wire, which should be longer than the wire - at least 1 cm on each side. Make bends, stepping back 6-7 cm from each end of the wire - you will get something like a hook. Hang the dashboard on this hook.
When selecting new bearings, make sure that the parts match your brand of washer. For example, you need bearings for a Bosch Max 5 washing machine - say so in the store so as not to buy the wrong parts.
The video shows how a master disassembles a Bosch machine and changes the bearing. Take a look, you will find this useful:
As you can see, repairing Bosch washing machines yourself is a completely doable task. Just don’t forget about periodic cleaning of your washing machine and maintenance, which will protect the machine from breakdowns.