Among the many brands of washing machines, Electrolux is in constant demand and popularity. Modern models are distinguished by wide functionality and convenient operation. But, sooner or later, in any technology, various malfunctions and breakdowns arise. You have to contact warranty service centers or try to repair the Electrolux washing machine yourself. Self-diagnosis capabilities allow you to identify a breakdown and take timely measures to avoid more serious consequences.
What details does the machine body hide?
“Acquaintance” with the machine begins with studying all the devices and parts included in the design. This is the only way to see all the components and understand their relationship and location. So, any washing machine from Electrolux, both front and horizontal, is necessarily equipped with the following elements:
- electric motor;
- tank;
- drum;
- drain pump;
- several types of pipes;
- detergent dispenser (powder receiver);
- shock absorption system (springs and dampers);
- tubular electric heater (TEH);
- garbage filter;
- drum pulley;
- snail;
- thermostat;
- control board;
- counterweights;
- hatch blocking device (UBL);
- filling valve;
- hatch cuff;
- pressure switch;
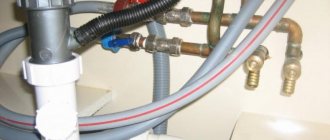
- hoses (drain and fill);
- dashboard.
The design of most washing machines is the same, and Electrolux is no exception.
The above components and devices are located in the body of the washing machine. As for the iron “box” itself, its design is simple: top cover, front, back and side panels. The loading hatch is located at the top or in the front, depending on the type of machine.
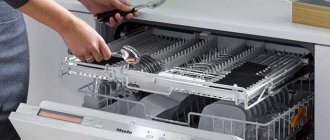
For diagnostics and repairs, it is not enough just to know the names of all components of the washing machine. It is necessary to study the elements, their location and purpose in more detail. We will tell you below how to check each part for functionality.
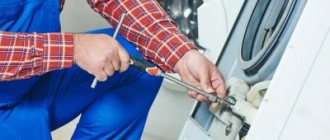
Instructions for disassembling a household appliance
The disassembly process begins with preparation, it is important:
- Prepare your tools in advance. You will need screwdrivers, pliers, and open-end wrenches. Additionally, you should stock up on WD-40 spray or an equivalent.
- Prepare the place. The washing machine is a large piece of equipment, and you need enough free space to disassemble it.
- Unplug the machine from the socket.
- Drain off any remaining liquid and remove the laundry from the drum.
The next step will be to dismantle the external components of the washing machine. You need to remove the lid, walls, detergent compartment, to do this:
On the back you need to find and unscrew two screws and remove the panel.- The cuvette for household chemicals must be removed all the way and pressed on the “tab”, it is located in the rinse aid compartment.
- Unscrew the fasteners that are under the powder box, and additionally unscrew the hatch fixing screws.
- The hatch clamp should be slightly pryed with a screwdriver and carefully pulled off.
- There are screws to the left of the electronic panel; you need to remove them, and then pry up the fasteners to remove the electronic module.
- Once the module is pulled out, you will have access to the screws holding the back and front panels.
The final stage of disassembly will be the removal of the tank-drum assembly. It is better to do this with an assistant, because removing the drum yourself is quite difficult.
Instructions:
- first you need to disconnect the terminals from the power unit, then turn the pulley with one hand and tighten the belt with the other;
- you need to unscrew the screws securing the engine;
- after unscrewing, the motor needs to be moved a little and pulled out;
- Then the pump wires are disconnected, the screws are unscrewed - to move the pump it must be turned clockwise;
- removing the wiring and sensor and heating element, then unscrew the nut located in the center, pull out the heating unit using swinging movements;
- the screws of the counterweights are unscrewed, the components are dismantled;
- After this, all that remains is to remove the dispenser pipes, the filling valve wiring and the pressure switch.
Control board
The control board is considered the “brain” of the Electrolux washing machine. With its help, all elements of the system are powered and controlled. It is the electronic module that starts the machine, transmitting user-specified commands to the required nodes along a “chain” of conductors, tracks and microcircuits.
Everything is performed and regulated by the control board. Turning on the machine, setting the program, filling the tank, rotating the drum at a given speed, draining the water - each command given by the user is first sent to the electronic unit, and then transmitted to its destination using semiconductors and contacts. If the entire module or one of its microelements breaks down, the washing machine stops functioning, as control over a specific unit is lost. For safety reasons, the system is shut down immediately.
The electronic module system also includes the dashboard of the washing machine. Through it, by pressing buttons and rotating the selector, the user configures the cycle, turns on additional options, adjusts the spin intensity and water heating. Afterwards, the system processes the received information and starts the machine. It is very difficult to figure out on your own how the control board is structured and works. Only professionals should diagnose and repair it.
Failure of the control board is a serious failure, which is strongly not recommended to be repaired on your own!
Electrolux washing machine does not turn on
This situation occurs quite often. This may primarily be due to a lack of electricity. The circuit breaker trips for various reasons, mostly due to a short circuit. Sometimes a residual current device is triggered when current leaks into the washing machine body. Triggering of an RCD often occurs due to poor-quality electrical wiring. Lack of power is often due to a faulty outlet.
Another reason is often a surge protector. For testing purposes, it is recommended to connect the washing machine directly to an outlet. Sometimes the cord from the machine itself turns out to be faulty, constantly experiencing mechanical stress. A multimeter is used to detect a breakdown. If there is a break, it is recommended to completely replace the wire, since twisting will not ensure reliable and stable operation.
Quite often the power button fails. In some Electrolux models, power is directly supplied to it. When checking, the washing machine must be de-energized. The functionality of the button is checked using a multimeter turned on in buzzer mode. During testing, the button alternates between on and off. In the ON position, the multimeter will beep, which indicates its working condition. When disabled, the button will not be detected.
Sometimes the problem is a faulty noise filter. The filter dampens electromagnetic waves generated by the washing machine. If it breaks down, the electric current stops flowing through the circuit and the washing machine does not turn on. The filter is checked by testing. At its input there are three wires - phase, neutral and ground, at the output - only phase and zero. If there is voltage at the input but not at the output, then the filter is faulty and requires replacement.
The most serious reason for the Electrolux washing machine not turning on is due to a malfunction of the control module. Complete replacement of the device is very expensive; the control module can be repaired yourself. However, this is not always possible to do at home, so in this case it is recommended to use the services of a service center.
Elements that monitor water intake and level
The pressure switch and inlet valve are responsible for the supply of water in the washing machine. The first, thanks to a long tube, controls the pressure in the tank and sends a signal to the control board about the degree of filling of the tank. The second one receives a response from the module, starts pouring or, on the contrary, stops it.
The inlet or inlet valve has 1 to 3 coils. They are supplied with voltage as soon as the control module sends a signal to start water intake. Thanks to this, the membrane opens and water from the water supply begins to flow into the tank. When the desired level is reached, the pressure switch goes off, the board turns off the current supply, and the system stops filling.
The named elements always work together: the valve fills, the pressure switch controls, and the board acts as an intermediary transmitter. Thus, the tank is filled to the specified level, eliminating underfilling or overfilling.
When you turn on the washing machine, the RCD is triggered
Most washing machines are installed in the bathroom, therefore, in accordance with the PUE, they must be protected from leakage currents using a separate RCD or differential circuit breaker. However, situations often arise when protective devices begin to constantly operate for no apparent reason. There are several most likely options that cause such an unplanned operation.
First of all, operation can occur as a result of incorrect connection of the differential machine. This happens when trying to ground the device in the absence of a grounding wire. In another case, the phase is passed through the device, and the working zero is simply duplicated or connected directly to the common zero bus. According to the rules, the current of the phase and neutral conductors passes through the internal circuit of the protective equipment. Part of the current passing through the common zero bus is perceived by the RCD as a leak, so the power is immediately turned off.
Another reason is a faulty protective device. Before checking the RCD, all outgoing wires are disconnected. After this, voltage is applied to the switched on RCD or differential circuit breaker and the TEST button is pressed. As a result, the protective equipment should be disabled. If this does not happen, then the RCD is faulty and must be replaced.
If the RCD is working properly, you should carefully inspect the washing machine itself and assess its condition. This applies to old units because they have damaged internal wiring, worn insulation of electric motor windings, deformed housings of internal parts and other damage that can cause current leakage. The test is done using a multimeter by checking the resistance between the machine body and the plug electrodes.
If all previous checks did not reveal any malfunctions, then the cause is most likely faulty wiring. It may be pierced by a nail or self-tapping screw, or placed too tightly in the panel or distribution boxes. Quite often moisture ingress is observed. These faults are especially pronounced when the insulation is damaged or worn. If damage cannot be detected, the entire cable line must be replaced.
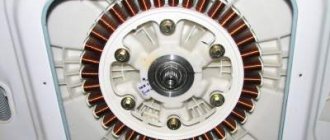
Electric motor and speed sensor
The rotation of the drum is provided by a motor and a tachogenerator. They also “work” as a couple, complementing each other. The motor spins the drum shaft, and the tachometer controls the speed, more precisely, the number of revolutions per minute. This is necessary to avoid chaotic movement or sudden braking.
The driving force is an electric motor. Most modern front-facing Electrolux are equipped with inverter motors that are attached directly to the drum shaft. The absence of a belt drive makes rotation more efficient and sharper, and the design itself, without an “intermediary,” becomes more reliable and durable.
Some washing machines are equipped with commutator motors. In this case, the drum is spun using a drive belt, which transmits impulse from the engine to the shaft. Unlike its inverter “brother,” the commutator more often needs repairs: the rubber band falls off, and the electric brushes wear out.
Water heating elements
Heating to a given temperature is the function of a tubular electric heater. How hot the water in the tank will be depends on the selected mode. After the user selects a program and sets the degrees, the control board transmits the received information to the heating element. The heater begins to act in accordance with the task.
The heating element and the temperature sensor built into it are responsible for heating the water in the washing machine.
The degree of heating of the heating element is controlled by a thermistor. This is a metal tube located directly in the heater. As soon as the water reaches the set temperature, the sensor reports to the control board, which in turn turns off the heating element.
REPAIR OF HOUSEHOLD APPLIANCES
This control system was used in the very common Electrolux EW914S, Zanussi WDS872C AMCs, many are still in use.
This control system is used in some models of P6000 series traditional washing machines and washer dryers with final spin speeds of 650-1400 rpm. This hybrid system consists of a main electronic circuit board and an electromechanical timer.
| Function | Timer No. | Electronic block PCB No. | Notes |
| VA60-VF60 | 124 70 50-00/6 | 124 70 52-00/2 | First version with two functionalities |
| VA60-VF60 VB60 VC60 VE60 | 124 70 50-01/4 | 124 70 52-20/0 | New features added. Made some changes to the timer (changes, pin 11). The timer and circuit board are completely interchangeable with the previous one. |
| 124 70 52-21/8 | Some modifications have been introduced. Interchangeable with the previous ones. |
The electronic board performs the following functions:
— controls washing programs and drum rotation options
- turns on the timer motor
— turns the drum rotation motor on and off
- controls the temperature of the washing water
- controls the water level in the tank
When executing washing programs, the electronic board receives an operating algorithm code from the timer, through which it recognizes the position of the timer and the choice of program type. At a certain moment, the board activates the timer motor, thereby advancing the timer. Each time the supply voltage is turned on, the motor changes direction of rotation. (The high-speed timer assembly rotates reversing 180 degrees; if the high-speed assembly rotates one full turn, the timer will switch one step).
1) Electronic board
2) Timer
The electronic board can be configured by changing external connections (jumpers) to perform different functions.
| Function | VA60 | VB60 | VC60 | VE60 | VF60 |
| Countries | Europe | Europe | Europe | Scandinavia | Europe |
| Washing system | Traditional | Traditional | Traditional | Traditional | "New traditional" |
| Rinse system | Antifoam | Antifoam | Traditional | Antifoam | Antifoam |
| Tank | INOX | Carboran | Carboran | INOX/ Carboran | INOX |
| Jumper on timer Q6-Q3 | No | No | No | Yes | No |
| Jumper on timer Q6-Q2 | Yes | No | No | No | Yes |
The functions of the timer are as follows:
— Controls the direction of rotation of the motor (the rotation timer is controlled by an electronic board);
— Supplies power to other components and systems in the SMA (solenoid valves, circulation and drainage pumps, door lock, heating elements);
— Provides information to the electronic board (by closing contacts C4-C10) regarding the position of the timer and the type of washing of the selected program.
1) Printed circuit board. 2) Contact groups. 3) Timer motor. 4) Drum with cams. 5) Protective cover.
6) Calipers. 7) Contact area. 8) Contact board. 9) Contacts. 10)Flange.
This timer has two types of contacts: relay (2) and brush (9). The timer motor (3) is powered by the electronic board.
1) Timer drive motor
2) Drive
3) Reversible drum motor cams
4) Low-speed unit
5) Relay contacts
The distribution box on which the relay contacts are located is divided into two blocks: one block of slow cams (low-speed unit) (4) with stepwise advance (one full rotation of the timer consists of 60 steps), and one block of cams with a continuous rotation mechanism (high-speed unit ) (3), which controls the direction of rotation of the drum motor.
The high-speed cam unit does not advance continuously as in traditional timers; instead, it is rotated by the motor at a certain angle until the cam unit reaches the appropriate position. (The motor is controlled by an electronic board). At this point, the cam block stops for the time required to perform the corresponding operation, and then is positioned to the next position.
The high-speed cam block can rotate either clockwise or counterclockwise. The electronic board controls the rotation of the cam unit by closing contacts 2-B (N3-A8) and 6-B (N3-A6) on the timer.
When the cycle begins, these cams move to the home position (i.e. zero) and the electronic PCB checks this home position by closing pin 2-T (N3-A7) on the timer. The low-speed cam block, on the axis of which the brush contacts are located, moves only in one direction.
Relay contacts of the low-speed unit supply power to the door lock, valve electromagnets (via pressure switches), drying heating elements, drain and circulation pumps. Brush contacts determine the operating algorithm of the electronic board. The contacts of the high-speed unit commute the washing heating element, valve electromagnets (via pressure switches), reverse the engine, confirm the rotation of the high-speed unit clockwise and counterclockwise. The program failure is caused precisely by the oxidation of low-current contacts of the high-speed unit.
The washing temperature depends on the choice of program; in most models, this temperature can be set using a potentiometer. The washing temperature is controlled by an electronic board using an NTC-type sensor, the internal resistance of which decreases with increasing temperature. The decrease in resistance is recognized by the electronic board, which advances the timer to the next step when the water temperature reaches the desired value.
The electronic board also monitors short circuit and open circuit of the NTC sensor.
1) Plastic case. 2) NTC resistor. 3) Contacts.
Temperature sensor resistance error (±10%).
Some models use an 8-position potentiometer (0 - 10,000 ohms between pins 1-2/3 and 1-4/5). Used to set the temperature required for the wash cycle. The potentiometer is connected directly to the electronic board. In some models, the same potentiometer is used to control the spin speed.
The motor speed is adjusted by changing the switching phase of the triac (TRIAC). The motor speed is constantly monitored by an electronic circuit board (PCB), which processes the output signal from the tacho generator to determine the motor speed.
Engine protection system.
The electronic printed circuit board monitors the following faults:
Short circuit or break in the tachogenerator winding. The tachogenerator magnet is broken. In this case, the electronic board cuts off power to the motor. The timer will move to position 59, which drains the water, and then to position 60 (stop).
Motor power triac short circuit. The motor power is turned off, the timer remains in the position in which the malfunction occurred.
Motor control triac is broken, motor thermal protection is opened, motor windings are broken. The electronic board supplies power to the motor every time the direction of rotation is reversed, thereby checking for the presence of a fault during the remaining time of the wash cycle. If the motor thermal protection has tripped, the motor will operate normally when the automatic thermal switch is reset. If the fault persists, the wash program will run without rotating the motor.
Models equipped with a special pressure switch (VA60-VB60-VE60-VF60) check the formation of foam during spinning. If during the spin phases of the rinsing phase the anti-foam pressure switch moves to the “full” position due to the presence of foam in the tank, the motor is switched off and the drain pump continues to operate. The engine starts again when the pressure switch returns to the empty position. However, the pressure switch may work again if foam appears again. In any case, the duration of the spin cycle cannot exceed the maximum time required for each step.
At the end of each drain cycle, the electronic board checks whether the contact on the 1st level pressure switch is switched off (full position). If this does not happen, then the water has not been drained and the timer has moved to position 58, where the MCA does not perform any functions. Power is supplied to the door lock only until the user turns off the machine. This is the same type of check during drying on washer dryers during the drying cycle.
Before performing the final spin phases, the electronic control system checks the layout of the laundry by rotating the drum at 85 rpm. If the load in the tank is unevenly distributed, the tachogenerator produces a highly modulated signal, which allows the microprocessor to detect that the load is not balanced. In this case, the SMA performs low-speed (85 rpm) drum evolutions in alternating directions of rotation, redistributing the laundry in the tub. If the load is then balanced, the spin phase proceeds normally. If not, the redistribution phase is repeated and a third check is performed. If the load is still not balanced, then after 10 minutes the timer moves to the next step, even if the spin has not been completed.
The components in the dryer circuit are identical to those used in traditional timer washer dryers. A special timer (0-100 min) is used to select the duration of the drying cycle. If the drying time is set and auto dry is pressed, drying will be performed automatically at the end of the wash cycle. The dry button must be turned on even if only a drying cycle is required. In any case, after 120 minutes, the drying timer goes to the “stop” position.
| 1. | Noise suppression filter. | 21. | Economy Wash button |
| 2. | Power indicator. | 22. | Super Rinse button |
| 3. | Door lock. | 23. | Quick wash button |
| 4. | Presostat. | 24. | “No drain” button (stop with water in the tank) |
| 5. | Overflow pressure switch. | 25. | On/off button. |
| 6. | Cold water solenoid valve. | 26. | Drying timer contact. |
| 7. | Hot water solenoid valve. | 27. | Drying timer motor. |
| 8. | Drain pump. | 28. | Drying heating element. |
| 9. | Protective pressure switch. | 29. | Thermostat with manual reset. |
| 10. | Heating element (washable heating element). | 30. | Drying thermostat. |
| 11. | Recirculation pump. | 31. | Safety thermostat. |
| 12. | Door closing lamp. | 32. | Drying solenoid valve. |
| 13. | Timer motor. | 33. | Drying indicator. |
| 14. | Electronic board. | 34. | Fan motor. |
| 15. | Temperature sensor (NTC). | 35. | "Stain removal" button. |
| 16. | Tachogenerator | 36. | Antifoam presostat. |
| 17. | Stator. | 37. | Temperature drop. |
| 18. | Rotor. | 38. | Half load button |
| 19. | Temperature adjustment potentiometer. | 39. | Soak button |
| 20. | Spin speed adjustment potentiometer. | 40. | Bio button |
Jumpers on the electronic board and on the timer set the gear ratio between the motor pulley and the drum pulley. On many models, the final spin speed is set using an 8-position potentiometer.
On models with a spin speed reduction button:
- if the button is connected between contacts P3-Q3 of the timer, the decrease is equivalent to position 1 of the potentiometer.
- if the button is connected between contacts P4-Q2 of the timer, the decrease is equivalent to position 5 of the potentiometer.
There is a quick test cycle to detect faults. To make sure the timer motor is working, check the movement of the green gear through the small window on the back of the timer.
On washer dryers, set the drying timer control to “0” before starting the test cycle. On models equipped with a hot water fill valve, close the hot water tap before starting the test cycle. The hot fill valve is checked last.
| 1a. Select program 2 plus one step (4th step) | ||
| Functions to be performed | Possible faults | Cause of failure |
| Switching on should happen within 45 seconds. | SMA does not turn on | The “ON” indicator is off: — Wiring harness — power cable — on/off button — connection from the terminal block to the on/off switch The “ON” indicator is on: — timer (contacts K2-B1) — door lock — wiring from door lock to on/off and timer buttons (Contact N3) |
| Filling with water to level 1 | Filling with water with pauses | Check the movement of the green gear on the timer (see picture) a. Gear does not move (control time 15 seconds): - timer motor (8-9 kOhm) - electrical connection between timer (A4) and PCB (Z10) - electrical connection between timer (A2) and PCB (Z11) - PCB does not supply power to the timer motor (triac is faulty) b. The gear reverses at intervals of 3 seconds: - electrical connection between the timer (A6) and the PCB (Z5) - electrical connection between the timer (A7) and the PCB (Z6) - electrical connection between the timer (A8) and the PCB (Z7) - contacts timer A3-A7, A3-A6, A3-A8 p. The gear rotates in one direction for more than a minute. In this case, turn off the CMA for a moment and then turn it on again: - if the gear changes direction of rotation, there is probably a fault in the electronic board - if the gear does not change direction of rotation, there is probably a fault in the timer (pins A7-N3) or the electrical connection between the timer ( A7) and PCB (Z5) |
| No water fill | - hydraulic circuit - solenoid valve - hydraulic system of the pressure switch (clogging, leakage) - pressure switch - break in the drain pump winding (F1-F5) - connection of the timer K3- to the pressure switch, timer F2 / F7- to the electric valve - timer (contacts F5- F6, F2-K3) | |
| Continuous filling with water | - solenoid valve - hydraulic system of the pressure switch (clogging, leakage) - pressure switch - drain hose is too low ( | |
| Wrong water level | — hydraulic system of the presostat (clogging, leakage) — presostat | |
| Stops after filling with water | - electrical connection between timer (A5) and PCB (Z9), electrical connection between timer S2 and pressure switch - timer (pin S2-A5) - electronic board | |
| Sensor control (NTC) heating temperature | The timer jumps to step 10 | - short circuit or open circuit of the NTC temperature sensor - short circuit or open circuit between the contacts of the electronic board (X9-X10) - electronic printed circuit board |
| Heating 40ºC | No heating | - heating element - presostat - electrical connection between the timer, presostat, heating element - timer (contacts S1-S2) |
Vibration and centrifugal force compensators
To prevent washing machines with both top and horizontal loading from “jumping” during washing and spinning, special compensators are provided in the design. With their help, outgoing vibrations from the engine spin up to maximum speeds are dampened. The fact is that when the drum rotates, centrifugal force appears, which, without a shock absorption system and counterweights, will destroy the machine from the inside.
The following components help the washing machine maintain a stable position:
- dampers - spring struts that fix the bottom of the tank to the bottom of the body;
- springs on which the tank is suspended from above;
- counterweights are concrete blocks that weigh down the machine and maintain the desired balance.
These elements are designed to protect the washing machine from centrifugal force. However, if used incorrectly or for a long time, they can fail: shock absorbers wear out, springs stretch, and counterweights crack or become loose. In this case, it is necessary to tighten the fasteners or replace damaged parts.
Call the master
Sometimes you can’t do everything yourself, or it’s just scary to get into the washing machine without experience in performing such work. In such cases, it is better to call a specialist.
There are several options:
- Contact a specialized company. You can find companies that do repairs online. The advantage is that you can immediately get acquainted with the reputation and reviews of the company, the disadvantage is that it will cost more than calling private craftsmen.
- Services for freelancers. There are special services, for example, “You Do”, where you need to set a task, describe the approximate breakdown, if possible, set a price. The master can respond to the task. Such services usually also have reviews and ratings, and the price is lower than on companies.
- Private advertisements. Private craftsmen post information about repair services on bulletin boards and social networks. But you should be careful with this method; there is always a risk of running into a scammer.
The cost of services depends on the pricing policy of a particular company or master and even on the city of residence. The table shows approximate prices for replacement parts:
| Call a specialist, diagnostics | 500-1000 rub. |
| Drum | From 2000 rub. |
| Motor replacement/repair | From 1500 rub./from 750 rub. |
| Button | From 1000 rub. |
| Water level/temperature sensors | From 1200 rub. |
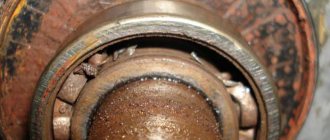
| Bearings | From 2500 rub. |
| Email module | From 2500 rub. |
Other, less difficult to install components, for example, a power cord, a hatch latch, or removing a third-party object, will cost about 1000-1500 rubles including labor.
Unfortunately, there are quite a lot of scammers, because of them you can lose both money and equipment. Common schemes:
Taking an advance for the visit of the master. Advances are possible only in cases where the master travels far outside the city, and even then not always. Usually, after sending the advance, the “specialist” number does not respond.- The washing machine is taken to the workshop for repairs. Moreover, the address of this workshop is unknown; in such cases, the equipment can be taken away forever.
- Replacement of working units. A type of fraud when, in order to increase the check, they change something that still works. It is more difficult to understand such a situation; it is advisable to first read reviews about the honesty of the service.
Hatch lock and rubber band
It is important to understand how the hatch works. Regardless of the type of loading, frontal or vertical, it has two locks: mechanical and electronic. The first is triggered when the user closes the handle, and the second is activated after the cycle starts. In the latter case, the UBL is activated, preventing accidental opening of the machine during the washing process.
The hatch locking device will prevent the door from being opened while the Electrolux washing machine is operating.
Ensure the tightness of the tank and the hatch cuff. This is a sealing rubber band that closes the gap between the drum and the body of the machine, preventing water from leaking out. If the rubber is cracked or torn, then you cannot start the machine - a severe leak is possible.
Elements responsible for draining
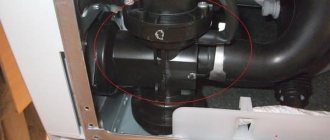
Without a quality drain, the washing machine cannot function. The emptying of the drum is ensured by a system of pipes and hoses, as well as a pump and a garbage filter. The “heart” of the drainage is the pump, which pumps water out of the tank after each washing stage.
There are two types of pumps:
- synchronous;
- asynchronous.
The pump consists of a motor and an impeller. The first starts the device, and the second, thanks to the rotation of the blades, gives the water the desired direction. A snail is fixed on top of the pump, through which pipes and a hose are fed.
Most of the debris, hair, dirt and wool that gets into the washing machine settles on the garbage filter.
The pumps are durable, but the drainage as a whole often does not function due to blockages. It is not uncommon for coins, debris, hair, and other small objects to get caught in the drum and remain in the drain pipe. The reason is the pockets of things that were not checked before washing. Most of the foreign debris remains in a specially designed garbage filter, which must be regularly unscrewed and cleaned.
Main containers
An important part of a washing machine is the tank. It is made of plastic and is completely sealed. This is where water comes from the tap and where it is mixed with detergents. On machines with horizontal loading, it is located with the hole forward, with a vertical hatch upward.
The drum is always made of stainless steel. metal and has porous walls. Laundry is placed in it, after which water and detergent from the tank enter the cylinder and washing begins. It is necessary to have plastic ridges on the drum surfaces - rib punches - mixing and turning the laundry for better washing.
If the material for making tanks and drums on Electrolux machines is mostly the same, then the size and volume are significantly different. It all depends on the capacity of the machine provided by the manufacturer.
Additional items
The Electrolux washing machine also contains other system elements that also provide high-quality washing. Among them is a dispensary - a tray for detergents. Thanks to the special design, the concentrate is taken gradually, in doses, strictly at a certain stage of the cycle. There is also no mixing of the ingredients: during the main wash, powder or gel is added, during bleaching - a cleaner, and during rinsing - a fragrance, conditioner or softener.
The Electrolux company produces washing machines with horizontal and vertical loading.
Hoses also deserve attention: inlet and drain. The first supplies clean water to the tank, and with the help of the second, the waste liquid is pumped into the sewer. Auxiliary elements are pipes connecting important components of the system.
A washing machine is complex, especially modern “smart” machines, stuffed with sensors and electronics. But you can understand the arrangement and interconnection of the elements - the main thing is to carefully study the instructions and the internal structure of the machine.
Interesting:
- Electrolux dishwasher dimensions
- How does a top-loading washing machine work?
- Electrolux washing machines
- How does a Zanussi washing machine work?
- Electrolux dishwasher repair
- How does a Samsung washing machine work?
Reader comments
- Share your opinion - leave a comment