The washing machine sooner or later fails: natural wear and tear, improper operation, power surges and other factors lead to various malfunctions over time. Replacement and repair of some parts may require complete disassembly of the device. It’s good if your machine is under warranty and you can contact the service - otherwise you will have to call specialists, whose services are not cheap. In this article we will tell you how to disassemble a washing machine with your own hands.
Having some experience with electrical engineering, using tools and relying on diagrams, you can independently disassemble the washing machine and fix minor breakdowns
Regardless of the brand (Samsung, LG, Indesit, Bosch, Ariston, Zanussi, Kaiser, etc.), automatic washing machines have a similar design and operating principle. In our article you may find some differences with your model, but they are minor and do not affect the disassembly process.
It’s worth mentioning right away that not all breakdowns can be fixed on your own. For example, diagnosing and repairing an electronic control module and motor requires special knowledge and skills, and replacing bearings, especially if the washing machine has a soldered tub, will require special tools, as well as physical effort, time and ingenuity.
Is it worth taking the job?
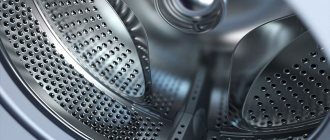
Most often, the washing machine drum is disassembled in order to replace failed bearings. It is not difficult to identify this breakdown; you just need to turn it manually and listen. If resistance to rotation is felt, extraneous noises are heard, usually crunching and crackling noises - the bearings need to be changed.
Without a doubt, replacing bearings, like a number of other works, can be performed by a specialized service center, but the cost of a specialist’s services is often unreasonably high, this is especially true in the case of repairing a machine with a non-separable drum. Not a single service center will undertake repairs of this kind, offering to install a new module instead of replacing the bearing.
If it is expensive to repair in a workshop, you have the time, desire, tools and experience of this kind of work, you can disassemble any drum yourself, it is only important to be extremely careful and attentive.
Disassembly of vertical SMAs
These are compact and ergonomic devices in which the tank is secured with screws. Dismantling is carried out in this order:
- Unscrew the screws that secure the back panel and the lower part of the facade.
- The side panel is moved to the side and then removed.
- Remove the wiring along the entire length of the casing and unscrew the screws.
- Next, the steps are the same as in frontal SMs - unscrew the fixing screw and remove the drum.
The main reasons for drum failure
The drum of an automatic washing machine is one of its most important components; it is the basis, at least, of its mechanical component. Like any other component and assembly, it can fail, which will entail the need for repairs. In addition to the most common malfunction - bearing failure, repairs may be required in a number of other cases.
Drum jamming caused by foreign objects getting inside. Unfortunately, this happens quite often. A torn button, a fastener, a metal object forgotten in a pocket - all this can end up in the space between the body and the drum, get caught on the heating element, fall into the hole, blocking rotation and destroying the tank.
The use of certain types of detergents can cause rapid wear of the seals, they lose elasticity and crack. The seal does not cope with its task, water seeps through it, which negatively affects the operation of the machine as a whole and can cause an accident.
You cannot do without dismantling the drum even if the shaft is damaged. A broken drive belt or a skewed pulley can all lead to the need for serious repairs involving complete disassembly of the device.
A common reason for a machine to suddenly stop working is the failure of the electric motor or the need to replace the commutator brushes. To repair the engine, it is not necessary to disassemble the drum, but you definitely cannot do without removing it.
Rules for disassembling the frontal SMA
- Disconnection from the network.
- Removing the drain hose.
- Blocking the inlet hose.
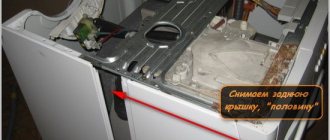
- Unscrewing the screws holding the rear panel SM.
- Removing the front and top panels.
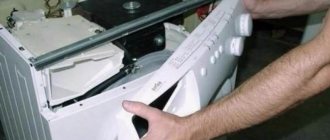
- Removing the detergent container. Use a slotted screwdriver to remove the control panel - you do not need to remove it entirely. By placing the panel on the side, you can free up access to disassembly.
- Removing the hatch cuff, and then dismantling the bottom panel. There are screw connections here - they are unscrewed. Now you can start removing the tank.
- Before unscrewing the washing machine drum, remove all attached spare parts and disconnect the motor - it is located in the rear.
Preparatory work
Before getting down to work, you should prepare your workplace and stock up on the necessary tools. We need to start with the car. Removing the drum is a large-scale undertaking; the machine must be moved away from the wall, preferably installed in the middle of the room to gain access to all its parts.
Immediately you need to worry about lighting. Even if you have a bright room for work, it would be a good idea to prepare a portable lamp or lantern.
In order not to be distracted by searching for tools during work, everything you need must be prepared in advance. The list can be adjusted depending on the brand and model of the device, but in any case you cannot do without the following:
- screwdriver or universal screwdriver with a set of attachments,
- pliers, preferably several with different jaw widths,
- metal and wooden hammer (mallet),
- a set of keys or sockets with a knob,
- car bearing puller.
If the task is to disassemble a non-separable drum, you will have to prepare something else:
- electric drill and drills,
- metal hacksaw,
- hot melt adhesive.
As a result of prolonged use in a damp room, the bolts are guaranteed to be covered with a thick layer of oxide; to remove them quickly and painlessly, you must also stock up on WD-40 or its equivalent. A blowtorch or gas torch will help you quickly and easily dismantle the bearings. Of course, you should not work with open fire in the house. It would be better to go out into the yard or work in a ventilated workshop.
Reassembly and inspection
The reverse assembly process follows the following algorithm:
- we mount the tank in its original place (suspended on springs);
- install shock absorbers (for this work it is convenient to place the machine on its side);
- connect the drain hose;
- we connect the wiring to the heating element and the engine (it is convenient to carry out the work when the machine is positioned vertically);
- install the drum cuff and secure it with a clamp;
- connect the water intake, control panel;
- install a counterweight;
- fix the lid of the washing machine;
- We connect the washing machine to the sewer.
You can check the operation of a repaired washing machine only during the washing process. The machine is plugged in, select the required program on the control panel, and press the “start” button.
Removing the Drum
Before you can begin to actually disassemble the drum, it must be removed; the operation algorithm largely depends on the type of machine, the specific model and its manufacturer.
Front loading machine
This type of machine is the most common. The process of removing a drum from such a machine is a rather complicated procedure, but with persistence, attention and accuracy, any job can be completed.
Before starting disassembly, it is important not to forget to disconnect the machine from communications, turn it off and remove the plug from the socket.
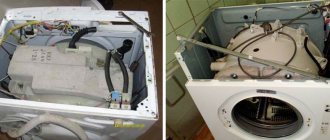
- After unscrewing several bolts holding the top panel, it is moved back and removed. Access to the insides of the device is provided.
- Unscrew the bolts securing the rear wall. They take it off.
- By turning the pulley, remove the drive belt.
- Disconnect all wiring going to the drum.
- Unscrew the bolts securing the electric motor.
- If the model has an upper counterweight, remove it.
- Remove the detergent tray. In most models from LG, Samsung, Indesit and a number of other manufacturers, it is held in place by a plastic latch.
- Disconnect the supply pipe.
- Unscrew the bolts holding the control panel.
- Carefully remove the panel.
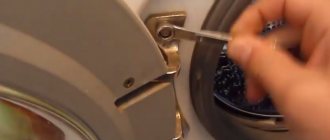
- Loosen the clamp securing the cuff of the loading hatch and tuck it inside the drum. It is important not to forget that the cuff is made of soft material and is very easy to damage.
This will open access to the drum, hanging freely on springs and shock absorbers. You can remove it. In some models of washing machines, in particular those manufactured by Samsung, it will be easier to work if you first remove the front panel and unscrew the lower shock absorbers.
Top loading machine
These devices are distinguished by excellent functionality with very modest dimensions. A top-loading washing machine has a hatch at the top. The drum is fixed in it with bolts. Due to significant differences in design, disassembling the device looks slightly different.
- They turn the car around.
- Unscrew the back wall by unscrewing several screws.
- Move the side walls aside and dismantle them.
- Remove all interfering electrical wiring.
- Unscrew the bolts securing the plastic cover.
- Release the shaft and remove the drum.
Regardless of the type of machine, it would be useful to take step-by-step photographs during the work. Having your own instructions with a photo will make subsequent assembly much easier and will protect you from the appearance of “extra” spare parts.
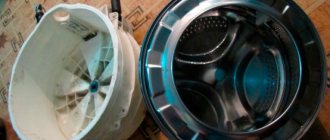
Collapsible drum
Most models of modern washing machines, this is true for models from famous manufacturers: LG, Samsung, Ariston and others, have a collapsible drum, which significantly simplifies any repair work associated with it. Structurally, it consists of two halves, which are bolted together. Along the joint line there is a gasket or a layer of sealant, which ensures ease of disassembly and tightness of the drum.
Most often, disassembly is not particularly difficult, you just need to perform a number of actions in the following sequence:
- place the drum on a flat surface with the hatch down,
- jam the pulley using a small wooden block,
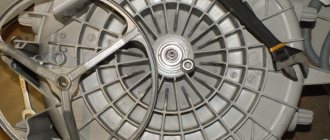
- Use a socket wrench or a socket with a ratchet to unscrew the bolt securing the pulley,
- After the pulley is removed, use a wrench of a suitable size to unscrew the connecting bolts,
- The halves are easy to separate; you may need to apply several light blows to the shaft with a mallet or a regular hammer through a wooden block.
When planning to unscrew a pulley, you must be prepared for the fact that the bolt will resist. If this is the case, you should not try to unscrew it “forcibly”; it is easy to tear off the edges, or even break the rod, as a result of which the repair will take a long time. Before unscrewing any bolts inside the washing machine, you should use WD-40, this will make the work easier and ensure the safety of the original fasteners.
After the drum is disassembled, you can proceed directly to replacing the bearings or removing foreign objects that have jammed the machine. If the task is to remove old bearings, it is better to use a screw-type puller. You can preheat the bearing, but you must use a torch or blowtorch with extreme caution so as not to damage the drum itself.
When changing bearings, it is important to pay attention to the condition of the sealing seals. If they have lost elasticity, there is a lot of wear or mechanical damage, the seals are replaced along with the bearings. Afterwards all that remains is to assemble the car; this is done in the reverse order. Of course, before assembling the drum, a layer of sealant must be applied to the parts being connected.
DIY washing machine tank repair
A washing machine is no longer a rarity and is a mandatory attribute of every home.
Its breakdown is always a nuisance, so there is a desire to quickly return the washing unit to work.
The tank of a washing machine is its main and main part.
In this article we will look at how to fix a problem with a washing machine tank.
What is a washing machine tank
It is in the tank that the moving parts of the washing equipment and the drum are located, among other things.
The tank washes the laundry, despite the fact that it directly interacts only with the walls of the drum.
It is into the tank that water flows and it seems that such a durable, but at the same time, mechanism that apparently does not perform the main job cannot break.
However, there is something in the tank that can go wrong. Repairing a washing machine tank is quite a labor-intensive job, and in order not to redo it, you will have to work conscientiously.
If you need to get to the heart of the car, you will have to disassemble it completely, then take out the tank and disassemble that too. The last stage of work after repairing the washing machine tank is reassembly in the reverse order.
Types of tanks
Tanks can be made from:
- enameled,
- stainless steel and
- plastic.
Today it is rare to find an enamel tank.
A stainless steel tank is reliable and can last for decades, but its production is quite expensive. Therefore, this type is found in expensive models.
A plastic tank is found in most modern cars. They are simple to produce, weigh little, and heat water quickly.
The disadvantage of a plastic type tank is its fragility, but with proper use it can last quite a long time.
Tank malfunctions
What can break in the tank?
- Bearings. A very inexpensive part, but it will take a lot of effort and time to replace it, risking serious damage to the shaft, pin and other parts. Bearings are located in the tank and are moving elements.
- Drain hole at the tank. Or rather, the drain valve, which usually breaks or becomes clogged and requires cleaning.
- Shaft. Typically, a problem with a shaft is the consequence of unrepaired bearing failure.
- Tank walls. Also the consequences of improper operation of bearings and shock absorbers, which lead to deformation of the tank walls under the influence of the centrifugal force of the drum.
Many serious failures begin with a bearing failure. Sometimes untimely repairs can lead to replacing the entire tank.
Disassembly
Repairing a non-removable washing machine tank is much more difficult.
The question arises: why not make all the tanks collapsible? Because when temperatures change, the tightness of the part is lost due to loose fasteners.
- Before you begin disassembling the part, you need to inspect the body from all sides and find the location of the soldered seam. It will be needed to drill holes for fasteners for reassembling the part.
- Armed with a drill and a thin drill, you need to drill 15-20 holes in a circle along the seam.
- Next, this seam must be sawed to get inside the tank. This is done with a hacksaw for metal. It takes a lot of time, you will need patience. The maximum recess when sawing the tank should not be more than 5 cm, otherwise irreparable damage to the walls of the tank can be caused.
- After this stage, the non-separable tank became collapsible and consists of two parts - front and rear. The front is an irregularly shaped plastic ring with a hatch and a rubber cuff in the middle.
The rear one consists of a drum with a drive mechanism, which we will remove. To do this, turn this part over with the hatch down and begin to disassemble the shaft. - Be careful with the screw in the middle. In order to unscrew it, you will need to attach a metal rod to which you need to hit with a hammer. After these steps, the screw can be unscrewed with a screwdriver.
- Now it's the shaft's turn. It is removed using 3 wooden blocks (1 small and 2 large). The tank is placed on large bars and a small block is hit with a hammer, which is installed on the rod. Despite the fact that the rod looks strong, the blows must be of a certain force - weak, stronger and even stronger, so as not to damage the part. As a result, the drum should separate from the tank.
- You don't have to dismantle the bearings if there is no problem with them. A damaged tank may be to blame.
- But often bearings or oil seals still have to be changed, then you will need a metal rod, with the help of which gentle blows are applied with a hammer to the edges of the part. It is under no circumstances recommended to tap on one edge to avoid drilling out the part. Both bearings must be replaced if they are faulty.
After the work has been completed, the machine is assembled in the reverse order.
Assembly
How to glue the washing machine tank after repair?
The sawn parts of the tank are lubricated with sealant and connected.
Cold welding can be used.
Bolts are inserted into the drilled holes and secured with nuts.
The size of the bolts will depend on the diameter of the holes you drilled.
If the tank is plastic
If the tank is plastic, it may have cracks and cause water leakage.
We immediately dismiss the option of soldering the crack, because this is a conditional repair of washing tanks that will not last long.
The best option is to replace it with a new tank. The price of a metal tank is more expensive than a plastic one.
If the tank is made of stainless steel
If we consider the possibility of repairing a stainless steel tank, then the option of using welding is quite justified. Of course, it is better to trust an experienced welder who will do everything carefully and quickly. After welding, you can paint over the seam with waterproof enamel to increase the service life of the part.
Keep in mind that sealant, no matter what quality, and cold welding will not solve the problem.
Methods for determining the collapsible tank of a machine
There are several ways to determine the material of a tank.
- Check in the data sheet. It is known that at spin speeds of 1600 rpm and higher, machines use only stainless steel materials. And these data can be viewed in the technical data sheet. But the strength of polymers is growing every year, and soon this method of determination will become obsolete.
- Ask your sales consultant when purchasing. But often managers of sales floors in hardware stores themselves do not know the structure of the units they sell. And if you ask to remove the front panel to examine the inside of the washing machine, you may receive a polite refusal.
- Consult the service specialists in advance. A qualified specialist can give good advice on choosing a brand with the right tank, but there is nothing better than seeing everything in person.
- Perform a personal visual inspection. To do this, you just need to tilt the machine and look underneath it. All devices do not have a bottom, and it will not be difficult to consider whether a given sample has the ability to replace bearings.
Collapsible tanks for washing machines are gradually becoming a thing of the past. The future belongs to stamped monolithic containers made of high-strength polymers, as they are cheaper to produce, are as durable as stainless steel parts, and are also more economical. For example, the walls of a polymer tank have low thermal conductivity, which allows you to maintain the temperature at a given level for a long time, which means saving electricity on heating water.
But while the cost of replacing a non-demountable unit will be equal to or exceed the price of half a washing machine, it will be more profitable to buy units with collapsible washing tanks.
Is it possible to solve the problem
If something gets into the drum assembly, it can cause the washing machine to stop and break down. To remove debris, you must disassemble the unit. However, it is worth considering that there are some nuances. The drum should be removed very carefully so as not to touch other parts of the device. As a rule, such repairs are carried out by professional craftsmen. If it is not possible to turn to specialists for help, then you can try to solve the problem yourself. The main thing is to adhere to the recommendations described below.
See also -
Problems with water temperature in the washing machine: checking the sensor
Why do you have to glue it?
Sealing and gluing the washing machine tank is a forced process that owners of some SMA models have to deal with. Washing machines with a non-removable tank are offered, for example, by brands such as Ariston and Indesit. Manufacturers, making this element monolithic, do not intend to disassemble it. If the bearing breaks, the unit must be completely replaced. But such a replacement costs a lot of money and our people simply cannot agree with this order of things. As it turned out, you can halve the drum, remove the bearing, replace it with a new one, and then connect the halves
It is important to know how and with what to seal the tank
Symptoms of a problem
The main signs of drum failure:
- the drum creaks, knocks and rubs;
- the drum does not rotate or does so with difficulty;
- the drum dangles;
- increased vibration during operation of the washing machine;
- increased noise;
- leakage;
- a foreign odor appears.
Assembly Tips
The assembly of washing equipment from different manufacturers may differ, but general recommendations from professionals will help to carry out this work efficiently.
After sawing, the two parts of the body can be glued together with silicone glue - this is the best sealant for this purpose, connecting both metal and plastic well. They need to carefully go around the edge of the cut, but try not to use it in large quantities. Before installing the new bearing, the seating area must be cleared of dirt and small debris. You can tap it not only with a hammer, but also through an insulating washer made of getinax
It is very important to hammer the part all the way. After removing the bearings, the drum shaft is thoroughly polished, and there is no need to remove the spider. Before checking the machine, it is also important to clean all parts of the equipment, including washing the drum and descaling the heater. It is better to place the tank on the springs with two people, but it is also possible to fix the spring at the top and then tension it.
If you are repairing the unit yourself, remember that assembly must be carried out strictly in the same sequence as disassembly.
Tricks for repairing a washing machine tank in the video below.