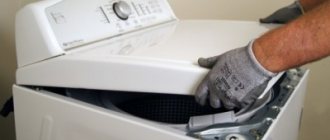
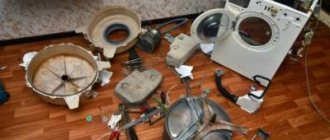
It is not difficult to disassemble a Whirlpool washing machine if you know how the device works. All elements of household appliances are enclosed in a metal casing, so dismantling must begin with it.
Before you begin, you need to prepare for this process and study the layout of the basic components.
To learn how to disassemble a Whirlpool washing machine with your own hands, read the article.
Preparing to disassemble the Whirpool washing machine
Preparing to disassemble a Whirlpool washing machine is a mandatory step. You should not ignore it, so as not to be distracted by searching for the necessary tools while doing the work.
For dismantling you will need:
- pliers;
- screwdrivers of different shapes or a screwdriver;
- wrench;
- hammer (needed when replacing bearings);
- empty bucket and rag;
- VD-40 lubricant or its equivalent.
When the tools are collected, it is necessary to decide on the location of the work.
It is inconvenient to do this in the bathroom, since space is limited. Therefore, it is better to take the machine into a spacious room with good lighting.
Before proceeding with transportation, the equipment must be disconnected from all communications . In order not to spoil the floor covering, it must be covered with cardboard or thick material. You should also keep a bucket and a rag at hand in order to collect the remaining water from the pipes in time.
Signs of a heating element malfunction
A specialist can calculate almost any malfunction even without diagnostics; a heating element malfunction is most often accompanied by the following symptoms:
- The machine does not heat the water - to check, just touch the hatch through which the laundry is loaded. washing in this case becomes impossible, programs can be performed in the standard mode; in modern models, information about the heating error is displayed on the display;
- The machine is knocked out immediately after starting or after 8-12 minutes. after turning on the heating - this often happens when the coil in the heater is short-circuited;
- the machine knocks out the RCD after switching on or during the process of heating water, this situation is typical for a short circuit of the heating element to the housing or electric current leakage to the housing due to poor insulation;
- continuous washing over a long period of time.
The listed signs are considered indirect; the technician has the right to change the heating element after checking the device with a multimeter. Replacing the heater does not take much time, the procedure takes no more than 30-40 minutes, less for professional technicians.
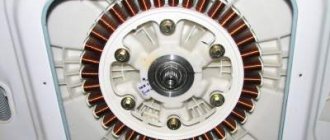
SMA device diagram
Basic elements of all Whirlpool machines:
Motor. If it is a commutator, then it includes a drive belt. The inverter motor is directly connected to the drum.- Buck . It consists of two halves with a drum inside. Its package includes a crosspiece, a bushing, a shaft, and bearings. There are bumpers (stiffening ribs) inside.
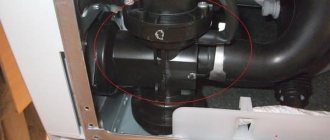
- Water drain pump . Its design consists of a motor, impeller and pipes. Before entering the pump, the water passes through a mesh filter.
- Shock absorbers. These are two springs that hold the tank.
- Control board . This is the main element that is responsible for all the actions performed by the washing machine.
- heating element . This element heats the water. It is located under the tank.
- Tacho sensor . It controls the rotation speed of the drum.
- Pressostat . A small sensor is located under the top cover. It performs the function of determining the water level in the tank.
- Counterweights . They hold the device in place during vibration.
In addition to the listed elements, the design of the washing machine includes:
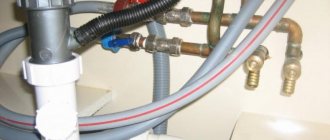
- drain hose,
- inlet hose,
- input filter,
- power cable.
A diagram of the washing machine is needed in order to understand exactly where each element is located. In general, the differences between different models of Whirlpool SMAs are minimal. The only difference is the orientation of the drum.
For top-loading appliances it is located on top of all elements, and for front-loading appliances it is in the center. It is held in place by two shock absorbers. On the front wall there is a hatch with a cuff and UBL. For top-loading machines, the control board and powder tray are located in the upper part, and the drum is hidden under the lid.
Drum recess
For further repairs, it is necessary to provide access to the tank from both sides. It is free at the front; all that remains is to loosen the pulley at the back and remove the drive belt. We proceed like this:
- unscrew the five screws holding the back wall;
- remove the drive belt from the pulley;
- loosen the nut securing the pulley;
- remove the drum from the housing.
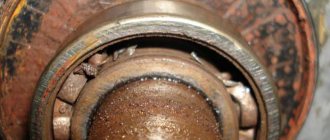
The first step is to assess the condition of the cross. If there are no marks, abrasions or chips on the shaft, then there are no problems with the part - you can continue replacing the bearings. Otherwise, you will first have to “get distracted”, repair the blades or buy a new spare part.
If the bearing is strongly stuck to the shaft, it is necessary to generously treat it with WD-40 and wait 15-20 minutes.
Having dealt with the cross, we begin to replace the bearings. The tools you will need are a hammer, WD-40 and a drift. Instead of the latter, you can take a car puller or a blunt chisel. It is necessary to knock out the “clips” from the seat according to the following instructions:
- remove the oil seal, rubber seal, picking it up with a screwdriver;
- place the drift in the center of the outer bearing and, moving in a circle, tap the “ring”;
- go around the washer and knock out the second bearing in the same way.
The dismantling does not end there . It is recommended that after removing the bearings, thoroughly clean the seat - remove dirt and deposits, wipe with a rag and apply generously with lubricant. The drum shaft also needs cleaning. After “cleaning”, you can change the spare parts by installing new rings and an oil seal.
Instructions
The disassembly diagram for the Whirlpool washing machine will differ depending on the type of load. First of all, this concerns the sequence of actions.
Front loading appliance
Adhering to the following algorithm, you will be able to disassemble any model of Whirlpool washing machine with horizontal loading:
Unscrew the top cover. It is secured with two bolts, which are easy to reach. After removing them, the lid is lifted up slightly and pushed forward.- Unscrew the screws holding the control panel and remove it. Behind it is an electronic module, which is fixed with small bolts and latches that need to be opened.
- Immediately under the top cover you can see the water level sensor. It is held on by one bolt, which is unscrewed.
- The next step is to remove the detergent tray. To get it out, you need to pull the plastic tab. There are no other fixing devices.
- To remove the front wall, you need to tighten the top mounting screw. If necessary, remove the hatch cover. Release the clamp and remove the cuff. You can then remove the front wall completely and move it to the side.
- Behind the front wall there are traverses that need to be twisted.
- Disconnect the contacts leading to the surge protector and remove it.
- Remove the water supply valve. It can be seen on the back panel at the top.
- Twist the counterweights.
- Remove the belt and motor.
- Remove the heating element, which is fixed with one bolt. You need to take it out carefully, swinging it from side to side.
- Disconnect the thermostat.
- Remove the tank. If necessary, untwist it into two halves.
- There is a drum inside the tank. If access to its internal components is required, first remove the spider, then the pulley, oil seal and bearings.
- Dismantle the pump. It is disconnected from the filter, drain hose and pipes.
The washing machine is completely disassembled. You can begin repairing or replacing spare parts.
The video will show you how to disassemble the Whirlpool washing machine:
From vertical
To disassemble a Whirlpool top-loading washing machine, perform the following steps:
- Unscrew the fasteners that are located on the right and left walls of the case. They act as external latches for the top cover.
- Carefully pry up the control panel and disconnect the contacts from it.
- Under the panel you can find several more bolts that are also twisted. Another screw is located behind the seal; once this is removed, the top cover can be removed.
- Loosen the clamps and remove the pipes.
- Screw in the bolts holding the side walls and front panel.
- Remove the belt from the motor.
- Dismantle the engine.
- Remove the pump.
- Twist the heating element.
All that remains is to remove the drum and counterweights, remove small elements (pressure switch, thermostat, filling filter) and hoses.
What should you protect Whirlpool washing machines from?
The need for servicing of the presented household appliances arises for the following reasons:
- Power outages and power surges can lead to failures of the software unit, damage to boards and electrical connections;
- due to careless operation, leaks occur, buttons are pressed through, the hatch cuff is damaged, the lock and other components fail;
- the mechanisms of a Whirlpool machine, like any other equipment, are subject to natural wear and tear, so sooner or later they require replacement;
- The drain hose, pump, drum, and pipes become clogged with dirt and foreign objects, which require professional tools to remove.
How to put it back?
After completing the planned work, the machine needs to be assembled. All actions are performed in reverse order, starting with the largest element - the tank.
When it is in place, install the pump, motor, heating element . The sensors are screwed on top, pipes are inserted, and counterweights are fixed.
When all the nodes are in place, the body is assembled. Before screwing on the top cover, you need to once again check the reliability of the fittings and the tightness of the contacts.
If the detergent dispenser and pipes are coated with limescale on the inside, the stone must be removed before reinstalling. A solution based on citric acid copes well with this task. Soaking time is about 30 minutes.
After connecting the device to communications, you need to check its functionality . To do this, the wash is started without items. You can choose a short program, the main thing is that all functions are used: heating the water and spinning.
If the machine is working properly, there are no leaks or excessive vibration, you can operate the equipment as before. If leaks are found after assembly, first check the tightness of the drain hose. Sometimes the problem can be fixed by simply tightening the clamps.
Where and at what price can I buy a new one?
Before repairing, you must purchase spare parts. It is not possible to buy a universal part, since the size range of bearings is quite wide. One manufacturer may have more than a dozen species. When choosing, it is recommended to follow the designations of original or similar parts.
The most common bearings for whirlpool with numbers:
202;- 203;
- 204;
- 205;
- 206;
- 207;
- 305;
- 306.
You can use the following selection methods:
- Find the information in the instructions for the washing machine.
- Using the serial number of the machine, obtain information from the Internet.
- Dismantle the old part and use its markings to accurately decide on the purchase. This is the most reliable way.
You can purchase bearings at many home appliance parts stores. Parts are often offered by workshops that repair cars. A large selection is available in online stores. The price is within 500 rubles, the elements are sold both in a repair kit and separately. Replacement usually requires two bearings: a large one and a small one.
Additional components are also important . Even the most expensive bearing will not last even a year if a low-quality oil seal is installed and the wrong lubricant is used.
Difficulties and ways to overcome them
Difficulties that you may encounter when disassembling the Whirlpool washing machine:
- in order not to confuse the bolts that secure different elements, they need to be laid out on sheets of paper and the corresponding signatures made; matchboxes are also suitable for this purpose;
- when connecting the control board, there is a risk of mixing up the terminals, which can cause damage to household appliances - to prevent this from happening, the wire layout must be recorded on your phone;
- some bolts may come out of the thread with difficulty; if they are rusty, they need to be treated with lubricant;
- if after assembly any of the elements do not work, it is necessary to check the tightness of the contacts;
- To avoid stripping the threads, do not apply excessive force; the bolts must be secured securely, but without force.
Call the master
In cases where it is impossible to replace the heating element yourself, the best solution would be to turn to professionals . The most obvious way to find a master is to look at popular message boards on the Internet. There you can compare prices for services and phone numbers of specialists.
In order not to make a mistake in choosing a worker and not to fall for scammers, it is worth looking for reviews about a specific master. A reliable way is to get a phone number from someone you know who has already had their washing machine successfully repaired by this technician.
In the regions of Russia, the cost of replacing a heating element starts from 600 rubles. In many advertisements the price is indicated “by agreement”.