Check progress
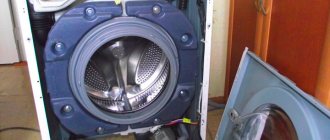
To gain access to the tachometer on the ElG washing machine, you need to disassemble the device. The first step is to turn off the power to the equipment and disconnect the washing machine from the home communication networks. Then you need to move the machine to a place where it will be convenient to disassemble it. It is important to ensure free access to the back cover of the automatic machine. Algorithm for subsequent actions:
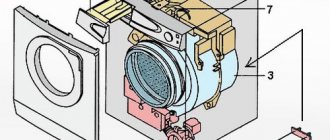
- Unscrew the bolts holding the back wall of the case, remove it and put it aside;
- using a 17mm wrench, unscrew the rotor screw (it is important to ask someone to hold the drum from the inside to prevent it from rotating);
- remove the motor rotor;
- armed with a 10mm socket, unscrew all the bolts holding the stator assembly (when removing the last self-tapping screw, hold the stator with your hand so that the element does not fall off or fall);
- disconnect the clamps and connectors from the assembly.
This way you will have access to the Hall sensor. To diagnose faults, it is not necessary to disconnect the element. You can check the tachometer for functionality using a multimeter. It is necessary to set the resistance of the device to 20 kOhm and apply the probes to outputs 1 and 5, then to 2 and 5.
The multimeter screen should display a value from 5 to 15 kOhm; if the resistance is less, the Hall sensor will have to be replaced.
Diagnosis of tachometer malfunction
How can a simple user understand that there is a malfunction with the Hall sensor? External signs:
- The machine suddenly changes the drum rotation speed.
- Insufficient number of revolutions for high-quality spinning of laundry.
- When washing, the drum rotates faster than expected.
But before diagnosing a breakdown, you need to know how to check the tachogenerator in a washing machine. To do this, you will have to remove the SMA engine, so first we will rule out more likely problems:
- Look at the control panel. Find the spin key there and check to see if it is stuck, which is what caused the problem.
- Restart the washer. Unplug it for 15-20 minutes, then turn it on. If nothing has changed, then the tachogenerator needs to be checked.
Removing and installing the sensor
If a malfunction of the tachometer is detected, the only way out is to replace the part with a new one. The first step is to dismantle the old Hall sensor; to do this, use a slotted screwdriver to disconnect a special latch. It is important to act carefully so as not to damage the fasteners and contacts. After loosening the fastening, the tachometer is carefully removed from the groove.
When removing the Hall sensor, do not damage the latch on the stator, otherwise this will greatly increase the cost of repairs.
It is better to go to the store with the old sensor removed, this will help you avoid making a mistake in choosing the part. When ordering an item in an online store, be very careful and take into account the product labeling. Also check the purchased tachometer with a multimeter to ensure that the new part is in good working order. Often, retail outlets sell defective components, so precautions will not be superfluous.
Then you can begin installing the Hall sensor. Insert the element so that its recesses completely coincide with the guides on the stator. Carefully press the tachometer until you hear a characteristic clicking sound. Then all components of the LG direct drive washing machine are installed in the reverse order. Having finished assembling the washing machine, connect it to the water supply and sewerage system, and plug it into the electrical network. Check the equipment for functionality.
Source
Replacing the sensor
It is not possible to repair the pressure switch in all cases, so the best solution would be to purchase a new one and replace it. The sensor is supposed to be replaced with one similar to the type and model of the washing unit. Before purchasing a new unit, it is recommended that you do the following:
- Clearly rewrite the name of the pressure switch that has become unusable, double-checking each symbol or letter.
- Inform the seller of the model to eliminate the possibility of error.
Ideally, you would purchase a marked relay, in accordance with the number written on the sensor housing element.
To install, just use the following algorithm:
- Install the tube that was originally removed from the used pressure switch in the same place, but only on a different sensor.
- All electrical wires must be connected to the sensor.
3.Using bolts, the pressure switch is installed in its intended place.
- The top cover of the washing unit is reinstalled in its intended place, but do not forget about securing it with bolts.
- Now you can connect the machine to the electrical network.
- Loading the laundry into the drum is the next operation.
- Set the recommended washing mode and start the mechanism.
After the repair has been carried out, it is strongly recommended to be nearby to observe how the unit functions, so you can conclude whether everything was done correctly. In the absence of comments or other failures, there is reason to believe that everything is normal.
Repair of Hall Sensor SMA LG (6501KW2001A)
Manufacturers of washing machines strive for constant improvement and creation of competitive advantages, the Korean company LG is no exception, and many craftsmen have already encountered their drum drive motors, which differ from the classic design in the absence of a drive belt and additional “wear elements” (commutator brushes, armature bearings and lamellas)
On the one hand, direct drive washing machines are more reliable, but on the other hand, they also received additional elements unique to their class of electric motors
The number of rotation speeds is controlled by a microcontroller, which “sees” this information using
In the last article I wrote about the hall sensor in Whirlpool washing machines, but there are design differences from LG
The PCB has Part Number EBR375603! Let's get acquainted with the Sensor pins, according to the pinout on the printed circuit board: 1 pin - Sb 2 pin - Sa 3 pin - NC 4 pin - GND 5 pin - VCC
Resistance between the contacts of the working sensor: Between pins 5(VCC) and 1(Sb), 5(VCC) and 2(Sa) is equal to - 10 kOhm (10.32 kOhm is a very good indicator, but in practice it can be 9.32 kOhm , are considered to be the performance indicators of the sensor - tested experimentally). If you do not have readings between the terminals, then it is often enough to replace the SMD Resistors: - Between terminals 5 (VCC) and 1 (Sb) these are resistors - R03S 681 (1206) = 680 Ohm and R04S 681 (1206) = 680 Ohm - Between pins 5(VCC) and 2(Sa) are resistors - R01S 681 (1206)=680 Ohm and R02S 681 (1206)=680 Ohm
But even if you have a resistance of 10 kOhm, you shouldn’t rejoice in advance, the sensor may still not be working due to the Hall Sensor - W12C! If this is pin 1(Sb) – IC02S and 2(Sa) – IC01S! When there were no “donors”, I found a working analogue of the Hall sensor: bipolar - Hall Sensor SS41 (4.5-24v), which had to be modified with an SMD resistor - 103 (1206) = 10 kOhm as shown in Figure 2 and Figure 3!
Consider the fact
– if you install the resistor not at the same level with the TO-92 Hall Sensor housing and leave excess solder, the board will not fit into the plastic housing, and if you try to connect it with force, the resistor will come off or damage the Hall Sensor! When replacing Hall Sensor SS41, take into account the height of the mounted part, it is 12.1 mm! (Fig. 4) SMD parts included in the LG Hall sensor: IC01S - W12C (analogue of Hall Sensor SS41) IC02S - W12C (analogue of Hall Sensor SS41) R01S SMD marking - 681 (housing 1206) = 680 Ohm R02S SMD marking - 681 (housing 1206 )=680 Ohm R03S SMD marking - 681 (case 1206)=680 Ohm R04S SMD marking - 681 (case 1206)=680 Ohm C01D (C3)- 100 nF case 0805 C02S (C2)-10 nF 50V case 0805 C01S (C1 )-10 nF 50V housing 0805
Signs of breakdown
If the tachogenerator fails, the normal operation of the entire washing machine is disrupted. The reason for this is the lack of data from the control unit and the rotation speed of the electric motor. The failure manifests itself as follows:
- if the electric motor of the washing machine gains excessive speed, then during operation of the unit you can feel an increased level of vibration, noise, and beating inside the housing;
- with increased load on the electric motor, the bearing mechanism of the pulley and the shock absorbers of the washing machine experience excessive load and may fail prematurely;
- when the electric motor turns uncontrolled, the entire system of mechanisms becomes unbalanced, which is why we hear a beating inside the machine body, and the pulley drive belt quickly wears out or breaks;
- in washing machines with an inverter engine, if the tachogenerator breaks down, a sound similar to a squeak will be heard, while the rotation of the drum is usually blocked, and the sound increases;
- If the tachometer is broken, the washing machine may operate jerkily and not carry out the spin program.
Tacho sensor for washing machine
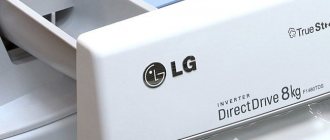
The motor of direct drive washing machines operates in difficult conditions, which are characterized by sharply uneven torque values over time. Since many manufacturers minimize the dimensions of the electric motor, their declared overload factor rarely exceeds 10%. In such conditions, the durability and reliability of the tachometer located in the washing machine is crucial (the control panel of the LG washing machine is shown in the figure). How to make a tachometer or diagnose it?
What it is?
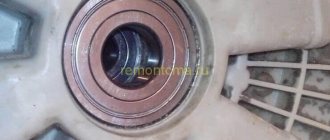
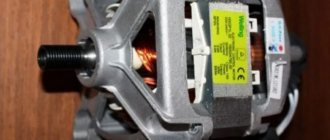
Any washing machine operates thanks to an electric motor, whose function is controlled by a so-called tachogenerator - a small electrical appliance. The washing machine's tachometer is located on a part of the engine called the rotor. The sensor serves to monitor the engine speed and takes into account the voltage value of the generated electric current. Due to the fact that the washing machine has such a sensor, all components (including the engine) operate within the parameters specified by the washing program.
In appearance, the tachometer looks like a compact metal ring equipped with wires of small diameter. The tachogenerator can be easily found in automatic washing machines equipped with a commutator motor.
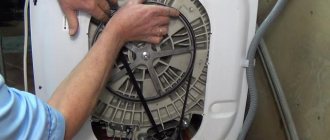
Determining which engine option is used on your model of automatic washing machine will not be difficult - you will need to dismantle the rear panel of the case, and if you see a large wheel with a drive belt, you have a commutator motor.
If during inspection you do not find a pulley with a drive, you should understand that your machine runs on an inverter-type motor, where the sensor is built inside the housing. The tachometer records the speed of the electric motor and transmits the received data to the electronic board of the central control unit.
The data is processed, and the washing machine either increases the number of revolutions or reduces them.
Operating principle
Failure of the electric motor is associated with a current overload in the circuit. This unfavorable phenomenon can be warned by the Hall sensor in the washing machine. Hall sensors are compact and accurate. Sometimes such devices are called rotor rotation control sensors. The sequence of their operation is as follows.
If current flows through a conductor and a magnetic field, the induced magnetic flux can move through the conductor perpendicular to the flow of current, causing charged particles to drift toward the edges of the rectangular strip. These charged particles aggregate at the edges of the surface. The magnetic flux imparts a force to the conductor, causing the voltage (plus sign) to drift toward one edge while the electrons (minus sign) move to the opposite edge. The force acting on the flow of current is called the Lorentz force.
While a magnetic force is applied to a conductor, the carriers are located on opposite sides, creating a voltage drop across the conductor. This voltage drop is the Hall voltage. It is proportional to the current flowing through it, the strength of the magnetic field and the type of conductor material.
If any of these three variables changes, the voltage drop across the conductor will also change. Therefore, the device must have a controlled voltage applied to the current path. If the current is controlled and the conductor material is given, the only thing left to change is the magnetic intensity. The greatest effect will be achieved when it changes at an angle of 90° to the direction of the current.
Sensor design
The design of the pressure switch is round, with adjusting screws and flat-shaped contacts located on the outside. Moreover, the function of the screws is to set and regulate the switching on and off of the pumping device at a given water level. There is a separate pair for the water level mode, namely:
- To fully load the drum.
- If the unit is only half loaded.
- Delicate wash mode.
4.Eco mode.
One screw is supposed to turn on when the set level is reached, and the second works to turn off.
The range of offered machines differs in the number of modes, that is, the sensor is adjusted for a specific model. To purchase a replacement element, you must tell the seller the name of the model, since an analogue from other equipment will not work.
The heads of the screws themselves are painted, this allows them to be unscrewed and installed unmistakably, and the color itself acts as a seal for the assembly. If the coating is damaged, then we can say that the warranty will not automatically apply.
The cylinder is structurally provided with a chamber for air, connected together with a tube, which in turn is lowered into the tank. When water is collected, the pressure indicator increases and a notification is transmitted from the built-in membrane to the signal contacts.
The terminals are in one row and located along the entire plane of the sensor, after which a terminal block with wiring is installed on them, directed to the immediate program. From the end, a tube of different sizes is lowered into the tank.
Signal Boost
The device is configured in two different ways - analog and digital. Such devices are classified as proximity devices; they do not make direct contact, but use a magnetic field to activate an electronic circuit.
The signal strength varies depending on the material in the conductor. The material directly affects the electrons or positive ions that pass through it. Semiconductors from:
- gallium arsenide (GaAs);
- indium antimonide (InSb);
- indium arsenide (InAs).
It is important that the conductor is rectangular and very thin. This allows space for the charges passing through to separate and combine at the edges of the plate. The more intense the magnetic flux, the greater the voltage drop across the conductor.
Checking the functionality of the sensor
Sometimes the problem is solved by simply resetting the control circuit. If this does not help, you will have to perform a series of actions described below.
Signs that your device is not working satisfactorily
How to check the tachometer? As the drum in a washing machine is rotated by the motor rotor, the Hall sensor - also mounted on the stator next to the rotor inside the motor - remains in a static position.
An electrical circuit inside the control unit detects the position and speed of the rotor and sends this information to the electronic control panel. The board uses this information to make decisions about the washing process and check that certain components are working correctly.
It happens that the Hall sensor in LG machines does not transmit a signal to the control board that the motor is rotating when it is supposed to do so, for example, during a scheduled shutdown of the washing machine.
Some of the reasons why the unit does not work:
- engine breakdown;
- malfunction of the device itself;
- break in the electrical control circuit.
Some external symptoms of a tachometer malfunction are: the washing machine refuses to start, the water does not reach the required level, the unit vibrates intensely, and the laundry is poorly wrung out. In this case, you can check using a regular multimeter.
Check procedure
To find a faulty sensor in an LG washing machine, you need to apply +5V (using a power source or battery) between the red wire, which is the positive terminal, and the black wire, which is the negative terminal. After this, the voltage is checked between each of the signal wires (white) and the red wire. When rotating the engine with your own hands, the voltage should vary from + 5 V to 0 V. When using tachometers such as SS411 or S41F, the testing voltage range can be increased to 30 V.
How to check the Hall sensor:
- The drive belt is removed.
- The engine is dismantled (when disconnecting the wires, they must be marked!).
- Inspect the fastenings: they may be weakened due to vibrations.
- Measure the resistance on the device using a tester. It should be about 60–70 ohms.
- Check if current is generated. To check, the tester is connected to the contacts and at the same time the motor is rotated by hand. If the voltage changes (within 0.2…0.4 V), then the device is working properly, and the cause of the breakdown lies in the control panel.
How to check?
Testing the tachogenerator is carried out by measuring its resistance, for which a multimeter is used.
- The device will need to be set to ringing mode and brought to the tachogenerator terminals . Next, with your free hand you need to set the motor rotor into rotation - the direction of rotation can be any. If at the moment of rotation the multimeter plays short sounds or the needle fluctuates, it means that the tachometer is working.
- The device must be switched to voltage detection mode, setting the limit to 4-5 Volts, and bring it to the tachometer terminals. We rotate the rotor and observe the device. If the voltage generation is 0.2-2 Volts, then the tachometer is working.
If diagnostics using a multimeter did not produce any results, it is necessary to visually inspect the tachometer to see how securely it is attached to the electric motor. If the mounting bolt is loose, it needs to be tightened. Sometimes the contacts of the tachometer may come loose - they are also checked and tightened. The tachogenerator in good condition on the multimeter shows a current resistance of 60 Ohms. If the tachometer does not show activity during diagnostics with the device, it means that it must be replaced.
DIY tachometer
Manufacturing and replacing a Hall sensor is possible in several ways, it all depends on the type of chip used:
- Purchase an ACS711 chip, the output of which is connected to a differential amplifier. To power the circuit, you can use any DC source that provides a voltage of at least 3.5 V.
- Make a contactless electromagnetic relay with the required characteristics.
- Buy a ready-made tachometer. For washing machines, the recommended regulator is type MLX91206, used in the automotive industry.