Causes of failure
Locking the washing machine hatch is one of the most important elements of the entire device. It is he who protects the owner’s property from flooding. Why doesn't the door of the washing machine open after washing?
If the door opens randomly during the washing process, all the water from the drum will end up not only in the owner’s apartment, but also with the neighbors living on the floor below. What is the reason that the hatch door is locked? There may be several options.
Broken handle
Budget models of washing machines most often have a plastic handle. If this material is far from high quality, the handle may fail at any time. The only way out in such a situation is to replace the broken part. But how to do this if the hatch is blocked? There are several ways to open a machine with a broken handle.
- Many models of washing machines (Samsung, Ariston, Indesit, Bosch) are equipped with an emergency door opening lever. This point is always reflected in the attached instructions. The mechanism is usually located next to the garbage filter. To open the door, simply pull the lever. The door should open.
- If there is no lever, a thin nylon thread or fishing line will come to the rescue. To open the hatch, the fishing line must be pushed into the gap between the body and the door. The most convenient way to do this is with a flat-head screwdriver. Next, the fishing line is pulled under the hatch and pulled towards itself with force. Sometimes the manipulation has to be done several times.
- You can also unlock the door through the top cover of the washing machine. To begin with, the device is disconnected from the network and the upper part is carefully removed. There will be free space at the front of the case between the wall and the counterweight. You need to reach the hatch closing mechanism with your hand and try to open it.
Once the hatch is open, all that remains is to remove the broken handle. Most often, this part is not repaired, so it will be easier and faster to purchase a new handle in a specialized store and install it in place of the old one.
Unexpected power outage
In the event of an unexpected power outage, the washing machine automatically blocks the hatch. This is necessary so that the water remaining inside does not spill out. In addition, the electronic components of the device may “freeze” after a power surge. Under no circumstances should you try to open the hatch by force. Options for action may be as follows:
- If there is a short-term power outage (no more than half an hour), you will have to wait until the power is turned on again. In most cases, the machine will unblock itself when the current supply is restored. This option will work if there was no water in the drum at the time of the power outage.
- If there is no power soon and the wash program has not been completed, the water in the drum will have to be drained manually. For this purpose there is a hose at the bottom of the machine. Once the water stops flowing from the hose, the hatch door will unlock automatically.
- Sometimes the methods described above do not bring the desired result. In this case, you will have to open the door manually - for example, using the same fishing line.
Most popular brands (LG, Gorenje, Siemens) have the same hatch locking mechanism, and there should be no problems. The exception is Kandy brand units - the trick with fishing line will not work with them.
Water in the drum
Sometimes there is water left inside the drum after the wash cycle ends. Of course, the door will not open in this case. How to unlock the hatch in such a situation? The options listed below will work.
- If the reason for the atypical behavior of the washing machine is an electronic failure, you can try running another suitable program - for example, “rinse” or “spin”. After the allotted time for the cycle has passed, the door should unlock automatically.
- The reason that water remains in the drum may be a blockage in the drain hose. In this case, running the spin and rinse programs will not bring results. After cleaning the hose, the spin program starts again.
- Often the reason that water remains in the drum is the failure of the pump or water level sensor. In such cases, the corresponding icon will light up on the display. The elimination of such a malfunction will have to be entrusted to a specialist, since some working units will need to be replaced.
The water in the drum is not always visible, so if you have problems unlocking the hatch, you can check for the presence of liquid by draining it through a garbage hose. If there is liquid inside the device, it will certainly leak out. All that remains is to select a container of the appropriate volume.
The door does not open
A similar malfunction can occur if the water is not completely drained from the tank. To open it, you need to manually remove any remaining water through the drain filter.
Perhaps the program is not finished yet and the drum is rotating, so the hatch does not open. Wait until the cycle ends.
A malfunction can be called a broken door lock - UBL. LG washing machine door repair can be done at home.
A video on the topic will help you:
Checking and replacing the pressure switch
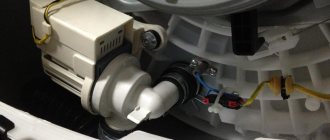
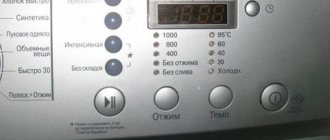
If the display shows error codes FE, IE or PE, you should pay attention to the water level sensor in the tank. To get to it, remove the top cover of the machine. On one of the side panels you will see a round-shaped device, to which a hose from the tank and wires with a connector are connected.
To check the functionality of the part, disconnect the clamp and remove the hose coming from the tank. It happens that the hose becomes clogged with lint, threads, dirt and other small objects. If a blockage is found, clean the hose. Then, instead, connect a hose of the same diameter, 30–40 cm long, to the pressure switch. Blow into it, building up pressure. If you hear the relay click, the device is working properly. Connect the cleaned hose from the tank to it and check the operation of the CM. Replacing a non-working sensor is also not difficult - just remove the old device, disconnecting the hose and connector with wires from it, and then install a new pressure switch in its place.
Diagnosis and replacement of the fill valve
If the MCA inlet valve is leaking water all the time (IE error), you can replace it yourself. To do this, follow these steps:
- Turn off the water supply valve to the inlet hose and expand the CM.
- Unscrew the inlet hose from the valve fitting.
- Use pliers to remove the strainer from the fitting and check it for clogging. If necessary, clean under running water.
- Remove the top cover of the SMA, then disconnect the pipes from the valve.
- Unscrew the fasteners holding the valve and disconnect the wire terminals.
- Use a multimeter to check the serviceability of the valve control coil. Its resistance should be in the range of 2.5–4 kOhm. If a break is found, the valve will have to be replaced completely.
- If the control coil is working properly, all that remains is to replace the rubber cuffs in the valve - most likely they are leaking water due to wear.
Checking and replacing the drain pump
The appearance of the OE error code on the display indicates a problem with draining the liquid from the tank. To find out the cause of the problem, you need to check the drain filter - it may be clogged. First drain the water from the tank. If the filter is clogged with debris, clean it and reinstall it, then check to see if the drain works.
If the filter is clean, but the pump still does not pump out water, you will have to replace it. For this:
- turn off the power to the machine;
- carefully place the equipment on the left side panel;
- remove the faulty pump and install a new part.
Video about replacing a faulty pump in an LG WD-80150NUP washing machine:
In conclusion, it can be noted that the listed malfunctions of LG washing machines can be easily fixed on your own. But it is better to entrust the search for damage in the control unit and replacement of bearings to an experienced technician. To purchase new replacement parts, you need to know the model number of your SMA. It is indicated in the accompanying documentation and on the equipment body.
Why won't my Candy washing machine start?
Pay attention to the symptoms of failure. For example, after loading powder and laundry, you press the “On/Off” button, but the equipment is silent? Or does it respond when the plug is plugged into the socket by flashing indicators? The issue could be either a simple power outage or a burnt-out control board.
Shall we figure it out?
SMA "Kandy" does not work: network problems
These problems do not directly concern technology. When the plug is plugged into the socket, the washing machine shows no signs of life at all, the lights don’t light up, and the buttons don’t beep. What is the reason:
- The electricity was turned off. This also happens. Check the lights in other rooms, if everything is fine, then look further.
- The socket is broken. Alternatively, there is insufficient voltage in the network to power the washing machine. This is why it is recommended to install stabilizers. How to check? Connect another device to the outlet. Deaf? It's time to call an electrician.
- The machine was knocked out. Check and turn on the machine. If the device does not want to start, it is probably due to a short circuit.
- The RCD tripped. The protective device protects the owner from electric shock if there is a leak on the housing. Try connecting the RCD again, but if the device works again, contact an electrician.
- The plug or cable is damaged. Inspect the details. If there is a burning smell, a melted body, or damaged insulation, replace the product immediately.
- The extension cord is faulty. If the machine is connected through a carrier, then check it. Just connect another device. Experts recommend plugging the SMA only into special sockets.
Everything has been inspected and tested, but the problem is not resolved? Then it's time to examine the details of the washer. The following work is only possible after the equipment has been completely disconnected from electricity.
The reason for the breakdown of the Kandy washing machine
So, the electrical components are working properly, but the SMA still does not start. If the equipment does not respond to commands at all, here’s what you need to check:
- Start button. This is the most common reason. Oxidation of internal contacts occurs as a result of voltage drops in the network, high humidity, and ingress of detergents. The contacts are checked with a multimeter, the button is replaced.
- FPS noise filter. The system works like this: the network cable is brought to the body of the machine, where it is connected to a filter through which the current passes to other parts. FPS eliminates interference during operation of the washing machine, allowing the TV and other equipment to operate simultaneously. The filter is located under the top cover of the Kandy SMA. Inspect it for signs of burns and swelling.
If the machine starts as usual, but does not wash, make sure that the hatch door is tightly closed. This problem may be reflected as an error code on the panel. Check:
Door lock and lock. If the lock fits normally into the hole and closes the hatch tightly, but no click is heard, then the problem is in the locking device (UBL). For safety reasons, the machine starts the cycle only after the UBL signals the module to lock the door. When this does not happen, the part should be checked and replaced. This is easy to do by disassembling the door.
Internal wiring. Problems with the wires are indicated by chaotic blinking of the lights on the panel. It is necessary to find the damaged area and replace it.
These are the problems that could arise if the equipment refuses to turn on. The main recommendations to avoid problems with electronics are to install a stabilizer. You should not connect the washing machine through an extension cord; it is better to connect the cord directly to the outlet.
In the video, the service technician describes the problem with the Kandy SMA control module:
What should I check?
If the LG machine does not turn on, first of all you need to make sure of some points.
- The power cord is connected to the outlet. If it is indeed on, then it is worth checking the presence of electricity in general. If everything is in order here, you need to make sure that there is sufficient voltage in this particular outlet. Sometimes it happens that its level is not sufficient to activate the operation of the device. At the same time, the voltage in other outlets, even in the same room, may be normal. To make sure that the problem is really not in the washing machine, you should simply connect to the outlet any other device that can operate at a lower voltage.
- If the problem is not electrical, then you need to check the outlet itself. It should not be scorched, it should not smell like burning, it should not emit smoke.
- Now we inspect the power cord itself and its plug. There should be no damage or melting on them. The cord itself should be smooth, without creases or bends. It is very important that there are no wires sticking out of it, especially charred and exposed ones.
It is also necessary to carefully study the electronic display of the machine itself. It may well be that an error code will be displayed on it, which was the root cause of the fact that the device stopped turning on.
It is important to understand that if the device operates through an extension cord, then the problem may lie there . In order to determine whether this is actually the case, you need to check the integrity of its cord and socket, and also try to plug in another device through an extension cord.
If the check does not reveal any defects, then the reason really lies inside the automatic machine itself.
How to fix minor damage
In case of minor breakdowns, you can try to repair the Samsung vacuum cleaner yourself. Sometimes it makes an excessively loud noise or vibrates. Most often this happens due to the following reasons:
- filling the dust bag;
- filter clogging.
A diagram for disassembling the vacuum cleaner is presented in the instructions for its use. Emptying the dust bag is the easiest way, especially if it is disposable. In the instructions you can always find diagrams and tips that may be useful. If you don’t have the skills to repair household appliances, it’s not easy to understand the circuits, but if you have experience, it’s worth a try.
Most often people encounter the following problems:
- the vacuum cleaner loses power;
- its filters are clogged;
- It doesn't turn on when the button is pressed.
Loss of power: what is the reason
When the suction power of a Samsung vacuum cleaner drops, most of the dust and small debris remain on the floor. If this happens, check the tightness of the pipe, brush and corrugated hose. You need to disconnect the corrugation, remove the tube and nozzle and carefully inspect all the elements. Turn on the unit, blow out the pipe with the hose: perhaps a piece of paper or some other object has gotten inside. If the item is detected and removed, all that remains is to reassemble the vacuum cleaner, plug it back in and continue cleaning.
Weak traction can occur as a result of a hair or fur ball wrapping around the brush. After removing the lump, the operation of the vacuum cleaner is restored. Since any attachment is curved, debris can get stuck in the curved area. You need to proceed like this: carefully disassemble the brush, unscrewing the fasteners, then remove the foreign object from the bend and put the brush back together.
Before you start disassembling the vacuum cleaner, you need to check what power its regulator is set to. Maybe you accidentally touched the lever while moving the device around the apartment. If it turns out that the lever is at the minimum, adjust it and continue cleaning.
What to do if the filters are clogged
When the filters become clogged, the Samsung vacuum cleaner also pulls weakly and makes uncharacteristic sounds. Severe clogging of the filter system can be accompanied by a complete stop of its operation. First of all, you need to clean the cyclone filter, which is made of transparent plastic. As a rule, it has several compartments. There is a sponge in the container that also needs cleaning. In some cases, it is necessary to completely replace the filters and equip the engine with an additional protection system.
The diagram for disassembling and cleaning the filter looks like this:
- click on the button;
- carefully separate the container from the body;
- open the lid;
- remove the trash;
- Insert the container back into the housing and lock it with the button.
The vacuum cleaner stopped turning on
If your home assistant stops turning on, don't panic. You need to make sure that the plug is in the socket and that the socket is working properly. Don't forget to check the power control lever.
All vacuum cleaners from Samsung have LED indicators. If the device is working properly, the lights will light green. The red color lights up when the dust bag is full. Sometimes, after checking the socket, cord, and power regulator, the unit does not show “signs of life” after being plugged into the network. There has probably been a more serious breakdown that cannot be repaired without complete disassembly. Repairing household appliances with your own hands is possible if a person has experience in this matter.
Video
Disassembling and replacing bearings in an LG washing machine:
Electronic engineer with many years of experience. For several years I was engaged in organizing the repair of household appliances. I am glad to share with readers my knowledge in the field of operation and repair of devices. Loves sport fishing, water tourism and travel.
Found a mistake? Select the text with the mouse and click:
Fresh lemon is not only suitable for tea: clean dirt from the surface of an acrylic bath by rubbing with half a cut citrus, or quickly wash the microwave by placing a container of water and lemon slices in it for 8-10 minutes at maximum power. The softened dirt can simply be wiped off with a sponge.
If your favorite things show the first signs of gestation in the form of untidy pellets, you can get rid of them using a special machine - a shaver. It quickly and effectively shaves off clumps of fabric fibers and returns things to their proper appearance.
Threads made of gold and silver, which were used to embroider clothes in the old days, are called gimp. To obtain them, the metal wire was pulled for a long time with pliers to the required fineness. This is where the expression “to drag out the rigmarole” came from - “to do long, monotonous work” or “to delay the completion of a task.”
The dishwasher cleans more than just plates and cups. You can load it with plastic toys, glass lamp shades and even dirty vegetables, such as potatoes, but only without using detergents.
The habit of using an automatic washing machine “sparingly” can lead to the appearance of an unpleasant odor in it. Washing at temperatures below 60℃ and short rinses allow fungi and bacteria from dirty clothes to remain on internal surfaces and actively multiply.
Stretch ceilings made of PVC film can withstand from 70 to 120 liters of water per 1 m2 of their area (depending on the size of the ceiling, the degree of its tension and the quality of the film). So you don’t have to worry about leaks from neighbors above.
Removing the control panel block
Let's assume that everything is fine with the network cable. This means that the problem is hidden somewhere in the depths of the control unit. To continue testing, we need to dismantle this block and then disassemble it. Let's get to work.
- First you need to remove the cover from the LG washing machine.
- Next, you need to remove the powder receptacle and put it aside.
- We take a Phillips screwdriver in our hands and unscrew the screws that are located next to the powder receptacle niche on the right and left.
- Using the same screwdriver, we press in the latches of the control unit, and then carefully separate the unit from the body.
We won't remove the wires for now. But if during the test you need to completely separate the control unit from the body, then first take a photograph of the location of the wires so that you can easily connect everything in place.
Repair of FPS, transformer and on/off button
For now, let's remove the control unit, placing it aside on top of the corner of the machine body. First you need to check and fix the FPS failure, if any. On top, under the housing cover, you can find an interference filter.
We call it using a multimeter. If the part does not ring, it must be replaced; if everything is in order with it, we return to the block. We disconnect the wires and then disassemble the block to get to the transformer. We visually check the tracks to make sure that the transformer is not unsoldered, and then we start calling it with a multimeter. If you find a breakdown, it means that your own repairs will consist of either soldering the tracks or replacing the transformer; there is nothing else you can do.
An LG direct drive washing machine may stop turning on for another reason. Why? Because of the start button. Again, we take the multimeter and call the contacts of this button, at the same time we check the start and on/off buttons. Having discovered a problem, take a soldering iron, solder the tracks, remove the faulty buttons and solder new ones. At the end, connect the control unit and turn on the power, if the light blinks, it means the power is on and the machine will work.
Share your opinion - leave a comment
Checking external communications
So, by clicking the switch, you are convinced that there is light in the house, which means that in the second stage you need to check the outlet to which the LG washing machine is connected. What to do? Look into the electrical panel and check whether the circuit breaker that powers the outlet has been knocked out. Unplug the power cord of the washing machine and connect another electrical appliance to this outlet: a kettle, a table lamp, a microwave oven. If the electrical appliance works as if nothing had happened, then the LG washing machine is really faulty.
Power won't turn on? This means that the next thing in line to be checked will be the power cord. Sometimes users manage to place something heavy on the power cord, perhaps even the LG washing machine itself. It’s easy to guess what happens after this: the wire breaks through and it stops powering the equipment.
We pull out the entire length of the power cord and inspect it carefully. If there is any burning or melting on the plug or any section of the wire, then the wire is most likely broken. But a hidden breakdown is also possible. Take a multimeter, set it to ohmmeter mode for continuity and check the integrity of the wire. The faulty wire will have to be replaced.
How to replace washing machine buttons
Is it possible to replace the washing machine buttons yourself, or do you have to call a professional? The answer is clear - you can. Proceed sequentially:
- Before starting work, unplug the washing machine.
- You need to remove the dispenser tray. Pull it towards you while pressing the latch in the center.
- After unscrewing the screws from the back, move the top cover away from you and set it aside.
- Unscrew the screws that are located behind the dispenser tray.
- If there are screws on the other side of the panel, remove them.
- Release the plastic latches using a flathead screwdriver.
- Before disconnecting the wiring, take a photo of the location of the connectors. This way you can connect them correctly.
- By removing the panel from the case, you will see its components. This is the panel body and the control unit, which is secured with latches.
- Unlock the latches and set the control board aside.
- Now you can see the buttons.
- All keys and the selector are removed by simply pressing from the outside, so changing them is not difficult. The design is very simple; in operation, the buttons simply press on certain areas of the board. Therefore, the board must be checked.
After removing the old elements, proceed to install new ones. To do this, you only need your hands and a screwdriver. The electronics module is then placed in place, the latches are snapped into place, and the wiring is connected.
Call the master
Many users find it difficult to figure out Samsung devices and repairs on their own. To solve the problem, it is advisable to invite a specialist. He will conduct a full diagnostic of the device and identify the real cause of the problem.
Home repairs often result in the need for repeated intervention in the design of the washing machine. This is fraught with additional financial expenses.
You can find a responsible technician in service centers that service household appliances. Specialists have the ability to perform professional diagnostics using instruments.
The repair technology has been worked out in such workshops down to the smallest detail. Our craftsmen use proven products and high-quality components. The cost of repairing a Samsung if there is a problem with filling the tank depends on the cause of the breakdown.
The workshop price includes the following rates:
- replacement of the water supply valve – from 1100 rubles;
- flashing or replacing the control board – from 1,500 rubles;
- replacement of a water level sensor – from 1300 rubles;
- reinstallation of the door locking device – from 1500 rubles.
You can also find a person who does private repairs of washing machines at home. However, responding to such advertisements sometimes ends in new problems.
Private craftsmen do not provide a documented guarantee for their work and often inflate the price. A verbal agreement may not end in favor of the equipment owner. Therefore, contacting official workshops is more profitable from both a technical and economic point of view.
How is the problem solved, and is it possible to prevent it?
Why doesn't the vacuum cleaner work? Let's look at some trivial reasons that any user can deal with. Automation failure can occur for the following reasons:
- Filling the dust container. This will be indicated by the presence of a dusty smell.
- Ingress of large debris. Large sizes of dirt stuck in the air duct interfere with the flow of air sucked by the vacuum cleaner.
- Debris stuck in the hose. Evidence of this is a change in sound when the device is turned on.
- Pre-engine filter is dirty. During this process, an unpleasant burnt smell appears.
Let's consider the possibilities of repairing a faulty Samsung vacuum cleaner, and what to do when the vacuum cleaner does not turn on. You can fix the above problems yourself, but it’s still better to avoid them in the first place. To do this, you will need to disconnect the equipment from the power source, then disassemble the device and clean the debris accumulated inside.
To access the dust container, remove the top cover. Some dust containers can be cleaned, or you can replace them with new ones. It is also advisable to wash the dust collector and dry it. In order not to spill dirt and dust, you should close the existing valve for a tight seal. When installing the dust collector back into place, make sure that the neck fits snugly against the bag holder. If this does not happen, then dirt and dust will seep into the structure, which will lead to overheating of the motor and accumulation of dirt on the components.
Filters require additional care. Be sure to read the instructions and find out how many filters are installed in your particular vacuum cleaner model. All filters installed in the structure should be checked. Some types of filters can be washed with running water to clean them. But before installing it in the structure, you should definitely dry it. Starting a vacuum cleaner with a wet filter will cause damage. Periodic replacement is carried out according to the manufacturer's recommendation. When the filter has served its useful life, it is replaced with a new one. The filter life is indicated in the operating book.
All replacement consumables, filters, brushes and other accessories can be purchased at a specialized store.
To remove blockages in the nozzle, unscrew the corrugated accessory from the body, inspect its integrity, remove the accumulated dirt and screw it back. Dirt stuck in the bellows prevents air flow.
But still, if the vacuum cleaner does not turn on, what should you do? If the repair of the breakdown is serious, it is better to contact specialized technicians who can solve this problem.
But it is worth remembering that the main possible breakdowns occur due to engine overheating. You should adhere to the following rules:
- To prevent overheating, use the vacuum cleaner for no more than 30 minutes when cleaning. At maximum mode, use the device for no more than 10-15 minutes. Longer operation may lead to overheating; to do this, allow the device to rest and cool down.
- Make sure the dust bin is full to remove accumulated dirt and dust. An excess of dirt and dust will not allow air flow to pass through, which will lead to overheating of the electric motor. Also, an excess of dust in the dust collector will lead to clogging of the structure inside the device.
- Clean the pre-motor protection filter in a timely manner. Excessive contamination can lead to the formation of an unpleasant burnt odor.
- Avoid sucking large objects that may block the blower. Before using a vacuum cleaner to clean the floor covering, you should collect large debris and accidentally fallen items by hand.
- You need to monitor the level of noise produced. If the sound changes, this may indicate a clogged brush or bellows accessory.
Monitor the performance of your home assistant, and provide timely care for the vacuum cleaner and its replacement consumables. Then it will be easier to avoid breakdowns of equipment to maintain cleanliness in the house.
Simple reasons that you can deal with yourself
Stopping and freezing are not always associated with global problems. It happens that due to inattention, the user chose the wrong cleaning mode, put things in the drum incorrectly, or the drain hose became bent/clogged. These and many other faults can be easily fixed with your own hands.
Program selection error
This problem is usually encountered in the middle of the wash cycle. The machine started working as usual: it heated the water, carried out a preliminary and main wash, and suddenly went silent. In this case, the door is blocked and the water does not drain.
In this case, you need to check which operating mode of the device is set. If it is a “delicate” or “hand wash”, then the drainage and spinning are automatically turned off. Simply turn the mode switch to the desired position and repeat the washing process. Some machines have an additional rinse and spin function. Using this option, you will be able to complete the wash.
Overload of laundry
Overloading a washing machine causes a lot of troubles, some of which will be noticeable immediately, while others will appear after some time. If the washing machine freezes immediately after turning on and selecting a program, you need to check whether there is too much laundry loaded into the spinner.
It is very important to ensure free rotation of the laundry in the drum of the machine. This is the only way to achieve uniform distribution of water and powder, and therefore better cleaning quality
An overloaded drum puts great force on the bearings of the device, which can result in failure or breakdown of the unit.
Before you start using a new appliance, you should read the instructions about the norms and rules for loading laundry. Each machine is equipped with a special sensor that monitors the weight of the drum with laundry and will not allow washing to start if it is overloaded.
To correct the situation, you need to turn off the machine and take out some of the things, postponing cleaning them until next time.
Imbalance
When loading laundry into the machine, you must not only follow the weight recommendations, but also ensure that the items are evenly distributed in the drum. If the machine has filled with water, turned the drum several times, but is not going to start washing, you can suspect the presence of an imbalance.
The cause of this problem may be improper loading of clothes and other things into the machine. Before washing, buttons and zippers on the products are fastened, items with Velcro are placed in special bags, and bulky rugs, pillows and blankets are washed separately.
You can deal with the problem as follows:
- disconnect the device from the network;
- drain the water using the drain filter located at the bottom of the unit;
- open the hatch;
- sort out the laundry, arrange things evenly in the centrifuge.
After this, you can set the desired program and restart the device.
Clogged water supply or drainage system
If the washing machine does not switch from wash to rinse mode, it can be assumed that the drain filter, pipe or drain pump is clogged. Waste water carries with it threads and lint, particles of dust and dirt, and sometimes much larger debris, such as coins, pins, paper clips that have fallen out of pockets.
To prevent this “wealth” from entering the sewer pipe, a drain filter is provided. Over time, it becomes so clogged that it is unable to pass water. As a result, the unit does not switch to rinse and spin mode, and the washing cycle stops.
In this case, you need to determine where exactly the fault is hidden: in the machine, the drain hose or the general sewer.
- Inspect the drain hose and straighten any kinks.
- Eliminate the possibility of blockage in the sewer. To do this, the end of the drain hose must be disconnected from the sewer pipe and directed into a bathtub or bucket. Start draining the water. If the water still does not drain, then there is a problem with the machine. Otherwise, you need to clean the sewer pipe.
- Remove and clean the filter located in the lower right corner of the device.
This simple procedure will bring the device back to life. If you empty your clothing pockets of debris and small items before washing, you will need to clean the filter no more than once a year.
Reasons why your LG washing machine may not start
There can be many reasons why a washing machine may not start the wash cycle. But in any case, this causes a lot of inconvenience, because if an automatic washing machine breaks down, there is no way to wash the accumulated dirty laundry. There are two options - wash by hand, which few people can agree to, or urgently call a professional.
Let's find out what are the main reasons why an LG washing machine does not start the wash cycle:
· Failure of the control module - in this case, it may be necessary to reflash the control board, repair it, or completely replace it. Some of its components could be damaged, oxidize, or burn. For example, a relay, then when you turn on the washing machine, clicks will be heard, but the start will not occur.
· Damage to internal wiring - you will need to disassemble the washing machine, find damaged wires and replace them with new ones. In the event of such a breakdown, the washing machine will not start; all its indicators will light or flash.
· Failure of the UBL (Hatch Lock Device) - the washing machine cannot lock the door, so washing cannot start. In this case, you will need to replace the UBL with a new, working one.
· Damage to the power cord - during operation, the washing machine vibrates (especially during spinning), may move slightly (if the floor is slippery), the power cord may be pinched at this time or creases may form on it. Because of this, one day the washing machine will not turn on and no power will be supplied. The cable needs to be replaced.
When most of these breakdowns occur, an error or malfunction code will appear on the display of the LG washing machine. By deciphering it using the instructions, you can quickly find out what the true cause of the washing machine malfunction is and fix the problem in time. In most cases, troubleshooting a problem of this nature requires the intervention of an experienced specialist.
The machine does not wash when the lights are flashing
Sometimes it happens that after turning on the device the indicator lights up, but the washing does not start. The problem is explained by the presence of certain reasons, which are not difficult to identify.
This is about:
- Broken hatch lock. First you need to make sure that the door closes tightly enough. If nothing interferes with its closing, you need to check the functioning of the lock after starting the wash. To obtain accurate information, you should use a tester. A broken element will need to be replaced.
- Damaged wiring. When such a malfunction occurs, the indicators flash randomly or light up and go out at the same time.
Replacing the washing machine door lock
How to protect equipment from failure
In order for the equipment to serve for a long time and not stop working, it is necessary to regularly clean it and carry out maintenance. This will take a little time and will significantly increase the life of the device.
In order for the equipment to work without failure, you should adhere to some rules:
Do not overload the equipment, as this will lead to overheating. It is best to turn off the device every 20-30 minutes and let it cool. Do not use a household device to remove construction dust. Household models are not suitable for this - fine and corrosive dust will quickly damage the motor. If the equipment begins to overheat, you should immediately turn it off and check it. Not all models are equipped with automatic shutdown when overheating. Do not try to suck in large pieces of debris - they may get stuck in the hose or nozzle. Both filters need to be changed regularly. The outlet, which traps most of the dust, must be removed and cleaned after 50 hours of operation. Thin, designed to eliminate allergens and microorganisms, must be replaced as they become dirty. The more dirt there is on the filters, the more the engine heats up during operation.
You cannot vacuum cleaner without filters: debris will be drawn into the motor and break it. It is important to check that the dust container is full and empty or change it regularly. Modern models have a tracking system that gives a signal, but it does not always work correctly
It is best to change the container when it is 80% full - this is about 3-5 cleanings. You should not disassemble the device yourself; if you have any questions, it is better to contact a specialist.
If the vacuum cleaner suddenly turns off during operation and does not turn on again, the reason is most likely that the motor is overheating. Overheating can be caused by an overfilled garbage container, a clogged hose or filter, or a breakdown in the motor. Most problems can be fixed at home, but some should be left to the experts.
Reasons for the strong heating of the vacuum cleaner during operation
The vacuum cleaner works, but stops sucking up dust - why is this happening?
The process of disassembling a vacuum cleaner for repair purposes
Creating a cyclone for a vacuum cleaner - diagrams for construction and household
How a vacuum cleaner works and what you can do with it
Rating of washing vacuum cleaners with an aqua filter for the home
Troubleshooting
Understanding that your refrigerator is not working correctly is simple: you just need to listen carefully to it. If during operation it starts to hum, and after a few minutes it stops, then something has gone wrong. It’s even worse if the unit turns off on its own: in this case, it should be disconnected from the power supply before the cause of the breakdown is determined and eliminated.
One of the most common (and simplest) situations is the failure of the control relay. Replacing it will cost you relatively little, and the refrigerator will work like a clock again. A more complex (and expensive) problem is repairing the electronic unit. But replacing the compressor will cost the most.
You can understand that the problem is in the compressor if you measure the resistance of its windings. To determine whether the control relay has failed, it will have to be disassembled. Or you can simply replace the old relay with a new one - and the problem will be solved. But if, nevertheless, repairs are required, check the condition of the solenoid core - it fails quite often. Instead, you can install a piece of metal wire, and for some models, as an emergency temporary measure, even a refill from a regular fountain pen will do - then you will be able to find a little time to carry out a full repair.
Speaking about modern models, it is worth noting their silent operation. On the one hand, this is good - we can not pay attention to turning the unit on and off. But on the other hand, without hearing the nature of the operating cycles, we will notice the malfunction that has appeared only when the refrigerator completely stops performing its function - generating cold.
Be attentive to your equipment, carry out routine repairs on time, and it will serve faithfully for many years.
We do it ourselves!
Before you start repairing your washing machine yourself, you need to make sure that the plug is connected to the outlet. Perhaps the reason is that the household appliances are simply de-energized. After all, we often forget to check the simplest option and immediately sound the alarm. Then we will check the presence of electricity in the network. To do this, you can connect any electrical appliance and check its functionality. If there is electricity, the machine is connected to the network, but it still does not turn on, then it’s time to start repairing.
Is the outlet working?
To check the health of various conductors that may break, it is best to use a tester. This device is also called a multimeter. Using it, we will look for faults by “ringing” various wires, etc. Brief video instructions on how to use a multimeter here:
In order to check the socket, you can also use an indicator screwdriver or some other electrical device. For clarity, it is better to use a lamp. If the lamp connected to this socket lights up, then the socket is working. If it doesn’t light up, then we have found our breakdown. And all that remains is to eliminate it.
To do this, we will turn off the power to the apartment. This is done in the shield. Then, using a screwdriver, remove the cover and repair or replace the socket. For clarity, we attach a video:
Is the network cable working?
If used carelessly, the washing machine's power cord may become damaged. Usually it frays or breaks
In order to check this type of malfunction, let's check the wires using a multimeter. If you find a break, it is better to replace the entire wire. As a last resort, you can find the break point and fix it with a twist or soldering iron. But we do not recommend this option.
Broken button that turns on the machine
If your machine model is not new, then the breakdown may be related to the button that turns on the machine. There are two wires connected to the button. Using a tester, you need to make sure that these wires, as well as the button itself, are working properly. Let's check the button both in the off and on positions. If during the process of “ringing” with a multimeter you find a faulty button, then we order a new one and replace it.
Module and command apparatus
If all previous checks have shown that everything is in order, then we move on to the next possible reason - module failure. As in our other articles, we do not recommend repairing or changing the electronics module of a washing machine on their own for those people who do not have sufficient skills in solving similar problems.
But before you call a professional, you may want to check for other possible problems.
Interference filter malfunction
There is a possibility that the interference filter has failed. This part of the washing machine is needed only to ensure that various household appliances, such as a TV, radio and computer, do not interfere with the operation of the machine. It may break during long-term use of the washing machine or due to a short circuit. Three wires are connected to it at the input, and two at the output. We will also ring it using a tester and make sure that it is working properly. If it is faulty, then we buy a new one and replace it.
Lock failure
If the lock is faulty, then you may observe the following problem: when connected to the network, the indicator lights up. But even with the hatch closed, the washing does not start. In order to check if there is voltage at the lock when the washing machine is turned on. If there is voltage and it does not perform its functions, then it needs to be replaced.
Instructions for replacing the lock yourself in video format are here:
Violation of integrity and breakage of electrical circuit wires
During operation of the washing machine, some wires may come into contact with individual parts. This situation may cause friction and broken wires. Also, due to vibrations, they can become disconnected from the mounting sockets. In order to detect this malfunction, you must carefully examine all the wires. Such an inspection will make it possible to detect this malfunction. You can also “ring” suspicious places with a tester.
We hope this material will help you solve the problem. Happy renovation!
Troubleshooting Methods
Among all the existing reasons that the LG washing machine does not turn on, the most likely is the lack of power supply.
This happens due to:
power outages that may not be noticed; voltage surges or short circuits; tripping of a residual current device (RCD); socket damage. To make sure it is working properly, you need to connect another electrical appliance
It is worth paying attention to how tightly the plug fits into the socket. If it is constantly there, the contacts of the socket relax over time.
To understand why the LG washing machine does not turn on, you need to check the power cord using a tester. If there is damage, it is better to purchase a new wire. Temporary use of a special tape or soldering iron is allowed, although this option may lead to undesirable consequences.
The start button is also checked with a multimeter, while the washing machine must be de-energized. The serviceability of the button is confirmed by a characteristic sound.
To prevent nearby electrical appliances from interfering with the operation of the LG washing machine, it is equipped with an interference filter (IFP). Why doesn't the device turn on? Due to prolonged use, the filter simply does not cope with its tasks, and therefore does not allow electricity to pass through. To test the element, the top cover of the unit must be dismantled. If it needs replacement, you should act as carefully as possible.
Interference filter
If a control module breaks down, you should refrain from trying to repair the part yourself. In this case, specialists should deal with the problem, which is repeatedly discussed on the forums of LG washing machine users.
From the presented video you can learn what to do if the device does not want to work.
What causes the machine to stop working during washing?
In some cases, LG washing machine owners have to look for reasons why the LG washing machine turns on and off.
Among the most common reasons are the following:
- loading things in excess of the norm;
- incorrectly set operating mode;
- incorrect distribution of laundry in the drum.
Turning off the machine is also provoked by the failure of its parts - the motor, contacts, pump, door lock and others. It is better not to repair the device without the proper skills.
To prevent the machine from turning on by itself, you must carefully study the instructions before using it. According to the manufacturer, if the LG washing machine turns on by itself, it means that it is constantly connected to the mains. Many people do not remove the plug from the socket after finishing the wash, so you should not be surprised when the LG machine suddenly starts working on its own.
Some malfunctions that provoke failure of the unit are caused by non-compliance with the rules specified in the instructions. Therefore, certain factors that interfere with the normal functioning of the device can be avoided. If complex damage occurs, it is better to contact a service center.
What to do if the car engine does not work
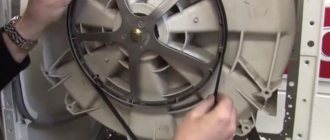
A visual inspection of the unit will help identify the breakdown. How to get to the electric motor:
- Disconnect the SM from the network.
- Move the equipment away from the wall to make dismantling easier.
- Unscrew the mounting screws and remove the back panel.
All that's left is to get the motor. Remove the belt from its pulley, disconnect the contacts and unscrew the bolts.
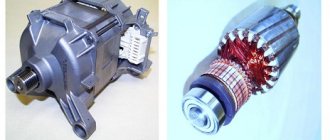
To identify the problem, you need to connect the rotor and stator windings. Connect a 220 Volt AC source to the free connectors. Is the node working? So everything is fine. Does not move? That means it's faulty.
Pay attention to the brushes and slats. Determine their degree of wear
Replacing brushes
If upon inspection it turns out that the length of the brushes is less than 5 mm, replace them. Prepare identical parts in advance, because they are different for each washing machine model.
To replace, disconnect the contacts of the parts and remove them from the assembly. Install new items.
Winding diagnostics
Why diagnostics? Because if the windings malfunction, they need to be rewinded. This is an expensive and unprofitable repair. It's easier to replace the entire engine. But you can check the windings for open circuits and short circuits yourself:
- Set the multimeter to ohmmeter mode.
- Apply the probes to adjacent lamellas one by one.
- Normally, the difference in indicators should not be higher than 0.5 Ohm.
- If the resistance does not match the specified value, then there is a short circuit. At the same time, you could smell something burning.
- The following diagnostics are also carried out: attach one tester probe to the stator housing, and alternately check the contacts with the other.
If everything is in order, then the readings on the screen will be hundreds of ohms.
Slat repair
Inspect the slats. Minor flaking can be eliminated by turning the manifold on a lathe. After work, the elements are cleaned of dust and installed in place.
Upon inspection, it may turn out that the contacts have broken. It can be difficult to restore them yourself, so it is better to contact a specialist.
Possible actions and repairs
High-tech and structurally complex equipment requires detailed diagnostics, some knowledge and special tools. Therefore, an adequate assessment of your capabilities is the first mandatory point before any manipulation with such equipment.
The locking device needs to be replaced
The reason for its failure may be a long service life. The reason is the deformation of the bimetallic plate due to a constant temperature difference. Replacing an element requires disassembling the locking device (UBL).
- Unscrew the two screws securing the lock to the body. The element is removed by supporting it with your hand from the back.
- The wires with connectors are disconnected from the faulty part, then they are connected to a new spare part. It is again fixed in its rightful place with screws, the cuff is returned to its previous position, and secured with a clamp.
- They check the performance of the machine and do a test wash.
Testing and repair of the command device
If the results of checking the remaining nodes are zero, then there is only one potential culprit left - the programmer (command device). In this case, quite painstaking and careful work remains. The unit is disassembled into small parts, then the “patient” is examined.
- to gain access to the command device, first disassemble and remove the front panel of the washing machine;
- remove the electronic module and begin disassembling it;
- remove the cover by pressing the latches located on the sides;
- remove the board, inspect it for burning, if there are such places, solder them;
- The resistance at the contacts is tested with a multimeter;
- check (clean) the central gear, then all elements, including the core, are removed;
- test the electric motor winding, replace the wire if burns are detected;
- the parts are treated with alcohol and placed back, observing the reverse assembly order.
Not all washing machine models have relatively simple programmers; some are quite complex. In this case, no one can guarantee a successful repair, so it is more logical to replace the unit with a new module.
New cars - problems with the button
The latest generations of washing units are capable of presenting another “surprise”. This is a problem with the “Start” button, since the current supply to it comes directly from the power cord. To check the potential source of problems, do the following:
- disconnect equipment from the network;
- remove the upper part of the body;
- dismantle the control panel;
- disconnect the wires from the button;
- connect the multimeter, plug the device into the network;
- test the presence of current when in the on position.
If the button functions normally, then the search for the culprit devices continues. Otherwise, the faulty part is replaced. Some washing machines have a different operating principle, where the voltage is supplied to the electronic module/programmer. It all depends on the manufacturer and the specific model.