You're out of luck - your hard-working washing machine has leaked, the motor starts working intermittently or doesn't turn on at all. This means it’s time to either replace or repair the bearings and oil seal, and maybe the plastic tank itself due to a crack or hole.
If you decide to repair, then the question will arise, how to glue the washing machine tank after repair? The achievements of the chemical industry - glue, sealants - come to the rescue.
Why do you have to glue it?
Sealing and gluing the washing machine tank is a forced process that owners of some SMA models have to deal with. Washing machines with a non-removable tank are offered, for example, by brands such as Ariston and Indesit. Manufacturers, making this element monolithic, do not intend to disassemble it. If the bearing breaks, the unit must be completely replaced. But such a replacement costs a lot of money and our people simply cannot agree with this order of things. As it turned out, you can halve the drum, remove the bearing, replace it with a new one, and then connect the halves. It is important to know how and with what to seal the tank.
Requirements for glued joints
When new bearings are installed, the question arises - how to repair a plastic tank that has been sawed in half. How to seal the drum to prevent leaks? What to choose - glue or sealant? It is better to use glue, since no sealant can provide the necessary strength characteristics of a glued structure.
Reliable connection of parts requires two operations:
- The halves are connected using bolts and nuts. To do this, holes are made in the plastic - evenly along the entire seam.
- The gap between the parts to be joined is filled with glue or sealant.
Not every composition will work. It is important to know what sealant to glue the halves together with. In this case, the operating features of the unit are taken into account:
- Strong vibrations - the connection must withstand severe mechanical loads.
- Extreme temperature conditions - the unit either heats up or cools down.
- Contact with aquatic environment. Including water supplied under pressure.
If the purchased composition fails you, leaks are possible. Then you will again disassemble the machine and fix the problem.
How to glue a plastic water tank?
Below are adhesives and sealants that are suitable for bonding the drum. These compositions easily withstand the difficulties characteristic of SMA - temperature extremes, vibration attacks, high pressure, contact with water.
Permatex 81730
This is a flowable adhesive-sealant designed for hermetically sealing headlights and glass in a car. The composition is characterized by transparency. Frozen seams do not allow water to pass through and are not afraid of extreme temperatures. The operating range of the composition is from minus 62 to plus 232 °C. Great for the task. Costs on average - 175 rubles.
Kraftool
The composition is highly elastic. Withstands strong vibrations and heating up to plus 250 °C. Its main purpose is to seal connections in electric motors. Reliably fastens the halves of the product even without bolted connections. One tube can glue 4 tanks together. The cost is about 200 rubles.
Glue F
This is polyurethane glue. If you use it, then you won't need bolts. But it is so strong that if you need to disassemble the machine again, you will have to saw it again. The second disadvantage is the price, it costs much more than sealants, a 310 ml can costs almost 700 rubles.
ABRO 11AB-R
An ultra-resistant sealant that can withstand the harshest conditions. He is not afraid of very high temperatures, and is not afraid of chemically aggressive substances, including acids. The cost is approximately 350 rubles.
How to glue the halves?
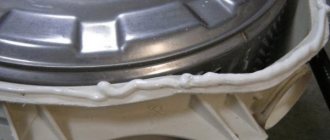
There is nothing complicated here. The main thing is to properly prepare the parts for gluing. Before sawing, you need to make 30–40 small diameter holes across the seam. They are then precisely aligned when gluing, and the halves fit together flawlessly.
The joint of the halves is smeared with the selected composition, and then the bolts are screwed on. Moreover, they tighten the bolted connections without waiting for the glue/sealant to dry. The seam will dry completely in about two hours.
How to get it?
Disassembling and cutting the tank may be necessary when:
- bearing faults and seal wear;
- bearing wear, which leads to shaft deformation.
To cut a product, it must first be removed. Disassembly of SM from Indesit:
- Disconnection from the mains.
- Dismantling the panels - top and rear, by unscrewing the bolts.
- Removing the drive belt from the pulley.
- Disconnecting the wiring connected to the heating element.
- Loosening the clamp holding the drain pipe. Eating the last one.
- Unscrewing the shock absorber nuts.
- At the top of the SM, unscrew the suspension fasteners.
- Removing the powder container - unscrew the screw.
- Removing the panel and removing the detergent tray.
- Removing the cuff and pressure switch.
- Removing the product from the hangers and removing it.
Procedure and features of work
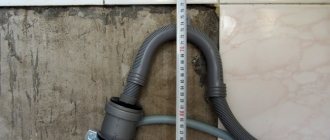
Before starting work, you must drain the water from the machine. It's more convenient to work together.
To get to the tank and drum you need to remove from the unit:
- Back, top cover, powder receptacle, front panel with circuit board.
- We remove the rubber band: open the plastic or metal latches, take out the clamp, and remove the rubber band.
- We remove all attached parts (drive belt from the pulley power supply to the heating element, motor, lower pipe).
- Place the washer on its side and remove the shock absorbers.
- Return to its original position and remove the tank with the drum through the top cover, without tearing the existing rubber bands.
- Free the tank from gravity by removing the load.
- Remove the cuff.
We recommend watching a video on how to work with a tank:
How to glue halves
The tank is ready for further work:
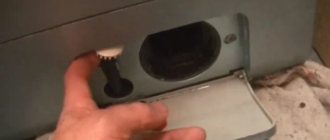
- Unscrew the pulley.
- Place with the drum hole facing up.
- To ensure secure fastening, drill holes for bolts along the contour of the upper part, so that later the two halves can be combined.
You need to drill close to the walls of the tank with a long drill with a diameter of 3–4 mm at a distance of 3 cm from each other.
- We cut with a grinder or a saw with small teeth.
If you use a grinder, be careful not to damage the drum during sawing, otherwise during further washing the drum will tear things. Control the depth of the cut.
- Separate the top from the bottom and remove the drum.
- We remove burrs and polish both parts.
- We are making repairs.
- We put the drum in place and put on the pulley.
- Generously lubricate the halves with a fixing agent along the edges of the contour.
- We combine the upper part with the lower one, making sure that the holes of the top and bottom coincide.
- We tighten the bolts.
- We are assembling the car.
- Sealant, glue dries from 12 to 24 hours.
How to fill a hole in a tank
Mechanical damage may cause a crack or hole to appear on the tank.
The scale of the disaster must be assessed. If the hole or crack is small, then take a soldering iron or a heat gun, sealant, a piece of plastic for a patch the size of the hole and a structure similar to the tank, a piece of sandpaper. Next, follow the instructions:
- Sand the repair area.
- Use a soldering iron to solder a piece of plastic.
- Fill with sealant.
- Leave to dry.
The crack is also glued together using a soldering iron and filled with sealant.
How to cut?
- The element intended for cutting is placed on the floor. The surface must be flat.
- Place marks under the screws.
- Drill holes in the plastic - 3 mm in diameter. Only 15–20 pieces.
- Place the product on its side. Using a metal file, they start cutting from the top.
- The maximum depth is 5 cm. A large cutting depth can damage the drum.
- As sawing proceeds, the seam is sprayed from time to time to make sawing easier and prevent the plastic from heating up.
- Having cut the product into two halves, pull out the drum. For this purpose, unscrew the fastening bolt and disassemble the shaft - the drum is attached to it. Remove the pulley and remove the drum. Now you can change the bearings and seals. After replacing the parts, gluing begins.
How and how to glue the washing machine tank after repair - video:
Replacing bearings in a non-separable type SMA is a complex task that takes a lot of time and effort. To achieve your goal, you will have to not only stock up on all the necessary tools and materials, but also patience.
Source
Sequence of work
Now you can start disassembling, after which you will learn how to seal the drum and tub of the washing machine.
- Place the product on a flat surface.
- Remove the load from it by unscrewing the fasteners.
- Remove the motor by unscrewing the fixing screws.
Article on the topic: How to remove the smell of kerosene from a washing machine
The preparation is complete. Next, you need to mark the places where the screws will be attached. Sealing the washing machine tank does not end with the use of adhesive. Additionally, drill 3 mm holes around the perimeter for fasteners. In total there should be from 15 to 20.
Arm yourself with a thin metal hacksaw and a blade. Having installed the tank on its edge, start cutting from the top. Use a blade where a hacksaw can't get through.
Note! Do not go deeper than 5 cm. Otherwise, you may damage the drum.
Alternately spray the seam with water. This will help avoid heating the walls and make cutting easier.
Once you have two halves, remove the drum. For this:
- turn the back of the tank;
- disassemble the shaft on which the drum is mounted;
- to do this, unscrew the fastening bolt;
- remove the pulley;
- pointing the metal bolt at the shaft, tap it with a hammer;
- take out the drum.
After disassembly, another question arises: how to repair and seal a plastic water tank?
Inspect the parts from the inside. If they are badly damaged, there is no point in wasting time on repairs. If necessary, replace seals and bearings.
How to achieve tightness
The sealant or adhesive for the washing machine tank must meet the operating conditions. That is, withstand temperature changes, vibrations, pressure, and exposure to water. Therefore, you need to approach your choice responsibly.
What kind of sealant can be used to seal a washing machine tank:
- Permatex 81730. The adhesive sealant has fluidity, thanks to which it effectively seals all seams and cracks. The transparent waterproof seam is resistant to extreme temperatures (-62° to 232°), shock and strong vibrations. An ideal solution for those who are looking for how to glue the washing machine tank after repair.
- It holds moving seams together thanks to its elasticity. Widely used for outdoor work on construction sites. Able to withstand critical temperatures up to +315°C. Economical consumption and durability are guaranteed.
Article on the topic: Is it possible to wash school backpacks in a washing machine?
- Glue F. A truly powerful tool - you don't even need to secure the parts with additional screws. However, there is a minus: when disassembling again, the tank will have to be sawed again. Costs more than sealant.
- ABRO 11AB-R. This sealant provides reliable results even under extreme conditions. It is resistant to high and low temperatures and mechanical stress.
After choosing, all that remains is to apply sealant to the edges of the halves and fasten them together.
Now tighten the screws in the prepared places. Feel free to assemble the machine and run the wash to check.
Doing this kind of work on your own is a feat, but you can do it if you arm yourself with our professional advice.
To help you, we offer a video on how to glue a washing machine tank:
Repairing a burst washing machine tank
During operation, even the most reliable washing machines can fail. Sometimes this happens due to improper use, and in other cases simply because certain parts wear out. One of the problems that owners of washing machines often encounter is the breakdown of the plastic tank. Many technicians at service centers recommend replacing the tank in this case. But, buying a new tank along with the work to install it will cost a tidy sum. If you wish, you can repair a burst washing machine tank yourself without spending a penny. What is needed for this and how to repair the tank - further.
What breaks in the tank of the car?
The tank of an Indesit washing machine (or any other) is its main part, which contains the drum and other moving elements. It is in the tank that water is collected and, in fact, washing takes place in it, even though the laundry is in contact with the walls of the drum, not the tank. At first glance, it seems that the tank itself cannot break, because it is just a reservoir. The moving elements contained in it are another matter, but this is a common misconception. So, what can break in the tank of an automatic washing machine?
- Bearings. This is a moving element located in the tank. The bearings themselves cost a penny, but changing them will require a lot of effort. In this case, there is a risk of seriously damaging the shaft, pin and other elements.
- Shaft. It may become deformed if the bearings are not repaired.
- Tank walls. They may bend under the influence of centrifugal force from contact with the drum if the shock absorbers and bearings are damaged. In the worst case, the walls may be damaged, which will break their tightness.
- Tank drain hole. Of course, the hole itself cannot break. But a drain valve is installed on it, which can fail. In addition, the drain hole may become clogged and will have to be cleaned.
Note! If the bearing is not repaired in time, this can lead to complete destruction of the tank due to a loose drum. After this, the tank will definitely have to be changed!
DIY washing machine tank repair
A washing machine is no longer a rarity and is a mandatory attribute of every home.
Its breakdown is always a nuisance, so there is a desire to quickly return the washing unit to work.
The tank of a washing machine is its main and main part.
In this article we will look at how to fix a problem with a washing machine tank.
How to prevent foreign elements from getting into the washing machine drum?
To prevent foreign elements from penetrating into the drum of the device (for example, in the HANSA WDHS 1260 LW) and damaging its internal components, you must follow a few simple rules.
Bras with wires, as well as corsets, should be washed in a special bag that closes with a zipper. This also avoids deformation of bras during washing and spinning. An ordinary pillowcase made of cotton can also serve as a replacement for the cover.
It is advisable to wash clothes inside out or stick them with tape if they have large buttons or are decorated with other large items. This way they are less likely to fall off.
Article on the topic: Where are hotpoint-ariston washing machines made?
Life hack: metal objects that decorate light-colored clothing sealed with regular tape will not leave traces of rust on the fabric.
The article discusses methods that will help you remove a stuck bone from a corset or bra from a washing machine. The user of the equipment can cope with this without outside help. A method that does not require disassembly is more painstaking; methods that require disassembling the machine will also provide access to parts that need to be cleaned.
What is a washing machine tank
It is in the tank that the moving parts of the washing equipment and the drum are located, among other things.
The tank washes the laundry, despite the fact that it directly interacts only with the walls of the drum.
It is into the tank that water flows and it seems that such a durable, but at the same time, mechanism that apparently does not perform the main job cannot break.
However, there is something in the tank that can go wrong. Repairing a washing machine tank is quite a labor-intensive job, and in order not to redo it, you will have to work conscientiously.
If you need to get to the heart of the car, you will have to disassemble it completely, then take out the tank and disassemble that too. The last stage of work after repairing the washing machine tank is reassembly in the reverse order.
Types of tanks
Tanks can be made from:
- enameled,
- stainless steel and
- plastic.
Today it is rare to find an enamel tank.
A stainless steel tank is reliable and can last for decades, but its production is quite expensive. Therefore, this type is found in expensive models.
A plastic tank is found in most modern cars. They are simple to produce, weigh little, and heat water quickly.
Tank malfunctions
What can break in the tank?
Bearings . A very inexpensive part, but it will take a lot of effort and time to replace it, risking serious damage to the shaft, pin and other parts. Bearings are located in the tank and are moving elements.- Drain hole at the tank . Or rather, the drain valve, which usually breaks or becomes clogged and requires cleaning.
- Val . Typically, a problem with a shaft is the consequence of unrepaired bearing failure.
- Tank walls . Also the consequences of improper operation of bearings and shock absorbers, which lead to deformation of the tank walls under the influence of the centrifugal force of the drum.
A hole has formed in the drum
The surface of the washing machine drum is “strewn” with small holes - they are necessary for water to enter the container and reach the laundry. However, sometimes users notice that the washing machine has begun to spoil things, and are surprised to find a new hole with torn edges on the walls of the stainless steel tank. How could she have appeared?
There is a simple explanation for this. For example, a solid metal object forgotten in clothing pockets: a screw, a paper clip, a self-tapping screw, can “fall” into the hole in the drum and get stuck between it and the tank. If the sharp tip of a nail rests against a stainless steel wall, it will easily “pierce” even such a durable material.
The same self-tapping screw, having broken through the drum, will fall into the tank and will always be in the machine. Therefore, there is a high probability that during the next wash or spin cycle it will again get stuck between the walls and damage either the plastic or metal tank. The user’s task is not only to “patch” the hole, but also to remove the dangerous object from the machine in order to prevent future damage.
What to do in this case? Do I need to seal the damaged area? In fact, the hole in the drum of the washing machine is safe; it will become an additional hole for filling water. Only sharp edges on the drum surface will interfere with the normal operation of the equipment, damaging clothing. These “burrs” must be removed.
To fix the problem you will need a drill, a drill slightly larger in diameter than the hole in the drum, and sandpaper.
First you need to “drill out” the hole to get rid of the sharp edges. Then the area around the hole is processed with a file or sandpaper. The main thing is that the surface becomes smooth again.
Do not forget about the need to remove a sharp object that has fallen inside the machine. How to get it out of the washing machine? First, unscrew the drain filter - we cannot exclude the possibility that the self-tapping screw is stuck there. If there is no bolt in the trash can, you will have to take more serious measures:
- turn off the power to the washing machine;
- disconnect the machine from the water supply and sewerage;
- remove the detergent drawer;
- lay the machine on its left side (it is better to lay a soft blanket under it);
- find the drain pipe connecting the tank and the pump;
- loosen the clamp and unhook the pipe from the tank;
- insert your hand into the hole and “examine” the inside of the tank, slowly and carefully turning the drum.
When you cannot find a foreign object in this way, put the washing machine back on its feet, turn the drum several times and lay the washing machine on its side again. If the screw is really inside, it should then fall out of the hole for connecting the drain pipe.
How to disassemble the tank
Depending on the model of the washing machine, the tank may be:
Disassembling the tank requires a careful and painstaking approach.
Repair of a non-separable tank
Disassembly
Repairing a non-removable washing machine tank is much more difficult.
Before you begin disassembling the part, you need to inspect the body from all sides and find the location of the soldered seam. It will be needed to drill holes for fasteners for reassembling the part.- Armed with a drill and a thin drill, you need to drill 15-20 holes in a circle along the seam.
- Next, this seam must be sawed to get inside the tank. This is done with a hacksaw for metal. It takes a lot of time, you will need patience. The maximum recess when sawing the tank should not be more than 5 cm, otherwise irreparable damage to the walls of the tank can be caused.
After this stage, the non-separable tank became collapsible and consists of two parts - front and rear. The front one is an irregularly shaped plastic ring with a hatch and a rubber cuff in the middle. The rear one consists of a drum with a drive mechanism, which we will remove. To do this, turn this part over with the hatch down and begin to disassemble the shaft.- Be careful with the screw in the middle. In order to unscrew it, you will need to attach a metal rod to which you need to hit with a hammer. After these steps, the screw can be unscrewed with a screwdriver.
- Now it's the shaft's turn. It is removed using 3 wooden blocks (1 small and 2 large). The tank is placed on large bars and a small block is hit with a hammer, which is installed on the rod. Despite the fact that the rod looks strong, the blows must be of a certain force - weak, stronger and even stronger, so as not to damage the part. As a result, the drum should separate from the tank.
- You don't have to dismantle the bearings if there is no problem with them. A damaged tank may be to blame.
- But often bearings or oil seals still have to be changed, then you will need a metal rod, with the help of which gentle blows are applied with a hammer to the edges of the part. It is under no circumstances recommended to tap on one edge to avoid drilling out the part. Both bearings must be replaced if they are faulty.
After the work has been completed, the machine is assembled in the reverse order.
Assembly
How to glue the washing machine tank after repair?
The sawn parts of the tank are lubricated with sealant and connected.
Cold welding can be used.
Bolts are inserted into the drilled holes and secured with nuts.
The size of the bolts will depend on the diameter of the holes you drilled.
Types of tanks
All washing machine tanks can be divided into collapsible and non-collapsible. The first are a structure joined by threaded connections. A non-separable tank is a part of two halves that are soldered together. You can find out which model is in a particular washing machine from the instructions or after a careful inspection of the device from below. Tanks are also divided depending on the material from which they are made.
Enameled steel
Currently, such products are sold infrequently, and they cannot be found among automatic machines. To protect against corrosion, the drum is coated with a special enamel, but it is not resistant to mechanical and chemical damaging factors, so it quickly deteriorates. Components for such devices are also not produced, therefore, it is unlikely that it will be possible to repair the leak.
Plastic
Washing machines and dishwashers with such tanks are widespread in the economy segment. The drums in them are made of reliable polymers with various additives. Plastic lightens the overall weight of the product, has sufficient strength to resist scratching, and does not cause noise when rotating. Unfortunately, plastic tanks cannot boast of a long service life and are quite fragile when dropped or subjected to a strong impact.
Stainless steel
Premium segment washing machines are equipped with such drums. They are quite expensive, but high quality and last for many years. Stainless steel is not afraid of water, is not subject to corrosion even without additional protection, is highly durable, and is not damaged by household chemicals or mechanical “injuries.” The disadvantages include the high price, increased noise level during operation, and significant weight of the equipment.
What to do if the tank body is deformed?
First of all, you need to analyze the nature of the damage and the scale of the work.
If the tank is plastic
If the tank is plastic, it may have cracks and cause water leakage.
We immediately dismiss the option of soldering the crack, because this is a conditional repair of washing tanks that will not last long.
The best option is to replace it with a new tank. The price of a metal tank is more expensive than a plastic one.
If the tank is made of stainless steel
If we consider the possibility of repairing a stainless steel tank, then the option of using welding is quite justified. Of course, it is better to trust an experienced welder who will do everything carefully and quickly. After welding, you can paint over the seam with waterproof enamel to increase the service life of the part.
Deformation repair
If the tank is deformed, repair occurs as follows:
- You will need a hammer with a block of wood. If the damage is minor without holes, no other tools are needed.
- The dent needs to be heated using, for example, a gas burner. The outside of the tank heats up.
- The block is struck with a hammer not to create a dent, but to create a bulge until the metal has cooled.
Drain repair
If there is a malfunction in the drain system, the action plan is as follows:
- Check the drain hole for blockages. It may be necessary to remove water stone; it is convenient to use sandpaper for this.
- The rubber seal and cuff also require careful inspection. It happens that the rubber band becomes oak and cracks, in this case there is only one way out - replacing it with a new one.
- The drain valve has contacts, it would be good to take a multimeter and check them, after thoroughly cleaning them. If the resistance is equal to one, the part will need to be replaced because it is clearly faulty.
Of course, repairing a washing machine tank with your own hands is not an easy task. Correctly disassembling, repairing and, most importantly, reassembling the unit flawlessly at home is almost a feat!
Source
Features of tank disassembly
Depending on the type of washing machine, the steps to repair the tanks may vary, so the time costs may vary. However, the general operating algorithm is similar.
Tools
To disassemble the tank and repair damage, you need to prepare a number of tools in advance:
- screwdriver and screwdrivers - Phillips, slotted;
- hammer;
- pliers;
- set of hexagons.
Front loading washing machines
First, you need to disconnect the device from the network, remove the drain hose, and simultaneously turn off the water supply. Dismantling the machine is done as follows:
- unscrew the screws on the back panel and remove it;
- repeat the same steps for the front panel;
- remove the powder container;
- Using a slotted screwdriver, remove the control panel, but do not remove it completely, but carefully secure it to the side;
- remove the hatch cuff and bottom panel by tightening the screws;
- detach all additional elements from the tank: shock absorbers, electronic parts, wiring, clamps;
- remove the motor after unscrewing its bolts and disconnecting the wires;
- reach the tank by the springs, lifting it upwards, act carefully so as not to damage the wires;
- remove the remaining elements from the tank, which has already been removed (heating element, balancing element).
Top loading washing machines
Such machines are less common in everyday life, and yet their breakdowns also happen. The tank is secured in them with screws, and you need to get it out like this:
- remove the screws from the back and front walls of the device;
- move the side panel, then remove it too;
- carefully remove the wires in the casing area;
- unscrew the screws and shaft fixing screws;
- remove the tank.
Which washing machines have collapsible tanks?
Some models of the Electrolux and Indesit brands have collapsible tanks. Typically, such products have a high price and belong to the elite category. To disassemble, you need to remove the tank, as described above, remove the screws connecting the two halves. Before coating the components of the tank with glue, they must be cleaned of dirt and degreased.